Blacksmith Shop Building Instructions
|
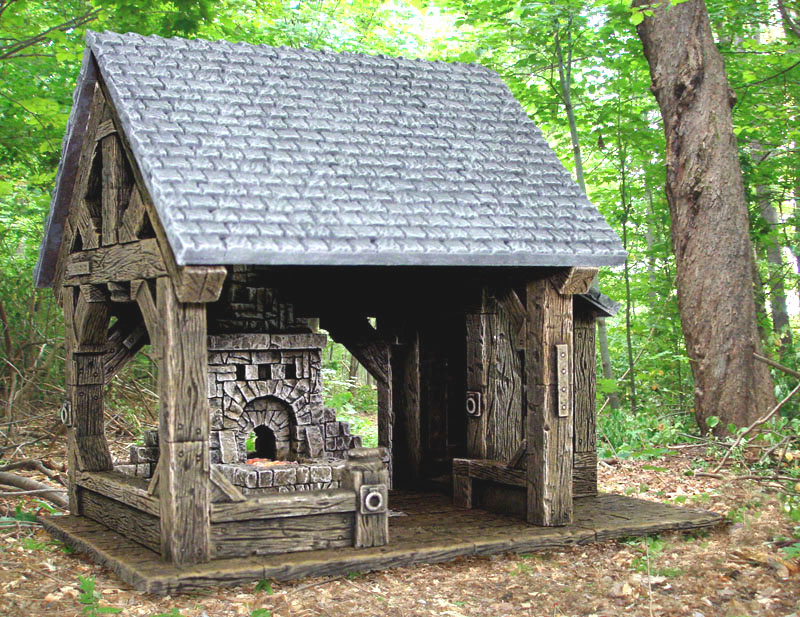
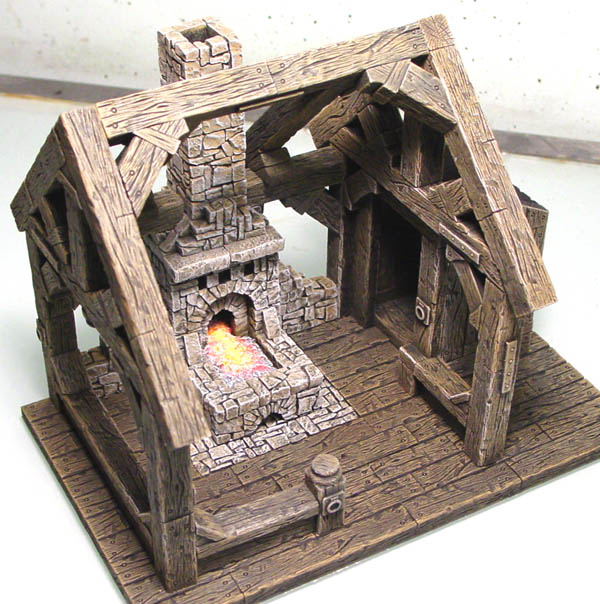
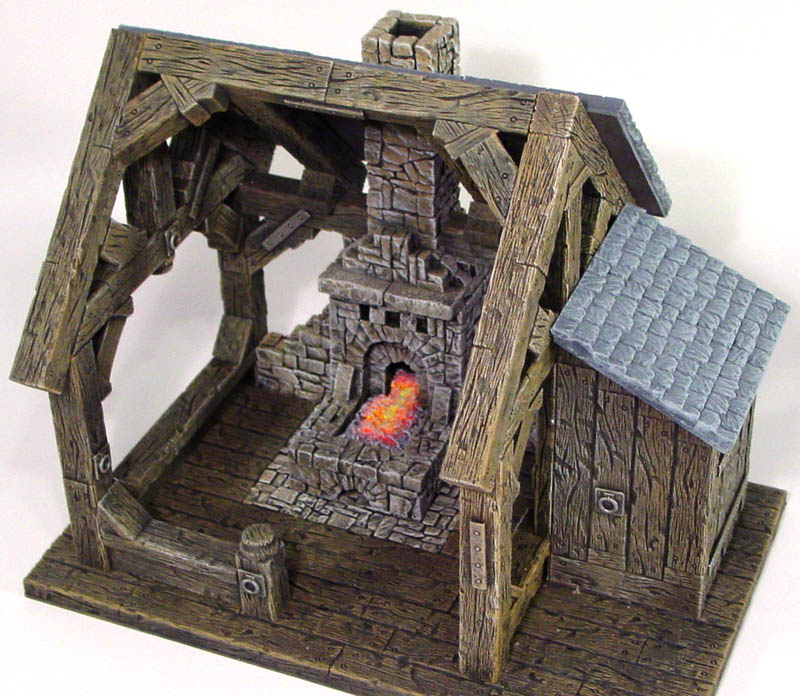
To build the Blacksmith Shop shown here, you will need 14 castings of mold #226 (wooden beam mold), 8 castings of mold #263 (rubble block mold) and 7 castings of mold #245 (slate roof mold). If you choose not to make the wooden floor and set the shop directly on grass, you will only need 10 castings of mold #226 and 6 castings of mold #263. Click on the photo for a larger view. |
|
About Mold #226
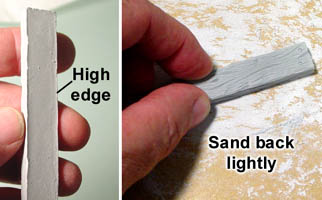
| 1. | For most models the planks will be glued back to back. Before you start gluing, be sure to check the backs of your planks. If the backs are recessed and have a raised edge all around, you will want to lightly sand the backs to remove this high edge. Since most models will have a lot of structure supported by 1/2" square posts, removing this high edge will ensure that the glue on the back of the planks bonds well. |
 |
|---|
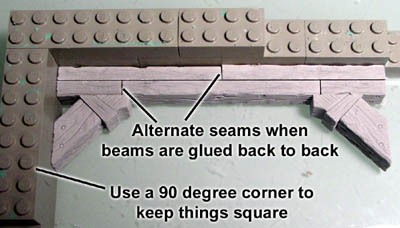
| 2. | Another thing that will strengthen the structure is to alternate the lengths of beams when glued back to back. Also, when gluing any corners be sure to use a right angle of some kind to keep your corners square. Here I'm using a right angle made of Legos. |
 |
|---|
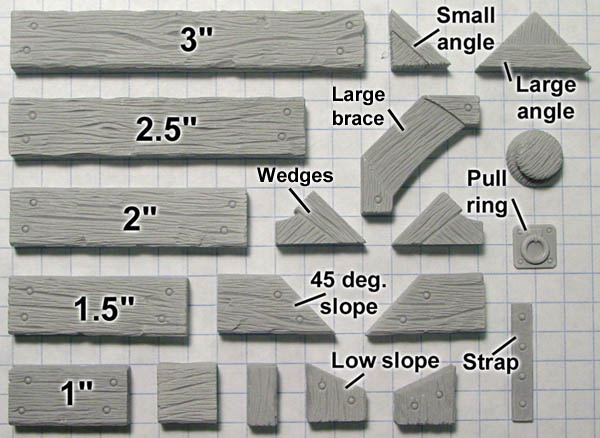
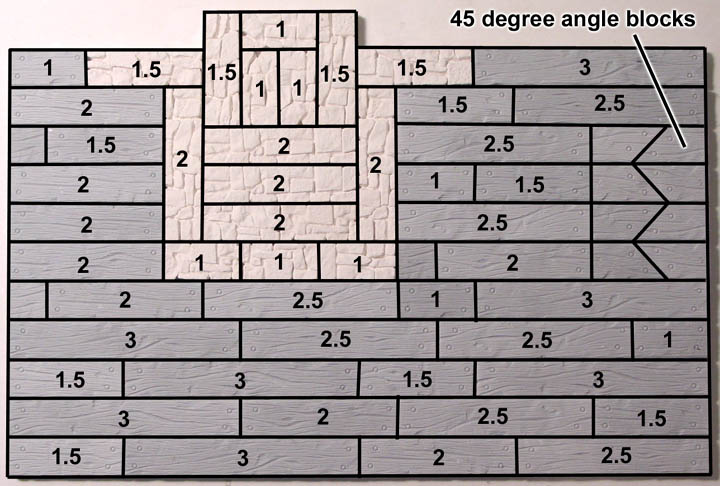
| 3. | This photo shows the variety of pieces on this mold. Click on the photo for a larger view. All of the photos in this section are taken using 1/4" graph paper as a background. This mold is meant to make large open wooden structures such as stables, docks, workshops and sheds. It can also be used for large bracing on house additions. |
 |
|---|
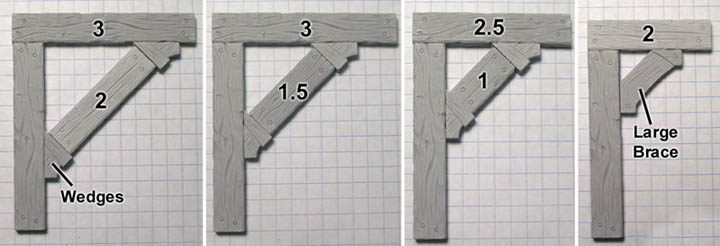
| 4. | This photo shows several options for bracing large corners. Using the small wedges allows you to adjust the size of the brace depending on what length of beam you use with it. |
|---|---|
 |
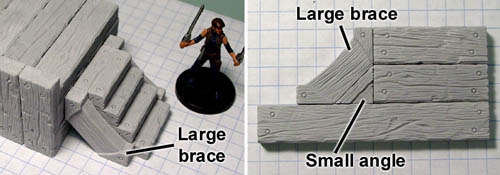
| 5. | This shows a couple of other uses for the large brace. You can use it to finish the sides of small stairs and fill in square angles with some decoration. |
 |
|---|
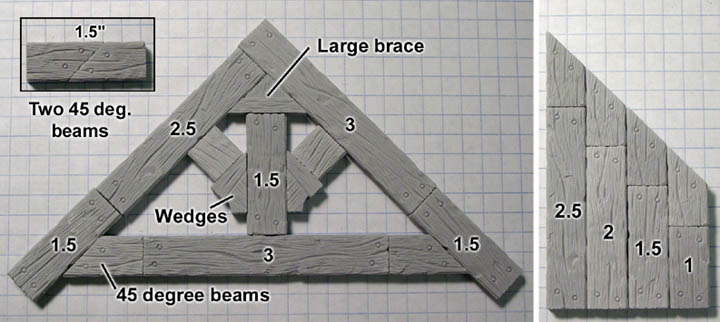
| 6. | This photo shows several uses of the 45 degree beam. These are mostly needed for 45 degree roof angles. You can also put two together to make a 1.5"" plank. |
|---|---|
 |
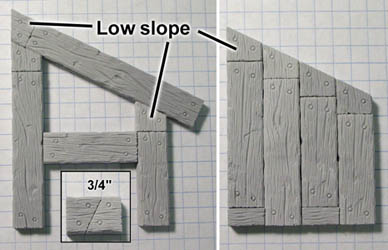
| 7. | This shows a couple of other uses for the low slope blocks. They allow you to make a roof with a lower angle. You can also put two of these blocks together to form a 3/4" long block. |
 |
|---|
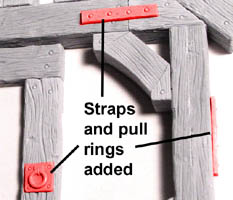
| 8. | The decorative pieces are the post, strap and pull ring. The strap and pull ring can be painted the same color as the wood. Afterwards, give them a quick dry brush of a metallic color to make them stand out. |
 |
|---|
Building and Painting the Timber Frame
To build the Blacksmith Shop shown here, you will need:
14 castings of mold #226 (wooden beam mold)
8 castings of mold #263 (rubble block mold)
7 castings of mold #245 (slate roof mold)
If you choose not to make the wooden floor and set the shop directly on grass, you will only need 10 castings of mold #226 and 6 castings of mold #263.
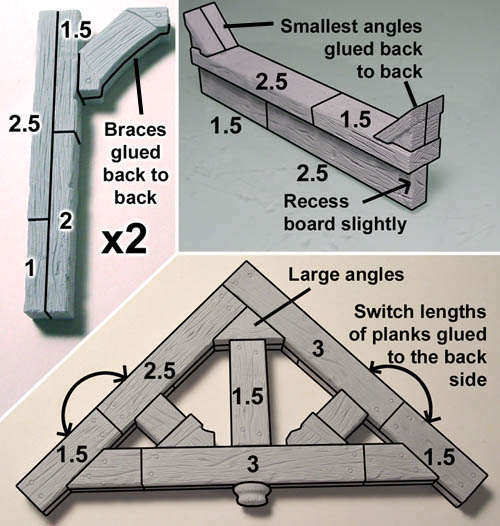
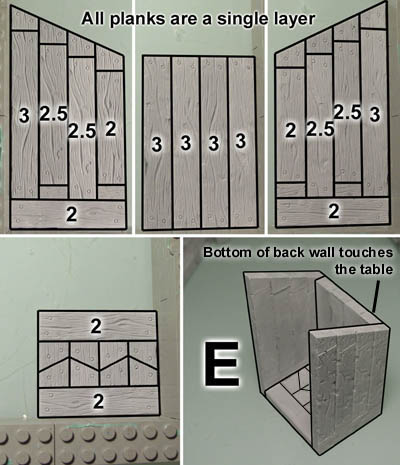
| 1. | These pieces form one side of the structure. When possible, switch the lengths of planks when gluing beams back to back for a stronger beam. On the lower rail, recess the bottom plank slightly. The back side of this lower rail will be smooth but it will face inside of the shop. Once each of these separate pieces are dry, glue them all together to form the side shown below.
|
 |
|---|
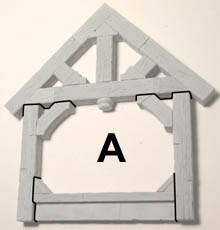
| 2. | This second wall section assembles a lot like the first. However, the doorway is made of 3 single planks instead of gluing planks back to back. Once each of these separate pieces have dried, glue them all together to form the other side shown below. |
|---|---|
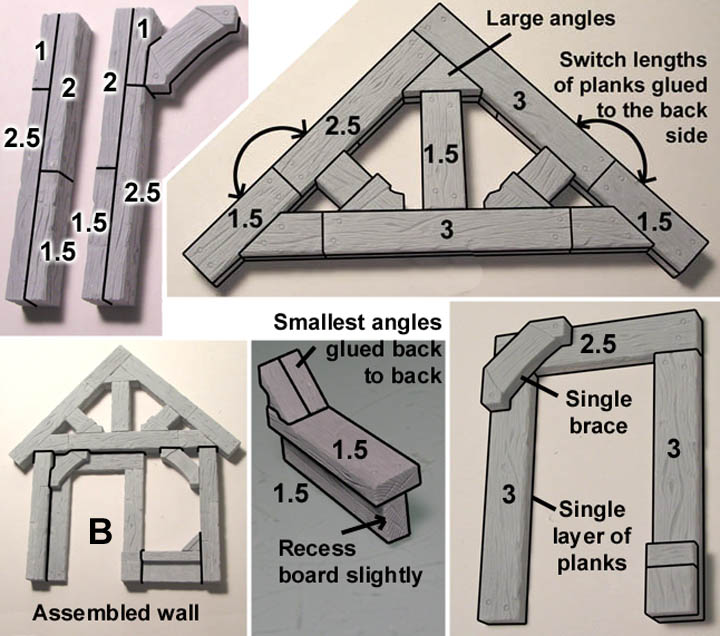 |
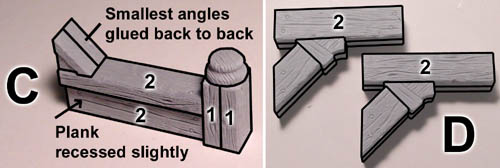
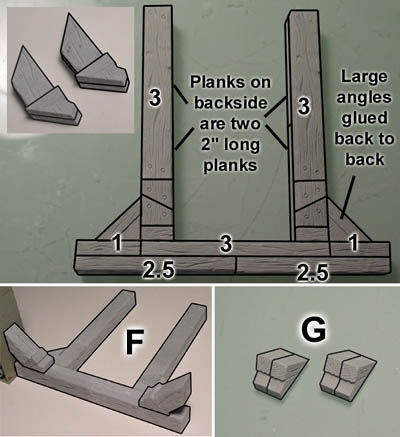
| 3. | On the railing piece, recess the bottom plank slightly. The two braces on the right have the exact same pieces glued back to back. |
 |
|---|
| 4. | All planks for this piece are a single layer. Nothing is glued back to back here. You'll notice that the floor is made of odd pieces. I used up the odd angle pieces here to keep the total number of castings down. To assemble the shed, place the floor down first with the 2" plank as the threshold. Then place the back of the shed against the floor so the bottom of the back wall rests on the table surface. Finally, glue the walls onto the sides of the back and floor. Be sure that all of the walls have the textured side facing outward. The final photo shows the assembled shed. You will notice that there is no texture on the inside of the shed. You really won't notice this once the shop is assembled and painted because the inside of the shed with the roof on it will be very dark. |
 |
|---|
| 5. | This is the upper brace for the peak of the roof. The two vertical long beams use up some of the odd pieces on the top but the backside of these beams are made from two 2" long planks. The two angle braces in the upper left are assembled separately and then glued on each end of the long center beam to complete this piece. The final pieces are two wedge shapes, each glued back to back. |
 |
|---|
| 6. | Now that you have completed all of the main pieces, feel free to add the steel strap and pull ring to any surfaces that are not going to be glued onto something else. To determine which surfaces you should not glue straps and rings onto, refer to the assembly guide below. You don't want to glue these items onto areas that will get in the way of gluing the main parts together. Do not glue these main parts together yet! The separate pieces will need to be painted first before the structure is assembled. |
 |
|---|---|---|
 | ||
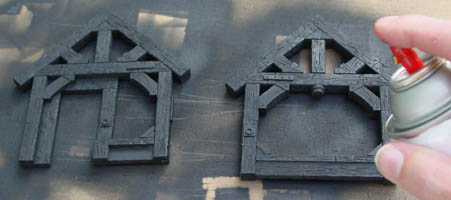
| 7. | Painting the Timber FrameThe first coat I am spray painting it flat black. Be sure to do this outside or in a well-ventilated area. Be sure to spray from all angles so that you get the sides of every beam. |
 |
|---|
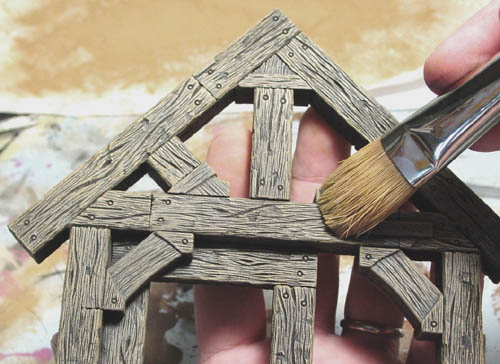
| 8. |
If you are using house paint, thin the paint slightly and make the brush as dry as possible. If you are using acrylic craft paint then you may not have to thin it. If the paint is too thick, you will get solid brown on the top of your planks. If you thin the paint but put too much on, the paint will run into the cracks. The trick here is to thin the paint slightly, dip your brush in and brush almost all of it off on a paper towel (even more than usual for dry brushing). What you want are lots of thin coats of paint. When first brushing over the planks, it will not look like anything is happening. This is exactly what you want. Don't go back for more paint but instead keep brushing over the planks. If the coat of pumpkin pie color is thin enough, the black transmutes through the brown and changes the color completely. Pumpkin pie turns into a dark oak. Remember to brush lightly, keep the paint thin and keep the brush really dry. |
|---|
 The second coat of paint is earth tone medium color from the
 Building the Forge and Floor
To build the forge you will need 6 castings of mold #263.
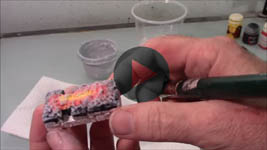
| 1. | Texturing the Fire BedClick on the video to watch it on YouTube. This video shows how to texture the fire bed of the forge by using plaster (or dental stone). The written instructions for this are shown below. |
 |
|---|
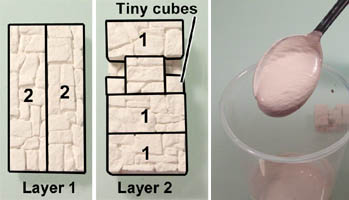
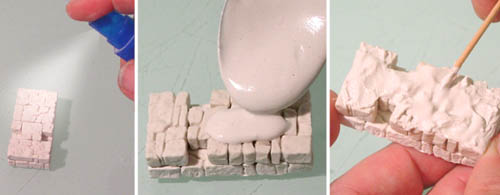
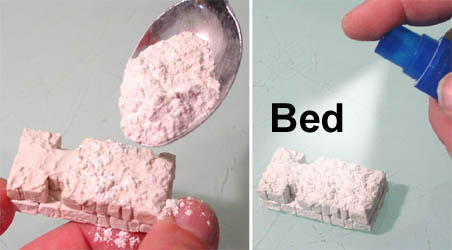
| 2. | Here is how to assemble the bed of the forge. Glue together the two layers of blocks shown here and let them dry completely. Next we will add the texture of coals to the bed. Start by mixing up a little plaster very thickly. You want it the consistency of a thick milkshake. Wet the plaster completely with water using a spray bottle (photo below). |
 |
|---|
| 3. | Immediately drip some thick plaster onto the surface and work it around using a toothpick. Try to heap up the plaster in the center and make lumps. The longer you leave the plaster on the surface, the thicker it will become. |
 |
|---|
| 4. | While this plaster is still wet, lightly sprinkle some dry plaster on top of it. Using a spray bottle, mist the dry plaster until all the particles are completely wet. If you spray it too much, the dry plaster will liquefy and loose its rough texture. If you spray it too little, the plaster will not set. Spray it until parts are barely shiny but still rough. |
 |
|---|
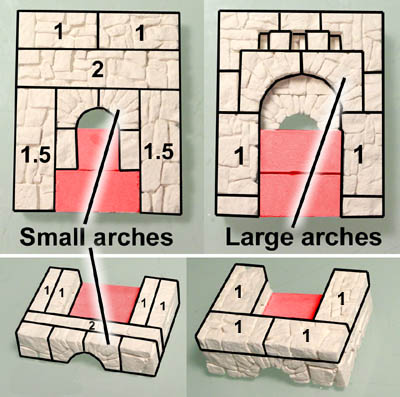
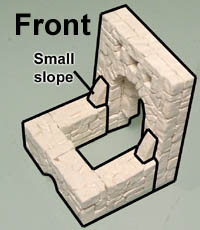
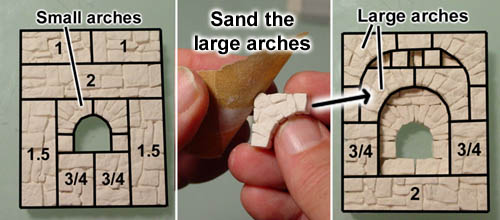
| 5. | Here is the front of the forge. Do not glue the blocks shown in red. These are to help keep the width correct. The first two photos show the front panel. The front trough is shown on the third and fourth photos. Below is the completed front. Glue the small slopes into place to complete it.
|
 |
|---|
| 6. | For the back of the forge, the back wall is assembled in two layers. On the second layer, you will need to sand down the large arches in order for them to fit on the inside as shown. I did this because I ran out of castings of the step piece shown in step 5 above. |
 |
|---|
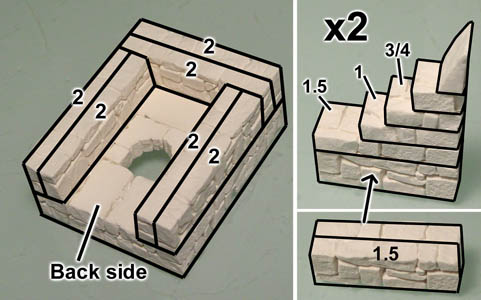
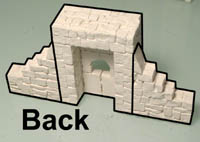
| 7. | Glue the 2" pieces onto the back side of this wall. Make two copies of the stepped walls and then glue them on each side of the back as shown.
|
 |
|---|
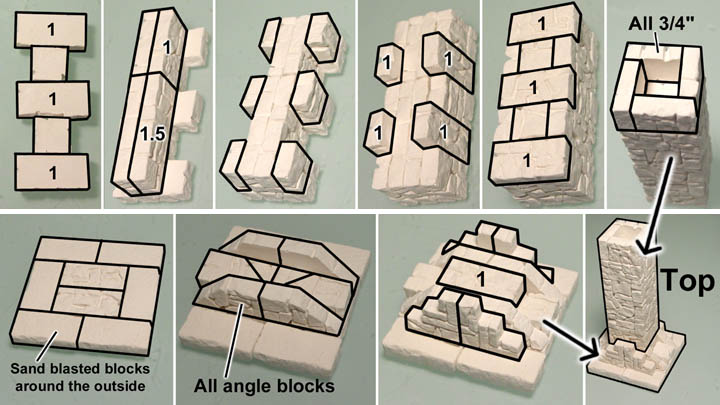
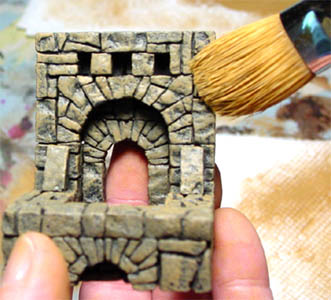
| 8. | For the chimney you will need mostly 1" blocks and square blocks. It's probably best to let the main column of blocks dry before you add the 3/4" blocks on the top (photo directly below on the right). Be sure that all of the texture is facing outward. For the base, the outside ring of blocks have the sand blasted texture. Assemble the chimney on the base to complete the top of the forge. |
|---|---|
 |
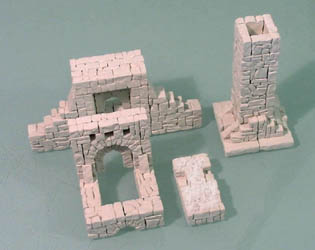
| 9. | Here are all of the pieces to the blacksmith's forge. Do not glue these together yet! The pieces should be painted separately before assembling. The instructions further below will show how to paint the hot coals that go on the bed of the forge. |
 |
|---|
| 10. | Building the FloorThis floor is optional. I would suggest building it because it gives you something to anchor all the pieces down onto. However, you may want your shop to set directly on the ground or natural terrain that you have made. Without the floor, you would only need 10 castings of mold #226 and 6 castings of mold #263. You will need to glue these planks down to something fairly stiff, such as chip board, mat board or a piece of foam core board. You might want to set a couple of heavy books on top to help keep the floor flat. After the floor is dry use a hobby knife to trim the excess paper around the outside. |
|---|---|
 |
Painting the Forge and Floor
| 1. | Painting the Fire BedClick on the video to watch it on YouTube. This video shows how to paint the fire bed on the forge. The steps are also outlined in detail below. |
 |
|---|
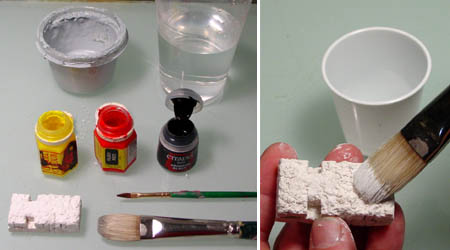
| 2. | To paint the fire bed, you will need the following:
|
 |
|---|
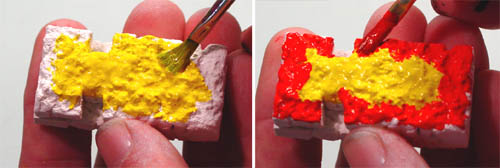
| 3. | After the white paint completely dries, paint the main center bright yellow. Rinse out your brush and immediately paint the outside edge bright red. The red can go all the way to the outside edges. |
 |
|---|
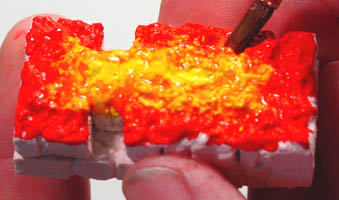
| 4. | Rise out your brush again. With the brush slightly wet, work the paint line between the yellow and the red to blend the colors. In a few seconds, you will end up with too much red on the brush which will want to take over the yellow. When this happens, rinse out your brush again and continue to blend the colors. |
 |
|---|
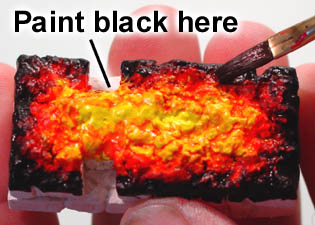
| 5. | Rise out your brush again and immediately paint black around the very outside edges. Don't forget to paint down into the little holes on each side of the fire bed. Afterwards, rinse out your brush and work the line between the red and the black paint in the same manner. If you find that the black is starting to take over, rinse out your brush and remove all the water from it on a paper towel. Then use the dry brush to soak up the excess black paint. |
 |
|---|
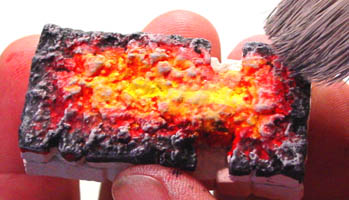
| 6. | Let the yellow, red and black paints are completely dry before continuing. The final step is to dry brush light gray over the whole surface using a wide brush. Be sure that the brush is very dry and has very little paint on it. Start softly and use a lot of brush strokes to slowly build up the gray on the tops of the coals. |
 |
|---|
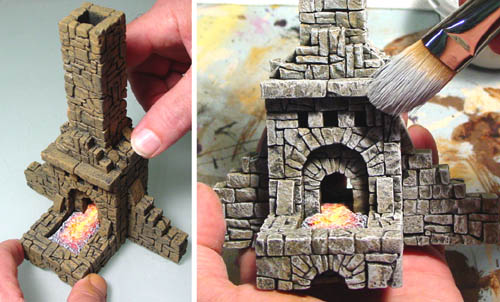
| 7. | Spray paint the three remaining pieces of the forge solid flat black. The second coat of paint is earth tone medium color from the Earth Tone Painting Instructions page. This is sort of a "pumpkin pie" color. Dry brush this on lightly and when the brush starts to run out of paint, then dry brush heavily. If you do it right, each stone should have varying shades of brown on it with no black. If you do it badly you will have solid brown stones with no variety of shade on each stone. |
 |
|---|
| 8. | Glue together the forge. Once the glue has dried, the last coat of paint is castle gray light color from the Castle Gray Painting Instructions page. Dry brush this on lightly. This color will highlight the edges of the stone in gray. It will also gray out the brown a bit. I glued the forge together before the last coat of paint so that the gray would cover more evenly all around. |
 |
|---|
| 9. | The floor is painted the exact same way as the beams were in the instructions further up on this page. Start by spray painting the entire floor flat black Then paint the earth tone medium color from the Earth Tone Painting Instructions page as was done on the planks above. |
 |
|---|
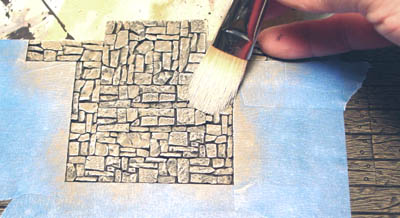
| 10. | Next, mask off the stone area on the floor. I prefer to use the good blue masking tape for this. It sticks down well and pulls off without removing your paint. With only the stone exposed, more heavily dry brush with the pumpkin pie color. Try to jam the brush further down into the cracks. |
 |
|---|
| 11. | Finally, lightly dry brush on the castle gray light color from the Castle Gray Painting Instructions page. Then you can remove the masking tape and see a big difference between the stone and the plank color. |
 |
|---|
Assembling the Blacksmith Shop
Do not glue the sides together until after they are painted!
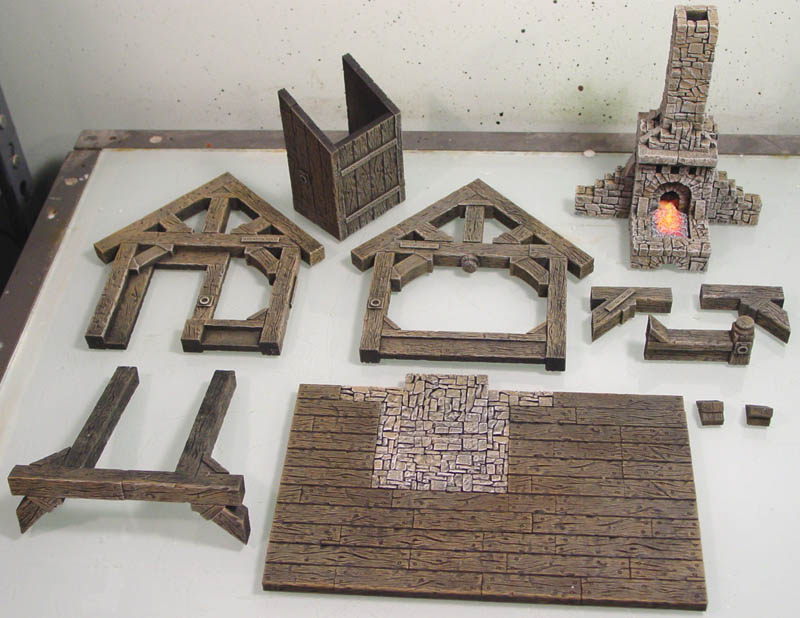
| 1. | This photo shows all of the pieces so far for the blacksmith shop. We will assemble the fully painted shop before we build the roof. Click on the photo for a larger view. |
 |
|---|
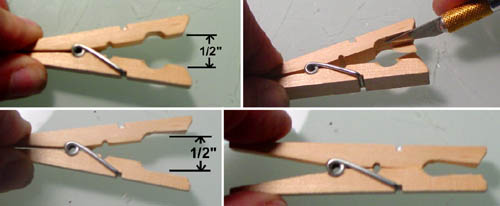
| 2. | The best way to hold the beams in place while the glue is drying is to use clothespins. However, most clothespins' jaws do not open up to 1/2" wide. To fix this, I'm using a hobby knife to trim the inside jaws in order to fit a 1/2" wide beam between them. |
 |
|---|
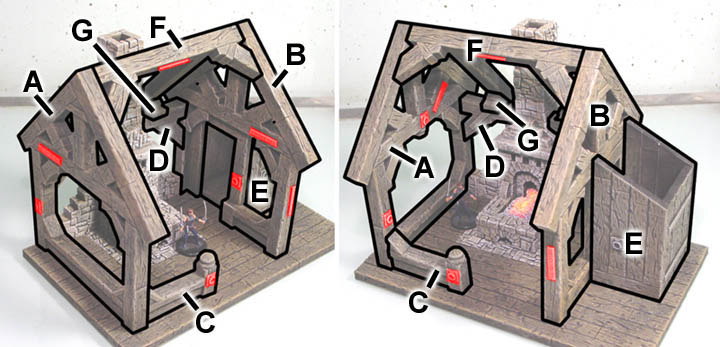
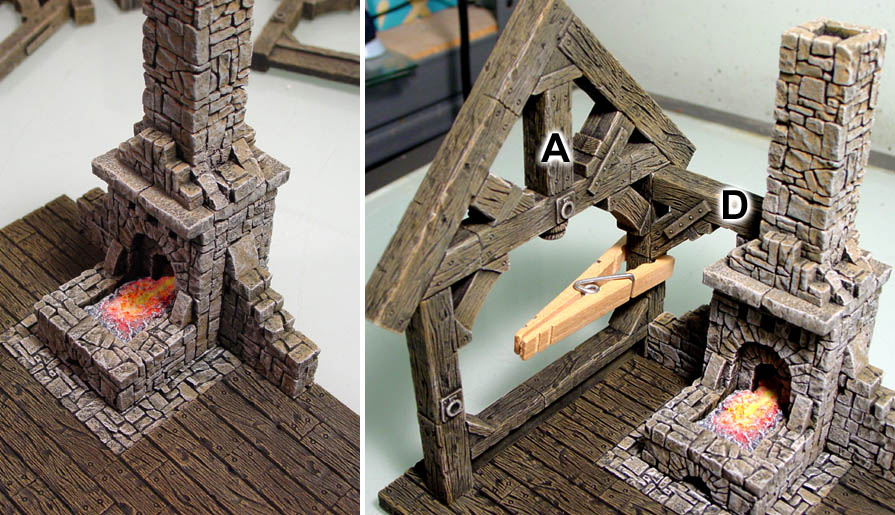
| 3. | Glue the forge down to the stone so the back is flush with the back of the shop and you have 1/2" of stone floor around the front of the forge. Glue wall A against one edge of the forge. Be sure the lower untextured side of the rail is facing inward. Beam support D rests on the chimney's shoulder and the other end is glued to wall A. Use a clothespin to hold this up while the glue is drying. |
 |
|---|
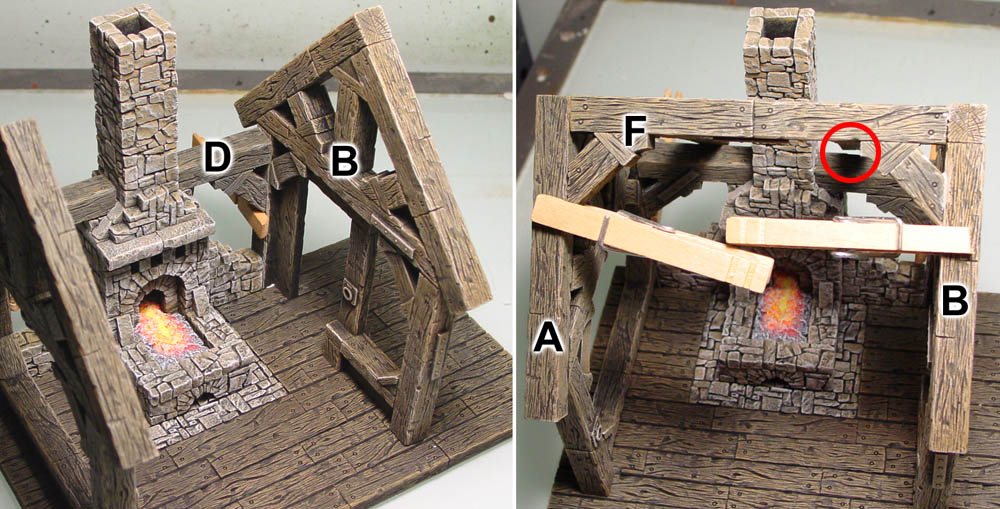
| 4. | Glue wall B against the other side of the forge. Be sure the textured side of the doorway is facing inward. Glue support beam D so it rests on the other shoulder of the forge and against wall B. Hold his in place with a clothespin until it dries. Then glue the center roof beam F between walls A and B. Hold this in place with clothespins as well. You may notice in the photo that the 2 beams that slant backwards from F are uneven and do not both rest on the support beams D. I've circled this in red. We'll fix this further down at step #6 below. |
|---|---|
 | |
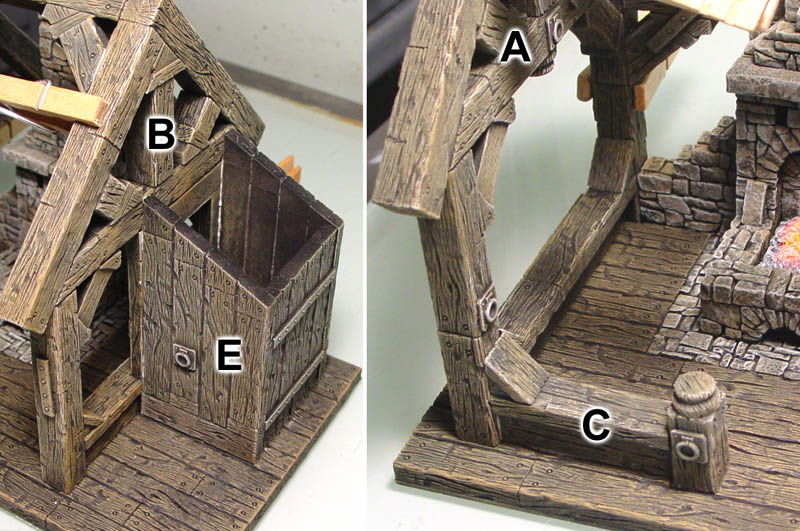
| 5. | Glue the shed E onto the side wall B. It should fit exactly between the outer edges of the door frame. Glue the rail C onto the front leg of wall A. The under rail's textured side should be facing outward. Glue the angle braces G into the angle gap between support beams D and the roof beams on F (last photo in step 6 below). |
 |
|---|
| 6. | The main structure of your blacksmith shop is now assembled. Click on the any of these photos for a larger view.
|
 |
|---|
Building and Painting the Roof
To build the roof shown here, you will need 7 castings of mold #245.
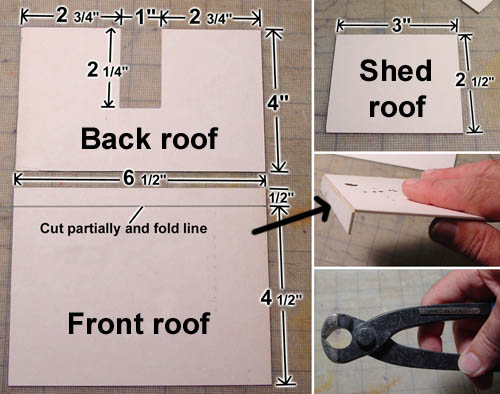
| 1. | Cut these three pieces of roof out of stiff card stock of some kind. I'm using mat board but you can also use the thick stock from the back of a note pad. You don't want anything over 1/8" thick or you will have trouble with the roof peak later on. If you have trouble measuring these pieces and keeping things square, you might glue a piece of 1/4" graph paper to the stock and then cut them out. Partially cut and fold down the top of the front roof. Also, get yourself a pair of tile nippers which will make the roofing job much easier. |
 |
|---|
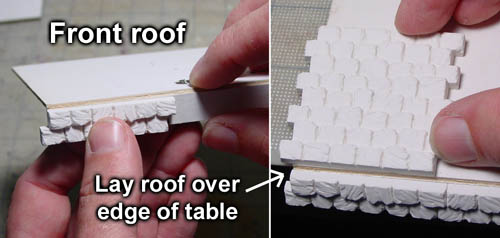
| 2. | Start by gluing the 2-row shingle strips onto the folded down edge of the front roof. The folded corner will end up being the roof peak. So make sure your shingles flow downward from the fold. Next glue the full shingle slabs onto the main area of the front roof, letting the alternating shingles extend past the edge. |
 |
|---|
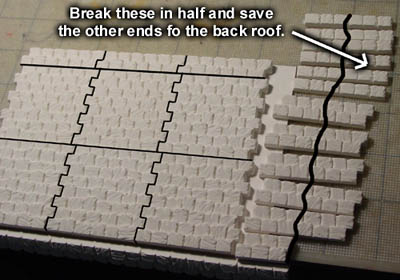
| 3. | It will take six slabs to cover the front roof. If your measurements are correct, you will finish the bottom edge of the roof using the 2-row shingle pieces. To finish the left side of the roof, use up the single and 2-row pieces. Break these pieces in half and save the other halves to be used on the back roof. |
 |
|---|
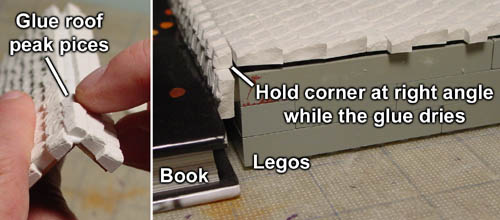
| 4. | Glue in the roof peak pieces. While the roof peak is drying, keep it at a 90 degree angle. You can do this by placing it on top of a book (I used Legos here) and placing a heavy book next to it. We'll trim the edges later on. |
 |
|---|
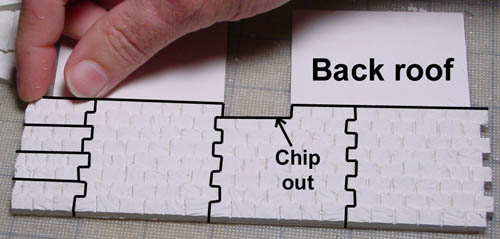
| 5. | Here are the shingle pieces to be glued onto the back roof. Notice that the center slab is chipped out around where the chimney slot is. Now we get to use those pieces left over from step 3 above to fill in the remaining side. |
 |
|---|
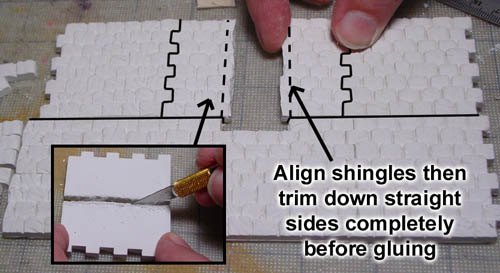
| 6. | Use a hobby knife to score the back side of a slab until you can break it down the middle. Place broken halves on each side of the chimney slot and align the shingles. Trim each broken edge on the dotted lines until each side lines up with the chimney slot. Do this before gluing the slabs in place. |
 |
|---|
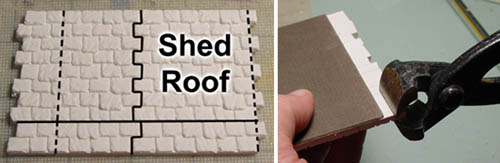
| 7. | The final piece is the shed roof. It's made using two slabs and two strips. The height will work out perfectly but the width will have to be trimmed down. Once the roofs are dry, use the tile nippers to trim off the excess edges of the shingles. |
 |
|---|
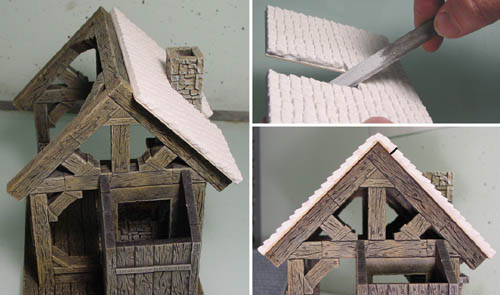
| 8. | Place the back roof on the painted timber frame and make sure the chimney slot is wide enough to fit around the chimney. Next, hook the front roof on the front of the shop and see how it fits. You will need to file down the chimney slot at an angle (shown in upper right photo) to get the back roof into the proper position. |
 |
|---|
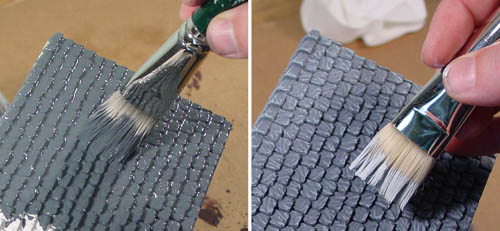
| 9. | To paint the roof, I'm giving it a base coat of Castle Gray Dark paint color. Once dry, I gave it a very light drybrush of the Castle Gray Medium paint color. This was enough to keep the roof fairly dark yet still show a lot of the texture detail. |
 |
|---|
Finished Photos
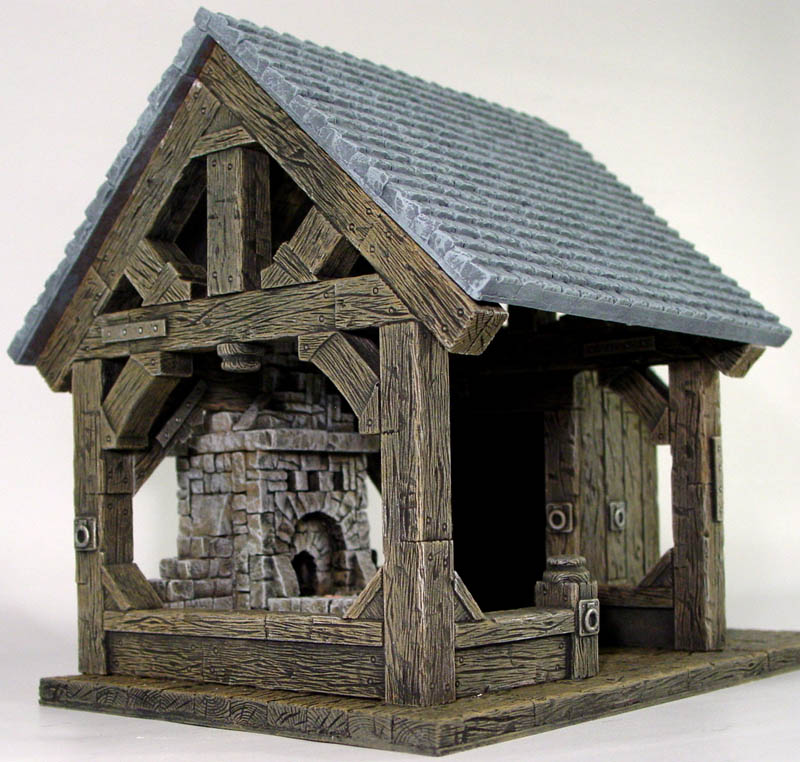
Click on the photos to see a larger view. The front of the roof unhooks so you have easy access to the inside. You will also notice that I did not put a horizontal support beam across the front of the shop. I left this out to have a clear view of the inside of the shop. In my opinion, seeing and reaching into the shop was more important than having the shop structurally correct. I glued the shed roof in place, but you could also glue a plank on the lower roof's underside to hold it in place if you wanted it removable |
 |
 |
 |