Dock Building Instructions
|
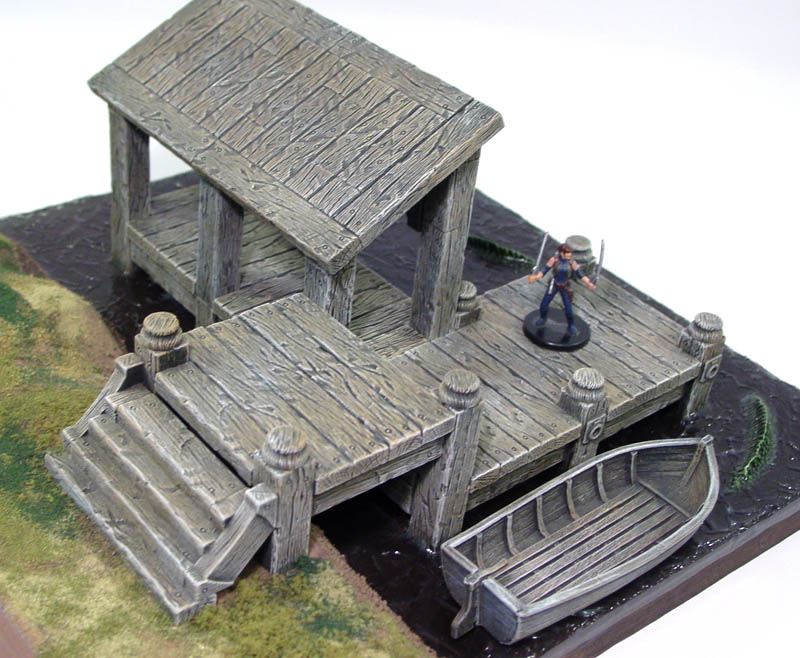
To build the dock shown here, you will need 10 castings of mold #226 (wooden beam mold). The boat you see in front of the dock is made by FreeBooter Miniatures. This particular boat is called the "Yola". Click the photo for a larger view. |

|
Building the Dock
To build the dock shown here, you will need 10 castings of mold #226 (wooden beam mold).
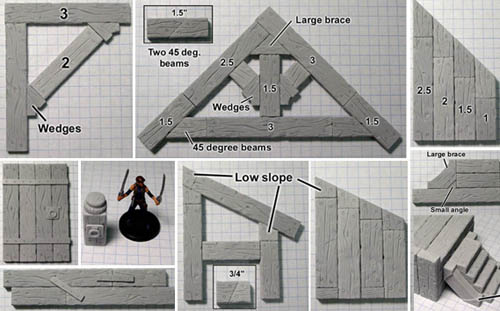
| 1. | This photo shows a variety of ways to use the pieces on mold #226. For a more complete description of ways to use this mold, take a look at the Blacksmith Shop Building Instructions page. |
 |
|---|
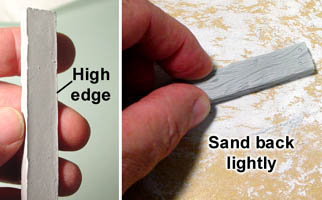
| 2. | For most models the planks will be glued back to back. Before you start gluing, be sure to check the backs of your planks. If the backs are recessed and have a raised edge all around, you will want to lightly sand the backs to remove this high edge. Since most models will have a lot of structure supported by 1/2" square posts, removing this high edge will ensure that the glue on the back of the planks bonds well. |
 |
|---|
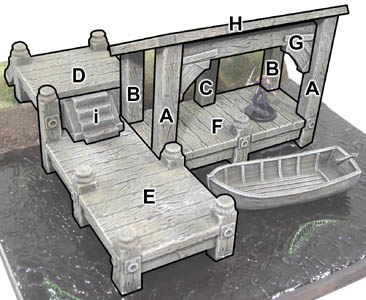
| 3. | To build the dock shown here, you will need 10 castings of mold #226. This photo shows the placement of all main pieces that we will assemble. All of these main pieces will be first painted completely before assembling them onto the lake. |
 |
|---|
| 4. | Start by assembling all of the posts shown here. The posts without letters beside them will be used as parts of larger dock pieces. For the angled ends, use the shallow slope angles. Two angles are glued back to back to finish the tops of the five posts on the left. |
|---|---|
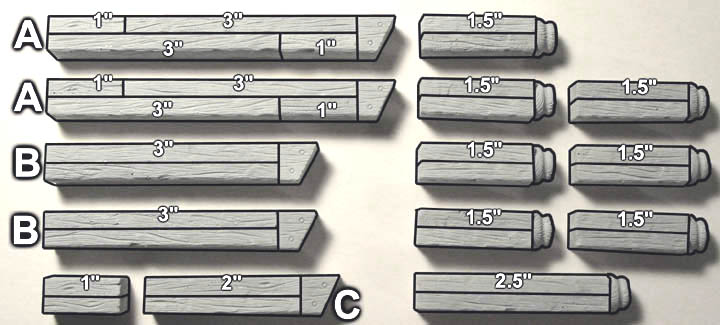 |
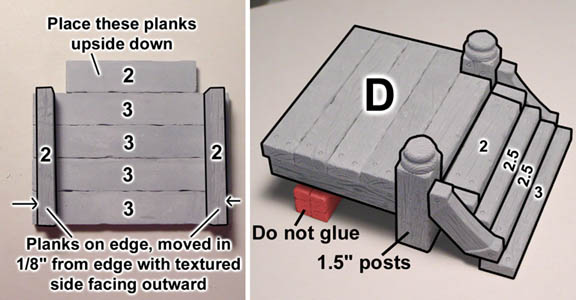
| 5. | Glue the main planks together face down. Then glue the side planks on moved in 1/8" from the edge with texture facing outward. Once dry, flip this over, rest it on a spare post temporarily and glue on the posts and stairs. |
 |
|---|
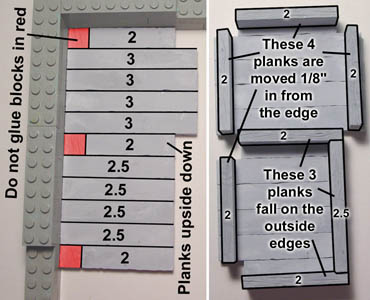
| 6. | For this next dock section, place all of these planks upside down and glue all of their edges together. Do not glue the square blocks shown in red. These are to help you leave the proper space where posts will go later on. You'll also notice that I'm using a corner of Legos to help keep the edges of this section straight and square. After this is dry, glue the brace planks on their edge with the texture facing outward. Four of the planks will be moved in 1/8" from the sides. Three planks will be placed towards the outside edges of the planks underneath. |
 |
|---|
| 7. | Temporarily lay down two of the long posts with angles on the top. Use these to prop up the main deck section. With the deck elevated, glue on the posts as shown here. The four posts on the left are 1.5" tall and the single tall post is the 2.5" post. |
 |
|---|
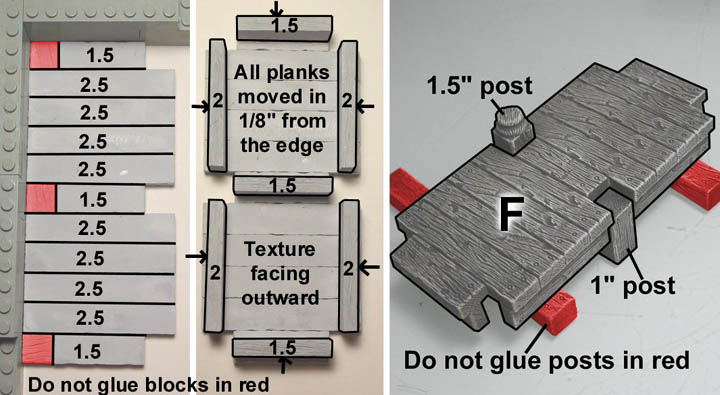
| 8. | Place all of these planks upside down and glue all of their edges together. Do not glue the square blocks shown in red. These are to help you leave the proper space where posts will go later on. Glue the brace planks on their edge with the texture facing outward. All of these braces are moved in 1/8" from the edge. Temporarily lay down two of the long posts with angles on the top. Use these to prop up the main deck section. With the deck elevated, glue on the posts as shown here. |
|---|---|
 |
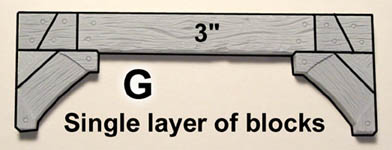
| 9. | This brace is made from a single layer of blocks. The back will have no texture but no one will see it later on. |
 |
|---|
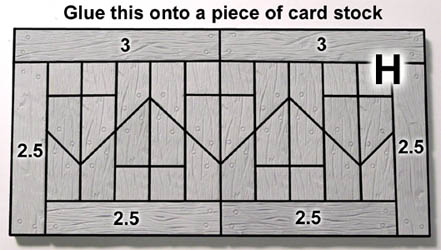
| 10. | The roof is made by gluing these planks to a piece of card stock. This was a way for me to use up some of the extra 45 degree angle pieces. The underside of the roof will have no texture but you will never see it. |
 |
|---|
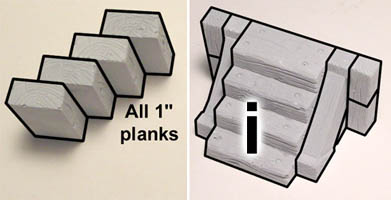
| 11. | For the stairs, glue four 1" planks together resting on end. When dry, stand them up and glue the angle braces with a 45 degree filler on each side (similar to what you see in step 9 above). Also glue two of the smallest blocks on each side of these angle braces. |
 |
|---|
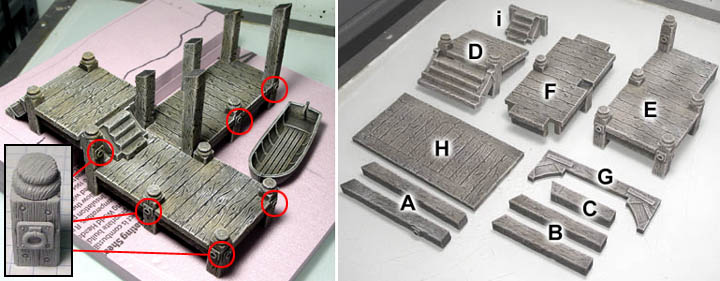
| 12. | Here are all the pieces to the dock. As a finishing touch, you may want to add the metal rings onto the front faces of the posts. The best way to do this is to place all of the pieces down temporarily and then choose where you want to glue the rings on. I show how to cut the pink foam for this in the instructions below. |
|---|---|
 |
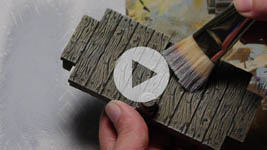
| 13. | Painting the Dock Pieces This video shows how to dry brush the dock pieces before gluing them in place. |
 |
|---|
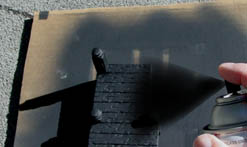
| 14. | For the first coat I am spray painting it flat black. Be sure to do this outside or in a well-ventilated area. Be sure to spray from all angles so that you get the sides of every beam. |
 |
|---|
| 15. |
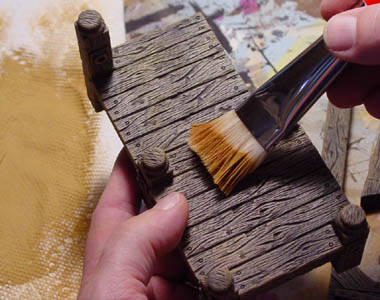
If you are using house paint, thin the paint slightly and make the brush as dry as possible. If you are using acrylic craft paint then you may not have to thin it. If the paint is too thick, you will get solid brown on the top of your planks. If you thin the paint but put too much on, the paint will run into the cracks. The trick here is to thin the paint slightly, dip your brush in and brush almost all of it off on a paper towel (even more than usual for dry brushing). What you want are lots of thin coats of paint. When first brushing over the planks, it will not look like anything is happening. This is exactly what you want. Don't go back for more paint but instead keep brushing over the planks. If the coat of pumpkin pie color is thin enough, the black transmutes through the brown and changes the color completely. Pumpkin pie turns into a dark oak. Remember to brush lightly, keep the paint thin and keep the brush really dry. |
|---|
 The second coat of paint is earth tone medium color from the
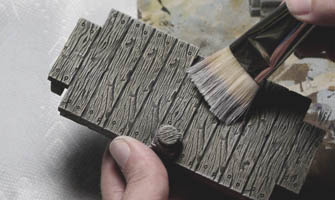
 | 16. | For a final touch, I wanted to gray the beams out a little to look like old wood. To do this, I did a final light dry brush of light gray from the Castle Gray Painting Instructions page. Do this very lightly and it will gray up the brown a little to make it look more like driftwood. |
 |
|---|
Cutting the Base
| 1. | Click on the video to watch it on YouTube. This video shows how to cut 1/2" thick foam to create the base for the dock. |
 |
|---|
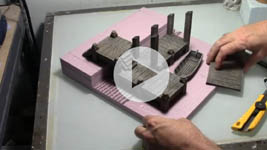
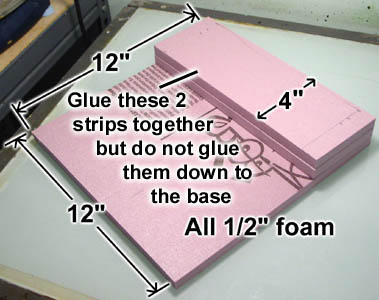
| 2. | For the base of this project, I'm using 1/2" thick insulating foam. It comes in pink or blue and you can usually find it at most lumberyards. This is the stuff they use on the side of houses before they put siding on. If you live where the weather is nice all the time, then it may not be available in your area. You want to cut three pieces. The bottom piece measures 12" square and the other two pieces are 12" long by 4" wide Glue the two 4" strips together but do not glue them down to the base. |
 |
|---|
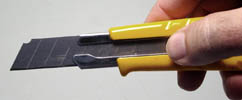
| 3. | When cutting the 1/2" thick foam, I'm using an 18mm snap off utility knife. It's the kind of knife where you can snap the ends off when the blade gets dull. This 18mm knife has a thicker longer blade than most simple snap off knives but for this project I think that any snap off type of blade would work. |
 |
|---|
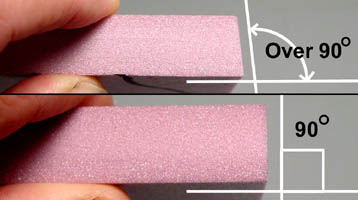
| 4. | When cutting the sides of the foam, try your best to get a 90 degree angle cut. You might try practicing a few cuts first. You want the cuts to be 90 degrees because we are going to block up the sides of this display at right angles to keep the water in. If your sides are not straight, it will be more difficult to seal the edges to keep the water from flowing out. |
 |
|---|
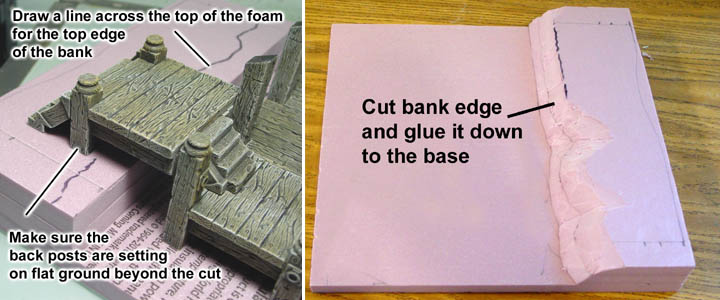
| 5. | Next you want to cut the bank edge. But before you can do this, you want to be sure that you don't cut it too far back. To determine where to cut, lay out the dock pieces on the foam according to step 12 above. Draw a line where the top edge of the bank will be and make sure that the back posts are resting on the foam beyond this cut line. Finally, cut the bank by using the retractable knife. You just want to cut the foam in an irregular angle shape to represent the bank. Afterwards, Glue this strip of foam down onto the main base. |
|---|---|
 |
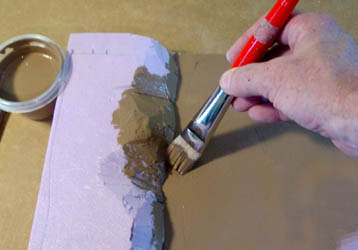
| 6. | I'm going to paint the base a dirt color. You can mix your own by simply looking at some dirt and trying to match the color. I also have a recipe for a dirt color on the painting colors page. Use this color to paint the base completely. Let this paint dry completely before trying to blend the colors shown below. Sometimes the pink color on the foam is hard to cover up and it may take two coats of paint to do it. |
 |
|---|
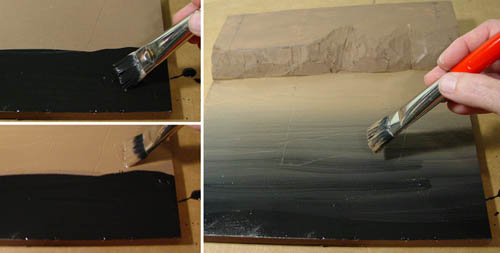
| 7. | I'm going to blend the color on the bottom of the lake from black to brown. This is fairly easy. Apply black paint across the bottom 3" of the base. Clean out the brush and apply 3" of brown paint above this strip of black. Now blend these two colors by painting back and forth across the middle division between these two wet colors. |
 |
|---|
| 8. | Don't forget to paint the edges of the foam as well. I'm painting the edges dark so they will match the dark water a little better. Just use the color that's on the brush after blending the black and the brown paint. |
 |
|---|
Assembling the Dock and Ground Cover
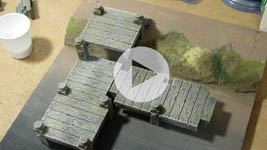
| 1. | Click on the video to watch it on YouTube. This video shows how to add ground cover to the bank and also how to assemble the painted dock onto the lake. |
 |
|---|
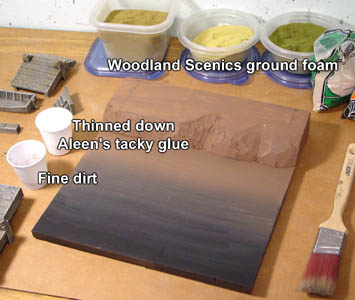
| 2. | Start by getting your materials together. I am using:
|
 |
|---|
| 3. | I only want to apply ground cover to the bank at first. Brush on the thinned glue mixture and then sprinkle on dirt and ground foam. I sprinkled dirt on the more vertical surfaces where it would be harder for grass to grow. I left off gluing the rest of the grass down until after the dock was glued in place. |
 |
|---|
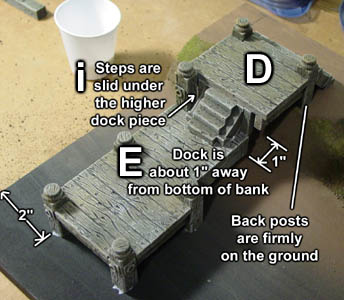
| 4. | Start by gluing down dock piece "E" about 2" in from the left side and about 1" away from the bottom of the bank. Then glue dock piece "D" up against the tall post. Be sure the back posts are firmly set on the ground. If not, you may have to slide the whole thing back until they do. Finally, glue the steps "i" connecting the two docks. Be sure to slide the steps under piece "D" about 1/4". |
 |
|---|
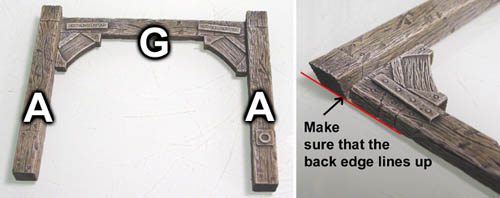
| 5. | Glue the brace between the two longest posts. When doing this, make sure the back edge lines up so that the brace does not get in the way of the roof. |
 |
|---|
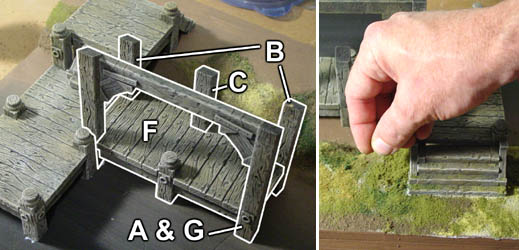
| 6. | Glue dock piece "F" up against the side of piece "E", being sure to leave a hole for the front post assembly ("A & G"). Glue the back posts "B" and "C" onto the back of dock piece "F". Glue the remaining ground cover in place around the back steps and on top of the bank. |
 |
|---|
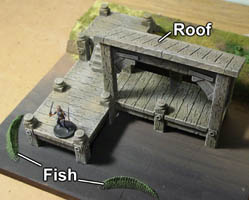
| 7. | Finish the assembly by gluing on the roof and also gluing the fish into the water. You can find instructions on how to make these fish on the Tips & Tricks 35 page. The final step will be adding the water under the dock. You will find instructions on adding the water on our Tips & Tricks 35 page. |
 |
|---|
Finished Photos
Click on the photos to see a larger view. The boat you see in front of the dock is made by FreeBooter Miniatures. This particular boat is called the "Yola". You will find the instructions on how to make the water and the fish that goes in it on the Tips & Tricks 35 page.
If you remember from the instructions above, we blended the colors of the river bottom from brown to black. However, with the amount of tint that the water has, you cannot see this blend at all. So it would probably make sense to either not worry about blending the river bottom, or add about half of the colorant to the water.
 |
 |
 |
 |