Fieldstone Bridge Building Instructions
|
This page contains instructions on how to use mold #74 to build the fieldstone Bridge. You will have to cast the mold 10 times to build the bridge. This bridge is slightly more difficult to build than the average model. The difficulty lies in using the correct pieces when assembling the arch and also in assembling the humped walkway. |
|
About Mold #74
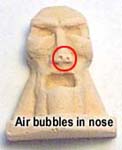
| 1. | Some of the pieces on this mold (such as the decorative face) are difficult to cast without air bubbles in the pieces. The best method of casting these pieces is to use the "wet water" method shown on the Advanced Casting Instructions page. Using this method, most of the air bubbles will be eliminated giving you nearly perfect castings. |
 |
|---|
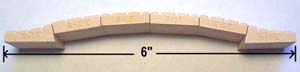
| 2. | Here are photos of the adjustable arch. These pieces can be used to make an arch from 2" wide to 6" wide depending on how many blocks you use. The first photo shows half of the arch. Notice that you also need a flat tile and a regular block to complete half of the large arch. The remaining pieces are numbered from 1 to 5. When separating the pieces and trying to figure out which one to use, look at the back of each block. Piece #5 has five stones on the back of it. Piece #4 has four stones on the back of it (and so on). The only exception is piece #1, which is pretty easy to spot because of its size and shape. |
 |
|---|---|---|
 |
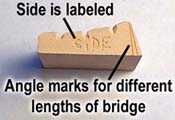
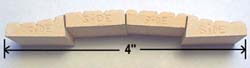
| 3. | The walkway of the bridge is made with two different pieces. The first piece is the starting and ending block of the hump. The second piece is used as the main building blocks of the walkway.
The ends of the block are angled, which makes the hump when you butt the pieces together. It takes 8 pieces to make the full length of the walkway. Always be sure the "Side"of the blocks is facing you. |
 |
 |
|---|---|---|---|
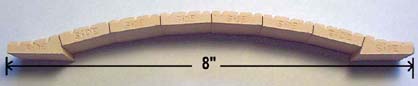 | |||
| 4. | If you sand the end of the first block down to the first mark, you can make your walkway with 6 pieces. |
 |
 |
|---|
| 5. | If you sand the ends of the first block down to the second mark, you can make your walkway with 4 pieces. |
 |
 |
|---|
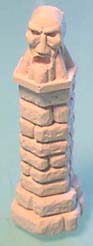
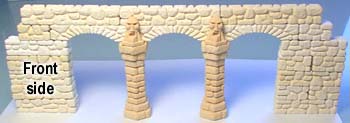
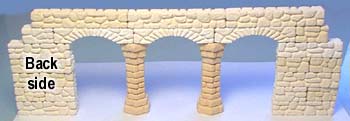
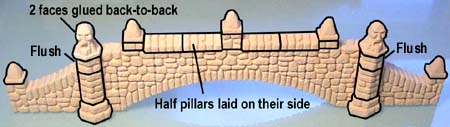
| 6. | The hexagon pillars are a handy addition to the mold. You can use these as stand-alone pillars, or place them under arches or on the sides of walls to act as a support. When placing them under fieldstone arches (found on mold #70), use half of the pillar to support the arch and the other half to support the decorative face. The last 2 photos show the front and back of an arched wall. |
 |
|
|---|
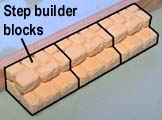
| 7. | 
The last piece I want to show is the step builder block. These are helpful for building a stairway that you can put a doorway or wall directly below. When you stack the blocks up, the underside of the stair is perfect for stacking basic building blocks under it. |
 |
|---|
Basic Bridge Building Instructions
You will need to cast this mold 10 times to have enough blocks to build this bridge. Be sure the blocks are completely dry before gluing them together.
You can download the plans shown here from the Building Plans Page and print them out yourself. You'll want the plans labeled "Basic Fieldstone Bridge".
| 1. | The building plans will have a diagram of the walkway (with the hump in it). Lay the blocks directly down on the plan as shown and glue the ends together. All of these blocks have the word "Side" carved into them. Be sure the word "Side" is facing you on all of the blocks. Make 3 of these rows and let them dry completely. Stack and glue these rows together to form the completed walkway. |
 |
|---|---|---|
 | ||
 |
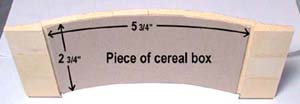
| 2. | To strengthen the walkway of the bridge, glue a piece of cereal box to the bottom of it. Cut the piece about 2 3/4" x 5 3/4" and center it under the walkway. |
 |
|---|
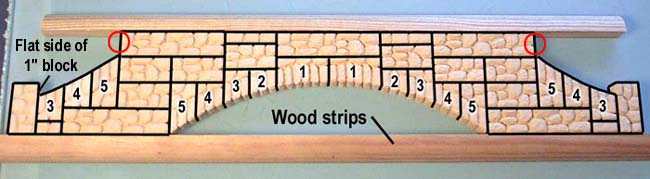
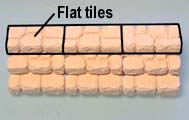
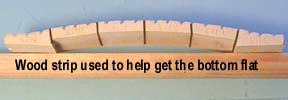
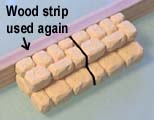
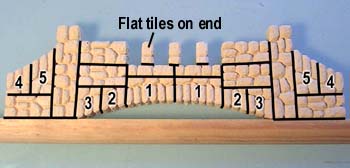
| 3. | Lay down and glue the blocks as shown. I've used two wood strips to help get the top and bottom of the bridge straight. Be sure that the 1" blocks on the very ends are turned so the flat sides are against other blocks. Make 2 of these sides. |
|---|---|
 |
| 4. | Add the decorative pieces as shown. Position the edge of the pillars flush with the edge of the block circled in red on the photo above. |
 |
|---|
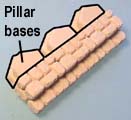
| 5. | Glue the piece shown to make the steps. The pillar bases help support the top step. Make 2 of these step sections. |
 |
 |
 |
|---|
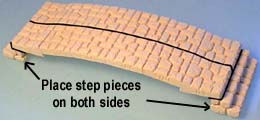
| 6. | Glue the step sections in the exact position shown. You may want to double check the position by laying the walkway on top of the steps. When you do, the steps should look evenly spaced. Feel free to adjust the steps as needed. |
 |
|---|
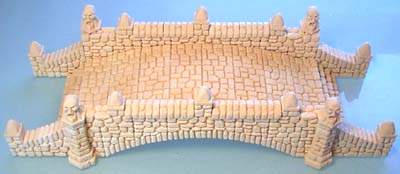
| 7. | Glue the walkway and the other side to complete the bridge. You can adjust several parts of the bridge to fit your needs. These include the width of the walkway, the length of the walkway, and the length of the large arch on the front. Below are some finished photos of the bridge. |
 |
|---|
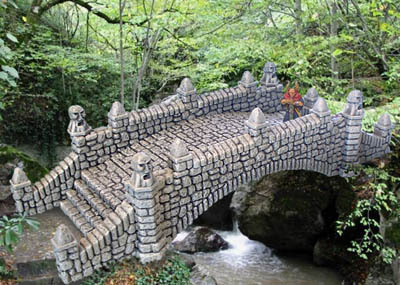
| 8. | To paint the bridge, follow the Earth Tone Painting Instructions. Here's a photo of the finished bridge. The miniature is by Games Workshop and is a 25mm Warhammer Fantasy(TM) figure. This bridge will sit flat on a table top. If you make a raised area (such as river banks out of foam), you can span the bridge across it without steps. This would work better for traffic such as carts, war wagons or siege equipment. |
|
|---|
Small Bridge Building Instructions
| 1. | Sand 4 walkway tiles down to the first mark (there should still be one mark left when you've finished). Assemble and glue a walkway strip as shown. |
|
 |
|---|
| 2. | Glue 2 step blocks side by side. Make 2 of these pieces Glue the walkways side by side and place the steps under each end. Be sure the walkway is completely dry first. |
 |
 |
|---|
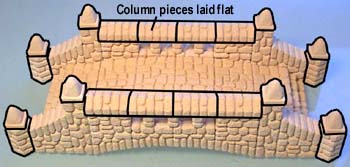
| 3. | 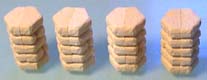
Glue 8 column pieces back-to-back to make 4 columns. Assemble and glue the pieces shown to make one side of the bridge. Make 2 of these sides. |
 |
|---|
| 4. | Add the full columns on each end of the bridge capped with the decorative blocks. The rails of the bridge are the column pieces laid on their backs (you may have to sand the pieces slightly to get them to fit). |
 |
|---|
| 5. | That's all there is to this little bridge. It makes a nice addition to a dungeon or any place that only a few people can cross at a time. To paint the bridge, follow the Earth Tone Painting Instructions. The orc miniatures are by Games Workshop and are 25mm Warhammer Fantasy(TM) figures. |
 |
|---|