Haunted Dice Tower Building Instructions
|
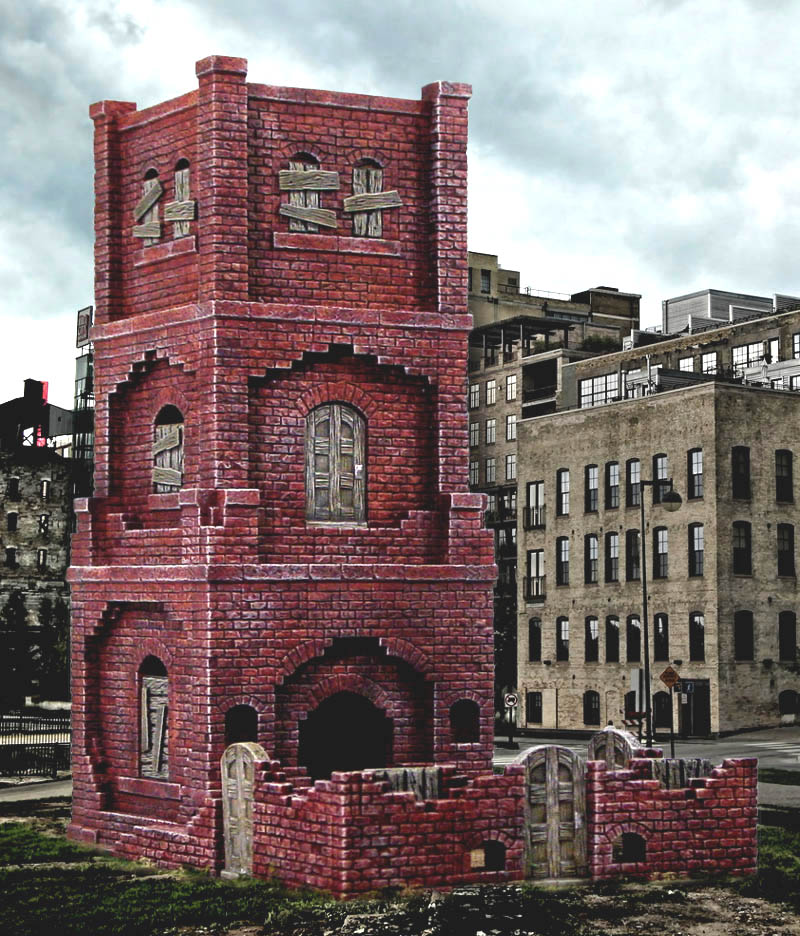
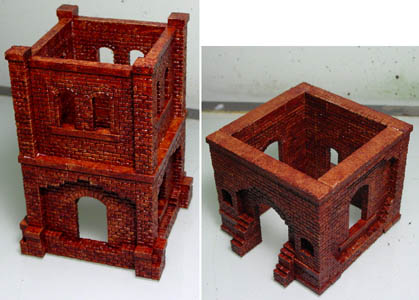
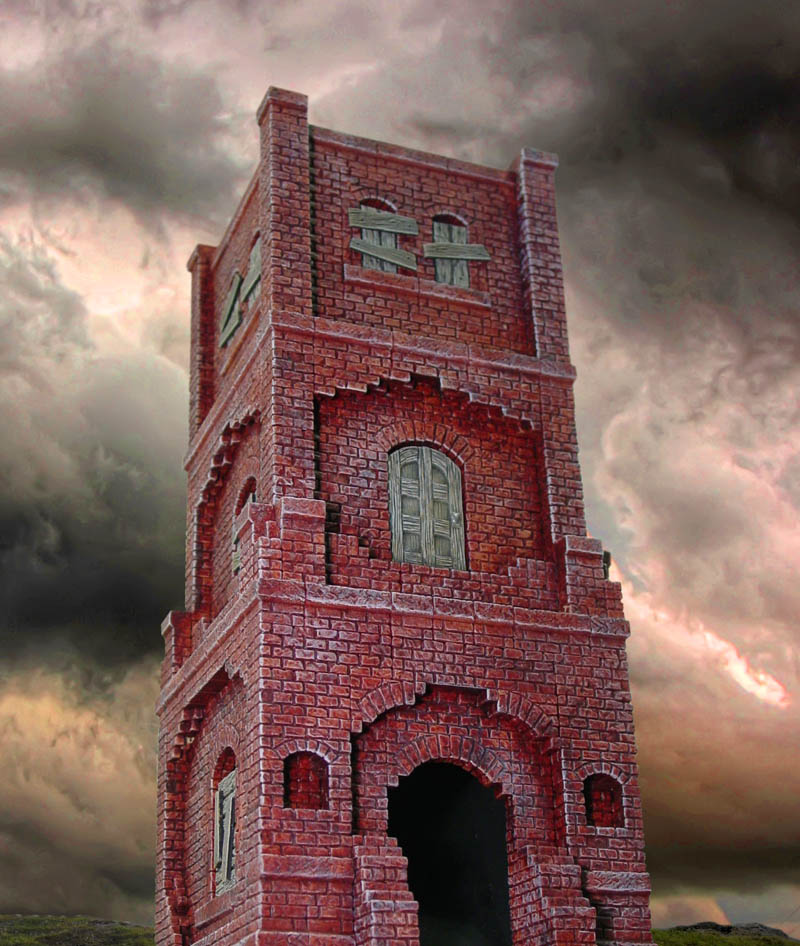
This page will show you how to use mold #344 to make the haunted dice tower shown here. You will need 16 castings of mold #344 to build this tower. Click the photo for a larger view. |
|
Casting and Gluing Tips for Mold #344
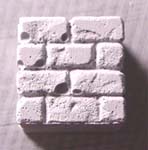
| 1. | These steps show helpful tips on casting and gluing blocks from mold #344. This is an extreme example of some of the problems you can have with casting this brick texture. This casting was done without any surfactant and without washing the mold before using it the first time. This texture is not very deep but there are still many tiny steep angled edges that the plaster must flow into to get a good casting. |
 |
|---|
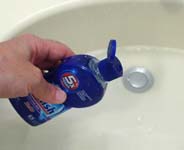
| 2. | Before your first casting, fill a sink with a couple inches of water and put one small squirt of Jet Dry into the water afterwards. Jet Dry is a rinse agent used in an automatic dish washer to help get rid of spots on your drinking glasses. It breaks the surface tension of the water so that water (and plaster) can flow into all the cracks. Do not use ordinary dish soap! It will cause more bubbles than it gets rid of. |
 |
|---|
| 3. | Next, submerge the mold in the water. Then use a small stiff bristled brush to work the air bubbles out of all corners of each block. I would have used a toothbrush for this but a toothbrush is just too large to fit down into the pockets of the mold. For the best casting results, follow the Advanced Casting Instructions by using a surfactant and a vibrating table. |
 |
|---|
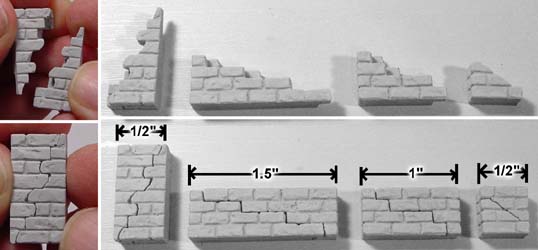
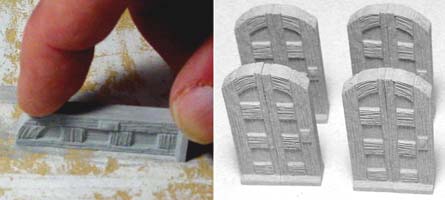
| 4. | The ruined blocks can be used to make full blocks. Simply take two identical blocks and fit them together to make a full block. These photos show the length of each of the blocks after being assembled. This way you won't waste any blocks if you don't want to use them as ruined blocks. |
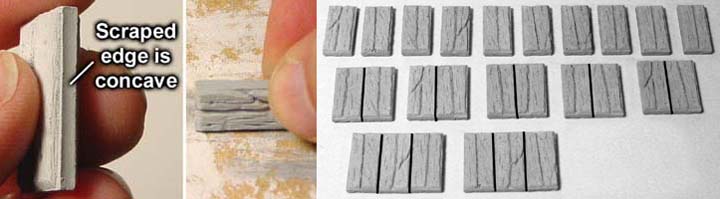
 |
|---|
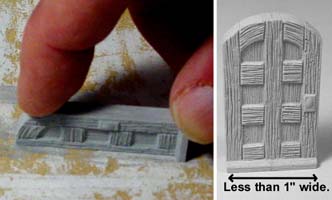
| 5. | To get the door to fit together properly, you will need to sand the scraped edge of the door slightly. This will make a better glue joint for a stronger door. The center seam should be hidden in the wood grain. Also, the width of the door is less than 1". It's skinny enough so that you can easily place and remove the doors from the doorways even after the walls are painted. |
 |
|---|
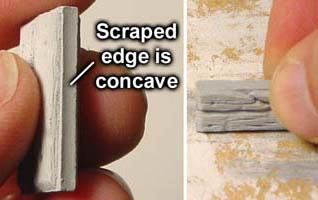
| 6. | The board sections are slightly short so that they will nicely fit into the windows after you paint them. However, the scraped edge may be concave which will make gluing them a problem. Sand the scraped edge before gluing them together to make a stronger bond. These board sections will be very weak at the joints. |
 |
|---|
Building Instructions
You will need 16 castings of mold #344 to build the tower and outer wall.
Assembling the Brick Sections
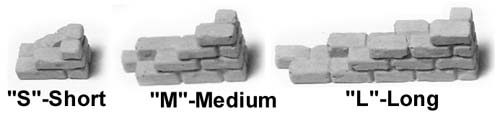
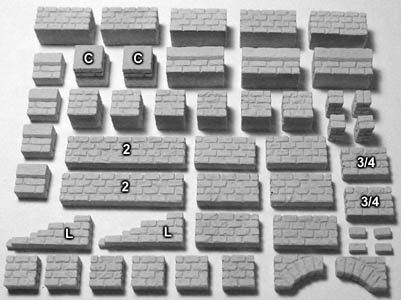
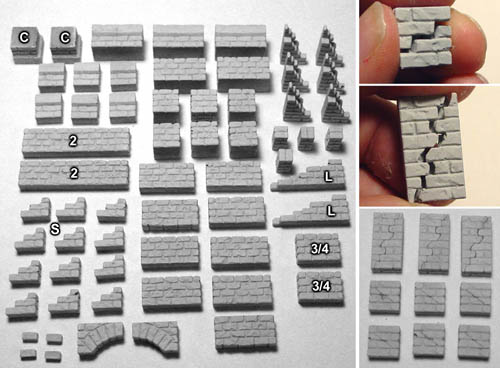
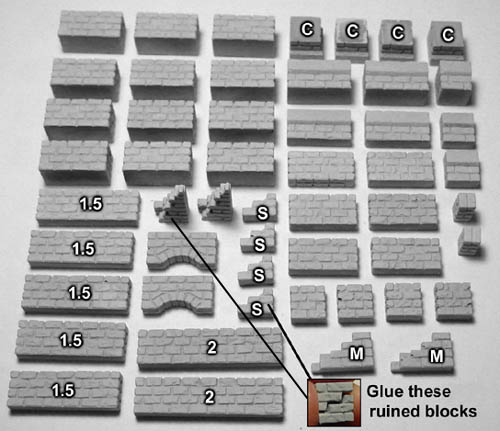
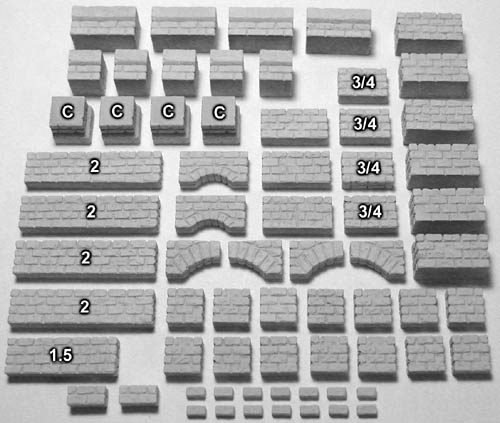
| 1. | When gathering the ruined brick pieces, I will label them as "S", "M" and "L" to represent short, medium and long pieces. |
 |
|---|
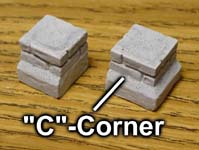
| 2. | There are also a couple of footer blocks that look almost the same. The one on the left is 1/2" wide. The one on the right is used for making a corner. Since these are easy to mix up, I have labeled the corner block with a "C" on the plans below. The regular 1/2" footer will have no label. |
 |
|---|
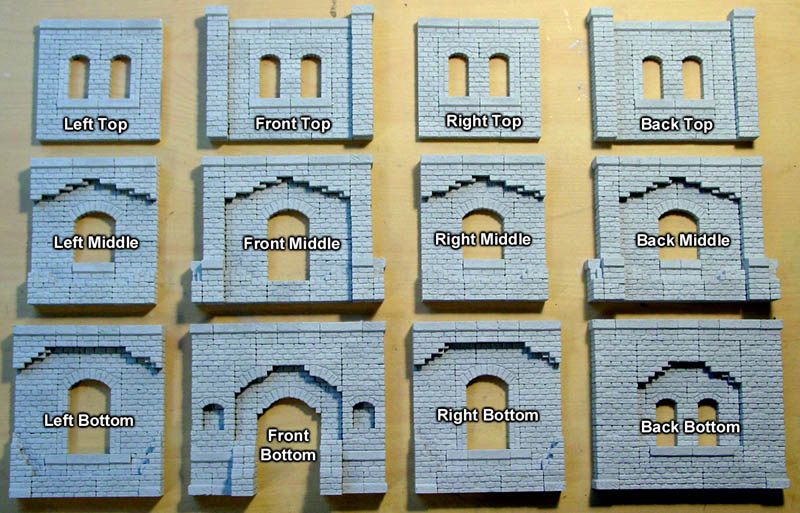
| 3. | Dice Tower Wall SectionsHere is an overview of the wall sections we will make for the dice tower. Click on the photo for a larger view. Keep in mind that you will be using every brick from the 16 castings that you make except a single 1" long thick block. For this reason, you might want to make a couple of extra castings. Then you can discard any bad castings that might happen. |
 |
|---|
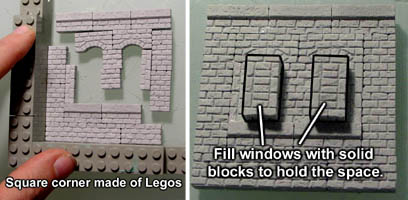
| 4. | When gluing together these wall sections, use a square corner made of Legos to keep the pieces square. Also, fill the windows with solid blocks, but do not glue them in place. These will keep the window spaces even while the glue dries and your painted plank sections will fit in the windows accurately without any sanding. |
 |
|---|
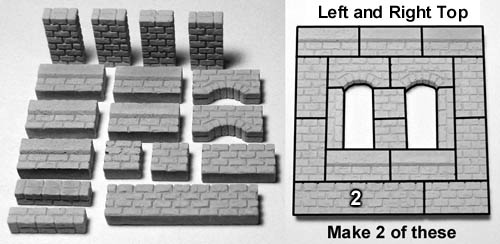
| 5. | Left and Right TopYou will need 2 of these wall sections. One will be for the top left and the other will be for the top right of the tower. |
 |
|---|
| 6. | Left and Right MiddleMake 2 of these. |
|---|---|
 |
| 7. | Left and Right BottomMake 2 of these. |
|---|---|
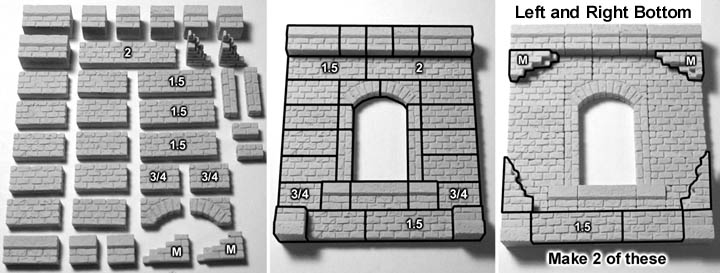 |
| 8. | Front and Back TopYou will need 2 of these wall sections. The smallest blocks go under the top corner blocks. |
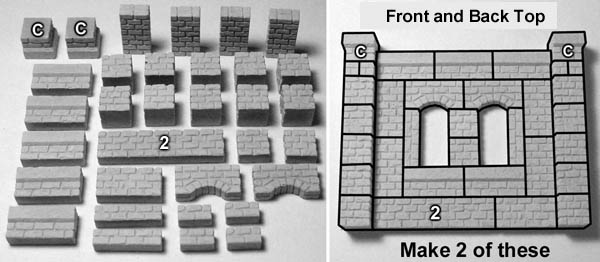 |
|---|
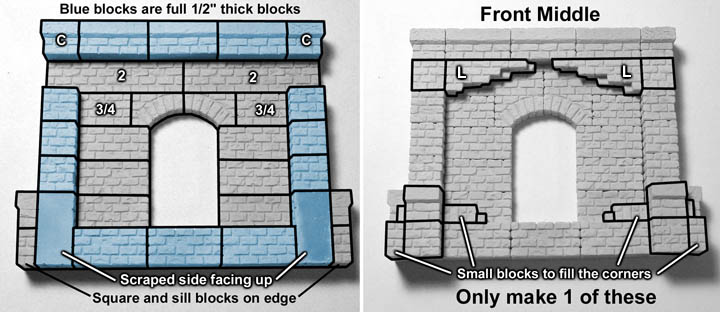
| 9. | Front MiddleThis wall section is a little trickier to put together. The blocks shown in blue are full 1/2" thick blocks. The bottom left and right blocks are full blocks positioned scraped side up. On each side of these blocks you will put a square block and sill block on their sides. On the last photo, the very bottom left and right corners are small blocks used to fill the corners. On top of these small blocks are tiny bricks. |
 |
|---|---|---|
 | ||
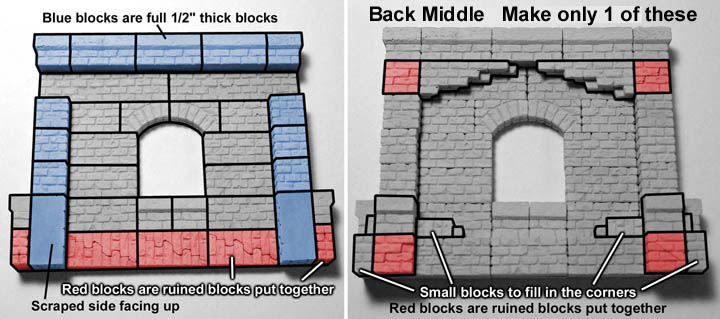
| 10. | Back MiddleYou will need to glue together all of the small and tall ruined blocks. The blocks shown in red are these ruined blocks. The blocks shown in blue are full 1/2" thick blocks. The bottom left and right blocks are full blocks positioned scraped side up. On the last photo, the very bottom left and right corners are small blocks used to fill the corners. On top of these small blocks are tiny bricks. |
 |
|---|---|---|
 | ||
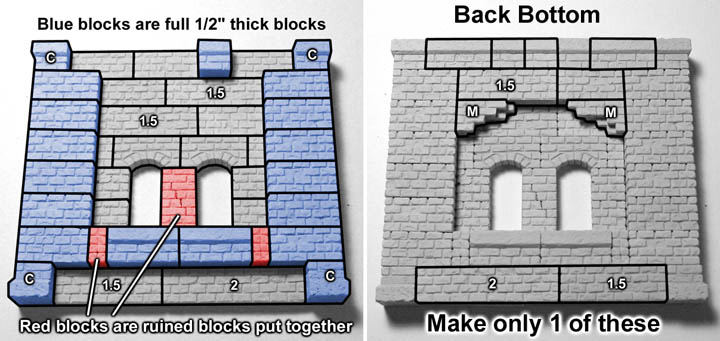
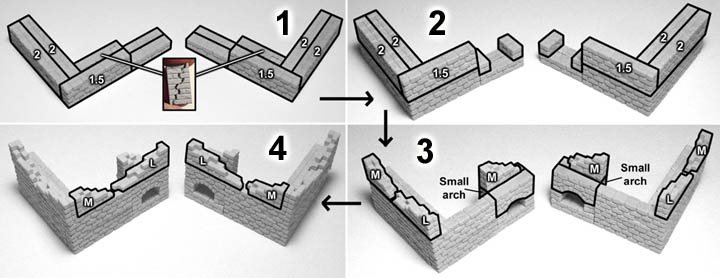
| 11. | Back BottomYou will need to glue together all of the small and tall ruined blocks. The blocks shown in red are these ruined blocks. The blocks shown in blue are full 1/2" thick blocks. I know the top looks a bit odd but I ran out of full footer blocks and had to use the thinner footer blocks to fill in. |
 |
|---|---|---|
 | ||
| 12. | Front BottomThe blocks shown in blue are full 1/2" thick blocks. For the small arches on each side of the doorway, you will need to pre glue the 3 small square blocks that go under each arch. On the bottom left and right of the big doorway is a foot that sticks out. Pre glue these feet together. These feet are made of a full 1/2" thick block and two of the 3/4" blocks. |
 |
|---|---|---|
 | ||
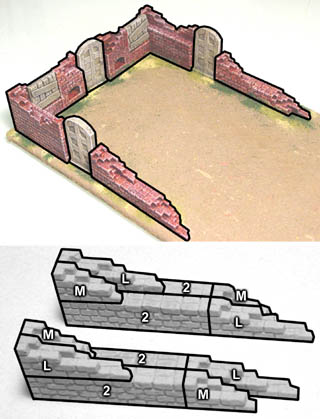
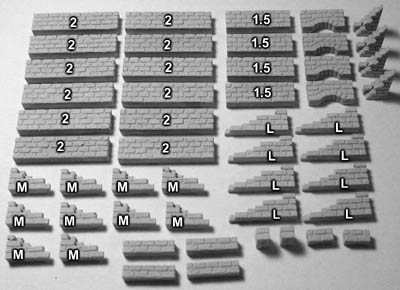
| 13. | Garden WallThe wood sections will be assembled, painted and glued in later on. What I show here are the four main wall sections that make up the garden wall. After all the pieces are painted, we will glue these down onto cardboard to make the walls of the dice tray. |
 |
|---|---|---|
 | ||
Assembling the Wood Sections
| 14. | Start by gluing together 8 door halves to make 4 complete doors. Most likely, the scraped side of the door half will be concave. To help the door fit together properly you may need to sand the scraped side of the door half. |
 |
|---|
| 15. | Next we will make boarded up window sections. The scraped side of these may also be concave so you may have to sand the scraped side so they will glue together more securely. What you see here are all of the board sections we need to paint. |
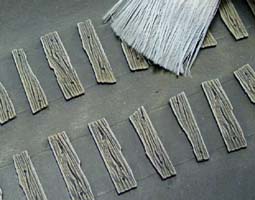
|---|---|
 |
| 16. | You will also have a fairly good sized pile of single planks. I would paint all of the single planks. This will give you a lot of options on how many planks you want to glue onto the outside of the tower and also across the boarded up window sections. |
 |
|---|
Painting and Assembling the Tower
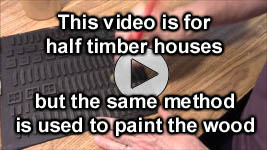
| 1. | Painting the Wood This video is actually from a different tutorial, but you will use the same method to paint the wooden sections for this project. |
 |
|---|
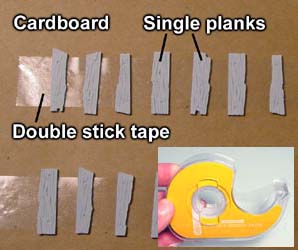
| 2. | Since we only need to paint one side of the planks, we can stick these down to a piece of cardboard. I'm going to use cheap permanent double stick tape. You need the permanent kind or the pieces will not hold down. Do not use too much pressure when pressing them down or you will break the planks. |
 |
|---|
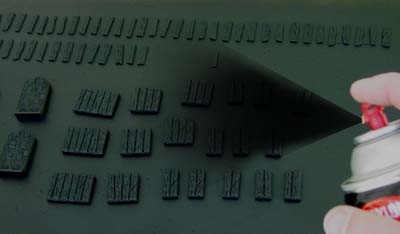
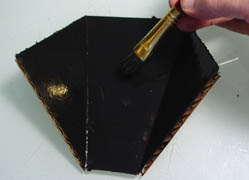
| 3. | The single planks only need to be painted on one side, but all other wooden pieces need to be painted on both sides. I suggest getting a second piece of cardboard to set the other wooden pieces on when painting. The first coat I am spray painting it flat black. Be sure to do this outside or in a well-ventilated area. Be sure to spray from all angles so that you get the sides and ends of each plank as well. |
 |
|---|
| 4. |
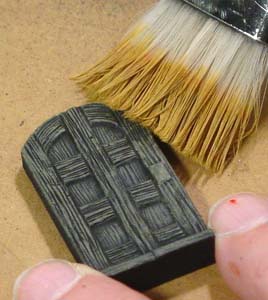
If you are using house paint, thin the paint slightly and make the brush as dry as possible. If you are using acrylic craft paint then you may not have to thin it. If the paint is too thick, you will get solid brown on the top of your planks. If you thin the paint but put too much on, the paint will run into the cracks. The trick here is to thin the paint slightly, dip your brush in and brush almost all of it off on a paper towel (even more than usual for dry brushing). What you want are lots of thin coats of paint. When first brushing over the planks, it will not look like anything is happening. This is exactly what you want. Don't go back for more paint but instead keep brushing over the planks. If the coat of pumpkin pie color is thin enough, the black transmutes through the brown and changes the color completely. Pumpkin pie turns into a dark oak. Remember to brush lightly, keep the paint thin and keep the brush really dry. |
|---|
 The second coat of paint is earth tone medium color from the
 | 5. | To gray up the planks a bit and have them match the brick better, I'm going to dry brush them with light gray from the Castle Gray Painting Instructions page. You want to do this very lightly, just to highlight the edges and grey out the wood sections a little. I also did this to the round topped doors because I wanted them to look the same age. |
 |
|---|
| 6. | When finished, pull up the tape and the planks should come up with it. Your wooden planks are now completely painted and ready to glue on. The most time consuming part of the whole process is sticking them down onto the cardboard at first. When pulling them off of the tape, do it very carefully because the planks can break easily. |
 |
|---|
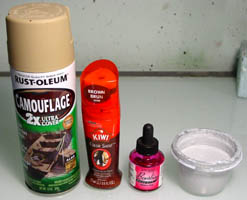
| 7. | Painting the Brick For this project, I will be spray painting a sand color on instead of painting the earth tone medium color. |
 |
|---|
| 8. | To paint the brick, I'll use these colors:
The light gray color is from the painting instruction pages. I found the Kiwi shoe polish at my local Walmart in the shoe department. You can find magenta India ink at an art or craft store with the calligraphy tools. |
 |
|---|
| 9. | The video above shows me painting on the earth tone medium color. However, for this project I'm using Rustoleum Camouflage Sand spray paint instead. Since many of these wall sections are thin and fragile, I thought it would be better to not soften the glue by painting on a water based paint. |
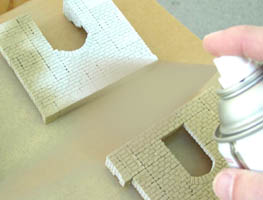 |
|---|
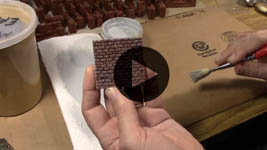
| 10. | Staining the Brick This video demonstrates how to apply the shoe polish mixture onto the painted surface of the brick. |
 |
|---|
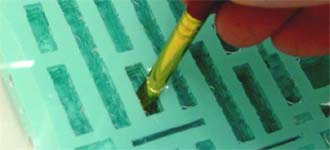
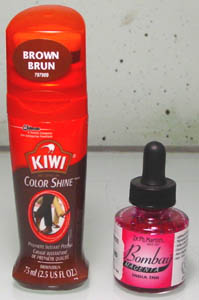
| 11. | After spray painting I'm going to stain the piece with a mix of Kiwi liquid brown shoe polish and magenta India ink. You can find India ink at your local craft store where they sell calligraphy and art supplies. Pour one tablespoon of brown shoe polish and 1/2 teaspoon of magenta ink into a cup and mix them up. I felt that the brown shoe polish alone just didn't have quite enough red in it for brick. However, you may feel differently about the color when you try it. Be sure to always test your paint colors on some extra castings before applying them to your project. It's not just a matter of getting the colors right, it's also a way to practice how to apply the stain to the surface. |
 |
|---|
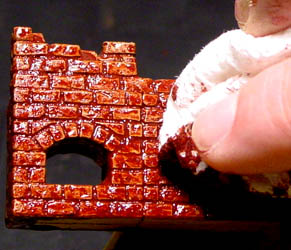
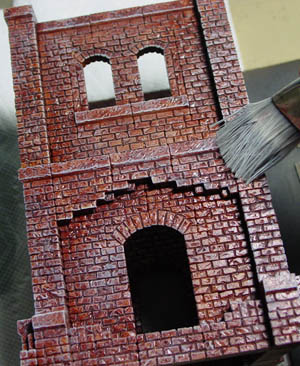
| 12. | Be sure to wear a rubber glove on the hand that's holding the piece to be painted. Jam the brush into all the cracks when applying the shoe polish and apply it liberally to all the surfaces. Afterwards, scrape the excess stain off of the brush by scraping it on the side of the cup. Then dab up any excess drips you can find. The shoe polish will get sticky as it starts to dry. I also found that the water based shoe polish will soften the glue holding the wall section together. Try not to handle the pieces too much after staining them. I stood mine up on a piece of wax paper to let them dry. |
 |
|---|
| 13. | After brushing on the stain you can dab up a little of the stain with a paper towel to mottle the texture somewhat. Dabbing the surface is optional. If you wipe up too much of the stain, you won't leave enough brick color on the surface. You will also find that the rubber glove will leave prints on the brick, so dabbing the surface helps to blend these fingerprints away and give your brick a more random look. The shoe polish is water based so you can clean your brush out with water. |
 |
|---|
Next I'm going to assemble the tower before I dry brush on the light gray. The next step would usually be to dry brush light gray onto the surface of the brick. However, I have found that dry brushing highlights the edges of the bricks a lot, and if you dry brushed them before assembling the tower it would look odd because there would be bright edges where the panels of the tower fit together. |
| 14. | Assembling the TowerBefore the tower is dry brushed in light gray, I'm going to assemble most of the tower. This means that I will glue together the top two stories and also glue together the base separately. I'm not gluing the base on yet because I want to add the dice chute first. Putting the dice chute in the tower will be difficult if you glue the whole thing together. |
 |
|---|
| 15. | To make the dice chute you will need to print out the chute plan. Lay this plan out on a piece of cardboard. Use a nail or ball point pen to punch a hole in each corner of the template. |
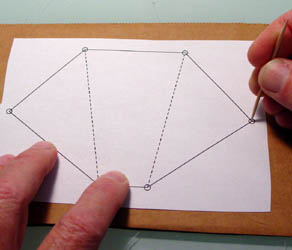 |
|---|
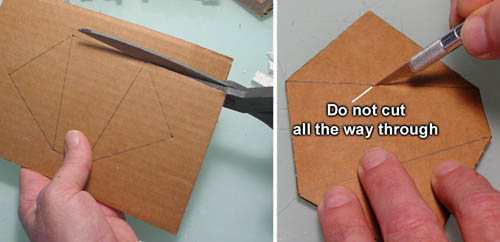
| 16. | Use a ruler and pencil to connect all the dots. Use a pair of scissors to cut around the outside shape. Next, use a hobby knife to cut the center fold lines but do not cut all the way through. Just cut through the top layer of paper. |
 |
|---|
| 17. | Fold the sides down away from the cut lines and test fit the chute into the base. The bottom small end of the chute will rest flat on the table top. Feel free to test the chute by dropping some dice down it. |
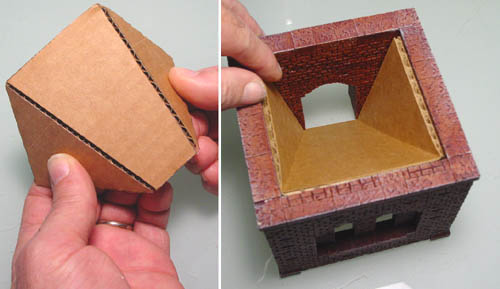 |
|---|
| 18. | After you are sure the chute fits well, paint both sides of the chute flat black. You need to paint both sides because you will be able to see the underside of the chute through the side windows of the tower. When dry, go ahead and glue the chute into place. |
 |
|---|
| 19. | Dry Brushing the Light Gray This video shows how to apply the light gray dry bushing on the tower. |
 |
|---|
| 20. | After the stain, I'm doing a light dry brush of the light gray. Doing this brings out the details and texture on the surface, as well as toning down the color of the brick. This step is optional! If you like the color of the brick after you stain it, then don't worry about doing the dry brush because brushing on the gray is kind of difficult and easy to mess up. Painting a flat brick surface is not as difficult because all of the brick is on the same level. However, this tower has a few areas with a lot of uneven bricks and protruding bits. The same amount of paint it takes to dry brush a flat wall will be way too much paint for the random protruding brick edges. This is one of the reasons that I assembled the tower sections before dry brushing the gray. Don't forget to dry brush the garden wall sections also! The garden wall sections will make our dice tray further down in the instructions. |
 |
|---|
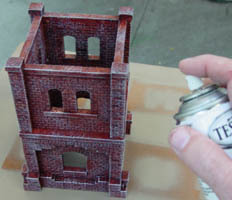
| 21. | I also noticed that the tower had a sheen to it, which was a little more glossy than I would have liked. I believe it was because I spray painted the base coat instead if painting on the flat medium tone earth color as shown in the video. To fix this, I'm spraying the tower with Testor's Dull Coat flat lacquer spray. In my experience, Testor's brand is the only dull coat that is actually dull. All of the other clear flat sealants you can buy have some sort of sheen to them. |
 |
|---|
| 22. | After painting, the last step will be to glue the wooden plank sections into the windows. Place the double board sections in every window they will fit into. Then glue the single planks across the windows as shown (or however you want to put them on). Click on the photo to see a larger complete version of this photo. |
 |
|---|
The Garden Wall Dice Tray
| 1. |
Then spread a good thick bead of glue around the outside edge to glue down the felt. Spread the glue with your finger so you don't have thick beads of glue around the outside. |
 |
|---|
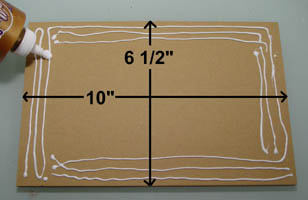
 The base of the tray will be a 10" x 6 1/2" piece of thick cardboard. If you don't have thick cardboard you can simply glue a couple of pieces together.
| 2. | For the base, I'm using a camel colored felt. Put the glued cardboard face down, centered onto the felt. Then use a pair of sharp scissors to cut the felt on each of the four corners. |
 |
|---|
| 3. |
Be sure to leave 1/4" of the square corner as shown. This will help cover the cardboard on the corners. Wrap the felt around on the back side and glue the felt into place. At this point, I didn't like the color of the felt. The camel color just didn't seem to match well with the color of the tower. To fix this, I painted the felt a dirt color. You can find the recipe for this dirt color on our Painting Instructions pages. Keep in mind that if you paint the felt, the paint will take all day to dry because the felt soaks up the paint like a paintbrush. I think the felt after it was painted made a nice ground texture that resembled dirt. |
|---|
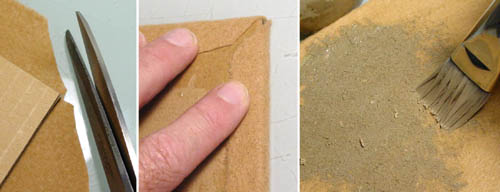 Next, cut the corners across at a 45 degree angle.
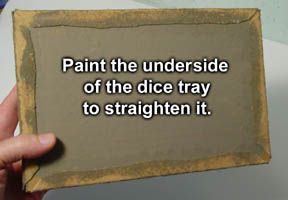
| 4. | After the paint dried, I found that the cardboard had warped slightly. To fix this I painted the underside of the cardboard. Once the paint had dried it had straightened the cardboard up. |
 |
|---|
| 5. | Here is the finished dice tray. Click on the photo for a larger view. All of the walls come in 1/4" from the edge of the cardboard. You can also see the position of the plank sections on each side of the front. The Doors must be glued in well to make sure they are not knocked over by rolling dice! I finished the ground texture by gluing ground foam scenic materials around the base of the walls and doors. |
 |
|---|
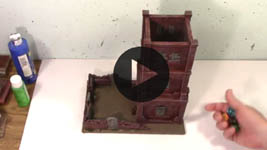
| 6. | The Haunted Dice Tower This video shows the completed dice tower and shows how well the dice roll down it. |
 |
|---|
Finished PhotosHere are a couple photos of the completed dice tower. Click on the photos to see a larger version of each. The second photo shows the tower with the garden wall dice tray attached to the tower. |
 |
|