Inn Building Instructions Page 2
 Casting Precautions Layout Basics |
 Assembling the Rooms |
 Hallways and Accessories Painting and Finished Photos |
Assembling the Rooms
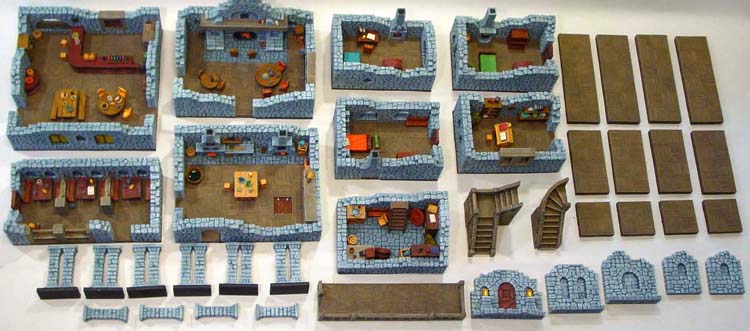
To make the set shown below, you will need to cast these molds as follows:
If you cast these molds in groups of 4 (always casting the top 3 molds), you should be able to get all the pieces in 28 castings. In other words, start by casting molds 701, 75, 221 and 57. After you do that 16 times, then start casting molds 701, 75, 221 and 58 for six times. Finally cast molds 701, 75, 221 and 59 six times. |
Things You Need to Know About Mold #75
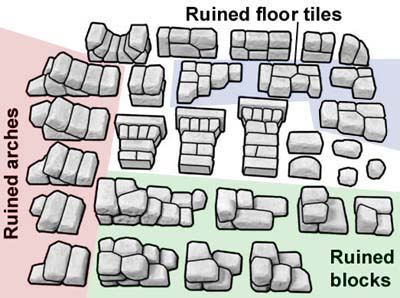
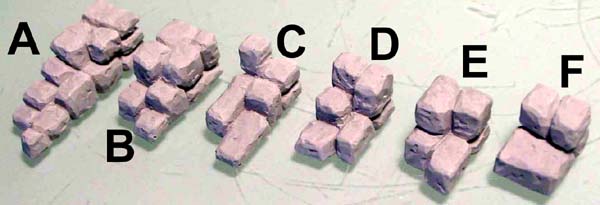
| 1. | Here is a diagram of the blocks that come on mold #75. After sorting the cast blocks, these instructions should help you identify what each of the blocks is and how they can be used. The ruined arches are in the red section. The ruined floor tiles are in the blue section. The ruined blocks are in the green section. Other pieces on this mold include thin wall blocks, pillar pieces, rounded blocks to fill in behind recessed arches and random stones. |
 |
|---|
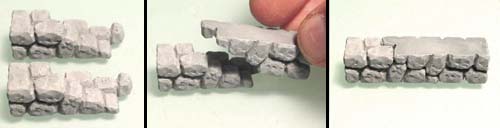
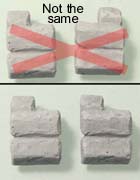
| 2. | Take two duplicate ruined blocks, flip one upside down and place it on top of the other. |
 |
|---|
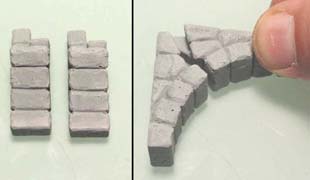
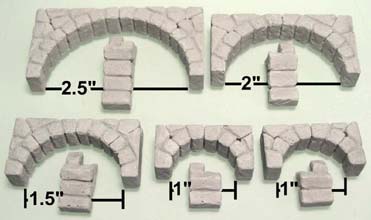
| 3. | The ruined arches work much the same way. Get two identical arch pieces. Their irregular stones fit together to make a full arch piece. Be careful on the smallest ruined arch pieces shown in the last photo. There are two different ones. Only two identical pieces will fit together. |
 |
 |
|---|
| 4. | Here are examples of full blocks and arches that each of these ruined pieces can make. | |
|---|---|---|
 |
 | |
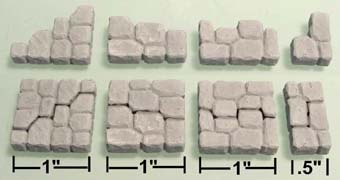
| 5. | The ruined floor tiles work much the same way. Simply glue two duplicate pieces together to make a complete floor tile. The sizes of the tiles are shown here. |
 |
|---|
What You Need to Glue Together from Mold #75
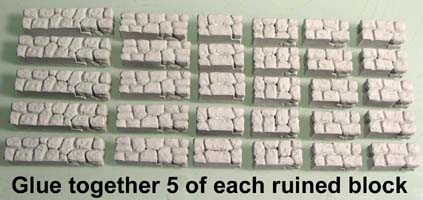
| 1. | To reduce the number of castings we need, we're going to glue together some of the ruined blocks to make full blocks. These will be used as building blocks for the walls of the inn. Glue together 5 of each ruined block. Be sure to use these blocks near the bottoms of the walls when building because the tops of these blocks will be partially flat with no texture. |
 |
|---|
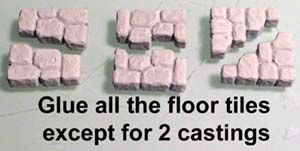
| 2. | Glue together all of the ruined floor tiles except for 2 castings worth. We need very few of the ruined versions of the floor tiles. We will mostly need full stone floor tiles to go under fireplaces in the inn. |
 |
|---|
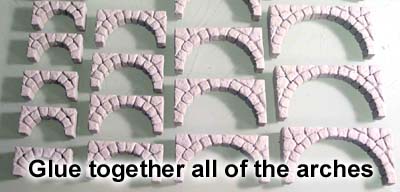
| 3. | Glue together all of the arches. We will not need any ruined or partial arches on this project. You only need a couple of the largest arches so there's no need to glue all of those together. |
 |
|---|
Building the Great Room
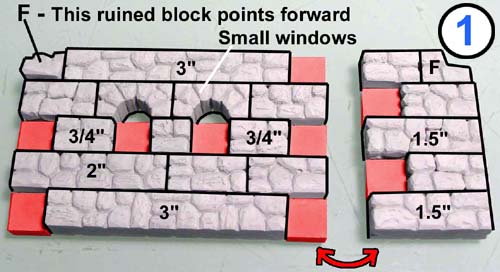
| 1. | For the plans below, use this guide to tell you which ruined pieces I am using on top of the walls. |
 |
|---|
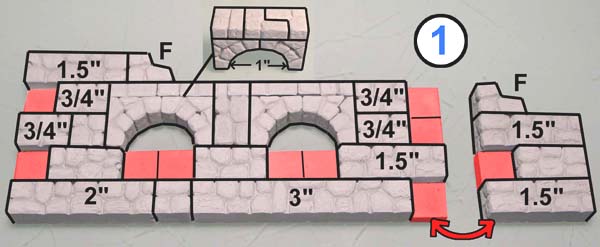
| 2. | Here are the first two walls. In order to keep things straight, I used 1/2" square floor tiles as spacers in the windows and on the ends where the two walls mesh together. Do not glue the blocks in red. |
|---|---|
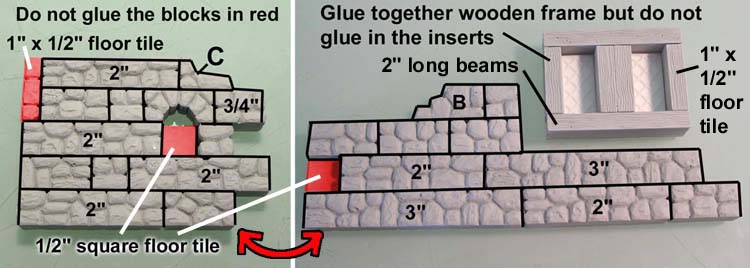 |
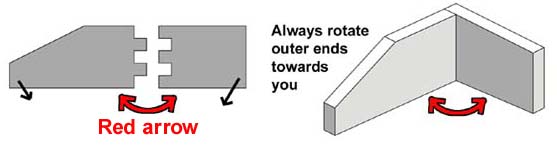
| 3. | Anytime you see this red arrow, it means that you will always rotate the outer ends of the wall pieces towards you. Glue the two wall sections together in this manner for a completed wall corner. |
 |
|---|
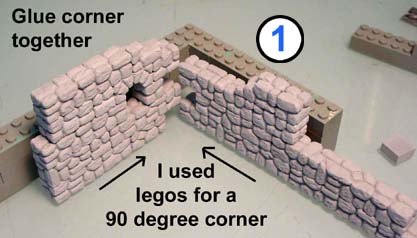
| 4. | To keep the wall sections a nice even 90 degrees, I'm using Legos as a guide. Be sure the wall sections are fairly dry first (otherwise they may fall apart on you). Then glue them together. The alternating sections will mesh on the ends. If the fit is too tight, you can use a file to remove material so it will fit. |
 |
|---|
| 5. | 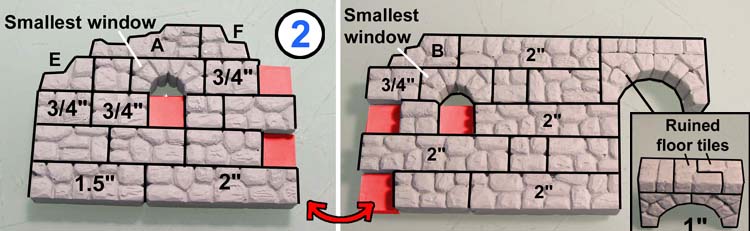 |
|---|
| 6. | 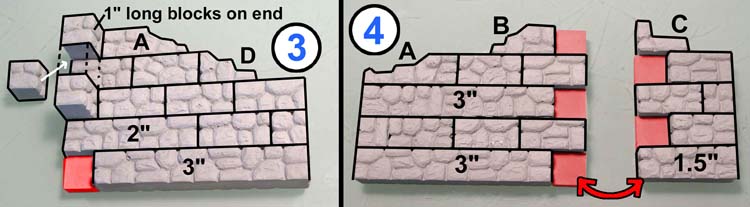 |
|---|
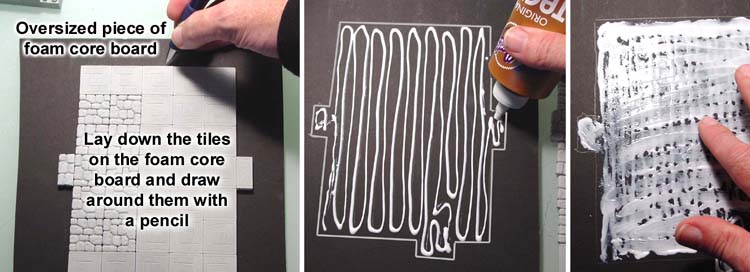
| 7. | I found this to be the best method for gluing down floor tiles. Place the tiles on the board and draw around them using a pencil. Then remove the tiles and put a bead of glue over the whole thing. Spread the glue around with your finger, then stick the tiles back on and let them dry. Do not cut the excess board off around the edge. We will need this later on to mount the walls onto. |
|---|---|
 |
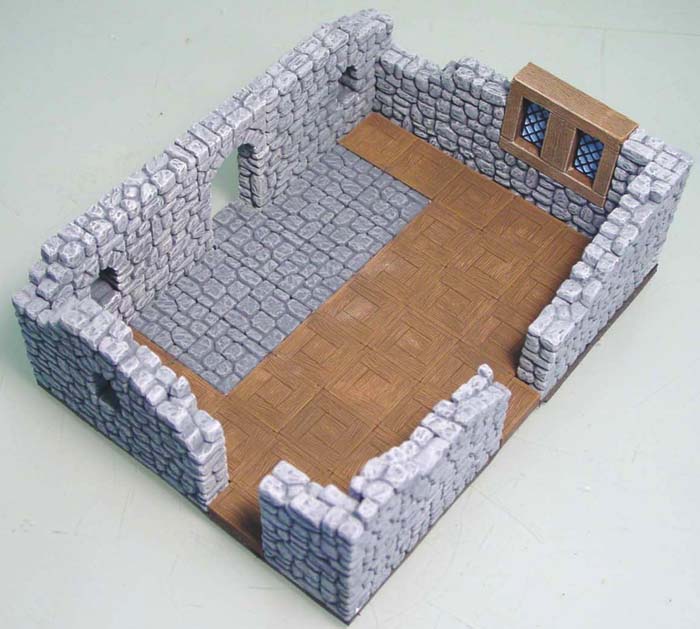
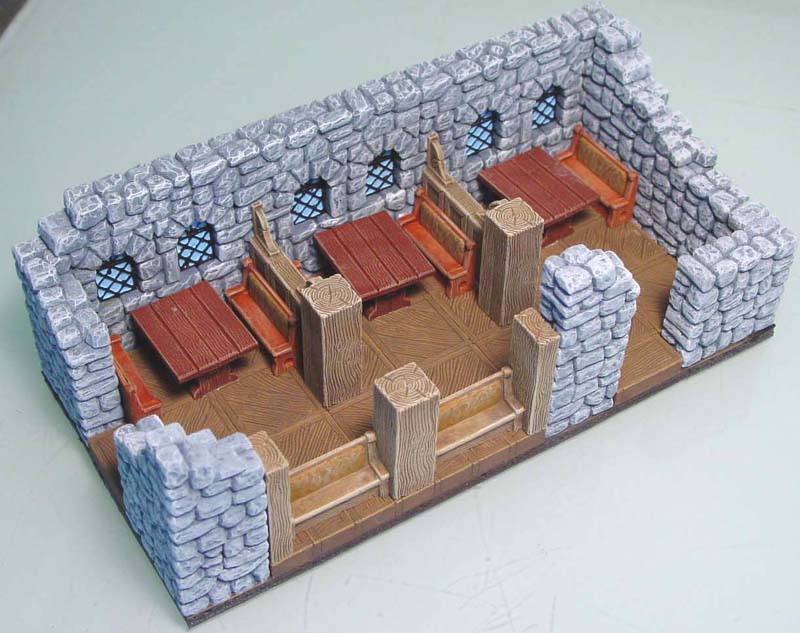
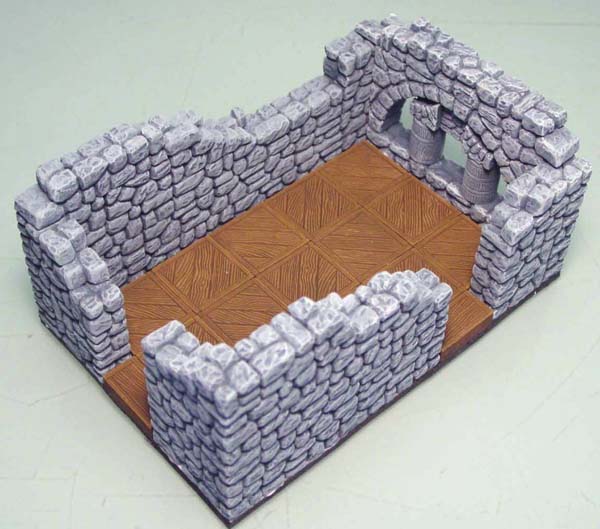
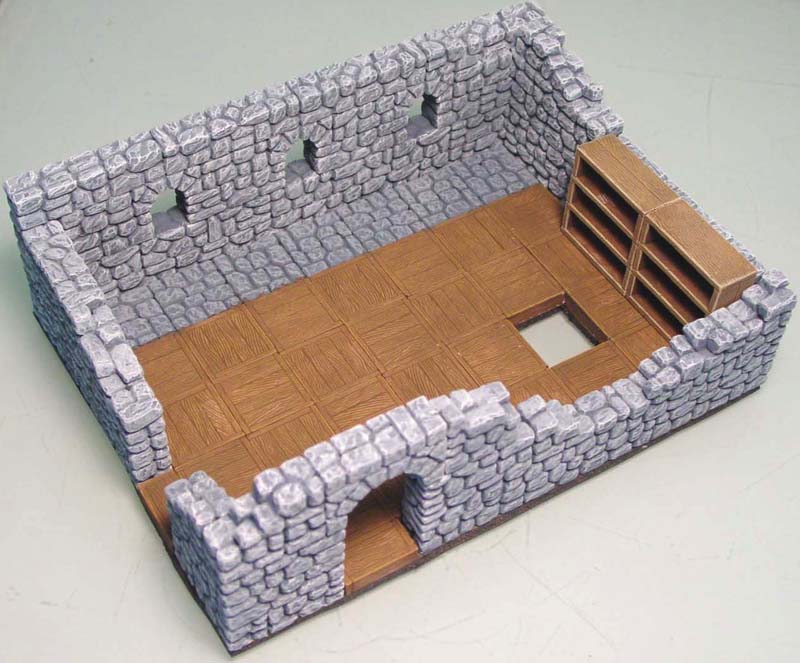
| 8. | These are the floor tiles used for the great room. The stone floor tiles are from mold #75 (ruined tiles glued together) and the wood floor tiles are from mold #221. To the right is what the finished room will look like but do not glue the pieces together yet!. We will need to paint the walls and floors separately before we assemble the room |
|---|---|
 |
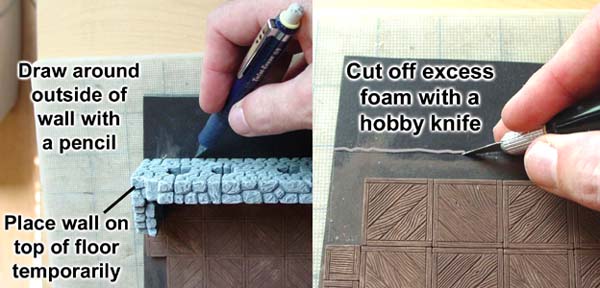
| 9. | After the pieces are painted, set the walls around the floor and draw around them with a pencil. Remove the walls and cut off the excess foam with a hobby knife. Afterwards you can glue the walls onto the foam for the finished room. |
 |
|---|
| 10. | Here is a sample of what a room will look like right before you are ready to put it together. It's much easier to trim the foam down with the walls removed. Notice that the window is glued into the wall after it is painted. This way all of the colors separate nicely and painting is much easier. One thing you will notice is that the paint takes up room when you are fitting pieces together. Parts that fit well before painting will now fit much more tightly and some filing may be needed. |
 |
|---|
Building the Office
| 1. | Once again, do not glue the blocks in red. These are 1/2" square floor tiles used to help keep things lined up while you glue the walls. On the top left, the ruined block F is rotated so it sticks out towards you. |
 |
|---|
| 2. | 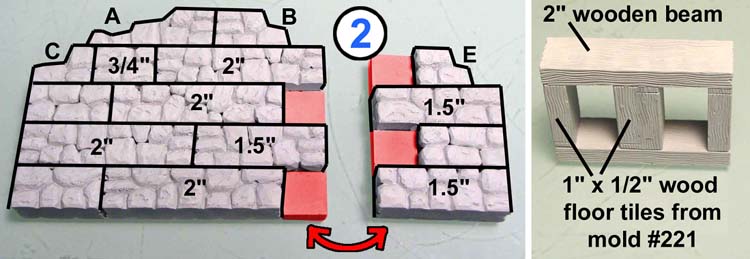 |
|---|
| 3. | 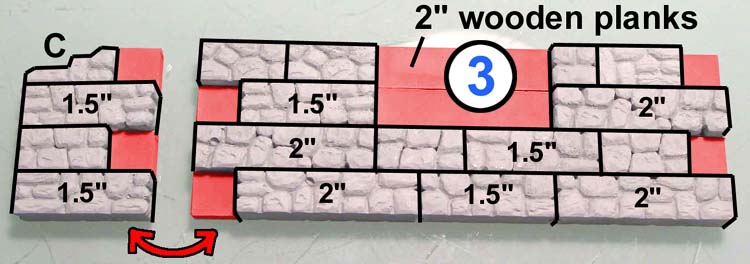 |
|---|
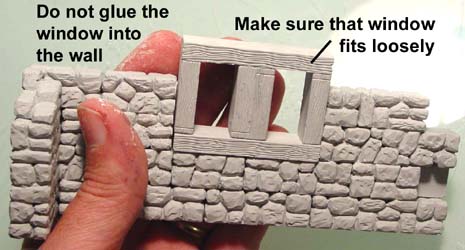
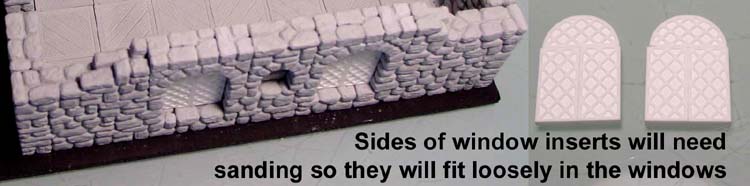
| 4. | Do not glue the window into the wall. We will need to paint these pieces separately before gluing them together. Also, be sure the window fits loosely. You may have to file the edges of the stone around the window to make this happen. If the window fits tightly at this point, then it won't fit at all after it has a coat of paint on it. |
 |
|---|
| 5. | 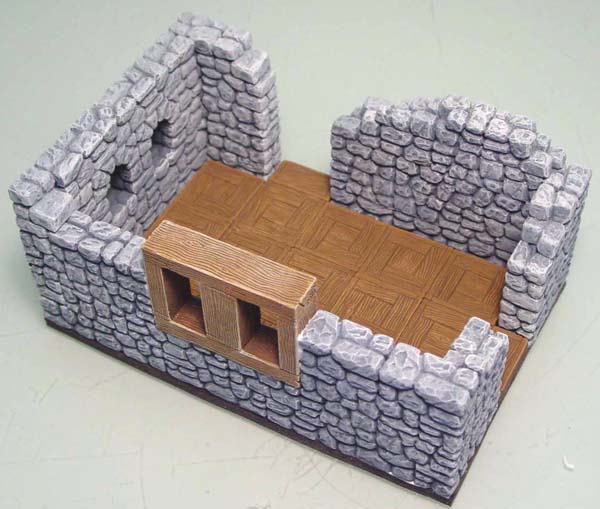 |
|---|
Building the Hobbit Bedroom
| 1. | 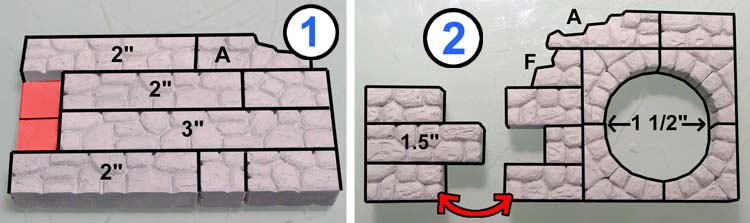 |
|---|
| 2. | 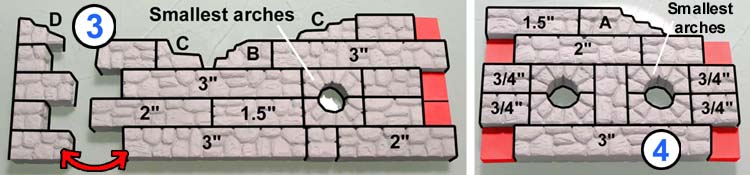 |
|---|
| 3. | This is what the hobbit's bedroom looks like assembled.. The round door is made using the large table top/wheel from mold #58. This wheel is slightly too large so you will need to sand the edges a lot to get it to fit into the round arch. |
 |
|---|
Building the Bar
| 1. | 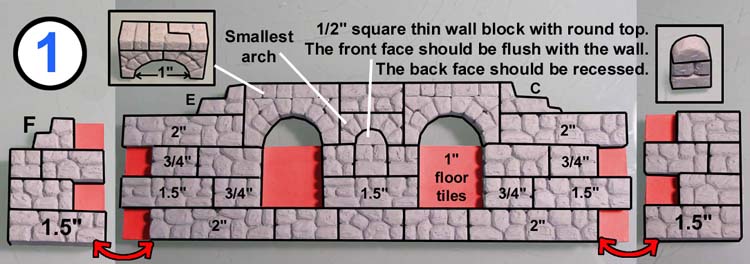 |
|---|
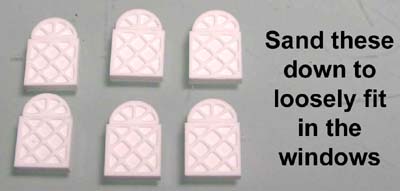
| 2. | Glue together the plastic window inserts. When dry, sand them down to loosely fit into the window frames. If they fit too tightly, then they will not fit after the walls are painted. Do not glue them into the walls until after the inserts and walls are painted. |
|---|---|
 |
| 3. | The blocks shown in blue are the thin wall blocks from mold #75. These are blocks you can stand on end and both sides will have stone texture.. I added a full photo of the finished piece above so you can see that the blocks are thinner. I will end up putting a bookshelf in that spot later on. |
 |
|---|
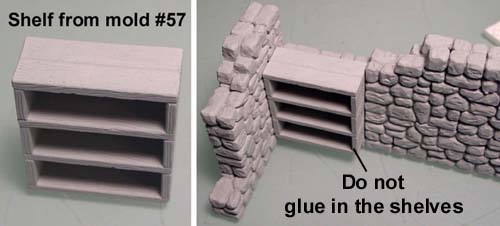
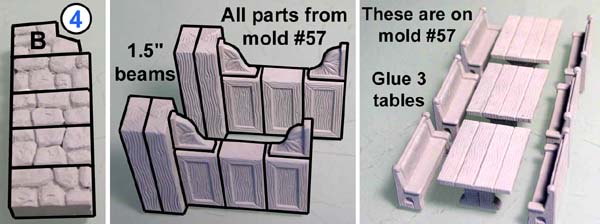
| 4. | Glue together the shelf from mold #57. Be sure the thin plank is on the bottom of the shelf and not the top. This shelf unit will fit into the wall as shown. If it's too tight, sand the left side of the shelf until it fits loosely. Do not glue the shelf in. It will be glued in after everything is painted. |
 |
|---|
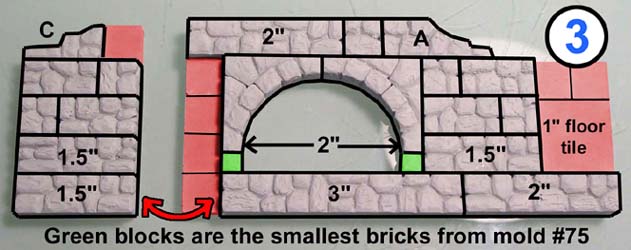
| 5. | The arch in this photo is the 2" wide arch. The blocks shown in green are the smallest brick on mold #75. These tiny blocks measure 1/4" x 1/4" x 1/2". |
 |
|---|
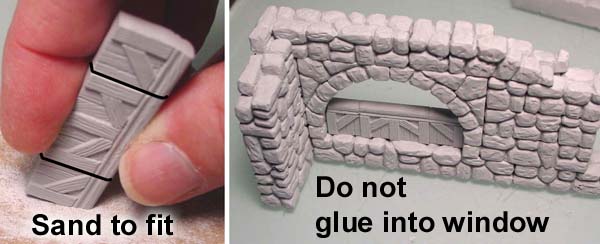
| 6. | Glue the railing together as shown in the first photo. When dry, sand off the top edges so it will fit into the window area on this wall. Do not glue it into the window until after all the pieces are painted. |
 |
|---|
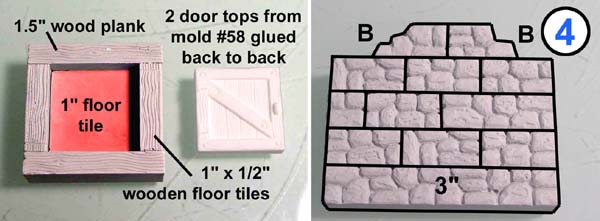
| 7. | The small door frame is made from the 1.5" wood beams from mold #57 and the 1/2" floor tiles from mold #221. Glue 2 door tops from mold #58 back to back. |
 |
|---|
| 8. | 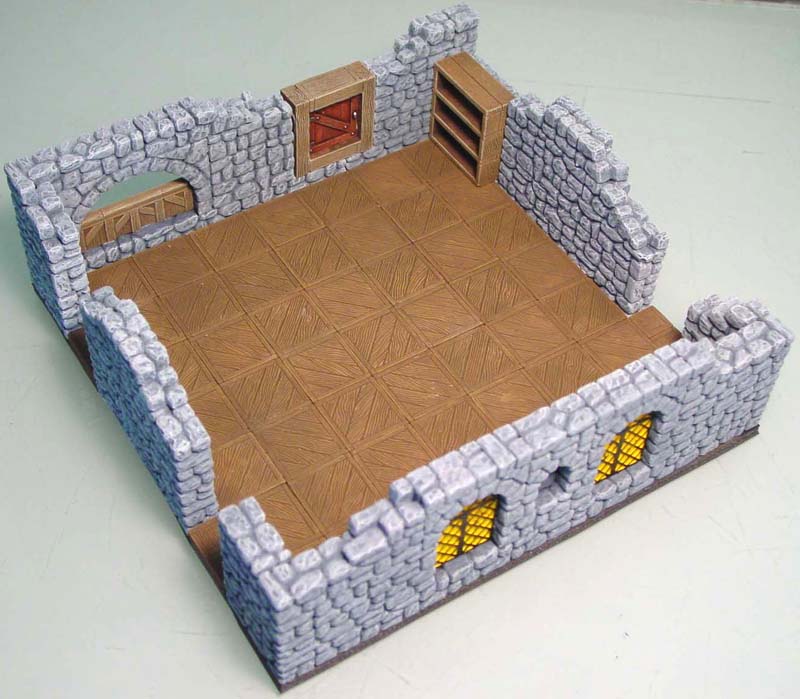 |
|---|
Building the Booths
| 1. | 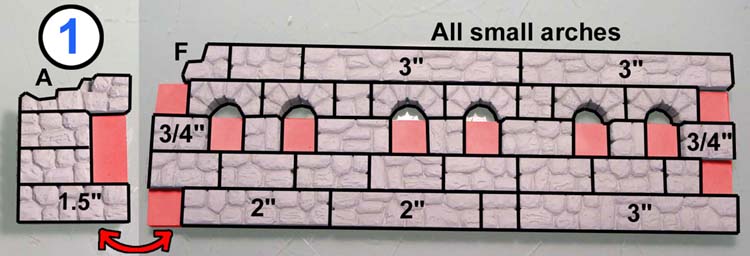 |
|---|
| 2. | Glue together the plastic window inserts. When dry, sand them down to loosely fit into the window frames. If they fit too tightly, then they will not fit after the walls are painted. Do not glue them into the walls until after the inserts and walls are painted. |
 |
|---|
| 3. | 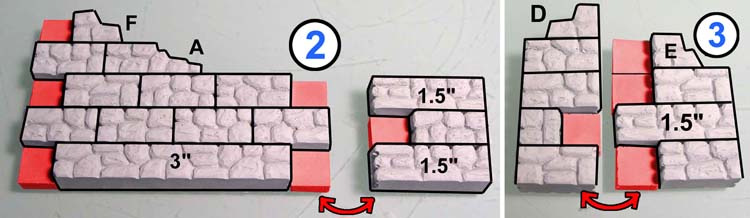 |
|---|
| 4. | Glue together 2 booth dividers using the pieces from mold #57. Glue together the 3 tables, also on mold #57. |
 |
|---|
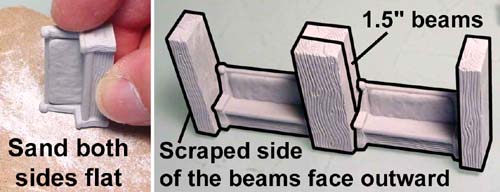
| 5. | One part of the walls will be made from benches and beams. Sand the ends of two benches so they are flat. Glue these benches between the beams as shown. Be sure to position the beams so the scraped sides are facing away from the benches. |
 |
|---|
| 6. | On the first photo, do you see all the small wooden squares?. Those are where the benches will go. Since I was starting to run out of the 1" x 1/2" floor tiles, I decided to start using some of the small squares instead. I used the diagonally slanted floor tiles and alternated them to make a diamond pattern on the floor. |
 |
|---|
Bedroom with a Large Window
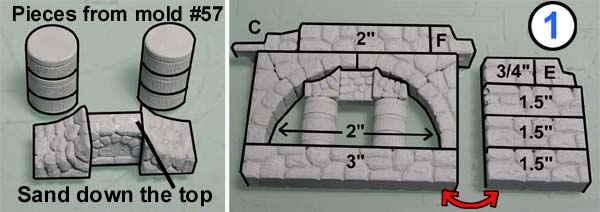
| 1. | Glue the pieces shown from mold #57. When dry sand the top so it will fit properly inside the arch. |
 |
|---|
| 2. |  |
|---|
| 3. | I used the diagonally slanted floor tiles and alternated them to make a diamond pattern on the floor. 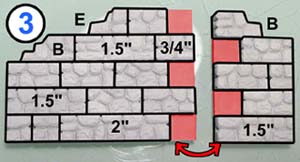 |
 |
|---|
Bedroom with a Recessed Arch
| 1. | The two arches shown are 1" wide inside. They are also topped with stone floor tiles to make them the correct height. |
 |
|---|
| 2. | 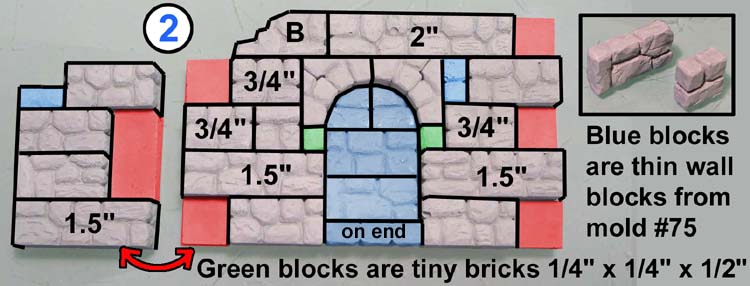 |
|---|
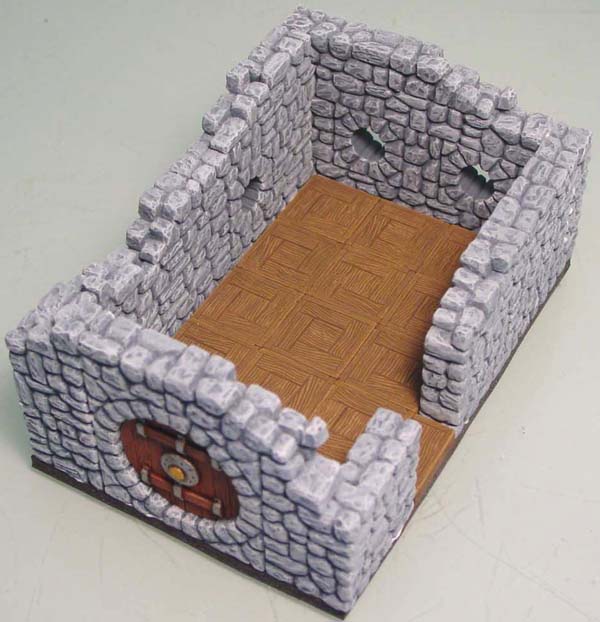
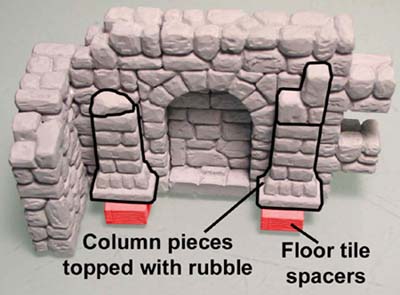
| 3. | This is a tricky section because it uses a variety of blocks. The blocks shown in blue are the thin wall blocks found on mold #75. The block at the bottom of the arched area is placed on it's edge with the scraped side of the block facing you. The tiny blocks shown in green are the smallest bricks found on mold #75. After the wall is assembled, add the column blocks to either side of the arch. Be sure to space them up with floor tiles (do not glue the floor tiles). These columns are topped with bits from mold #75. Just use any small bits you want. |
 |
|---|
| 4. |  |
|---|
Building the Kitchen
| 1. | 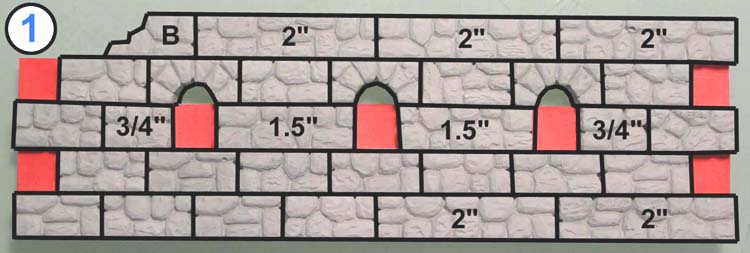 |
|---|
| 2. | 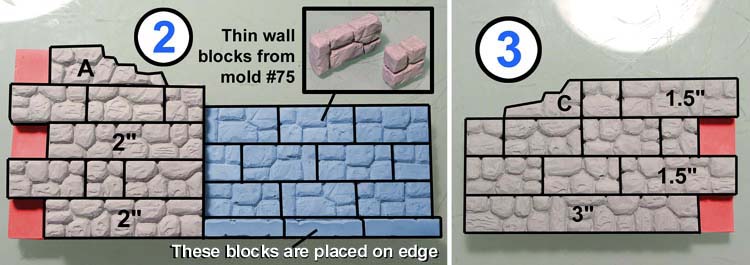 |
|---|
| 3. | 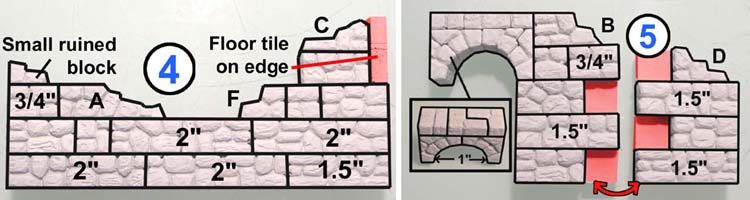 |
|---|
| 4. | The top row of the floor tiles are stone and the rest are the horizontal wooden planks. I've alternated the pattern from horizontal to vertical on every other tile. I show instructions for how to build the ovens on the back wall on the next page. The two shelf units are from mold #57. |
|---|---|
 |
Building the Cellar
| 1. | 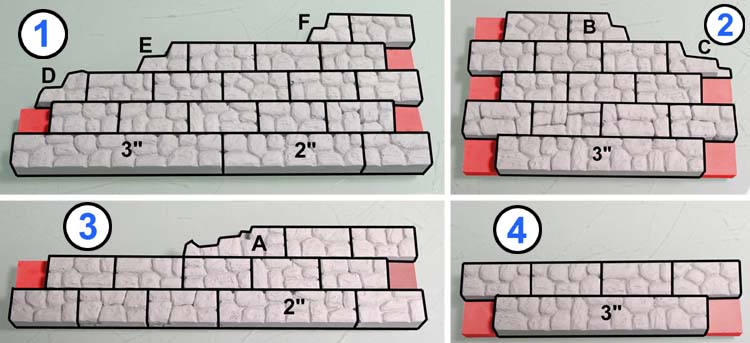 |
|---|
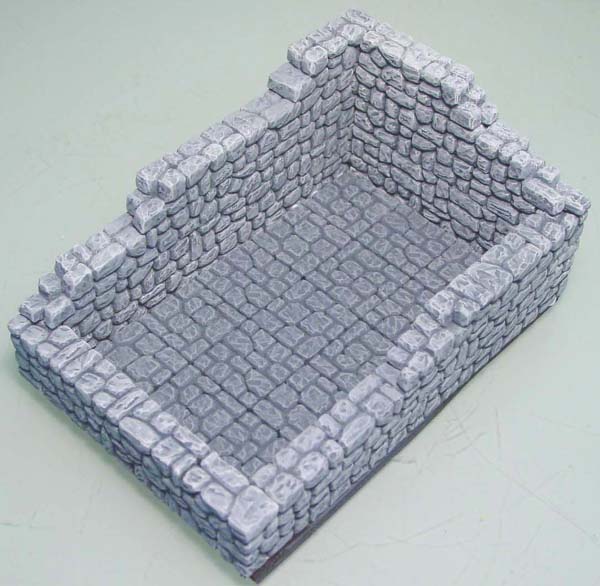
| 2. | This room was just something I threw together using the left over blocks. The idea was to have the hole in the kitchen floor lead down to the cellar. |
 |
|---|
| 3. | After the pieces are painted (painting instructions are on the next page), set the walls around the floor and draw around them with a pencil. Remove the walls and cut off the excess foam with a hobby knife. Afterwards you can glue the walls onto the foam for the finished room. |
|
|---|