Steel Bridge Building Instructions
|
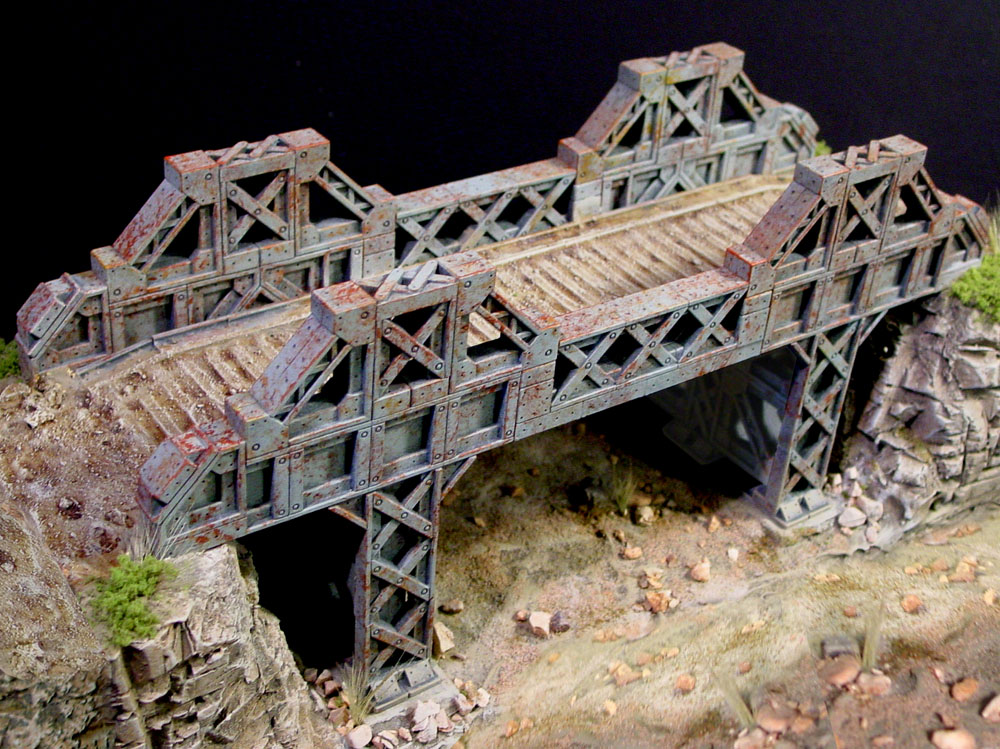
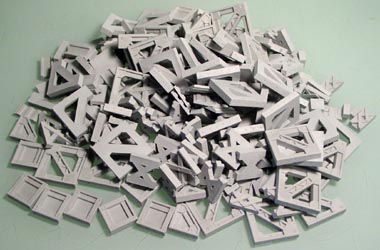
This page contains instructions on how to use mold #274 to build the steel Bridge. You will have to cast the mold 16 times to build the bridge. Click the photo for a larger view. |
|
About Mold #274
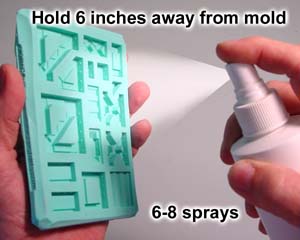
| 1. | Since this is a mold of steel girders, if you get any air bubbles in the castings they will look very odd. The best method of casting these pieces is to use a spray "surfactant" and a vibrating table of some kind. I show how you can use these on the Advanced Casting Instructions page. Using this method, most of the air bubbles will be eliminated giving you nearly perfect castings. |
 |
|---|
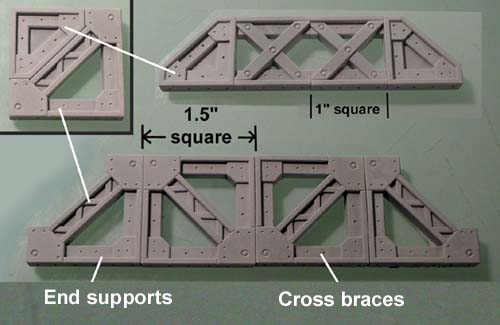
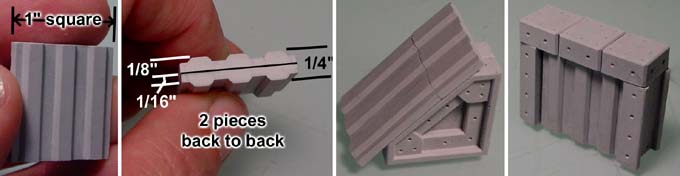
| 2. | The end supports and cross braces are the easiest pieces to see how to use. There are both 1" square and 1.5" square braces on this mold. Since you won't use as many end supports, I made them so they can fit together to make a usable square. |
 |
|---|
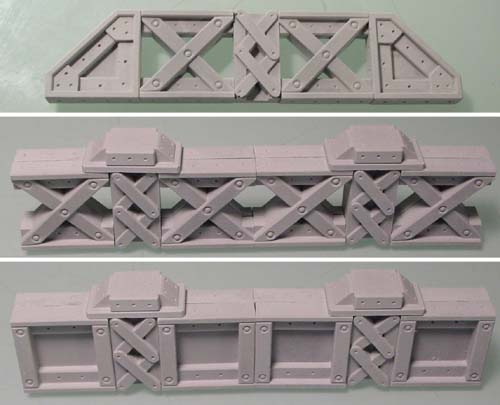
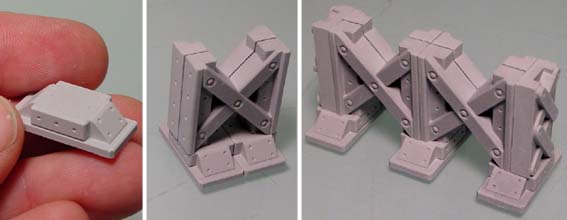
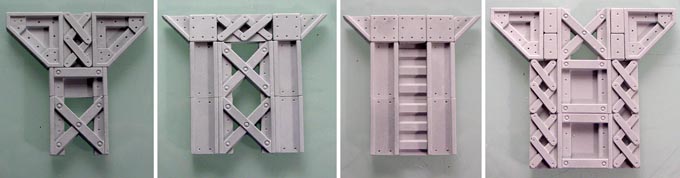
| 3. | These photos show different combinations using the 1" cross braces, the 1" slabs and the 1" x 1/2" small crosses. In the top photo, it looks a bit odd to have the small crosses end abruptly. To fix this, I used the footer piece as a cap to finish off the top. In the bottom photo you see the 1" slabs. The inner design is actually a rectangle, so you want all the rectangles to go the same direction when building with these pieces. |
 |
|---|
| 4. | This is the footer piece. Its main use is to support the bottom of the cross braces. |
 |
|---|
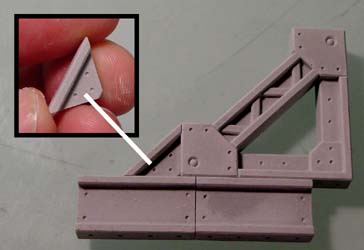
| 5. | This small piece is an angle brace. Its main use is to finish off the corners of your design. There will be many areas where an abrupt ending would look odd and these help the design flow a little better. |
 |
|---|
| 6. | This 1" square is a steel siding piece. There is a full square and a half square on the mold. These can be used for siding or corrugated steel roofing. For the bridge I ended up using this piece for its floor. |
|---|---|
 |
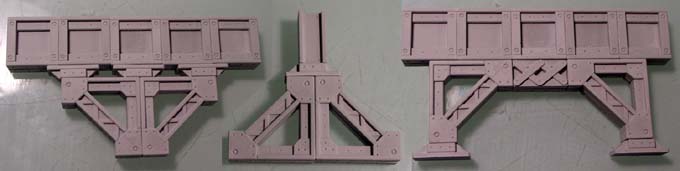
| 7. | Below are a few more ideas on how these steel pieces can be used. |
|---|---|
 |
Basics on Bridge Building
I feel this is the easiest way to plan the bridge you want. Since everyone needs a different size of bridge, these instructions cover the basics on planning them.
| 1. | First, I suggest you cast mold #274 lots of times! These blocks are really useful and you will find many ways to use the extra blocks in other projects. If your bridge is 12" long and over, cast this mold 20 times at least. Then sort the blocks so you can find the blocks you need. |
 |
|---|
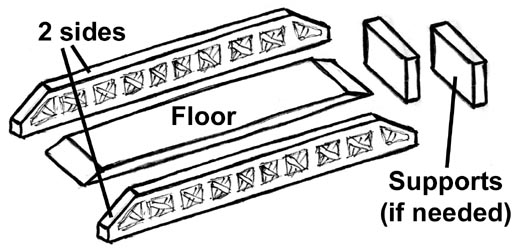
| 2. | A bridge can be made from these basic parts; 2 sides, a floor and supports (if needed). I'll cover each of these parts separately. |
 |
|---|
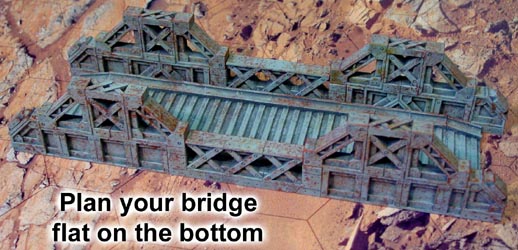
| 3. | Plan your bridge to be flat on the bottom so you can set it onto a flat map. This way, you can use your bridge anywhere you want (even on flat maps) without any supports at all. Supports really are not needed unless you have a very long span. |
 |
|---|
| 4. |
Be sure it is long enough to set firmly from one edge of the cliff to the other. Measure the width before you add the sides on so that any models you have (such as tanks or vehicles) will fit onto the bridge. Be sure the width you choose is in 1/2" increments. If not, it will be difficult to get your supports to line up on either side of the bridge. |
|---|
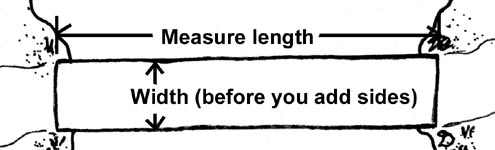 Measure how long and wide you want your floor to be.
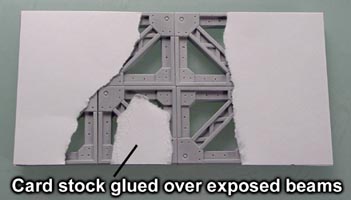
| 5. | If your floor ends up being covered with dirt or pavement you do not have to use any blocks to make it. Cardboard would work just fine. However, if you want to be creative you could glue some torn card stock (or something thicker) over a steel grid for a ruined bridge. Using blocks for the floor is nice because your floor will end up being an exact width in 1/2" increments, which is important if your bridge uses supports that will need to be flush on the sides. |
 |
|---|
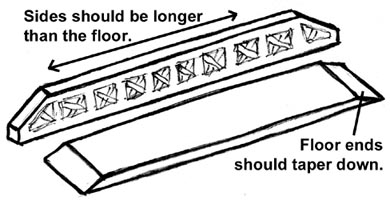
| 6. | The sides of the bridge will look better if they are longer than the floor. I would extend them at least 1/2" on each side. Your bridge will look more natural if the ends of the floor taper down on each end. Just imagine trying to drive across the bridge with a vehicle. |
 |
|---|
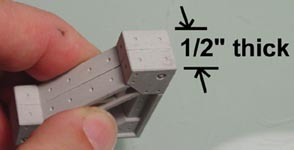
| 7. | The sides will usually be 1/2" thick. This is because you will be gluing blocks back-to-back which are 1/4" thick. |
 |
|---|
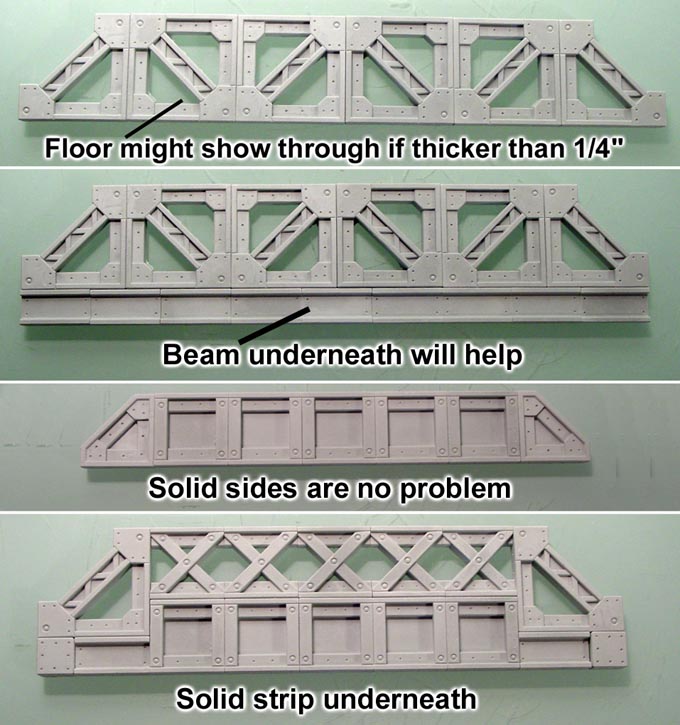
| 8. | When making the sides of your bridge, make the bottom edge solid if your floor ends up being thicker than 1/4". You don't want a cardboard support showing through any open beams on the sides. |
|---|---|
 |
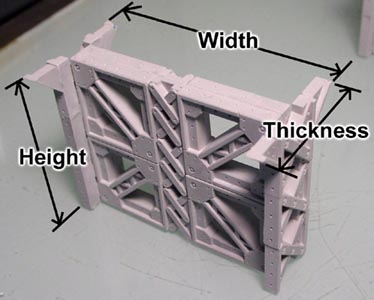
| 9. | Now for the supports. Most small bridges will not need supports but you may need them if your bridge seems a bit too long otherwise. The height will be the measurement from the bottom of the bridge to the floor of the canyon. The width will be the total outside width of the bridge. The thickness is the side of the support that you will see when looking at the side of your bridge. The thickness can be any width but it should be the most decorative part of the support since it's the side you are always going to see. |
 |
|---|
| 10. |
Then measure the height from the floor of the canyon to the yardstick. This will probably be some odd measurement. You will want your support to be slightly shorter than that height. What we will do is add a foam block under the support to make up the odd height difference. |
|---|
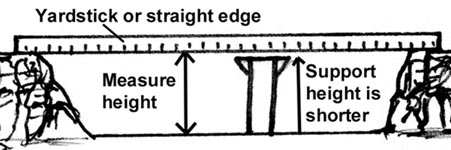 To find the height of your support, place a yardstick or straight edge across from hill to hill.
| 11. | Now that you have the height of your support and you know the width (which is the total width of the bridge, sides+floor), you can start playing around with the blocks. Of course the last measurement you need is the thickness of the support but that really isn't very important. You just want something that looks like it belongs under the side of the bridge. Here are a few ideas to get you started. Imagine these placed under the sides of the bridge. Remember, your supports should be a little short from reaching all the way up to the bottom of the bridge. |
|---|---|
 |
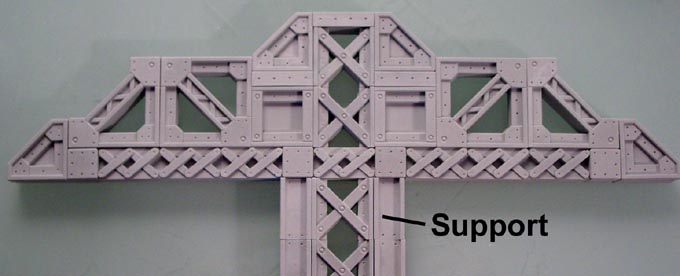
| 12. | You can make a really outstanding bridge if you get the supports to look like they belong. For this example, I've carried the support design into the upper part of the bridge. This way it looks like the support belongs in this position. Also, you will notice that the bottom strip of the bridge is solid to completely hide the sides of the floor. |
|---|---|
 |
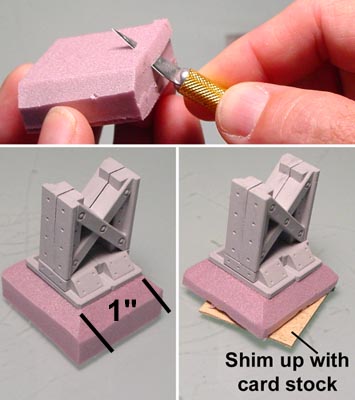
| 13. | Since the supports are a little short, I'm going to carve a foam block to place under it. Be sure your blocks are large enough to fit under the entire foot of the support. For this example, I've beveled the edge of the foam block to make it look more like a concrete pad. After carving the block, set it on the canyon floor and place your support on top of it. Check to see if your support touches the bottom of the bridge. If the block is too thick, take a knife and trim off the bottom until the support is the right height. If you cut off too much accidentally, you can always shim up the blocks using paper or card stock. |
 |
|---|
| 14. | Finally, be sure to keep your bridge in reasonable sized pieces. This will make them easier to paint. If you try and paint pieces that are too long and thin, they might fall apart on you. The sides of this bridge are made out of six pieces (three pieces on each side). Now have fun designing your bridge! If you have no idea what you want to do, then just build the bridge shown below. |
 |
|---|
Steel Bridge Building Instructions
In order to build the bridge, you will need 16 castings of mold #274. However, your bridge may not need supports underneath, or your bridge may need supports that are longer or shorter than mine. For that reason, I strongly suggest that you make several extra castings of this mold so you have the option to change how the supports under the bridge are made.
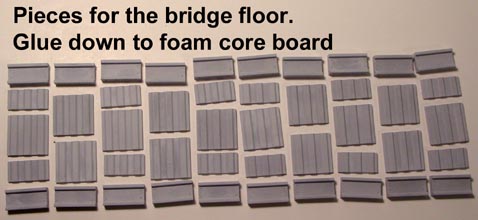
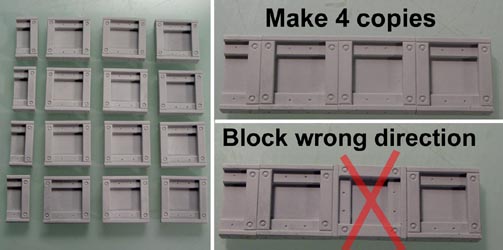
| 1. | You will need 16 castings of mold #274 to build this bridge. Gather these pieces for the floor of the bridge. These will be glued down to foam core board in the arrangement that you see them here. |
 |
|---|
| 2. | The easiest way to glue these down is to first push them all together then draw around them with a pencil. Then slide the blocks aside, put a bead of glue down onto the area and move the blocks back into position. Be sure to use a ruler to keep the edges straight. |
 |
|---|
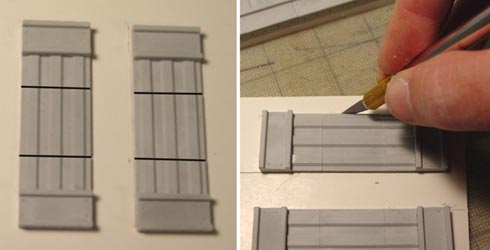
| 3. | Also glue the 2 separate floor pieces shown here. When dry, take a hobby knife and cut them out of the foam core board. Also cut out the main floor as well. |
 |
|---|
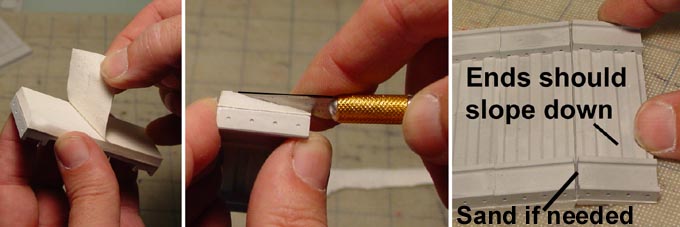
| 4. | We want both ends of the floor to slope down. To do this, I'm going to cut the bottom foam at an angle. Start by stripping off the back paper, then cutting the foam with a knife. You may also need to sand the edges so you don't have a large gap between blocks. |
|---|---|
 |
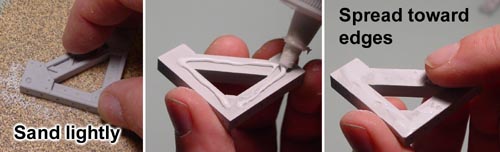
| 5. |
Many of these pieces will be glued back to back. This is the best method to get a strong glue joint. Start by lightly sanding the back side of the blocks. Then place a bead of glue on the back. Spread the glue towards the edges using your finger. Since the outside edges of the blocks will be slightly higher than the center, that's where you need to put the glue. |
|---|
 Gluing Blocks
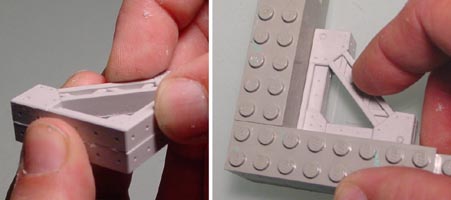
| 6. | Place the pieces together back to back. I'm using an "L" made out of Legos as a guide to keep the pieces together evenly after you set them together. |
 |
|---|
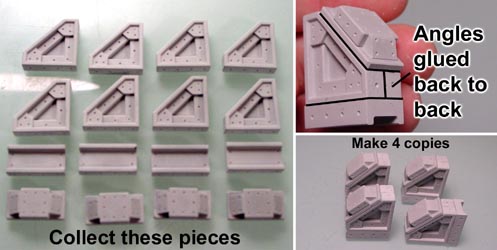
| 7. | Collect the pieces shown. Glue 2 angle pieces back to back, glue them onto an i-beam and then glue the footer onto the slope. Make 4 copies of these. |
 |
|---|
| 8. | Collect the following pieces shown below. Glue all of the angles and 1" cross pieces back to back. |
|---|---|
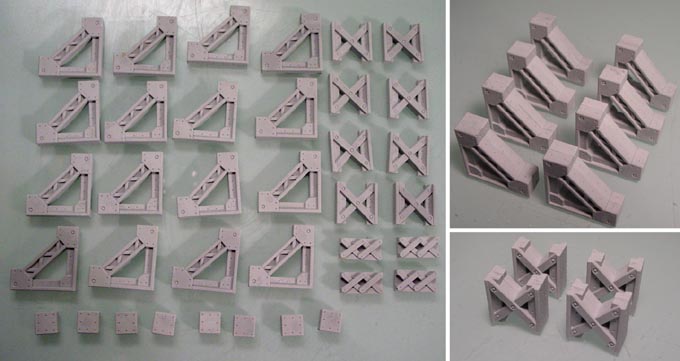 |
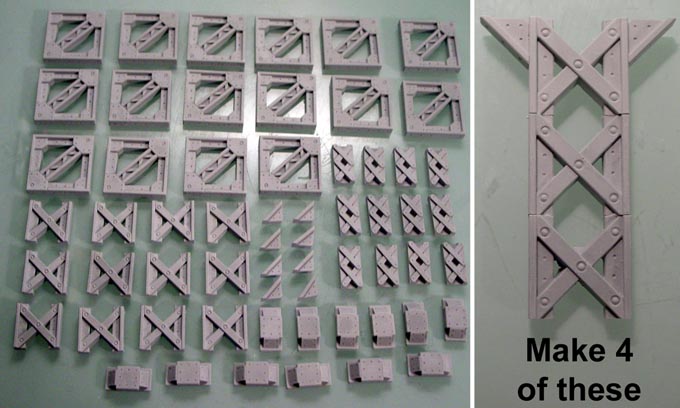
| 9. | Take the pre-glued pieces above to make 4 copies of this top brace. There are two 1/2" square blocks underneath the large "X" brace. Make 4 copies of these. |
 |
|---|
| 10. | Collect the steel slab pieces. Glue together 4 copies of this strip. These all have a half block on one end. Be sure to get all of the steel slabs going the same direction. They may look symmetrical at first glance but they are not. |
 |
|---|
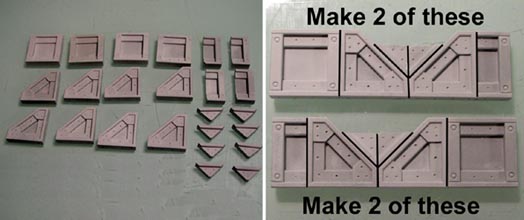
| 11. | Collect the pieces shown. Glue together 2 copies of each strip shown here. It may be hard to see at first, but there are left hand and right hand versions of each strip. |
 |
|---|
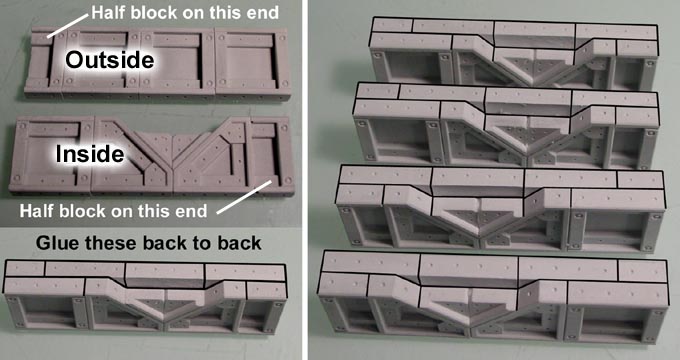
| 12. | I'm going to glue the outsides (from step 10 above) to the insides (from step 11 above). You will end up with 4 wall sections as shown below on the right. Keep in mind that there will be 2 left hand pieces and 2 right hand pieces. |
|---|---|
 |
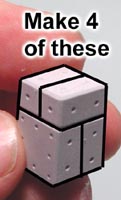
| 13. | 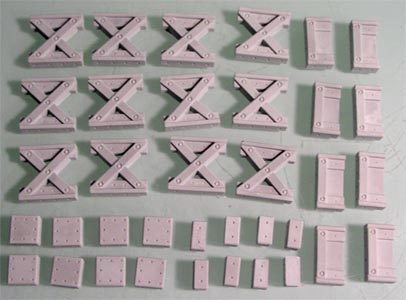 |
Glue together 4 copies of the block shown here. This is made up of two tiny blocks and two 1/2" square blocks. I glued all of the scraped sides of the blocks towards each other so no scraped sides are shown on the finished block. |
|---|
 Collect the pieces shown.
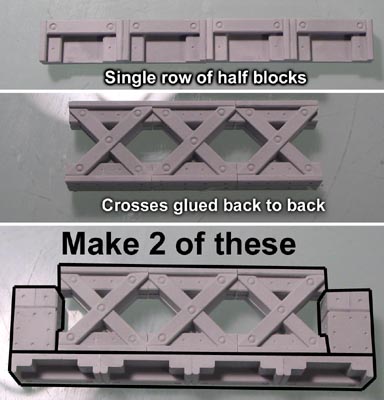
| 14. | Glue together a single row of half blocks. Do not glue anything to the back of them.. Next, glue 3 crosses back to back. The finished crosses will be 1/2" thick. Then glue them together side to side. Finally assemble the piece you see on the bottom. This will also use the 4 squares you assembled in the step above. Make 2 copies of this rail piece. |
 |
|---|
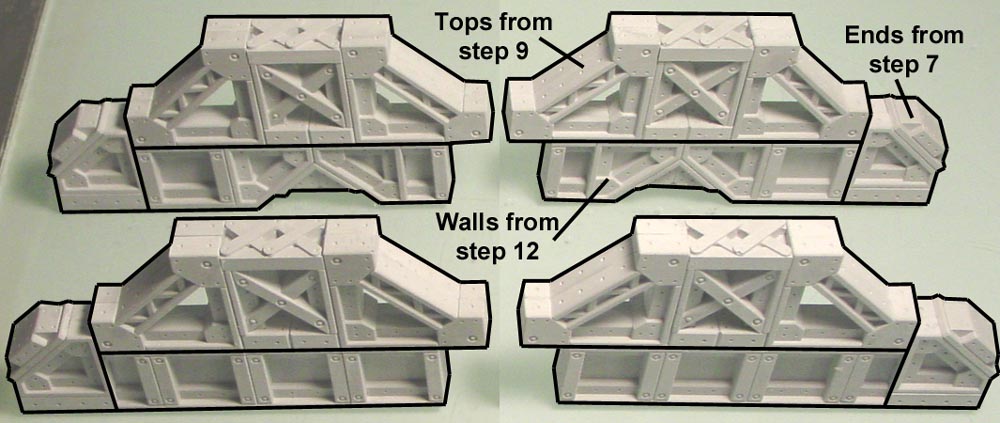
| 15. | Using most of the pieces we've assembled so far, glue them together to make these four bridge side pieces. Click on the photo below for a larger view. |
|---|---|
 |
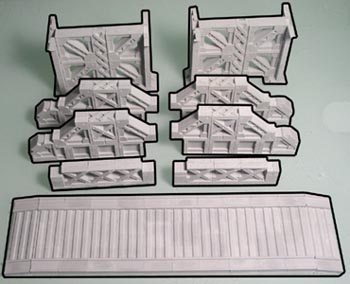
| 16. | Here are all of the pieces of the bridge so far. Do not glue them together yet!. You will want to paint them first. I'm going to add supports under this bridge for the display I'm working on. |
|---|---|
 |
| 17. | If you want your bridge to have supports, then collect the pieces shown. Your supports may have to be different in height depending on how deep the valley is you are trying to span. The valley on my example is a little over 3.5" deep. The hard part about following these instructions is that you may not need supports as long as mine. In that case, you'll need to improvise and make these pieces longer or shorter. For this reason, I suggested at the beginning of these instructions that you make several extra castings of this mold just in case you needed different pieces for your supports. |
|---|---|
 |
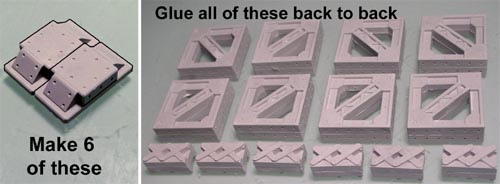
| 18. | Glue together two footers. Make 6 of these footer groups. Also glue the pieces on the right photo back to back. The same piece goes on the front and back. |
 |
|---|
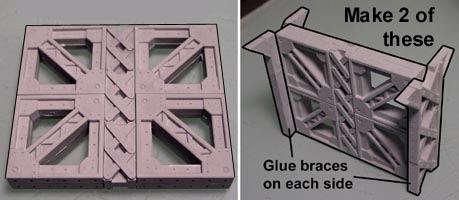
| 19. | Glue together this group of blocks. Then glue the supports on each side. You will want to make 2 of these. |
 |
|---|
| 20. | Glue the footers onto the bottom of these supports. The center footers are turned differently than the ends. This will complete all of the pieces needed for this bridge. 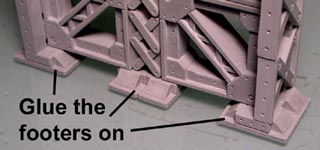 |
 |
|---|
Since everyone's terrain setup is different, I'm not going to show instructions on making this particular foam hill. However, you can find instructions for making rocky foam hill terrain on our Tips & Tricks 9 Page.
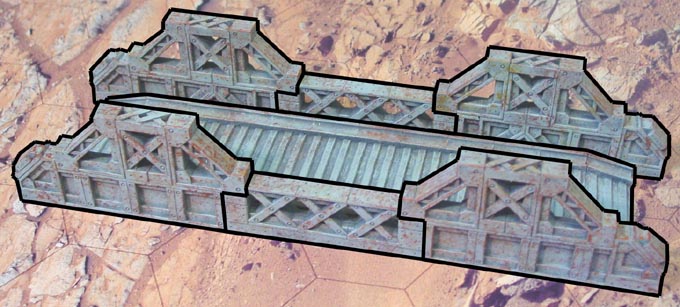
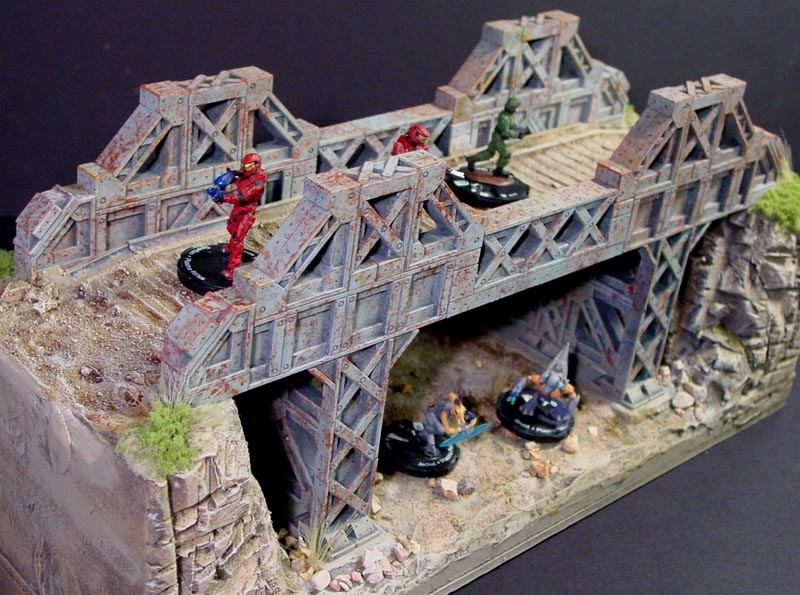
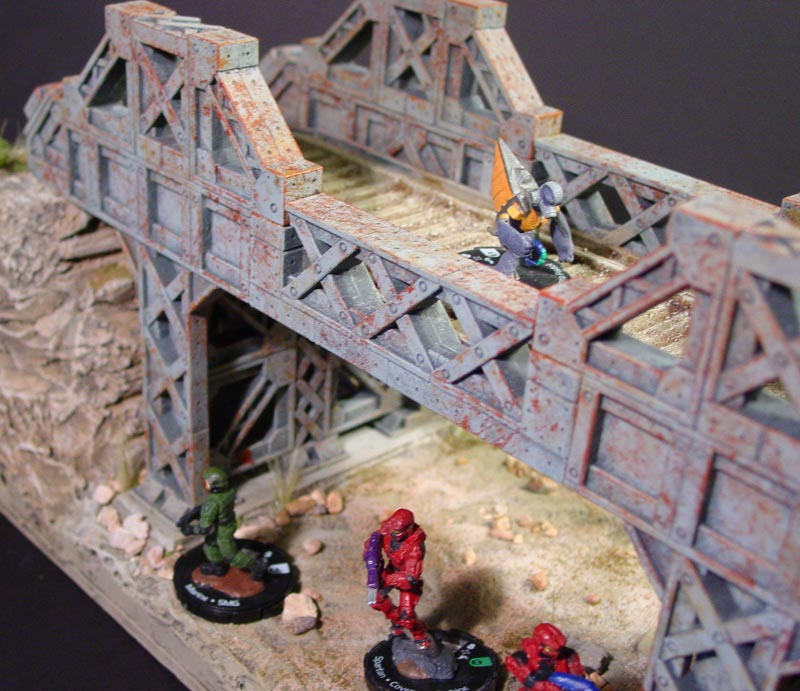
For instructions on painting the bridge and doing the rust effects, go to the Painting Instructions Page. Here are a few finished photos of the bridge. Click on the photos below for a larger view.
 |
 |