Tips & Tricks
Making a Wood Shingled Roof
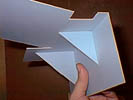
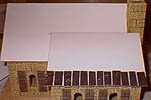
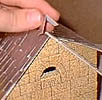
| 1. | First make the roof out of some stiff card stock such as a cereal box or matt board. If you have a template (like for the Dragon's Inn) use it as a guide to cut your pieces. If you're making your own design, measure and cut as needed. This example was made out of matt board. |
 |
|---|
| 2. | We are going to make the shingles out of a cereal box. Please note that you don't have to do the foil thing to make the shingles. If you want, just cut shingles straight from the cereal box and glue them on. For this example, I'm doing the foil thing because it adds a lot of detail to the shingles. |
|---|
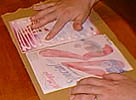
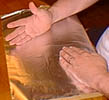
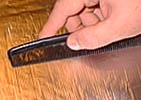
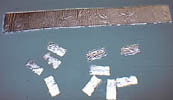
| 3. | Cut the front and back of a cereal box. Cover them with a thick even layer of white glue. Cover them with foil (dull side up). Using a comb, texture the foil with heavy grooves. Be sure they all go the same direction (like wood grain.) |
 |
 |
 |
|---|
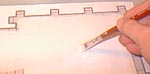
| 4. | Let the foil dry overnight. Cut the foil into 1 inch strips (across the grain). The strips don't have to be perfectly straight or even. Cut these into 3/8" pieces for shingles. Make some shingles slightly thinner or wider. |
 |
|---|
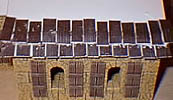
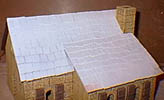
| 5. | Starting at the bottom, glue the shingles across the roof. The next row should be about 1/2" above the first, overlapping the first row. Be sure to stagger the shingles so they cover the gaps in the first row. Let the shingles hang off the sides, we'll trim them later. |
 |
 |
|---|
| 6. | Once you get both sides of the roof shingled, it's time for the peak. These shingles will need to be longer to reach over both sides. When finished with the peak, trim the excess shingles hanging over the sides of the roof. |
 |
 |
|---|
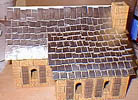
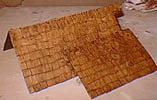
| 7. | Spray paint the roof white. You could use white house paint, but it's a little harder to use. Let the white paint completely dry. Thin down some dark brown paint. Brush it on the roof (drench it) to make sure it goes in all the cracks. Using a soft rag, wipe the excess paint off. The paint will act sort of like a stain. Let it dry, then reapply the paint until it's as dark as you want. |
 |
|---|---|---|
 |
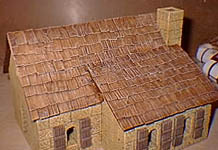
| 8. | When dry, mix white with a touch of brown and dry brush gently on the roof to bring out the highlights. Don't forget to protect the roof with a spray of flat lacquer or varnish. Your roof is now finished! |
 |
|---|
Making a Door
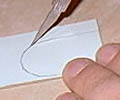
| 1. | Place a piece of matt board or thick card stock up against the doorway. Using a pencil, trace around the inside of the doorway. Using a hobby knife, cut out the door. For a thicker door, glue 2 pieces together and cut them out. |
 |
 |
|---|
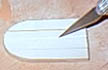
| 2. | Using a knife, cut grooves into the door to represent the separate planks of wood. Be sure to cut them on both sides of the door. |
 |
|---|
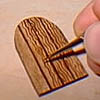
| 3. | Paint over the door with brown paint. Using a soft rag, wipe off the excess. The grooves should show up dark. If the door needs to be darker, reapply the paint. Paint wavy lines in dark brown paint to represent the wood grain. |
 |
|---|
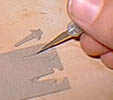
| 4. | For the hinges, draw and cut them out of thin card stock (cereal box) using a hobby knife. If you cringe at doing small details, just cut straight strips to represent the iron bars holding the planks together. |
 |
|---|
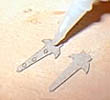
| 5. | Place dots of superglue gel (cyanoacrylate) on the strips. Let them dry, or spray them with a catalyst (zip kicker) to set the glue quickly. Paint the strips black, then drybrush them with silver paint. |
 |
|---|
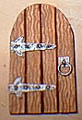
| 6. | Glue them on the painted door. For the door handle, I used circles of wire for the pull ring and holder glued to a square of thick paper. I'll stand the door up and glue it to a small square of clear plastic (thin enough not to be seen but thick enough to stand the door up). Using the plastic as a base, I can stand the door up anywhere in the building, placing it in an open or closed position. |
 |
|---|
Making Terrain for the Traveler's Bridge
Just a few quick notes I wanted to mention. First of all, I'm no expert when it comes to terrain. The techniques I use here pale in comparison to most model railroaders who do a fantastic job on scenery. All of the ideas for this terrain project originally come from model railroad how-to books.
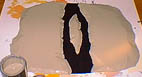
| 1. | I started off with a piece of matt board about 2 feet square. Matt board is the stuff you matt pictures with before you put them in a frame. I painted a solid black strip down the middle about 12" wide and let it dry. |
 |
 |
|---|
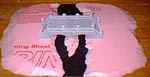
| 2. | The main ground will be made of polystyrene foam insulating board. This is the stuff they use for sheeting on houses before they put siding on. You can get it at any lumber yard and usually comes in pink or blue in thicknesses of 1/2", 1", 2" and even 3". Lay the bridge on the board and use a marker to draw the river on the board. Indicate where the top of the bank and the bottom of the river will be. |
 |
|---|
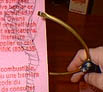
| 3. | I'm using a hot foam cutter to shape the edges of the board. This one was called the "Hot wire foam factory" and was pretty expensive (about $100). You can probably find cheaper ones, but this included lots of useful tools and I've been really happy with it. | 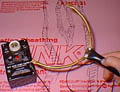 |
 |
|---|
| 4. | After cutting and shaping the edges of the foam, I'll place it on the matt board to see how the river and bridge line up. If everything looks good, I'll glue the foam down to the matt board. |
 |
|---|
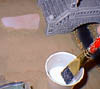
| 5. | I'll use an earth colored latex paint to paint the foam. The easiest way to get earth color is to put some dirt in an envelope and take it to a hardware store (they'll mix any color you want). Pick out a color of paint that matches the dirt, only pick a color about 2 shades lighter. Real dirt is too dark. It only looks lighter because it's outside in the bright sunlight. To compensate for indoor lighting, the paint color has to be lighter. |
 |
|---|
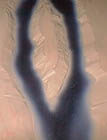
| 6. | The next step is to use an airbrush to blend the colors into the black. This will give the illusion of the bank sliding into the water. If you don't have an airbrush, thin the paint and try to gently fade the brown into the black river using a brush and several thin coats. |
 |
|---|
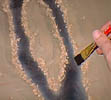
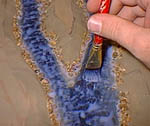
| 7. | Most of the scenic material for the rest of this project like matt cement, rock, ground foam and scenic cement you can buy from a hobby store or model railroad shop. Sprinkle some rock into the river and gently brush it along the banks. Once it's positioned, spray the rocks with scenic cement and let it dry overnight. It will have to dry completely to hold the rocks in place. |
 |
 |
|---|
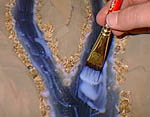
| 8. | Paint the river with a thick coat of acrylic gloss medium. It's the consistency of Elmer's glue and you can find it in any craft store. Let it dry for about 20 minutes and dab a paintbrush into it to texture it. This will form the ripples in the water. You can also add a tiny dab of blue to the gloss medium if you want to change the color of the water. Additional coats of gloss medium can add more texture and make the water look deeper and more glossy. The real illusion of water lies in the blending of the bank color into the water along with the glossy coating of the acrylic gloss medium. |
 |
|---|---|---|
 |
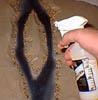
| 9. | Be sure the acrylic gloss medium is completely dry before you continue! Paint on some scenic cement where the road should be and sprinkle some fine brown sand or foam to make the dirt road. |
 |
 |
|---|
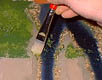
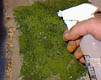
| 10. | Paint scenic cement on the rest of the ground and sprinkle ground foam for the grass. I'm using 3 different colors of green to give some variety. |
 |
 |
 |
|---|
| 11. | For bushes, I take some coarse ground foam and place a few small piles around. Then I drip some scenic cement directly on it to glue it down. |
 |
 |
|---|
| 12. | To finish the layout, remove the bridge. Use a brush to sweep away all the excess green foam out of the river and off of anywhere else you don't want it. Now spray scenic cement over the grass to glue it down. Do not overspray onto the river! Use your hand or something else to keep the matt cement off the river, or you'll give the river a flat finish (it should stay glossy to represent water). Let this dry overnight. You may want to reapply a few more coats to hold the foam down. |
 |
|---|---|---|
 |
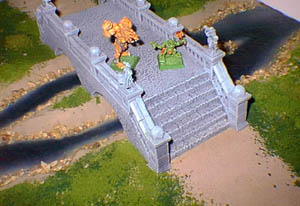
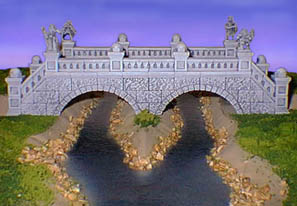
| 13. | These photos show the finished terrain with the bridge. Since the ground is mostly flat, you can still easily use it for tabletop wargaming. | |
|---|---|---|
 |
 | |
Painting a Stone Texture for a Floor
Sometimes you may want to paint a stone texture on a flat surface. Usually it's in a place where you don't have room for blocks or as an afterthought on an already built model.
To tell you the truth, I've never really done this before so we'll see how it works out. I'm copying what I've seen painted on game boards and such.
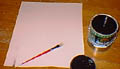
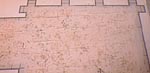
| 1. | We'll use the same paint colors that appear on our building. The gothic church (which this floor is for) is painted using brownish-gray tones. The church was painted using a dark, medium, and light gray-brown. I started by painting the light color first, covering the entire area with the lightest color. |
 |
|---|---|---|
 |
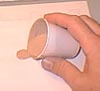
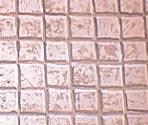
| 2. | Pour a little of the medium color paint on a piece of scrap. Wad up a piece of notebook paper. Dip it into the paint and stamp it around on the board to form a broken pattern. Using this method, texture the floor surface. |
 |
 |
|---|---|---|---|
 | |||
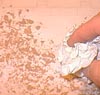
| 3. | Pour some of the dark brown-gray on and do the same. This should give the floor a kind of grainy rough texture. |
 |
|---|
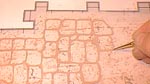
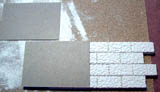
| 4. | Using the medium color, paint the outside shape of stones on the floor. I'm going to try an irregular stone pattern and see what happens. |
 |
|---|
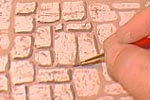
| 5. | Using the dark color, outline the bottom and right side of each stone. Be sure the color is on the edge of the stone, not in the middle of the crack between them. Afterward, add white to your lightest color and paint the upper and left sides of each stone. |
 |
|---|
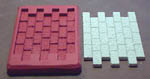
| 6. | After placing the floor under my gothic church, I realized that I don't like the result. The floor stones look OK, but they're too big to look right for this church. Also, the colors ended up a little too brown for my taste. Since I'm fairly picky about how my models look, I'm going to do this again, only change a few things. |
 |
|---|
| 7. | I'm going to do the floor texture using the same method as before, only this time my colors are a little more gray than brown. |
 |
|---|
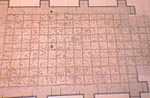
| 8. | This time we'll take the medium color and make smaller square stones. I used a ruler and measured out 1/2" squares and drew lines in pencil. Then I painted the lines thinner than last time. |
 |
|---|
| 9. | Using the darkest color, I went around the bottom left of each stone. Using the lightest color (with a little white added) I painted the top right of each stone |
 |
 |
|---|
| 10. | I'm much more pleased with the results this time. The stone size is more fitting and the color works better as well. Feel free to experiment with other types of textures. You can get nice results from spattering paint, or using other items to texturize such as a sponge or paint brushes. |
 |
|---|
Making Angled Walls and Walkways
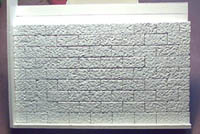
This section shows how to use mold #200 to make an angled edge around the bottom of a castle wall and a walkway around the top. This mold has several uses. Its main purpose is to make large wall building easy. Simply stack 2 halves together to make a complete wall section. Also, halves can be laid out flat to create roads or floor tiles. |
 |
 |
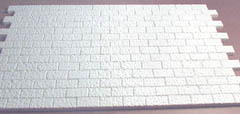 | ||
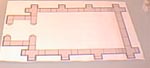
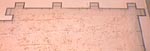
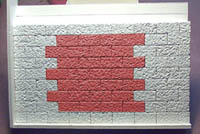
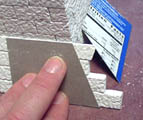
Look at the sample wall. I placed a wall section from this mold in the center of a group of regular blocks. Can you see where the wall section is? It's the section shown in red below. I was hoping to make large sections that would fit seamlessly into the existing blocks. |
| |
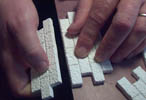
The large sections can easily break into smaller pieces. | ||
 |
 | |
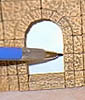
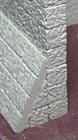
| 1. | The two things we're making are an angled wall along the bottom of a castle, and a walkway around the top. Please note: Sanding the pieces to the angles needed can be difficult. Be sure you cast several extra pieces to replace the ones you will break (I broke at least 3). I thought about making a mold that would create the angle at the bottom, but everyone has their own idea how high and what angle it should be. With this method, anyone can make the size they want. |
 |
|---|---|---|
 |
| 2. | Build the castle walls completely first (without the angle). Decide how many blocks high you want your sloped section to be and break off a piece of wall section to that height. For this example, my sloped section will be four blocks tall. |
|---|
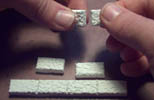
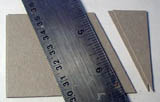
| 3. | Cut 2 pieces of cereal box as tall as your wall section. Stack them on top of each other and trim them at an angle. Lean the angled pieces along the corner of your wall to see if you like the angle of the slope. Recut the pieces until you get the angle you want. |
|
 |
|---|
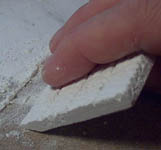
| 4. | Tape a piece of sandpaper to the table. Sand the top of the wall section at a steep angle. Also sand the bottom of the piece at a shallow angle. Test fit the piece to see if your angles are close. |
 |
 |
 |
|---|
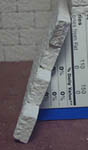
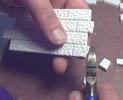
| 5. | To make one edge of the wall flat, use wire cutters (not pliers) to trim off the extra ends. Be sure to sand the edge flat when needed. This flat edge will go against an inside corner of the castle. |
 |
|---|
| 6. | Lay one of the angled card pieces against the wall section. Position the card as shown and draw a line along the edge of the wall. Carefully trim off the edge with wire cutters and sand it smooth. This edge should be beveled on the backside. |
 |
 |
|---|
| 7. | Follow the same procedure for the other wall sections. For inside corners, turn the angled card piece over. On the flat ends, trim down a piece of wall and glue it in to fill the gap. |
 |
 |
|---|
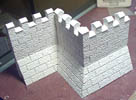
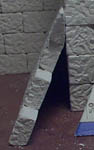
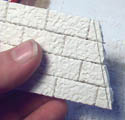
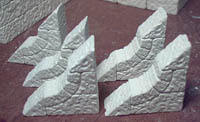
| 8. | The finished wall piece looks something like this. As I mentioned before, it's not an easy task to get the angles just right. If you need to fill in gaps, mix some plaster with glue to form a thick filler material. |
|
|---|
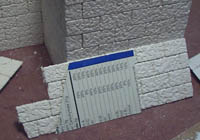
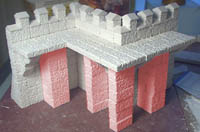
| 9. | Now for the walkway. For the braces on the walkway, I used the large rounded arches and sloped blocks from the Dragon's Inn mold #51 (they were left over from a previous project). The flat pieces of the walkway are just wall sections nipped off and sanded on the ends. To hold the walkway in place while it was being glued, I stacked up regular blocks underneath as a temporary support (shown in pink) |
 |
|---|---|---|
 |
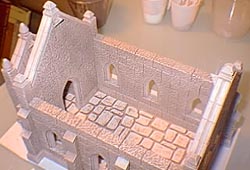
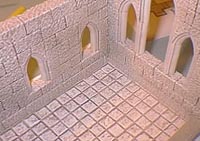
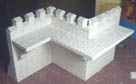
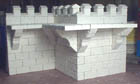
| 10. | Here's the finished walkway. Feel free to use spare blocks from other projects to dress up or support the walkway. |
 |
|
|---|