Tips & Tricks 25
|
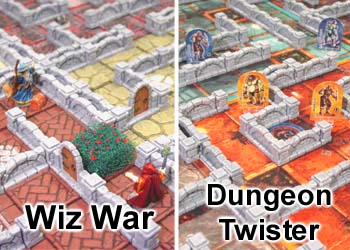
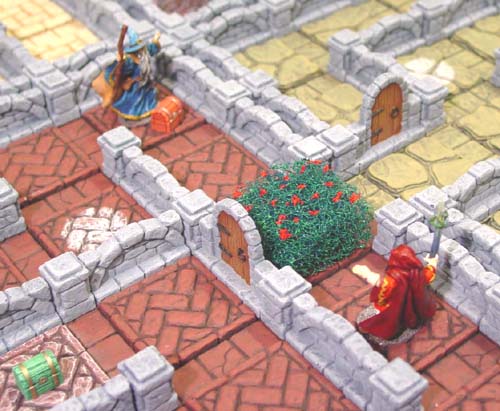
Instructions for building the Wiz War board are on our Wiz War Building Instructions page. Instructions for building the Dungeon Twister board are on our Dungeon Twister Building Instructions page. |
|
How to Use Mold #88
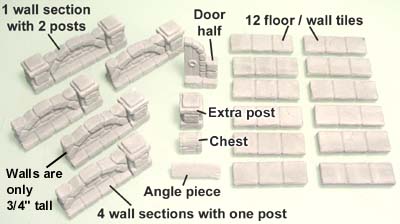
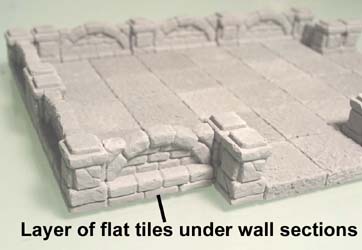
| 1. | These pieces are what you get from one casting of mold #88. The wall sections are only 3/4" tall so you can easily see the game board floor when you lay down card markers or tokens. The walls are also tall and solid enough to clearly show where they are, so you don't accidentally mistake your line of sight. |
 |
|---|
| 2. | I understand that most people will not like to use these walls for their average dungeon because they are so short. Please keep in mind that these were made strictly for game board use rather than for D&D and other role playing games. If you use these walls you can comfortably sit around a table and still see the game board floor without having to stand up and look down. Even though they are very short, they still feel like walls. They clearly mark the boundaries and make movement and line of sight much more clear. If you compare playing on a completely flat board to playing on one of these 3D boards, the game is much more fun and visually appealing, even with the walls so short. |
|---|
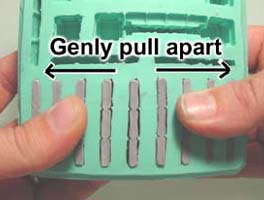
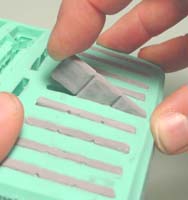
| 3. | The flat tiles are extremely fragile and will break easily. The best way to remove them is to gently spread the mold out around the pieces, trying to free one side of the tile from the mold. Don't pull it apart too far or you'll break the wall pieces. Then flex the mold the other direction enough to catch a corner with your finger and lift them out. |
 |
 |
|---|
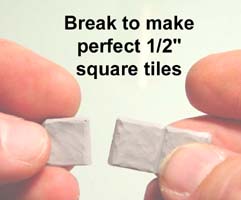
| 4. | The flat tiles can be easily broken into perfect 1/2" square tiles. If you only want wall sections, you can simply use these tiles to make a floor for any type of dungeon layout. |
 |
 |
|---|
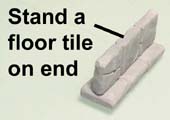
| 5. | If you stand a floor tile on top of another floor tile, you can use it to make wall sections that fill in odd lengths. |
 |
 |
|---|
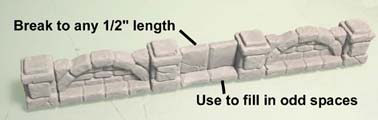
| 6. |
This will also help you to fit wall sections into odd lengths that you may need. When planning a dungeon layout, I prefer to put the walls on top of the flat tiles to give the walls a little more height. |
 |
|---|
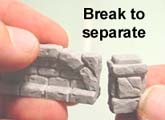 On the wall sections, you can easily break off the post ends.
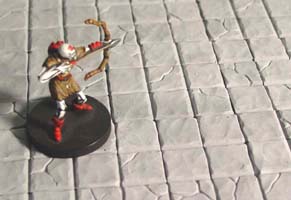
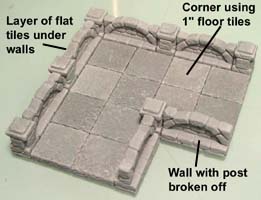
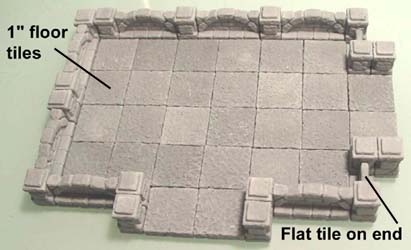
| 7. | This example shows how you can use the walls with standard 1" floor tiles. This works well for D&D and other 1" tile games. |
 |
 |
|---|
| 8. | These walls can also be used for rooms. Here you see the 1" floor tiles being used for the main floor. The wall sections are placed around the outside. I also placed the walls on top of the flat tiles to give them a little more height. The flat tiles were also used for the very short wall sections on the right side of the photo. |
 |
|---|
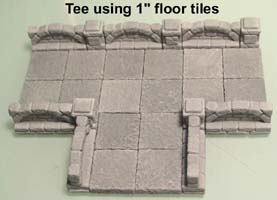
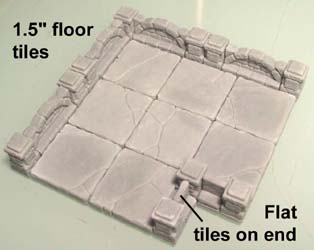
| 9. | This can also be done using 1.5" floor tiles instead. The wall sections are placed around the outside. I also placed the walls on top of the flat tiles to give them a little more height. The flat tiles were also used for the very short wall sections on the inside of the corner. This concludes the main uses for the mold #88. Be sure to look at our examples on how to use these walls for a Wiz War board and a Dungeon Twister board. |
 |
|---|
Dry Brushing Templates and Board Markers
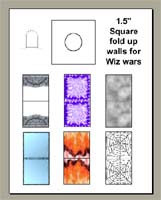
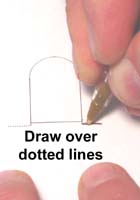
| 1. | These templates and board markers can be found on our Building Plans page. Look near the bottom for the plans labeled Wiz War Markers. These are used for our Wiz War game board. Print out the first page of the plans. Make sure you don't have Fit To Page selected or it might print out smaller than actual size. I'll show how to use the door template first. Using an ink pen, draw over the dotted lines to crease the paper. |
 |
 |
|---|
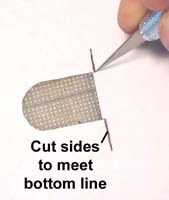
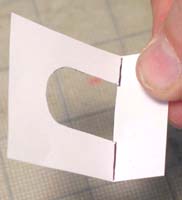
| 2. | Then use a hobby knife to cut out the door opening. Also, cut the sides down to meet the bottom dotted lines. Then use scissors to cut about 1" around the whole thing. Fold the bottom as the photo shows. You'll notice that the bottom lip sticks out the back slightly into the doorway. |
 |
 |
|---|
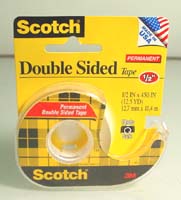
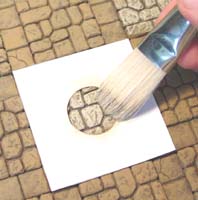
| 3. | Getting the mask to stay in place while you're painting can be tricky. The door is recessed a little making it harder to reach the wood area. To help with this, I'm using some Scotch permanent double sided tape. Cut several thin strips and place them on the back as close around the door opening as you can. |
 |
 |
|---|
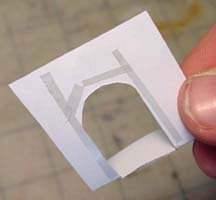
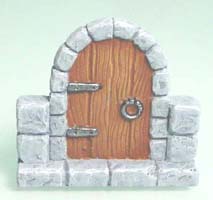
| 4. | Paint the outside stone of the doorway to match the color of the other stone walls. Don't worry if the stone color of paint gets on the door. Next, carefully paint the door dark brown without using the mask. You'll just have to get a small brush and get as close around the edges as you can. Don't worry if you paint over the hinges. Then stick the mask over the door and dry-brush the light brown. The mask will keep the dry-brushing from going over onto the stone color around the door. This will also get paint on the hinges, but we'll paint them last. |
 |
|---|
| 5. | Finish the door by painting the hinges and ring black, then paint the very tops of them with silver. The other dry-brush mask is used to paint the treasure chest markers on the Wiz War game board. Simply cut out the template, lay it over the square that marks the treasure starting spot and dry-brush it with a lighter color of paint. |
 |
 |
|---|
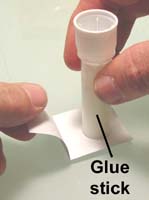
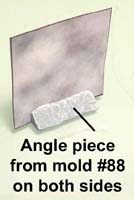
| 6. | Cut out the remaining colored squares on the page and fold them in half. Use a glue stick to glue the two halves together. Take painted angle pieces from mold #88 and glue one on each side of the wall marker. This will make it so the marker will stand up on its own. The first page as 1.5" square markers for Wiz War and the second page has 2" square markers for standard sized dungeon hallways. |
 |
 |
|---|
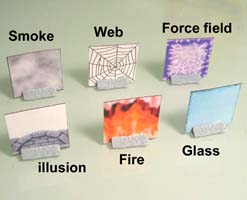
| 7. | I've made six different kinds of markers (although there are no spider webs in the Wiz War game). To see the rest of the Wiz War board, look at the Wiz War building instructions page. |
 |
 |
|---|
Making Glue and Ooze
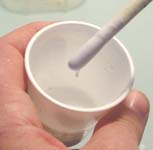
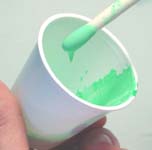
| 1. |
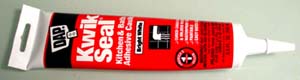
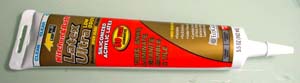
Squeeze a couple of tablespoons' worth into a disposable plastic cup. We'll want to thin it down with a few drops of water so be sure it's acrylic caulk or it says water clean-up. |
 |
|---|
 To make the glue pile, I'm using white paintable acrylic caulk. You can find it at any hardware store or in the paint department of any Wal-Mart.
| 2. | Thin the caulk with water until it's the consistency of ketchup. Then spread the caulk onto a clear plastic base. I've found that notebook dividers work very well. Since I want the glue marker to be about the size of a floor tile, I've laid down a floor tile for size reference. |
 |
 |
|---|
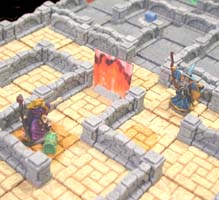
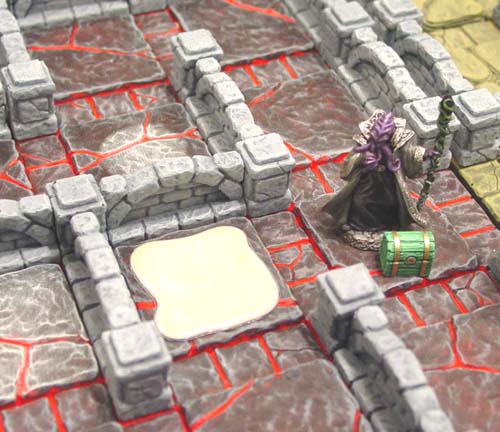
| 3. | Once the caulk is completely dry, cut around the plastic as close to the glue pile as you can. The glue should be a little smaller than the floor tiles you are using to make it easy to place down and remove from the game board. Click on the photo to see a larger version of it. To see the rest of the Wiz War board, look at the Wiz War building instructions page. |
 |
|---|
| 4. | For the killer ooze, I'm going to use clear acrylic caulking instead of white. I want the ooze to look very gel-like, and clear caulk will do a much better job. Make sure the caulking is water clean-up. |
 |
|---|
| 5. | Thin down the caulking with water until it's the consistency of Ketchup. Be sure the caulking is water clean-up or this will not work. This time add a little green ink wash or green paint to the caulking. The caulk I'm using here starts out a white color but ends up drying clear. Because of this, it will look minty green while you're mixing it up but dry a darker color so don't add much ink or paint. |
 |
 |
|---|
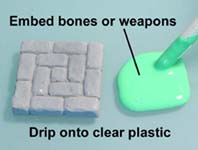
| 6. | Spread the caulk onto a clear piece of plastic. Use a floor tile for size reference. To add some detail, embed bones or weapons into the caulk before it dries. For it to work properly, you may have to sand down the back of the skeleton you put in the ooze. Otherwise it will stick up too much and not look dissolved. Be sure to paint the skeleton or items before you embed them in the ooze. |
 |
|---|
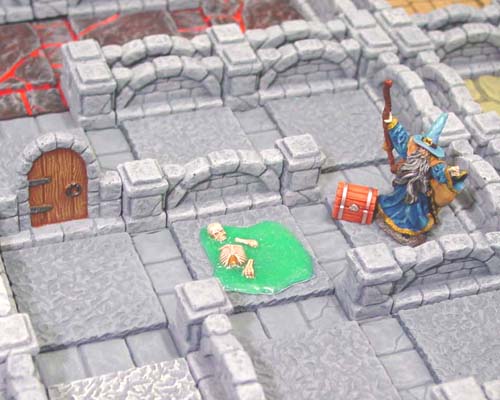
| 7. | Once the caulk is completely dry it will look a lot darker than when you mixed it up. Cut around the plastic as close to the ooze as you can. The ooze should be a little smaller than the floor tiles you are using to make it easy to place down and remove from the game board. Click on the photo to see a larger version of it. To see the rest of the Wiz War board, look at the Wiz War building instructions page. |
 |
|---|
Making Bushes and Stones
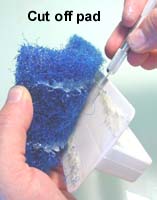
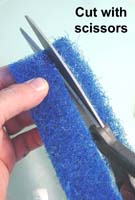
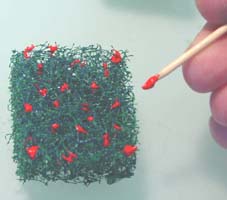
| 1. | For the bushes I'm going to use a plastic grill cleaner. You can find these with the house cleaning products at most department stores. Use a hobby knife to cut the pad off the plastic base. Try to remove as much of the glue as you can. Then use a pair of scissors to cut the pad up into squares the size you need. |
 |
 |
 |
|---|
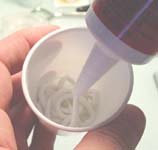
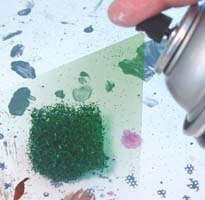
| 2. | Spray paint the bushes green. Be sure to do this in a well ventilated area. For the roses, I used artist's red acrylic tube paint. Squeeze out a little paint and use a toothpick to pick up bits of the paint. Dab the bits (or scrape them off) onto the bush to make a rosebush. |
 |
 |
|---|
| 3. | Click on the photo to see a larger version of it. The finished bushes are very handy to play the game with. If a figure moves into a bush, simply place them on top of it and they can still stand up. Be sure to cut the bushes small enough to fit between the wall sections easily. To see the rest of the Wiz War board, look at the Wiz War building instructions page. |
 |
|---|
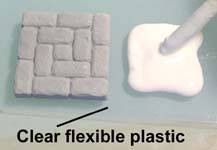
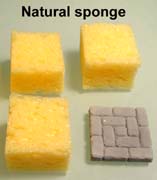
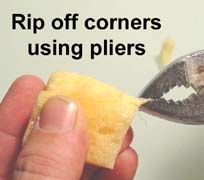
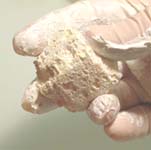
| 4. | For the squares of stone I'm going to use a kitchen sponge. If you can find a natural sponge, it will look a lot better than a regular sponge because the hole sizes and placement are more random. Using scissors, cut the sponge into square blocks the size you want. Use a pair of pliers to tear off the sharp corners and edges of the sponge to give it a more natural look. |
 |
 |
|---|
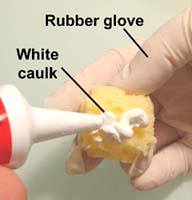
| 5. |
Put a rubber glove on one hand. You do not want to get caulking directly on your skin. Squeeze a good amount of caulk onto the sponge. |
 |
|---|
| 6. | Work the caulking into the sponge and load it up again with caulk when it soaks in. The point is to try and fill in most of the large pores in the surface so you don't have a ton of empty deep holes left. Once the caulk dries completely (at least one full day), paint it the same color as the stone walls. |
 |
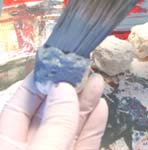 |
|---|
| 7. | Click on the photo to see a larger version of it. The finished stones look a little more like volcanic stones with the holes in them. Natural sponges will look better than manufactured sponges. Be sure to cut the sponge squares small enough to fit between the wall sections easily. To see the rest of the Wiz War board, look at the Wiz War building instructions page. |
 |
|---|
Making the "Buck"
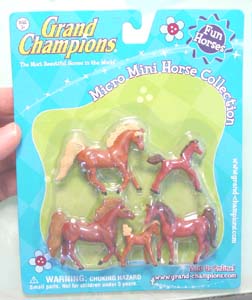
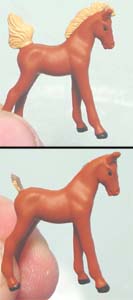
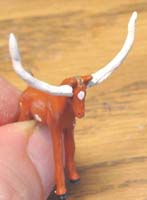
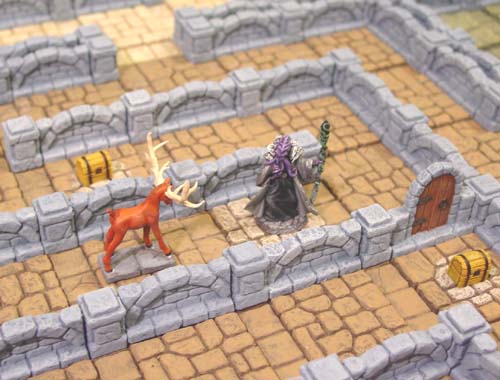
| 1. | One of my favorite monsters in the Wiz War game is the buck. You're not allowed to "pass the buck" because it has a huge set of antlers and moves around the dungeon blocking a wizard's way. To make my buck, I found some toy plastic horses at Wal-Mart I thought might work. I decided to use the smallest one in the middle of the package. I started by using a hobby knife to cut off the mane. I also trimmed down the tail to make it look more like a deer's tail. |
 |
 |
|---|
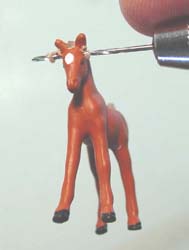
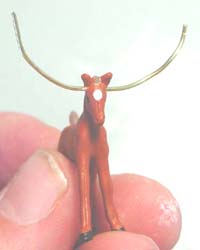
| 2. | I knew that the antlers would never stay on without some sort of bracing or reinforcement. So I'm going to put a wire through his head. The hardest part is to find a piece of wire and a drill bit that are the same diameter. Using the drill bit and a pin vice, drill a hole through his head. Then place one large continuous wire though his head and bend it up on the ends. Next we will cover it with epoxy putty. |
 |
 |
|---|
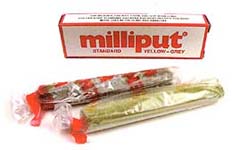
| 3. | I'm going to cover the wire with Milliput which is a 2-part epoxy putty that sets up in about 4 hours. Knead together 2 equal parts of the epoxy and roll a few long cone shapes about the size of each antler. |
 |
 |
|---|
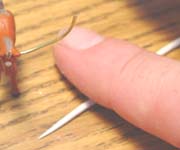
| 4. | Carefully form the epoxy putty over the wires on each side. The trick is to wrap the putty around until it touches itself on the other side. The putty will always stick to itself. Remember, the less putty the better. Try to use as little as possible to do the job. Afterwards, cut small thorn shaped pieces and stick them on. Try to make both sides look symmetrical. |
 |
 |
|---|
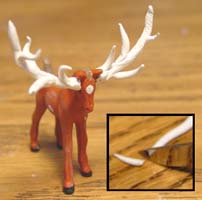
| 5. | Click on the photo to see a larger version of it. I finished the buck by painting the antlers off-white and covering up the cut-off mane with brown. Then I glued him to a 2-section flat tile from mold #88. The antlers are large enough to look like they block the hallway completely. To see the rest of the Wiz War board, look at the Wiz War building instructions page. |
 |
|---|
Making Gelatinous Cubes
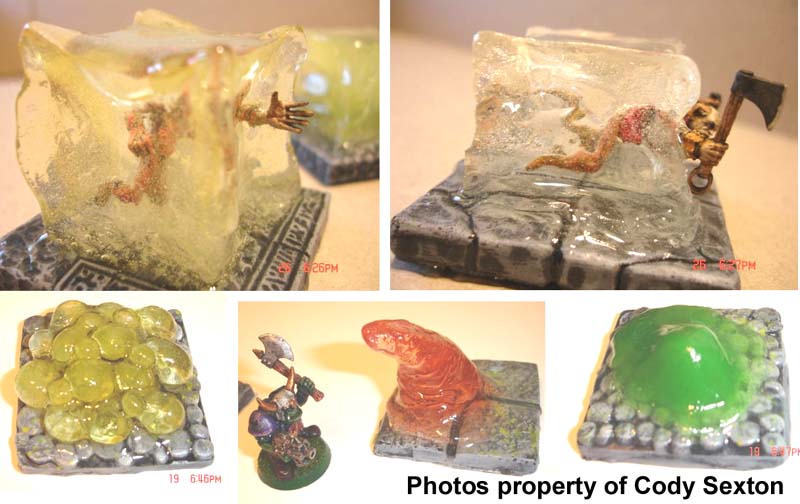
I originally saw this method of making gelatinous cubes posted by Cody Sexton (aka OrkBigMek) on our message board. He has made several more cubes than I have and has allowed me to post a few photos of his other experiments at the bottom of this article.
You will need a lot of materials to make gelatinous cubes like I show here. If you are not able to find mold making rubber, Aberoth shows how to make some without making a mold on his tips page at http://myweb.tiscali.co.uk/abarothsworld/tips.htm.
Mold Making Materials
However, you will need a weight scale to measure the parts. If you can find a mold making rubber that uses equal part of A and B, then you will not need a scale. You will also need some modeling clay, Legos, plastic cups, mixing sticks, paper towels, and some hard flat plastic to make the mold onto. |
Casting Materials
You mix equal parts of A and B, mix it up and pour or brush it onto the surface. It's meant to act as a very thick varnish. You may be able to find similar products used to put thick coatings on table tops. You will also need some plastic cups, mixing sticks, toothpicks and paper towels. |
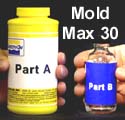 I'm going to suggest using Mold Max 30 from
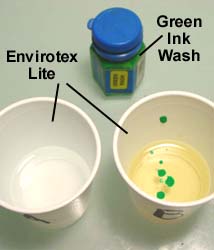
 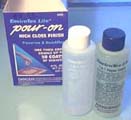 To add gloss to water, I'm using a product called "Envirotex Lite, Pour-on High Gloss Finish". This little 8 ounce kit costs about $10, but it's really good stuff.
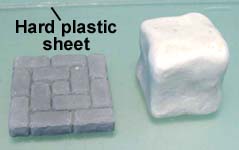
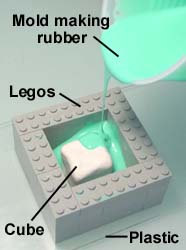
| 1. | Use modeling clay to sculpt your gelatinous cube. I'm using Sculpey polymer clay but you can also use the oily kind that doesn't ever harden. I want my cube to completely fit onto a 1.5" floor tile so I started with a square and then rounded the corners. Then I pushed it around a little because I didn't want a perfect cube. Be sure it is completely pushed down onto the sheet of hard plastic or CD cover. Don't worry too much about fingerprints. |
 |
|---|
| 2. | With the cube stuck down securely to the piece of hard plastic, make a wall of Legos around it. Leave at least 1/4" around the outside of the clay cube, and make the walls at least 1/4" taller than the clay cube. Mix up your mold rubber in a cup. Mold Max 30 uses 10-parts A to 1-part B. By the way, the stuff I'm showing here is not Mold Max 30, but a different brand I use for my own production molds. I don't usually tell people what I use. Pour it over the cube in a thin stream until it completely covers the clay cube. It will probably have to cure 24 hours before you can remove the clay cube. |
 |
|---|
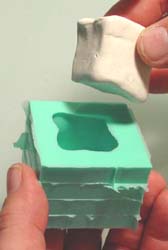
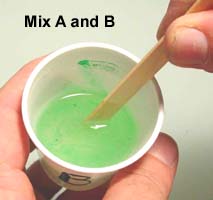
| 3. | Once the rubber is cured, remove the clay from the mold. Next we will mix up the Envirotex Lite. Pour equal parts of A and B into two plastic cups. Sprinkle a few drops of green ink wash into one of the cups. You do not want to add too much ink wash - just a drop or two. If you want more green color, you can always add more drops to it later. |
 |
 |
|---|
| 4. | If you want to reduce the amount of bubbles in the casting, then follow these steps exactly. Pour part A and part B together and mix slowly! I'm not kidding. Stir once per second for the next five minutes. Most people say "heck with that" and just mix like crazy - and that's OK if you don't mind lots of tiny bubbles in your cube. The smallest bubbles do not have enough force to rise to the surface on their own. |
 |
|---|
| 5. | Fill the mold to the top with the mixture. Let it cure 24 hours before trying to remove it. When you remove it you will end up with a frosted lime green cube. We will get it to look transparent and glossy by adding a coat of Envirotex over the top of it. I'm setting the cube on a piece of clear plastic used for notebook dividers. |
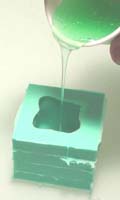 |
 |
|---|
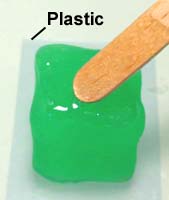
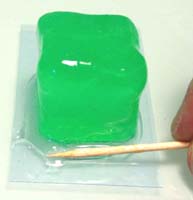
| 6. | Mix up a small amount of Envirotex and let it set for 2 hours! I made the mistake of pouring some over my cube just after I had mixed it and it all drained off of the cube onto the table. After 2 hours it will thicken up like honey and you can spread it over the cube without it coming off. Check it an hour or 2 later and you will see that more had slid down the sides and pooled around the bottom. Use a toothpick to scoop up the excess and spread it back on the cube. |
 |
 |
|---|
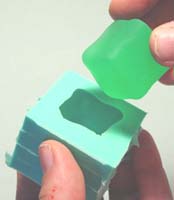
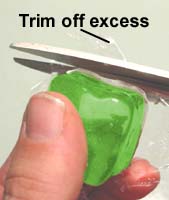
| 7. | Let the coating cure overnight. I placed my cube a piece of clear plastic and after it had cured I could easily peel it off. Use a pair of scissors to trim the excess clear gloss from around the edges. When finished, you will have a lime green cube to use with your game. To see the rest of the Wiz War board, look at the Wiz War building instructions page. Click on the photo to see a larger version of it. |
 |
 |
|---|
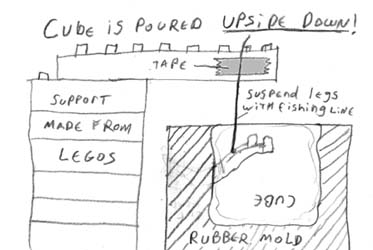
| 8. |
The diagrams should help you picture what will happen here. When we pour the cube, remember that it's upside down, so if you want his feet to touch the ground then they should be close to the top surface. |
 |
|---|
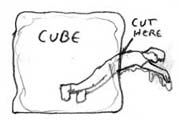 Next I will try to suspend a figure halfway out of a cube. To do this we will need to cut the figure in half where he comes out of the cube.
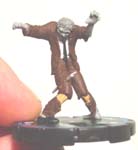
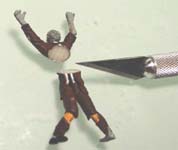
| 9. | I'm using a Wizkids Horrorclix zombie figure. Cut the figure at the dividing line between what will be the inside and the outside of the cube. Since I want his top half outside the cube, I will cut him in half at the stomach. |
 |
 |
|---|
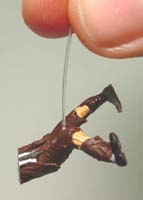
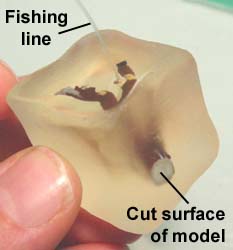
| 10. | Next we need to suspend the half of the zombie that will be submerged into the cube. We will use fishing line to do this. Super glue a piece of fishing line somewhere in the center of the body half. The trick is to position it so it leans the direction you want it to. This can be more difficult than you think at first. You'll also notice that the bottom half of this zombie is hanging belly up. Remember that we are casting the cube upside down. |
 |
|---|
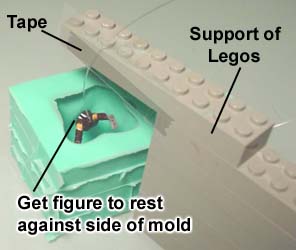
| 11. | Next I've built a support made of Legos to hold the fishing line in place. The fishing line is held in place by a piece of tape on the side. This will allow you to slide the fishing line under the tape to get the height and angle you want. Try to get the flat cut area of the model to touch the side of the mold as much as possible. Don't glue the model against the side of the rubber mold. I tried this using super glue and it took a small chunk out of the side of the mold later on. Just try to get the model to rest against it as closely as possible. |
 |
|---|
| 12. | Mix and pour the Envirotex in the mold as shown in the example above. This time I did not color the resin. Let it cure at least 8 hours before removing it from the mold. Once you remove it from the mold, you'll see that the model did not touch against the wall of the mold completely. Some resin ran around the cut side of it. |
 |
 |
|---|
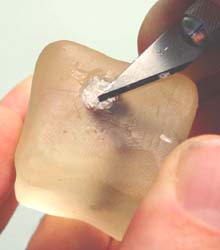
| 13. | The next step is to cut away the excess resin from the cut surface of the model. I want my zombie halves to meet up but they won't if there is clear resin in the way of their meeting. Use a hobby knife to cut away the excess resin and reveal the original flat surface of the cut zombie. If you remove the cube from the mold a little early (8 hours after you pour), the cube may still be a little rubbery and not set up hard yet. If this is the case then it may be a little easier to cut the excess resin away from the flat surface of the model below the resin. |
 |
|---|
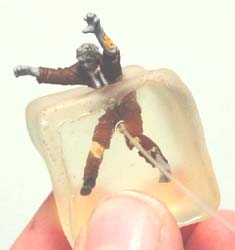
| 14. | Next, glue the other half of the figure where it belongs. Trim off the fishing line so you don't see it anymore. As shown in the first example, give the whole thing a coat of Envirotex. Once it's dry, you'll have a figure coming out of the cube. |
 |
 |
|---|
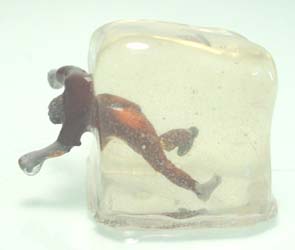
| 15. | The photos shown here are from Cody Sexton, who has done more experimenting with different ways to make cubes and shapes than I have. Click on the photo to see a larger version of it. As you can see, there are a lot of other shapes that can be made besides cubes. I thought the bottom center one was especially interesting. Also, other colors can be used besides green. Once you get starting making these, you may imagine a lot of new uses for this method. |
 |
|---|