Tips & Tricks 32
|
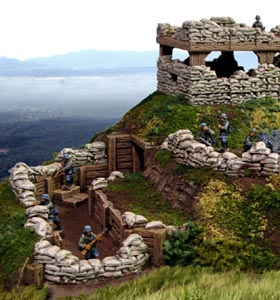
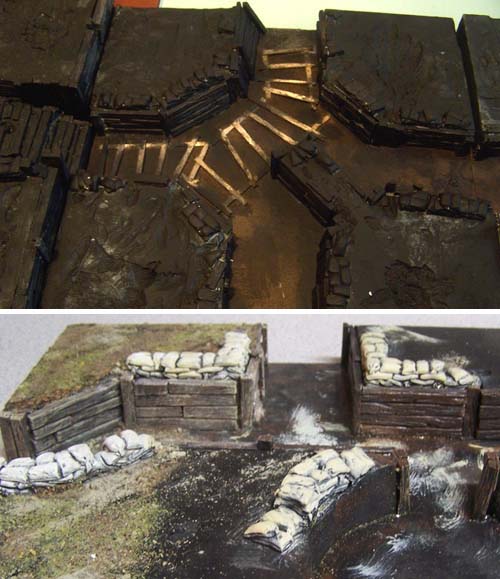
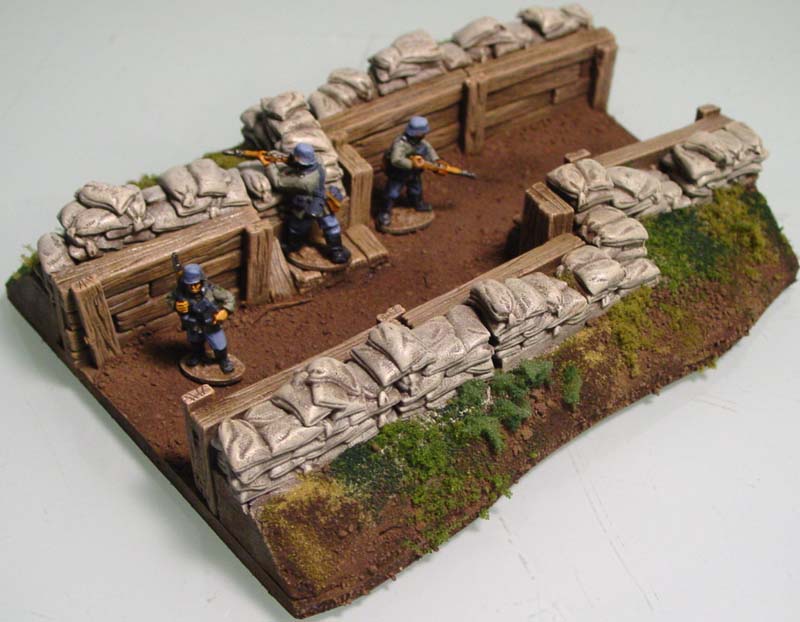
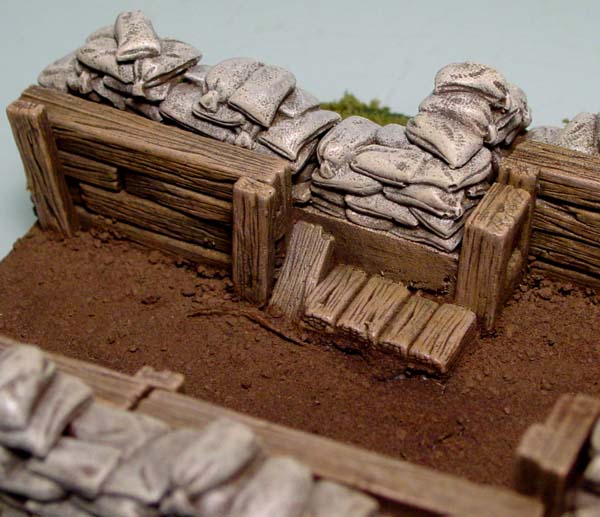
The first photo shows examples of these molds used for trench pieces. The second photo shows an example of these molds used to make a sandbag fortress. |

|
|
About the #340 Sandbag Mold
| 1. | Here are the pieces you get on mold #340. This mold has a fair balance of building block pieces for main walls and decorative pieces to add onto the tops of walls. Click on the photo for a larger view. |
 |
|---|
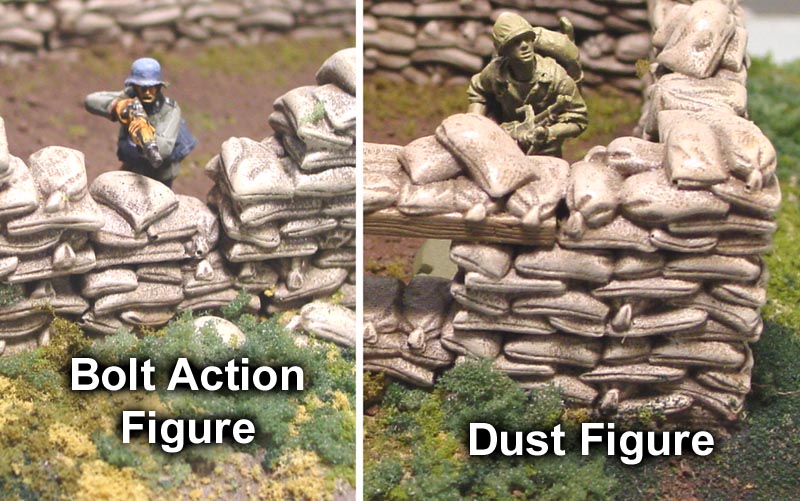
| 2. | This mold is used to make sandbag piles for 28 mm figures. The average size of a single sandbag is about 3/8" long x 1/4" wide x 1/8" thick. The photo on the left is a Bolt Action figure From Warlord Games. The photo on the right is a Dust figure from Fantasy Flight games. The Dust figures are a bit taller and are probably more like 32mm tall. I think that sandbags work well for both scales. Click on the photo for a larger view. |
 |
|---|
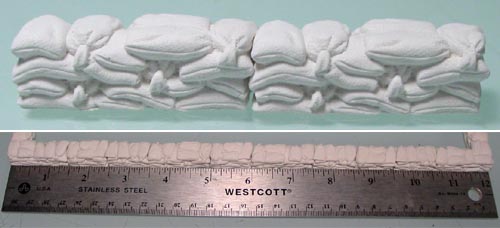
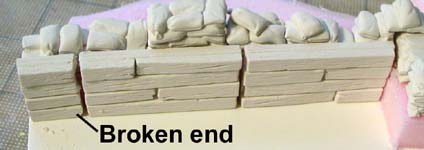
| 3. | The sandbags are made so they interlock loosely on the ends. The sandbags will line up to be a fairly exact length also. The second photo shows various lengths of sandbags that line up for a total length of 12" (with about 1/16" variance). |
 |
|---|
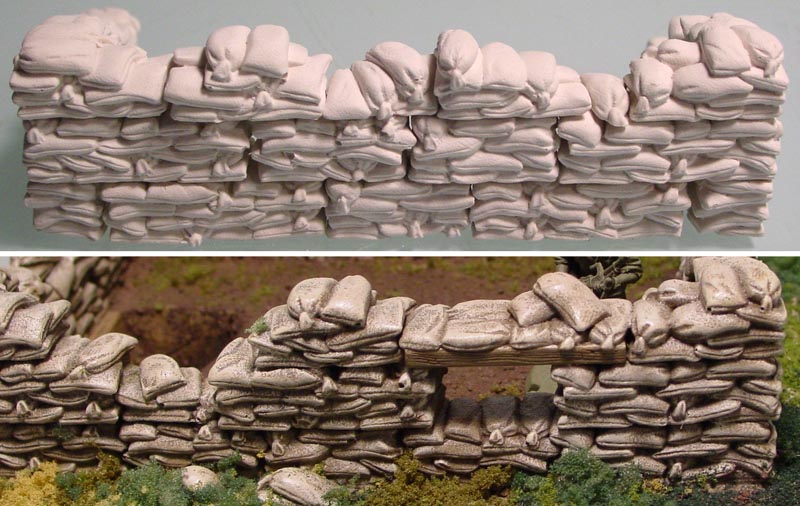
| 4. | When stacked together, you will notice a few hard edges where the pieces stack up. These are unavoidable because the bottom of the mold has to be scraped flat. However, after you paint them they don't seem to show up that bad. Be sure to alternate the blocks when stacking to hide the vertical seams. Click on the photo for a larger view. |
 |
|---|
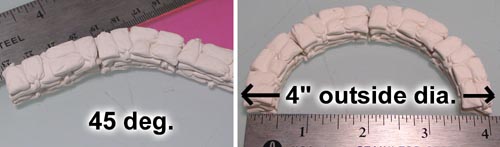
| 5. | The curved pieces bend at a 45 degree angle. If you put eight of them together, it will make a 4" outside diameter circle. |
 |
|---|
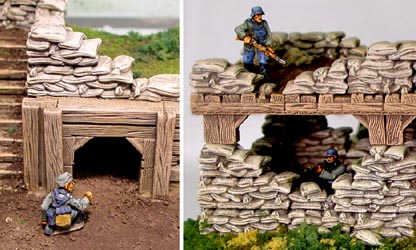
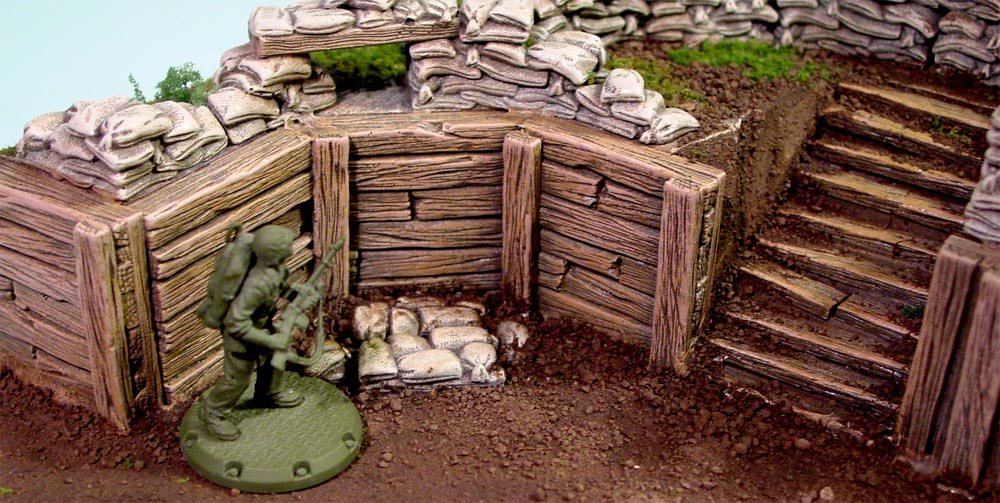
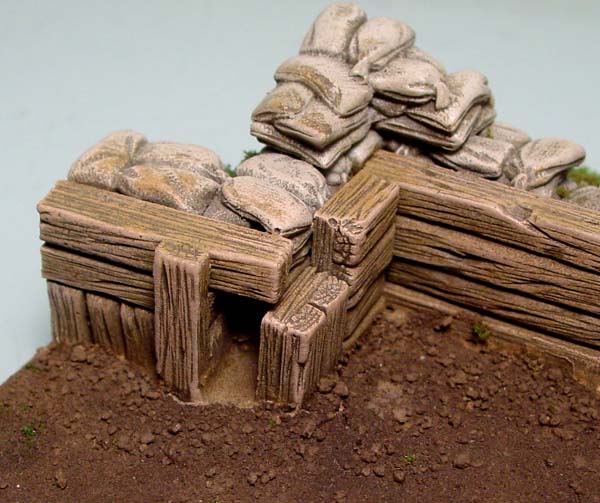
| 6. | The wooden braces on the mold can be used a few different ways. Here I show them being used to brace up the planks supporting a hole. The next photo shows them supporting the roof on the sandbag fortress. However, I found that these pieces were not quite as useful as I thought they would be. You'll probably have several of these left over after your project is finished. |
 |
|---|
About the #222 and #223 Trench Plank Molds
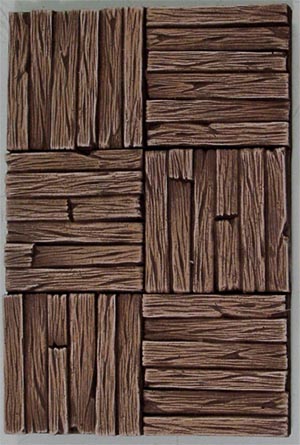
| 1. | Here are the pieces you get on mold #222. There are four tiles that measure 2" long, 1" wide and are 1/4" thick. There are also smaller tile pieces which are also 1/4" thick for those odd areas you need to fill on the trench walls. You also get three single planks that are 2" long, 1/4" wide and 1/8" thick. If your trench is only 1" tall then you can break these planks for shorter lengths. |
 |
|---|
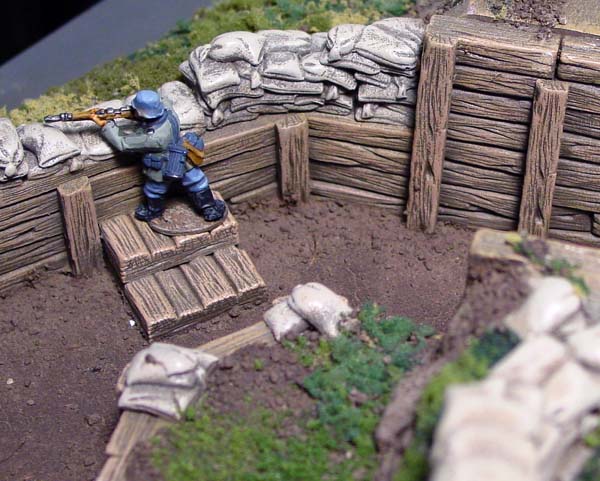
| 2. | For trenches, simply place the larger tiles on edge and cover the seams with either full or broken planks. The first two photos use Bolt Action figures and the second photo is a Dust figure. Click on the photo for a larger view. | ||
|---|---|---|---|
 |
 |
 | |
| 3. | Here are the pieces you get on mold #223. There are five tiles that measure 1.5" square and are 1/4" thick. You also get six single planks that are 1.5" long, 1/4" wide and 1/8" thick. There is also a 1/2" wide plank section which you can put three of them together to make another full tile. Click on the photo for a larger view. |
 |
|---|
| 4. | Mold #223 is not quite as useful as mold #222 because it does not have as many small pieces for variety. However, you may have places where you need lot of walls measuring 1.5" tall. These photos show the comparison between the Bolt Action figure and the Dust figure compared to the height of a 1.5" tall trench. Click on the photos for a larger view. |
 |
 |
|---|
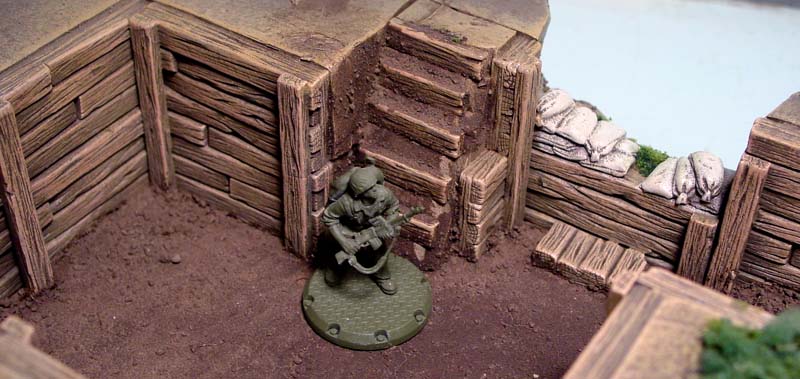
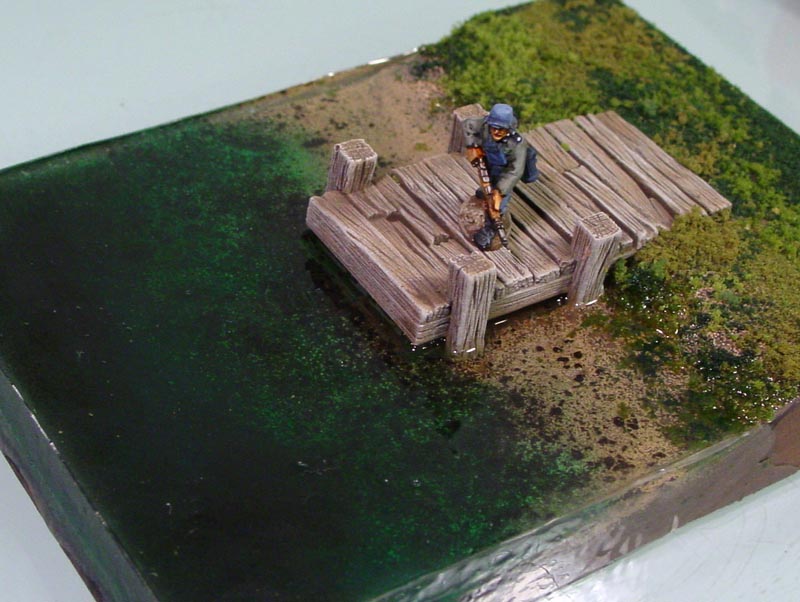
| 5. | The 1/5" wooden plank tiles can also be used for other things besides trenches. Here I show the pieces used for a dock. It also works well if you wanted some 1.5" wooden floor tiles. Click on the photos for a larger view. |
 |
 |
|---|
Trench System by Dan Moreno
The following trench system was designed and created by Dan Moreno. All of the photos of the trenches in this section are his property and cannot be used without his consent.
Dan's trench system shows off many creative ways to use the plank molds. I will add a few descriptions to some of the photos and there are a few questions that I've asked Dan mixed throughout the article.
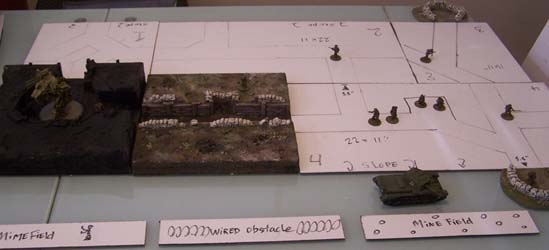
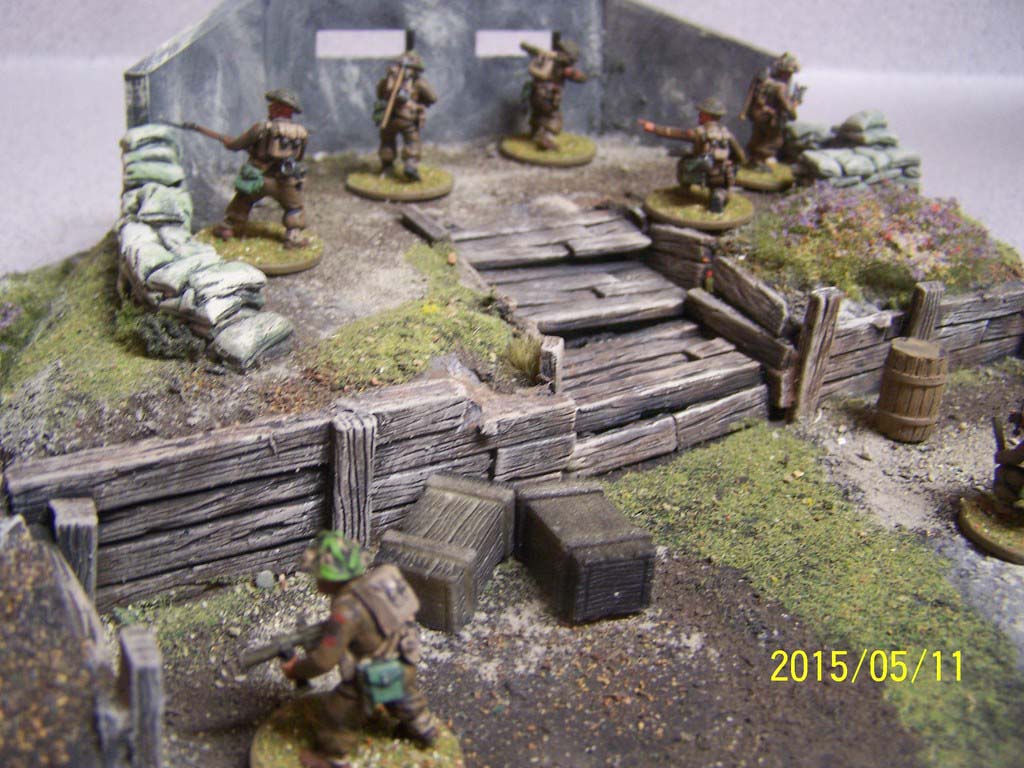
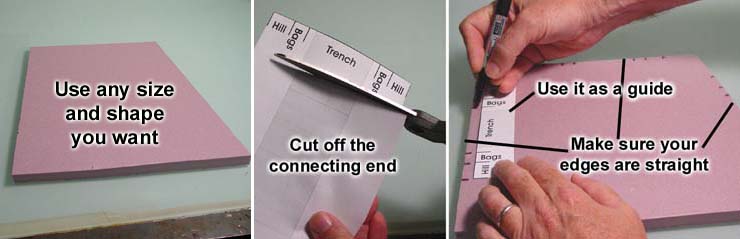
To get ideas about what shapes to make the trenches, it looks like he makes several full sized mock-up cards. These would make it easier to see if your current trench shape works with the rest of the layout. I imagine it also sparks ideas for interesting shapes and helps when visualizing how the whole table could look. |
 |
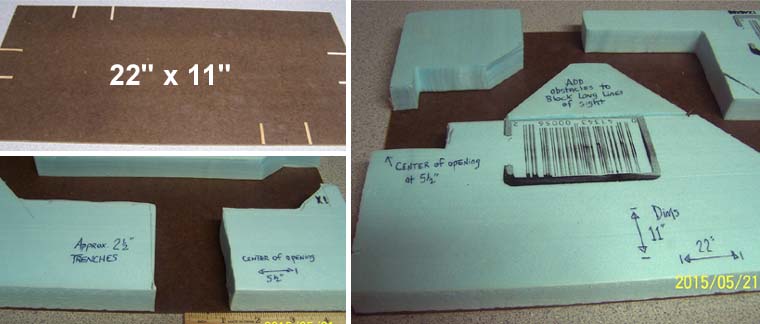
Dan says he starts with 1/4" MDF board with a dry erase backing. This provides an already painted surface on the bottom to prevent warping and adds a coat of moisture protection.
The size shown here is 11" x 22". He said the reason for not using 12" squares is so that he can easily ship these in standard boxes after they are finished. You will notice that he puts the connecting ends of the trenches in the center of each 11" square.

The main body of the trench is made from 1" thick foam. The width of the trench is about 2.5" but will end up being 2" wide after the wooden planks and sandbags are glued onto the foam.
Question: Some areas of the trench look melted. I assume you are using something like the "hot wire foam factory" to cut the foam and melt certain areas?
Answer: A hot wire is used to cut the foam and a soldering iron used to melt the foam for texture. Once the melted foam is coated in flocking, you don't notice the man-made melted areas. It's also less mess to melt the foam than to cut it.
Question: When you drew your trench sections, did it worry you that some parts would be too long or too short to fit the 2" plank sections? Or did you do that on purpose so that it would force you to come up with interesting ways to fill the odd gaps in the walls?
Answer: Great question... I did it to force me to piece meal some of the pieces together. I thought it could add a bit of realism to the piece.
Question: What other Hirst Arts molds did you use for planks besides #222?
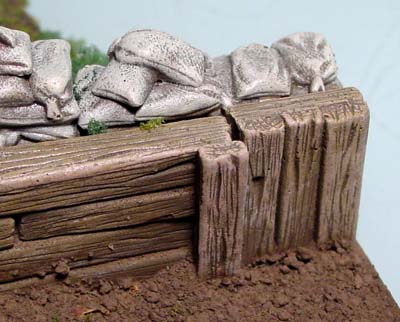
Answer: This can be made entirely out of mold #222. There are two scales of planks I'll describe as a 2x4 and a 4x4. To get a 4x4 look, I'll score it then snap off a single plank from the thicker plank to get the thicker corner 4x4 board.
|
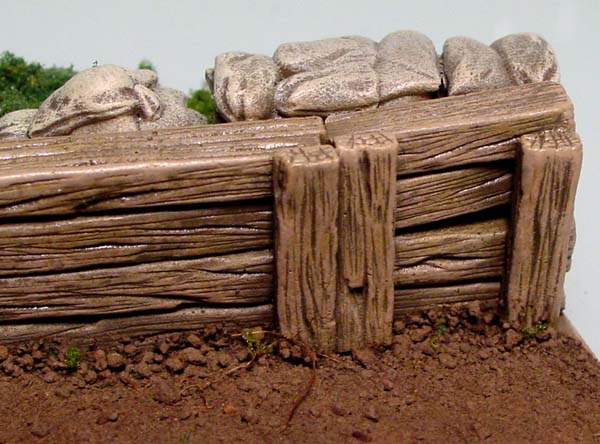
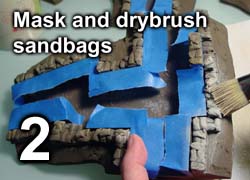
Question: What are your floor planks made of? It looks like a very thin material. Answer: Those are coffee stir sticks built into the floor of the trenches. Another inexpensive feature that works well with this terrain piece. Question: How many colors of paint are dry brushed onto the planks/sandbags? Example for planks: black base coat, medium brown dry brush, light cream dry brush (same highlight color as sandbags)? Answer: For the planks...it's how you have described it but add one more highlight of a vanilla and/or buttermilk. I avoid an all-white color. The sandbags are painted black, heavy dry brush with suede, dry brush with a desert tone and a touch-up highlight of a vanilla/buttermilk. Question: How do you dry brush your sand bags and planks without getting the dry brushing from one onto the other? Do you mask it somehow? Answer: There is a slight trick to this... after the everything has been painted black, the base color of suede is added to the sandbags. This color may get on the planks. The next paint goes on the planks...the dark brown, and some of the dark brown may get on the sandbags. The third color goes on the sandbags which is a desert tone. This desert tone covers any of the dark brown from the plank painting and is the same color used as a highlight for the planks. If some of the paint gets on the planks...it's okay...you just started to dry brush the planks at the same time. |
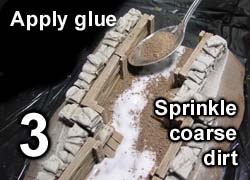
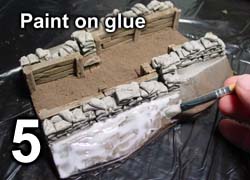
 Next the whole thing is painted with a mixture of black paint, wood glue and water. Dan says that it coats the foam and seals the plaster in one step.
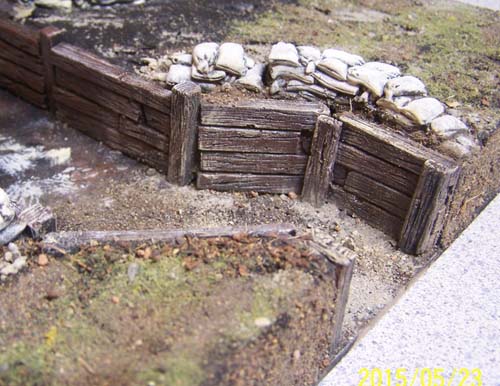 Question: What is the ratio of paint/glue/water that is painted on before the ground cover is sprinkled on?
Answer: This can vary slightly but the idea is to make a mix that doesn't run off of your work too easily...perhaps a 70/15/15 glue/water/paint.
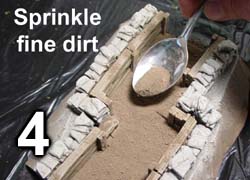
Question: You said you mixed sawdust and paint to make most of your ground cover. What is the paint to sawdust ratio?
Answer: There are a few youtube examples on how-to make your own flocking but the bottom line is...the saw dust should absorb all of the moisture from the paint.
When mixed, you have some clumpy material. Once the mixture has completely dried, you'll use a wire mesh to break-up the clumps. You should use a very fine saw dust, and add enough paint to for the desired color. Once the saw dust has dried, you'll lose about 20% of the pre-dried color. Your black would be a very dark grey. Orange, reds, and yellows may have a pastel color to it.


Question: Your trench system is 1" tall and stops suddenly at the edge of your gaming area. Do you have transition pieces that slope these edges down to the table surface or do you only play on top of the trenches?
Answer: There will be a sloped 2" transition piece available (shown on the photo dated 2015/05/26).
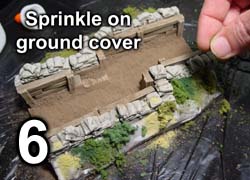
Question: What other woodland scenics materials did you use on the project?
Answer: Mostly the grass clumps from W/S and some static grass. The flocking could be described as a dirt (top soil from Lowes) mixed with a fine lizard bedding, sifted rocks from a cement bag, cement dust and grass flocking (soon to be all hand-made). The products described offer the best yield of material at some of the lowest cost available. The cement dust can be applied dry, or with enough moisture...a wet cement look. The Realistic Water product could be used for muddy and/or wet areas of the trenches.
Question: What games do you play on this trench system (or what game's miniatures do we see here used for scale)?
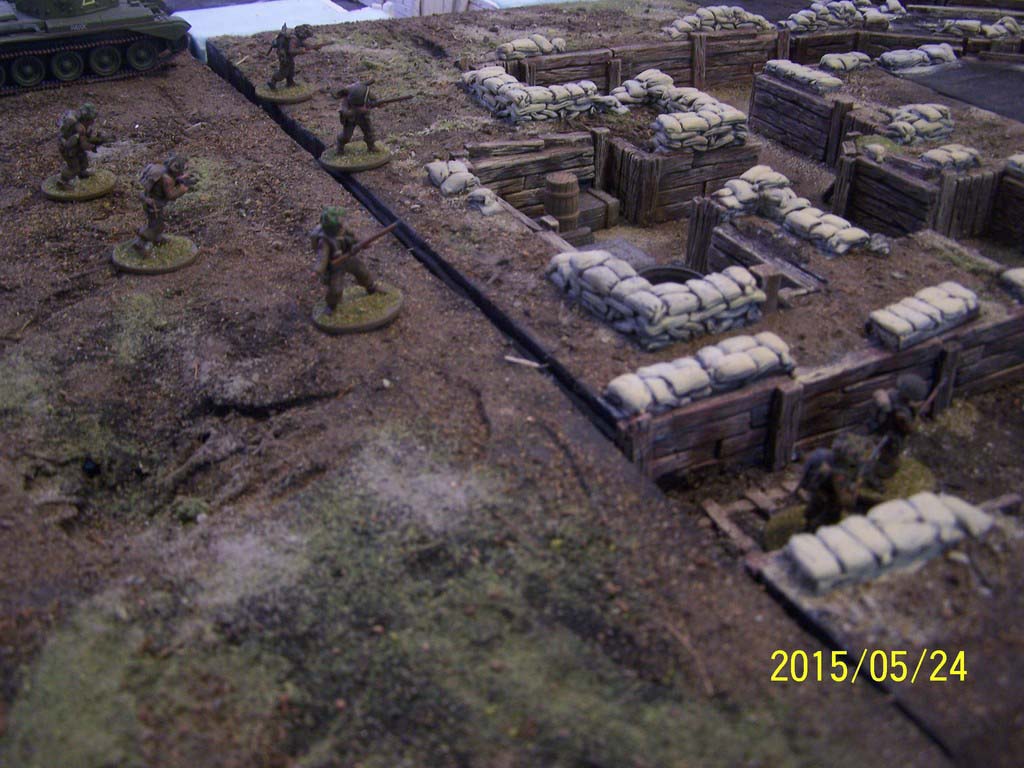
Answer: I believe this system will work well with Dust and/or bolt Action- 28mm. I've used 28mm Bolt Action pieces and Dust infantry for sample pixs.
Many thanks to Dan Moreno for sharing the photos of his project and tips on how he made it!
My Crooked Trench Pieces
This video shows the basics |
This video shows how to cut the foam |

This video shows how to paint and |
|
| 1. | This trench system is meant to be used as a single trench rather than covering a large section of the table with trench. It stands about 1.5" tall and you can make any combination of straight pieces, corners and tees. For this project, I only created about six pieces to show how it's done but you can make as many as you want. Because this was a not a full project, I do not know how many castings it took to make these six pieces. I would guess about five castings from each molds #222 and #340. Click on the photo for a larger view. |
 |
|---|
| 2. |
For even trenches, all of the pieces are a standard size and all of the ends cut off at 90 degree angles. Because of this, your trench can connect to itself at several different points when laying it out. Crooked trenches have connected edges at odd angles and can be any length and shape you want. Because of this, crooked trenches will not connect to themselves and are simply a barrier that goes across one end of your gaming table. The method for making either type of trench system is basically the same. The only difference is how you start them. I'll show you how to start the even trench system and then switch to the crooked trench system. |
|---|
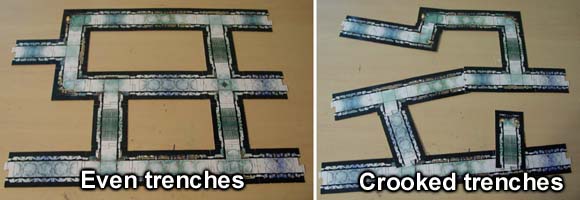 There are two different types of trench systems you can make; even trenches and crooked trenches.
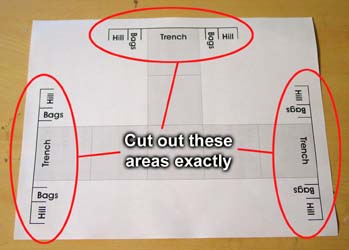
| 3. | Even TrenchesTo make the even trench system, start by printing out the trench plans. Be sure to measure them to make sure they printed out the correct size. You will find a 5" measurement in the upper left that you can check. Mount this onto a piece of heavy card stock. You will end up drawing around the ends with a pen. When trimming these out, only the end connections are important. It doesn't matter where you cut on the area in between the ends. That's why I didn't draw anything there. |
 |
|---|
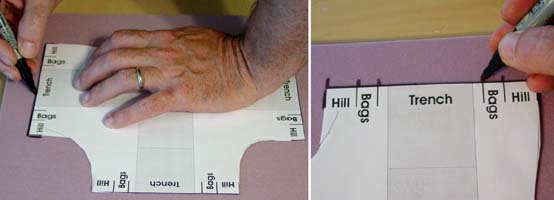
| 4. | I'm using 1/2" thick insulating foam for the main part of the hill. Place your template on the foam and draw around the ends using a marker. Then place marks on these ends indicating where the rows of sandbags go. |
 |
|---|
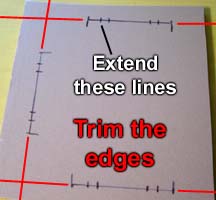
| 5. | Once these edges are marked, remove the template and make sure the sandbag marks cross the edge line and extend down into the body of the piece. Otherwise we'll end up trimming off these marks and you won't know where the sandbags go. Trim these edges off using a straight edge and a hobby knife. Be sure these cut edges are straight and vertical. If not, then your pieces will not butt up against each other as neatly. |
 |
|---|
To continue making the even trenches, skip down to step 7 below. |
| 6. | Crooked TrenchesTo make crooked trenches, the only thing that matters are the ends. Choose a piece of foam any size and shape you want. The edges can be at any angle you want but be sure the edges are cut straight and vertical so they will butt up against other pieces nicely. Cut off and end from one of the plan pieces and use it to mark the edges. What you are doing is putting marks on the edge to show where the sandbag rows and the outside connecting edges of the hill will be. |
|---|---|
 |
| 7. |
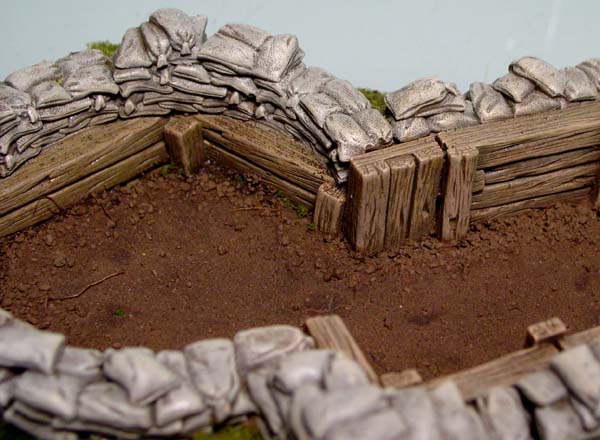
Try to make several long straight sections. Remember that you have a lot of 2" long wooden planks that will go along beside these sandbags. If you have too many short lengths of sandbag walls, then you will be breaking a lot of the 2" plank pieces trying to get them to fit beside the sandbags. Also, avoid using more than one of the curved sandbag pieces in a row. These will make it difficult to get your wooden planks to set against them. Vary the height between the 1/4" tall sandbag piles and the 1/2" tall sandbag piles. This will help you use up a greater variety of the sandbags you have cast. Eventually, you will want all of your sandbag walls at least 1/2" tall. For the 1/4" piles, we will stack some more sandbags on top of them to make the surface uneven and more natural looking. Glue the sandbags down onto the foam. Draw a line around the outside edges of the piece then cut along this line with a knife. |
|---|
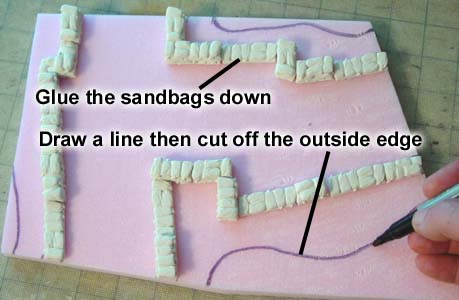 Place your sandbags onto the foam and decide what shape your trench will be.
| 8. | When cutting the 1" thick foam, I'm using an 18mm snap off utility knife. It's the kind of knife where you can snap the ends off when the blade gets dull. Cut the foam so the connecting ends are angled all the same way. The top edge of the foam should be cut at the bottom corner of the sandbags. The bottom edge of the foam should be cut where you put your outside mark. This way all of the connecting ends will have the same slope and will always fit together nicely. |
 |
|---|
| 9. | Using the utility knife, bevel the outside edges of the foam. Feel free to vary the angle and shape of these edges because they are supposed to look like a natural hill. After the outer edges are completely trimmed, place this onto a 1/4" thick piece of foam core board. You may use other materials for this base (such as cardboard) but I think foam core board holds up really well and is easy to cut. Remove the piece and cut the shape out of the foam core using a hobby knife. |
|---|---|
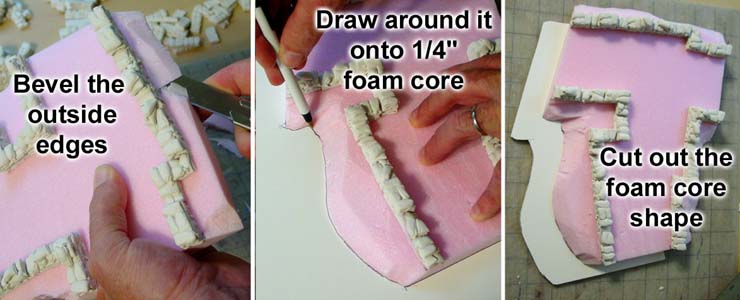 |
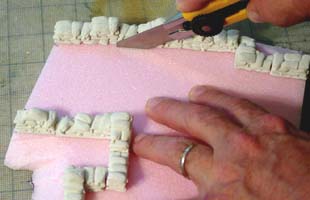
| 10. | Next we will cut the trench section out from between the sandbags. Remove the foam core from under the pink foam and cut along the inside edge of the sandbags. Try to make this edge straight and vertical as much as possible. It's OK if you nick off a few of the sand bag ties along the way. |
 |
|---|
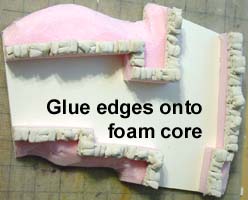
| 11. | After all of the edges are cut off, glue the edges onto the foam core board. Since the foam core's outer edge is the same shape, it's easy to see exactly where the sides of the hill go. |
 |
|---|
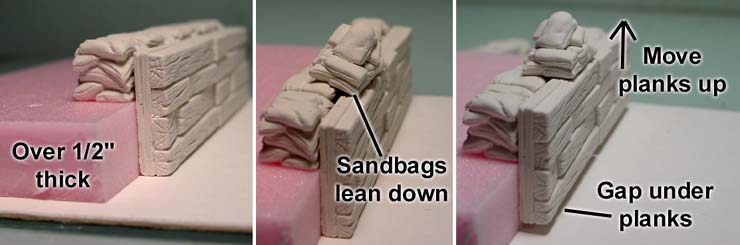
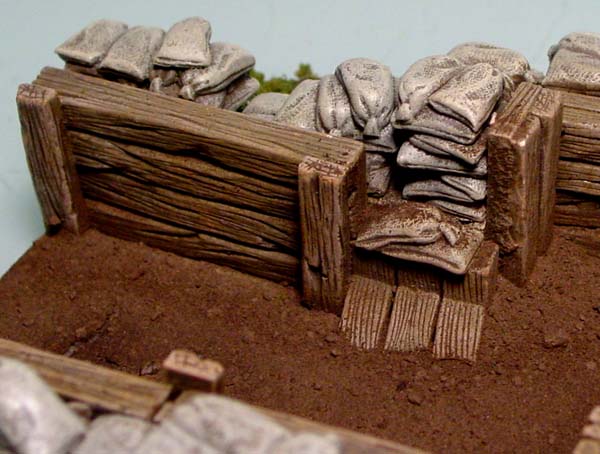
| 12. | The pink foam I am using is not exactly 1/2" thick. It's a little taller than that. This can sometimes give you problems if you want your sandbags to overlap your plank pieces. An easy way to solve this is to glue the planks higher up on the wall and leave a gap under them. Keep in mind that the more sandbags you have overlapping the planks, the more masking you will have to do when you want to paint the sandbags later on. |
|---|---|
 |
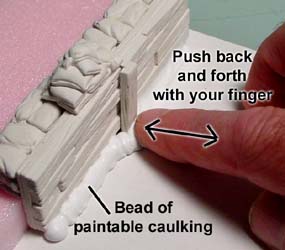
| 13. | I'm going to use paintable caulking to fill the gaps under the boards. Caulking comes in all kinds of formulas. As long as you get something labeled as "paintable", it will work for this. Squeeze out a bead of caulking (about 1/4" diameter) along the edge. Then use your finger to push back and forth while working your way along the edge. This will push the caulking against the boards and pull it back to form a natural curved slope at the bottom edge. Once this is covered with glue and dirt, you will never know there was a gap to fill. |
 |
|---|
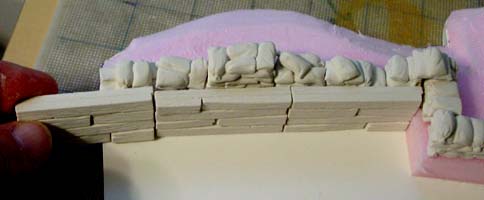
| 14. | Now for the fun part! You need to get the plank pieces to fit into the areas against the sandbags. Of course nothing will fit perfectly so we will have to be creative here. Start by gluing down long plank pieces in the places where they will fit. |
 |
|---|
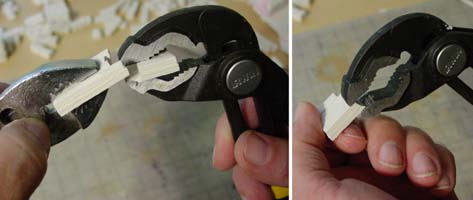
| 15. | I'm using a couple pair of pliers to break the planks. You'll need pliers, especially if you cast these in dental stone. Once you break the piece, you can use the pliers to nibble off the excess to get planks the length you need. Adjustable pliers work the best. |
 |
|---|
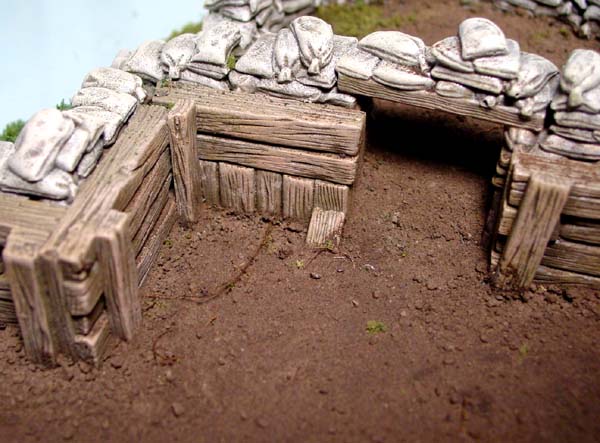
| 16. | Place the broken end toward the inside. This will end up being covered by a plank anyway. Don't worry too much about making things fit exactly. Just be sure that things don't extend beyond the connecting end of the hill. |
 |
|---|
| 17. | Below are several examples of how you can break blocks and arrange things to fit the odd shapes that will happen on your trenches. How to make the corrugated tin (seen in the examples below) is explained in the next section. Click on the photos below for a larger view. |
|---|


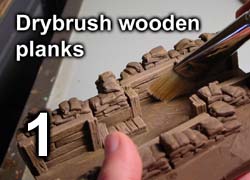
| 18. | After gluing on all the planks, the whole piece is painted dark brown from the Earth Tone Colors. Steps for painting are covered in great detail on the Sandbag Fortress Building Instructions page. However, I need to point out that painting the dark brown can sometimes cause your pieces to warp. As you can see in the second photo, even though the foam core board is pretty stiff, the drying paint will pull together and cause it to bend. In this state, the foam core base was very stiff and I was unable to bend it back into shape without breaking it. To solve this, after the piece is dry, I painted the bottom of the piece with the same dark brown. After an hour, it was dry enough that I could handle it without getting paint on my hands but still wet enough that the piece felt cool. At this time I was able to easily straighten the piece back into shape and it stayed straight after it dried. |
 |
|---|
| 19. | Below are the final steps for finishing the trench pieces. Please refer to the Tips & Tricks 31 page for complete instructions on how to do this. The instructions on that page are very detailed on how to complete the painting process and how to use dirt and ground cover to finish your pieces. |
|---|
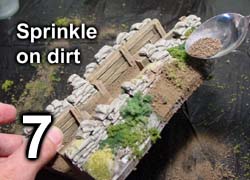
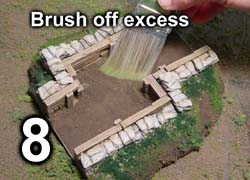
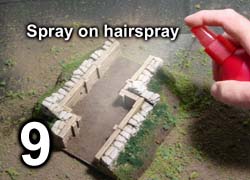
Steps for painting are on the Sandbag Fortress Building Instructions page and instructions for applying the ground cover is on the Tips & Tricks 31 page. Here is a photo of several finished trench sections put together. Click on the photo for a larger view. The German soldiers you see here are Bolt Action figures from Warlord Games. These soldiers are 28mm in scale and measure about 1 1/4" tall. These soldiers were painted by GRG3D. |
 |
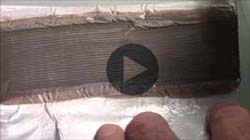
Making Corrugated TinClick on the video to watch it on YouTube. This video describes how to use basic materials to create corrugated tin for 28mm scale figures and terrain. This can be painted and cut to fit anywhere on your project. |
 |
| 1. | For this you will need some thick paper or card stock, aluminum foil, caulking and a scraper or putty knife. It's probably better if you use "paintable" caulking but I'm not sure it makes much difference. Cut a piece of card stock and foil about 4" x 6". |
 |
|---|
| 2. | We'll need something to roll over the foil. In the first example, I've used 24 gauge electrical wire wrapped around a piece of 1/2" plastic pipe. This is about the size of speaker wire. I super glued each end. Another option is using a spring. Get one with space between the coils. Most hardware stores will have a spring assortment. |
 |
|---|
| 3. | Spread a thin layer of caulking over the card stock, about the thickness of a playing card. Place the foil on top, dull side up and lightly smooth it down with your hand. |
 |
|---|
| 4. | Using firm pressure, roll the pipe over the foil in one continuous motion. The plastic pipe is easier to roll than the spring because it has a larger diameter. |
 |
|---|
| 5. | Immediately apply a coat of paint to the foil. I'm using the dark brown from the earth tone colors but feel free to use whatever color you like. Foil does not take paint well. No matter how thick your paint is, it will take two coats of paint before it will cover well. |
 |
|---|
| 6. | I dry brushed a medium brown-gray over top of it. You have to be very careful when dry brushing because the ridges are so fine that it's easy to just paint the thing solid gray accidentally. Cut the piece with scissors and apply it to your model. You may also dry brush it after it's on the model if you like but it's more difficult to dry brush after it's applied. |
 |
|---|