Half Timber Building Instructions
|
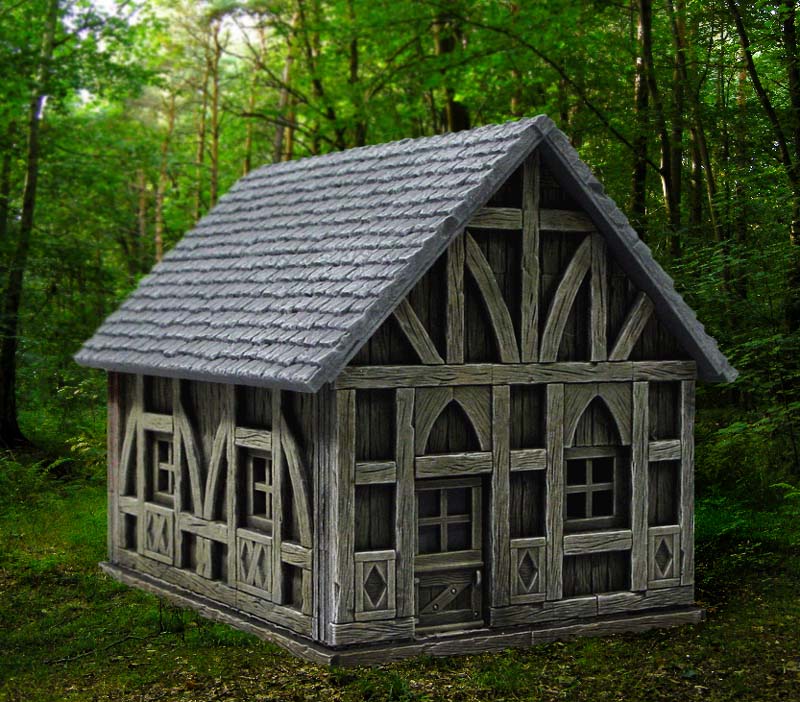
These instructions will show you the best way to plan and build a house using the half timber and panel molds. I have built three different houses, each using a different panel mold. Additional molds are needed to create the floor, chimney and roof of the house. |
|
About the Half Timber and Panel Molds
At the writing of this article, there are currently three different panel molds. These panels are used to build the walls of a house in even 1" increments. Afterwards, you cover the seams using the #225 Half Timber pieces.
 |
 |
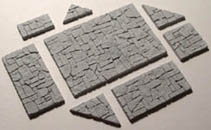 |
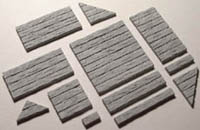
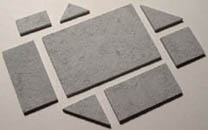
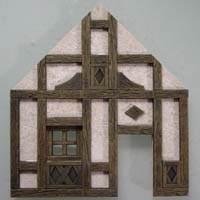
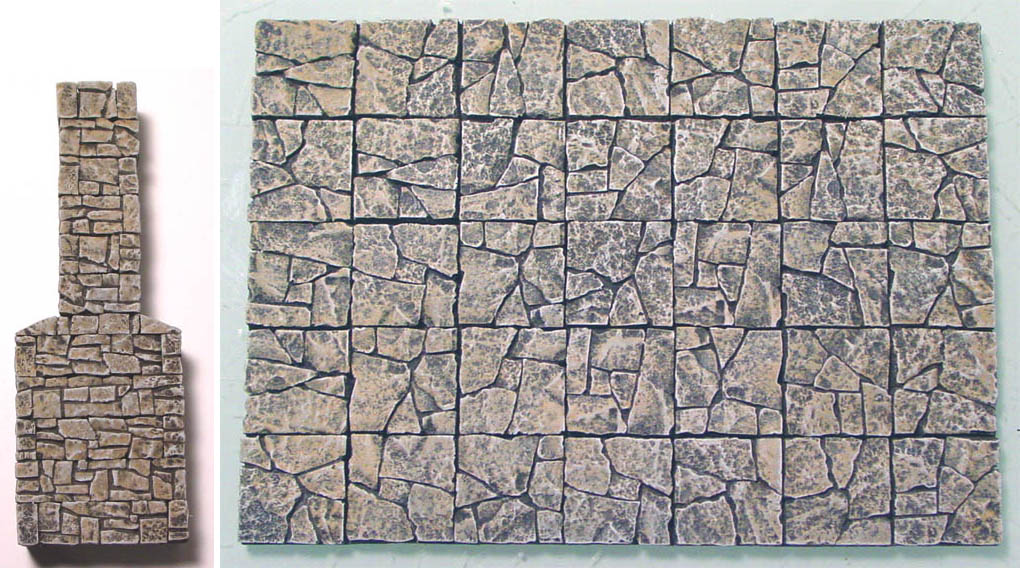
| #224 Wooden Panel Mold | #251 Stucco Panel Mold | #252 Rubble Panel Mold |
|---|---|---|
 |
 |
 |
Use the panels to make a wall section in even 1" increments. |
||
 |
 |
 |
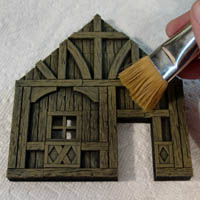
Glue on wooden timbers from mold #225. Trim off the excess. |
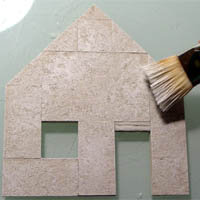
Paint the stucco wall panel cream and dry brush with white. |
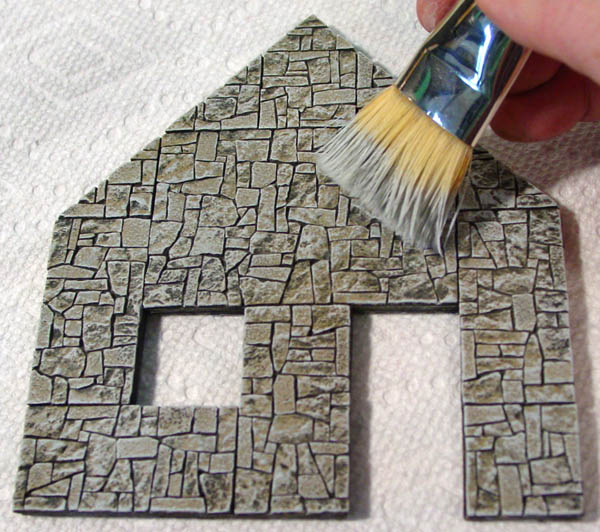
Paint the rubble wall panel black, earth medium and light gray. |
 |
 |
|
Spray paint black and dry brush with medium earth color. |
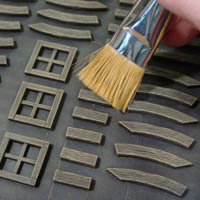
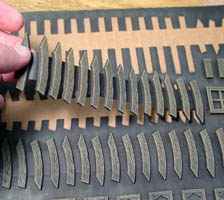
Paint all of the wooden timbers at once by spray painting black and dry brushing with medium earth color. |
|
 |
 |
|
Glue the painted timbers onto the wall. Trim off the excess timbers. |
||
House Building Principles
These are guidelines that I feel will make your model easier to build. However, these are only my personal opinion. Feel free to make your own rules if you have other ideas that will work better for your type of building needs.
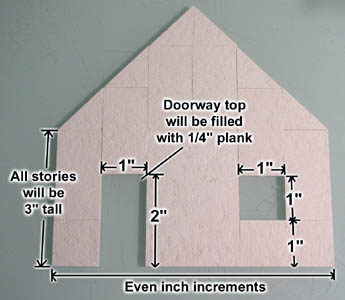
| 1. | All stories will be 3" tall. This is for 15-28mm figures. For other scales you would need to adjust this. Peaked wall sections will be in even inch wide measurements. This is because you want your roof slope to meet at the top corners of your wall. Odd measurements will mess this up. Doorway openings will be 1" wide x 2" tall. We will end up filling the upper 1/4" with planks later on to make the finished door size 1 3/4" tall. Window openings will be 1" tall, in increments of 1" wide and 1" up from the ground. |
 |
|---|
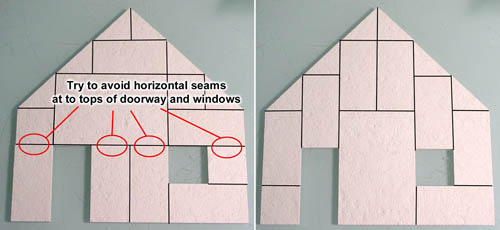
| 2. | Try to keep wall panels free of horizontal seams in the higher up area. Instead, try to put them 1" up from the ground level. This will keep you from having to put horizontal beams across the top empty area of your wall. However, it's not critical if you can't get this to work out. |
 |
|---|
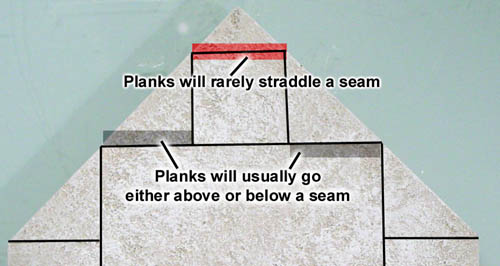
| 3. | Timbers will lay across the seams of the panels. Usually they will go on one side or the other of the seam. Doing this will keep you plank cutting to a minimum. On rare occasions you can use a plank to straddle a seam. However, this may result in you having to trim down the other planks that run into it. |
 |
|---|
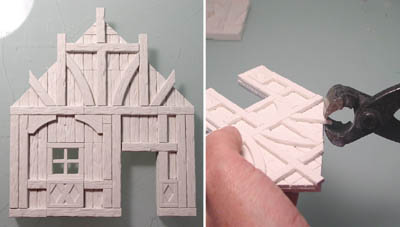
| 4. | Sometimes you will not want to cover all of the seams in a wall with planks because it would make the wall appear too busy. If you happen to miss a seam or two, it probably will not matter too much. Click on the photo and see if you can find the seam that was not covered with a plank. I felt that in this case, covering the seam would distract from the look of the wall. |
 |
|---|
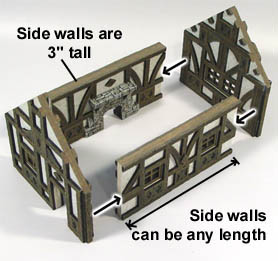
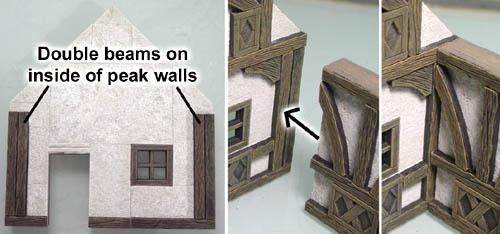
| 5. | Peak walls will cap off the sides of the house and the side walls will be sandwiched in between. Side walls are 3" tall and can be any length. You will need to put two planks where the side walls butt up against the peak walls (photos below). On the first two photos you can see that without two planks it leaves a gap in the inside corner of the wall. If you use two planks here, this fills the gap. |
 |
|---|---|---|
 | ||
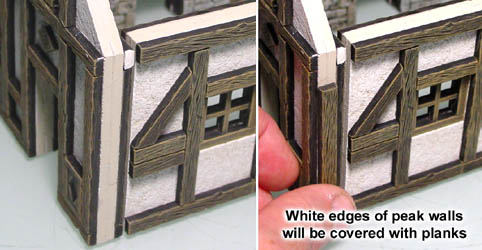
| 6. | After assembling the walls, you will see that the sides of the peak walls are unfinished, leaving a white strip. To cover this up, I'm gluing a plank over the white strip. Keep in mind that the strip should go all the way up but not interfere with the roof slope at the top corner. You may need to sand the top of the strip at an angle to match the rest of the roof slope angle. |
 |
|---|
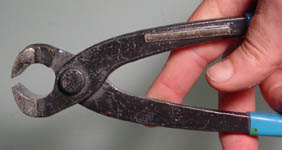
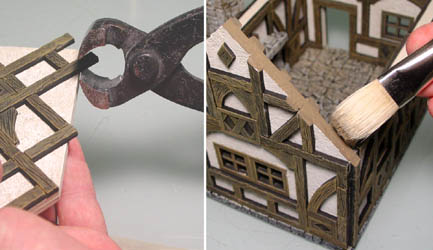
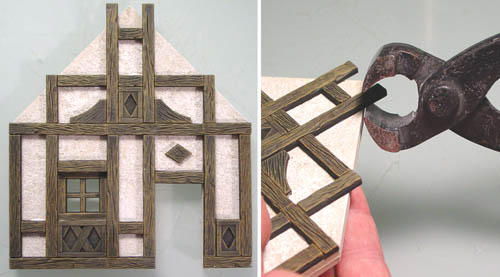
| 7. | One of the handiest tools I have purchased are these pair of tile nippers. You can find them at any hardware store or lumberyard and a cheap pair can cost about $10. These allow you to clip planks and panels fairly precisely. They also are great for roof shingle and floor tiles. |
 |
|---|
| 8. | When gluing planks onto the peak walls, planks will have to extend over the edge of the roof slope and need to be cut. Use the tile nippers to cut these off and sand or file any remaining plank that extends too far. Afterwards, I painted the top edges of the walls with a medium brown color. |
 |
|---|
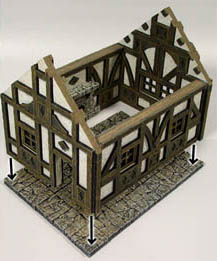
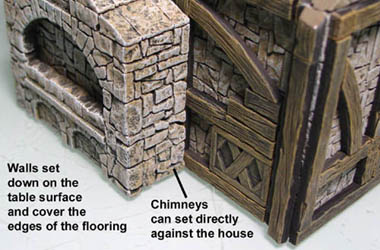
| 9. | Walls are set on top of the floors. If you choose not to have a floor, the walls would set straight down on the table top. |
 |
|---|---|---|
For the three example houses I have built on this page, I have chosen to set the walls on top of the floors. However, there is nothing wrong with setting the walls around the floors instead. Both types of options have their good and bad points. What follows below is a comparison of each method. |
Option A: Setting the Walls On Top of the Floor
The Good:
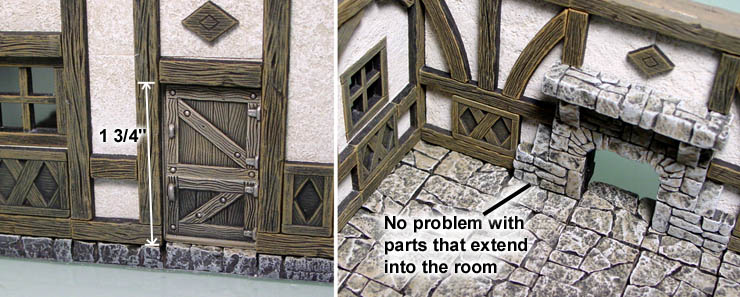
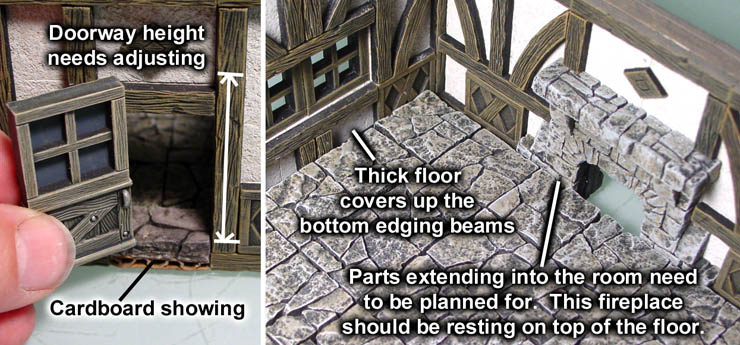
Your doorways will always be the exact height for your doors. On most of my molds, I have created doors that are 1" wide x 1 3/4" tall. With this method you don't have to worry if your doors will fit or not.
You also don't have to worry about things that extend into the room such as the fireplace in the right photo. Everything attached to the walls will set down directly flat on the floor with no problems.
The Bad:
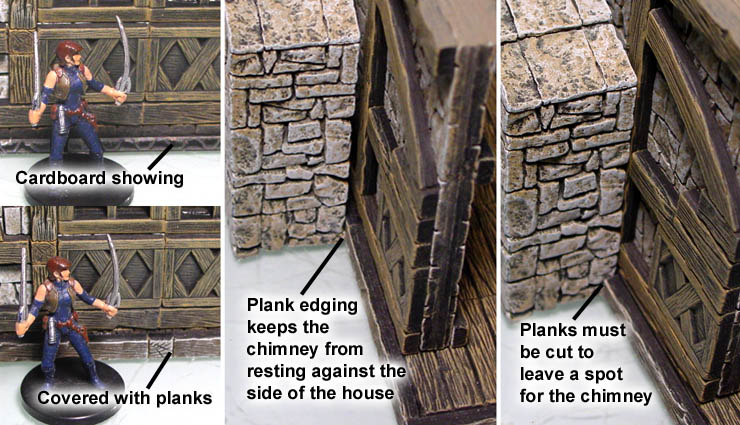
You will see the edge of your floor underneath the walls. On the upper left door photo this is not a problem. However, on the lower left photo I have floor panels mounted onto cardboard and you can see the edge of the cardboard.
You can cover up the edges of the floor with planks. However this can get into the way if you want to add other things on the outside of your walls such as a chimney or porch. These planks would have to be cut to allow these things to set flush against the side of your house.
Option B: Setting The Floor Inside of the Walls
The Good:
There is no need to cover the outside edges of the floor because the walls cover them. However, there will be a few places the walls do not cover such as the threshold of a doorway.
Also, any items such as a chimney or porch can be placed directly onto the outside of the house without any trimming or height adjustment.
The Bad:
You will need to put a threshold under your doors. Depending on your floor thickness, you may have trouble adjusting the height of your door frames to fit your doors afterwards.
Also, any items extending into the room and resting on the floor (such as a fireplace) will need to be planned for. In the bottom right photo, the right wall is actually setting 1/4" away from the edge of the floor.
Steps in Planning Your House
You may have an idea for a house that you want to build but don't really know where to start. These instructions show you how to plan your own house using the Panel molds and Half Timber molds.
The house size used in the example below is the same size used on the finished buildings shown at the bottom of this page. If you want to build one of the houses at the bottom of this page, then use the sizes and number of castings shown in this section.
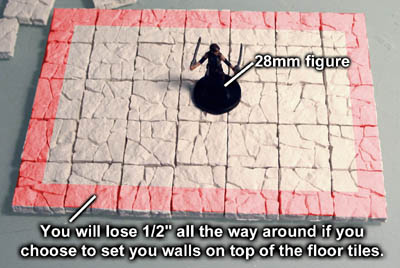
| 1. | Decide the floor area of the house first. I suggest you keep the floor in even inch measurements. Start by placing some floor tiles down and comparing it to the miniatures you are going to use. Keep in mind that you're going to lose 1/2" all the way around if you choose to set the walls down on top of the floor. If you don't have any floor tiles nearby, you can always draw your floor out on a piece of graph paper. |
 |
|---|
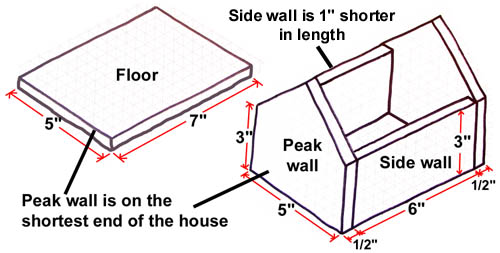
| 2. | For this example, my floor is 7" x 5". It's best to make the shortest side of the house the peak wall. The side walls of the house will be 1" shorter in length than the floor because the peak walls will take up a 1/2" on each end. Now we have the measurements for each wall of the house. Don't worry about how tall the peak walls are yet. |
 |
|---|
| 3. | Figuring Panel CastingsThis simple formula will tell you how many castings of a panel mold to make in order to build your house. First you add up how many linear inches of wall you have. |
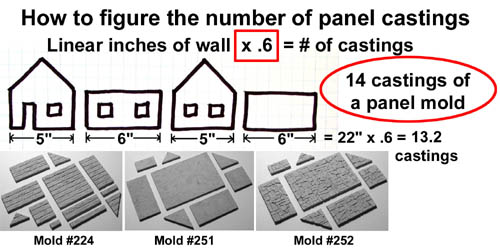 |
|---|
| 4. | Figuring Timber CastingsThis formula will tell you how many castings of the Half Timber mold to make in order to build your house. First you add up how many linear inches of wall you have. |
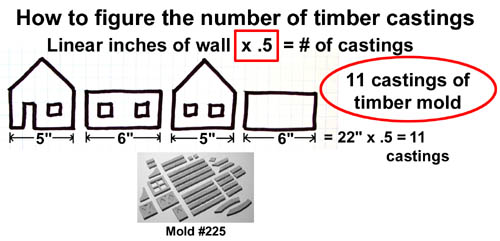 |
|---|
Please note: The number of castings figured here are enough to cover both sides of each wall.
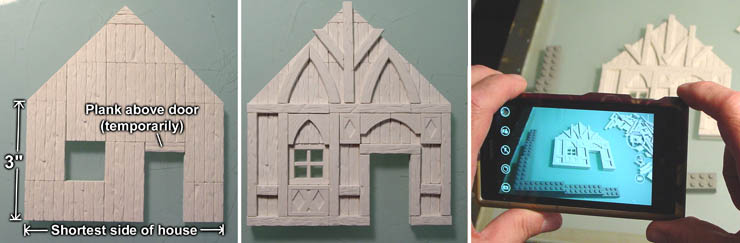
| 5. | The next step will be to figure out where you want your door and windows to be on your wall sections (you will be making 4 of them). What we will do is temporarily place down panels to see if there is a particular arrangement that you like. You can also temporarily set down timbers on top of them to get some idea of what the finished wall will look like. If you come up with something you really like and don't want to forget it, take a picture of it with your phone so you can remember how things are laid out. You do not have to figure out where the timbers are being laid down at this point. Once you have a good idea of how the panels will be laid out, then it's time to glue them together. |
|---|---|
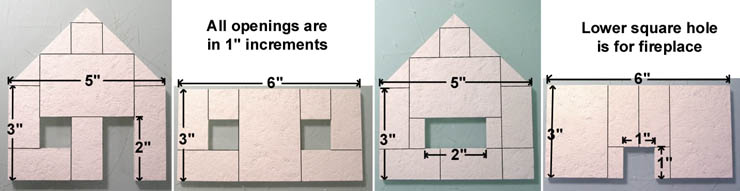
 |
| 6. | The photo below shows my final arrangement of panels for each wall section. Note that all of the openings are in even 1" increments. |
|---|---|
 |
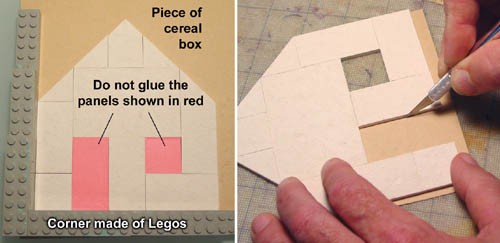
| 7. | Glue all of your panels down to a piece of cereal box. I have used a corner made of Legos to help keep everything square. The red panels are placed smooth side up to hold the position of the door and window. Do not glue the panels in red. When dry, trim off the extra cereal box. |
 |
|---|
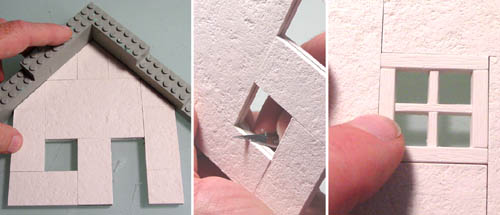
| 8. | Glue panels onto the back side of this wall section. The Lego corner helps make sure the panels line up front to back. Once dry, scrape out the window holes to make sure your windows will fit easily. Once these items are painted the window will fit much tighter. |
 |
|---|
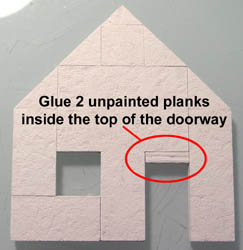
| 9. | Since I am gluing these wall sections on top of the floor, I need my doorways to be 1 3/4" tall. To do this I'm going to glue 2 planks across the inside top of the doorway. If for some reason you forget to do this, you can always glue painted planks in here later and it won't hurt anything. |
 |
|---|
| 10. | That's all for this section of the instructions! At this point you should have four unpainted wall sections. What happens next is that we will paint all of the wall sections and all of the wooden beams separately. The painted beams will be glued onto the painted walls to finish the project. |
 |
|---|
Painting Instructions
We will use colors that I already have on the web site. The colors used here are:
|
|
|
|
|


For Those Using the Wood Panel MoldSkip down to the Gluing On the Timbers section. For the wood panel walls only, we will glue all of the planks on before painting anything. Use a pair of tile nippers to trim off the excess planks and sand the roof slopes down smooth. For the other panels molds we will paint the walls and timbers separately before gluing them on. |
 |
| 1. | 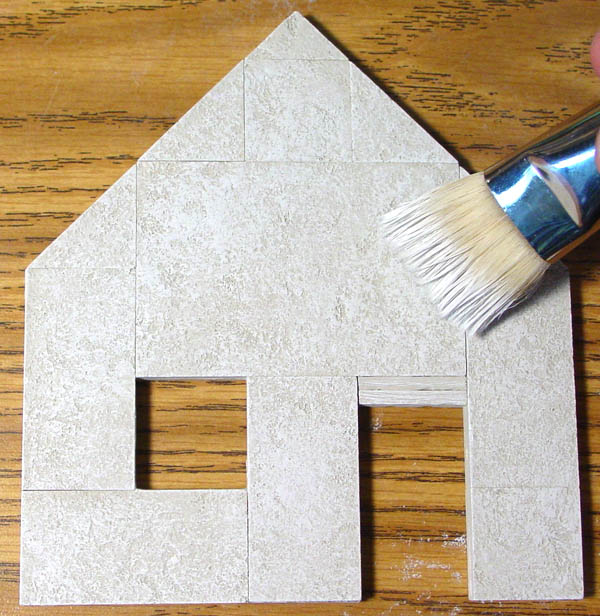
Painting Stucco PanelsFirst, paint the stucco panel pieces the earth tone light color from the Earth Tone Painting Instructions page. This is a light cream color. You may have to thin the paint down so that it will get into all of the detail. Once dry, dry brush it solid white. Paint all four stucco wall panels on both sides using this method. Click on the photo for a larger view. This will show the finished painted stucco panel in detail. |
|---|
| 2. | 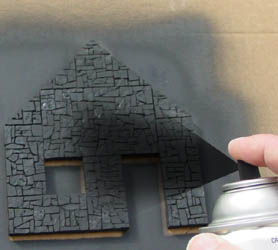
Painting Rubble PanelsFor the first coat I am spray painting it flat black. Be sure to do this outside or in a well-ventilated area. The trick is to get the paint into all the cracks. To do this you will have to paint the walls straight-on and also spray from all the angles you can think of. Be sure to paint both sides of each wall section. |
|---|
| 3. | The second coat of paint is earth tone medium color from the Earth Tone Painting Instructions page. This is sort of a "pumpkin pie" color. Dry brush this on lightly and when the brush starts to run out of paint, then dry brush heavily. If you do it right, each stone should have varying shades of brown on it with no black. If you do it badly you will have solid brown stones with no variety of shade on each stone. Click on the photo for a larger view. |
 |
|---|
| 4. | The last coat of paint is castle gray light color from the Castle Gray Painting Instructions page. Dry brush this on lightly. This color will highlight the edges of the stone in gray. It will also gray out the brown a bit. After the brush runs a bit dry, you can go a little more heavily but keep it lighter than when you were applying the brown. Click on the photo for a larger view. |
 |
|---|
| 5. | 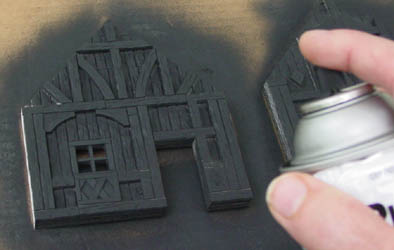
Painting the Completed Wooden PanelsFor the wooden panels, you don't have to paint the panels and timbers separately. Glue all of the timbers on, trim the excess planks off and sand any rough edges. For the first coat I am spray painting it flat black. Be sure to do this outside or in a well-ventilated area. The trick is to get the paint into all the cracks. To do this you will have to paint the walls straight-on, and also spray from all the angles you can think of. Be sure to paint both sides of each wall section. |
|---|
| 6. |
If you are using house paint, thin the paint slightly and make the brush as dry as possible. If you are using acrylic craft paint then you may not have to thin it. If the paint is too thick, you will get solid brown on the top of your planks. If you thin the paint but put too much on, the paint will run into the cracks. The trick here is to thin the paint slightly, dip your brush in and brush almost all of it off on a paper towel (even more than usual for dry brushing). What you want are lots of thin coats of paint. When first brushing over the planks, it will not look like anything is happening. This is exactly what you want. Don't go back for more paint but instead keep brushing over the planks. If the coat of pumpkin pie color is thin enough, the black transmutes through the brown and changes the color completely. Pumpkin pie turns into a dark oak. Remember to brush lightly, keep the paint thin and keep the brush really dry. |
|---|

| 7. | Painting the Wooden Timbers If you have no idea how many castings of this mold you will need, go up to the Figuring Timber Castings section above to find out. |
 |
|---|
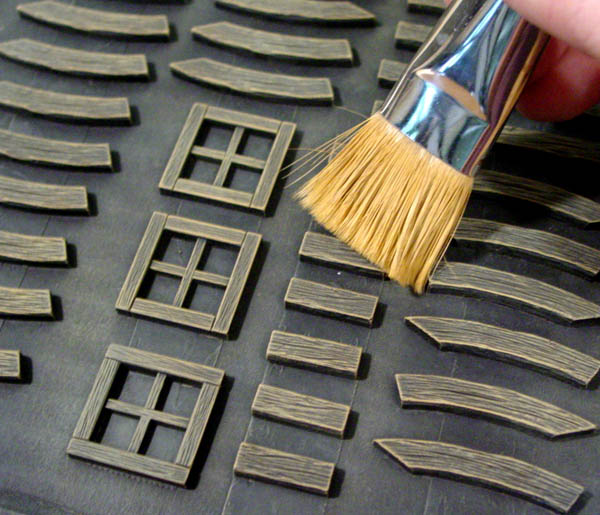
| 8. | Before we can spray paint these black, we need to stick these down to a piece of cardboard. I'm going to use cheap permanent double stick tape. You need the permanent kind or the pieces will not hold down. |
 |
|---|
| 9. | Before sticking them down, check the back of your planks. If the backs are concave, then you will need to sand the back slightly with fine sandpaper so they will stick to the tape properly. Simply lay a piece of fine sandpaper on a flat surface, place a plank on the sandpaper and give it a few quick swipes. This is much quicker and easier to do than you may think. |
 |
|---|
| 10. | Check to see if your pieces are stuck down properly by taking a wide brush and brush across them with medium pressure on the cardboard. Just pretend you are dry brushing your planks with paint. If they do not come loose from the cardboard then you know they will stay in place when you go to paint them. |
 |
|---|
| 11. | The first coat I am spray painting it flat black. Be sure to do this outside or in a well-ventilated area. Be sure to spray from all angles so that you get the sides and ends of each plank as well. |
 |
|---|
| 12. |
Click on the photo for a larger version of it. If you are using house paint, thin the paint slightly and make the brush as dry as possible. If you are using acrylic craft paint then you may not have to thin it. If the paint is too thick, you will get solid brown on the top of your planks. If you thin the paint but put too much on, the paint will run into the cracks. The trick here is to thin the paint slightly, dip your brush in and brush almost all of it off on a paper towel (even more than usual for dry brushing). What you want are lots of thin coats of paint. When first brushing over the planks, it will not look like anything is happening. This is exactly what you want. Don't go back for more paint but instead keep brushing over the planks. If the coat of pumpkin pie color is thin enough, the black transmutes through the brown and changes the color completely. Pumpkin pie turns into a dark oak. Remember to brush lightly, keep the paint thin and keep the brush really dry. |
|---|
| 13. | When finished, pull up the tape and the planks should come up with it. Your wooden planks are now completely painted and ready to glue on. The most time consuming part of the whole process is sticking them down onto the cardboard at first. When pulling them off of the tape, it's best to sort them into piles so you can find the right length of plank you need easily. |
 |
|---|
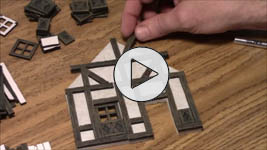
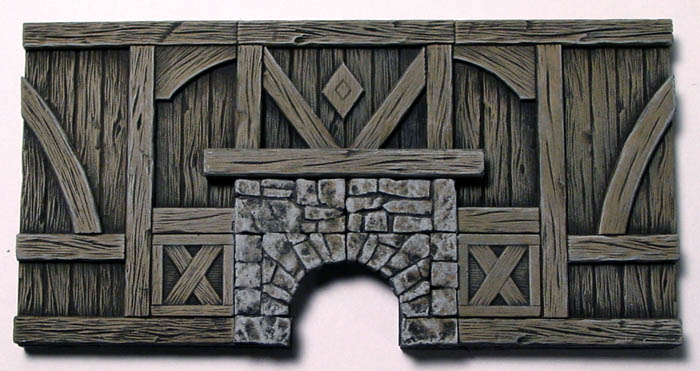
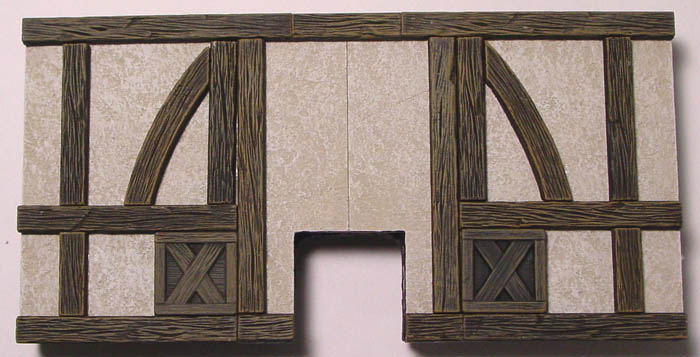
Gluing On the TimbersClick on the video to watch it on YouTube. This video describes in detail how the planks are meant to be arranged on the sides of your house. |
 |
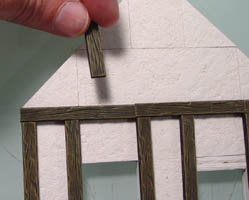
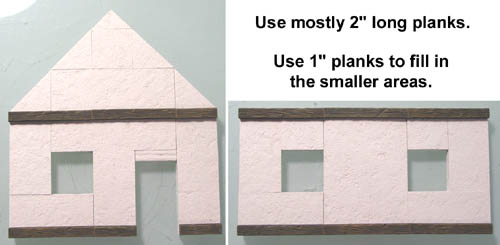
| 1. | Start by gluing 2" long planks horizontally across the tops and bottoms of the wall sections. Any odd lengths such as around the bottom of the door, fill in using the 1" planks since all of your wall sections are in even inch measurements. |
 |
|---|
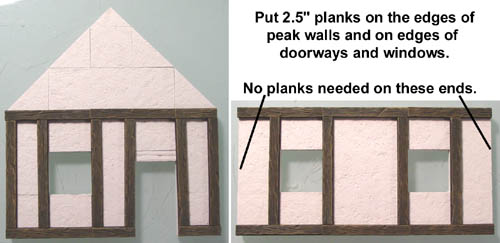
| 2. | Next glue the 2 1/2" long planks vertically on the edges of the door, windows and any seams you want to cover. Notice that we did not put any planks on the edges of the straight wall section (photo on the right). This is because this straight wall will butt up against the peak wall so no edge is needed. |
 |
|---|
| 3. | On the inside of both peak walls, glue double beams on the ends. This is because you need a 1/2" wide flat surface to mount the side wall onto. |
 |
|---|
| 4. | Next, put a plank above the doorway and then do your best to fill in planks anywhere you see fit. Notice that the planks will extend over the edges of the roof slope. Trim these off using tile nippers and then sand down any excess that sticks up. |
 |
|---|
| 5. | You will notice that this will leave a white edge along the tops of your peak walls. You can cover this up using a medium to dark brown paint. Almost any color of brown will do because you will only see this when the roof is removed. |
 |
|---|
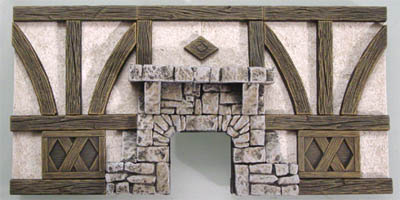
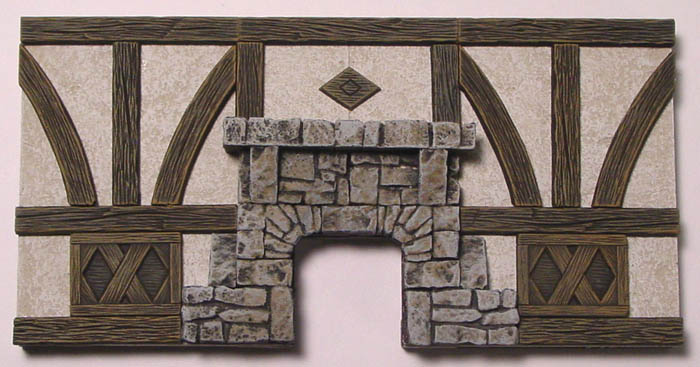
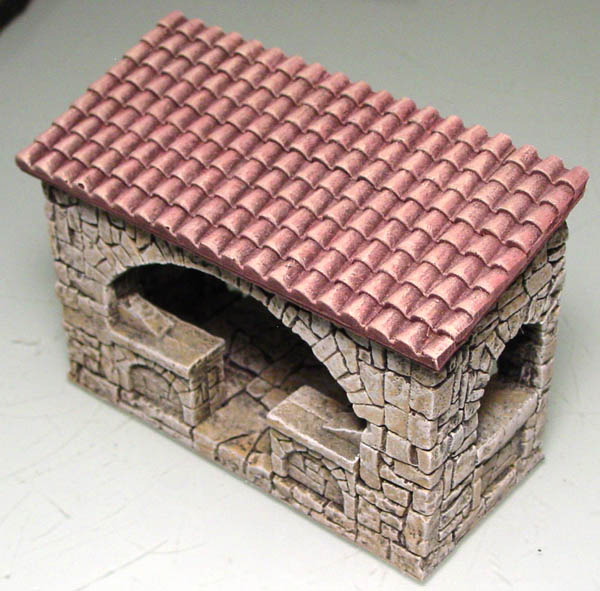
| 6. | If you have made a fireplace, paint it and glue it over the 1" square hole in the wall. Then you can glue your planks around it to finish the wall. I made the fireplace using mold #263. |
 |
|---|
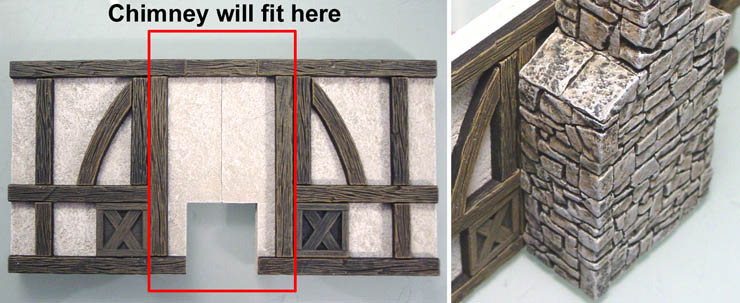
| 7. | On the back side of the fireplace, be sure to put down planks directly under where the chimney will set against. This will give you a nice flat surface to glue the chimney to. I made the chimney using mold #263. |
|---|---|
 |
| 8. | In case you might have some difficulty figuring out how to build a chimney for your house, below is a diagram of how the blocks from mold #263 could go together to make a simple chimney. The flue (top of the chimney) will be glued onto the base. I would let each part dry before gluing it all together. I do not have specific plans for each of the chimneys below. The more decorative ones use blocks from mold #259. Feel free to add more decoration or create any type of chimney you like. |
|---|---|
 |
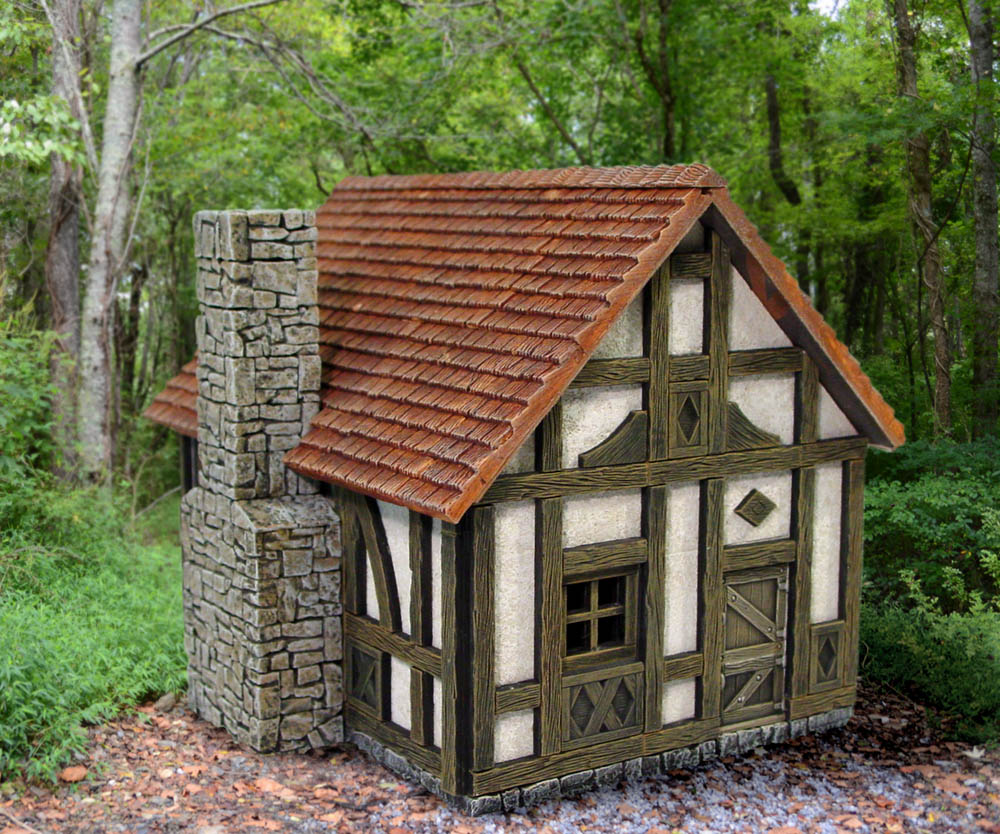
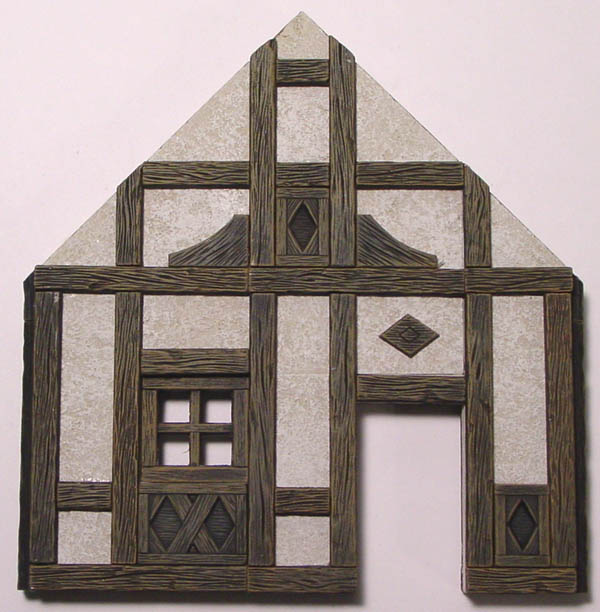
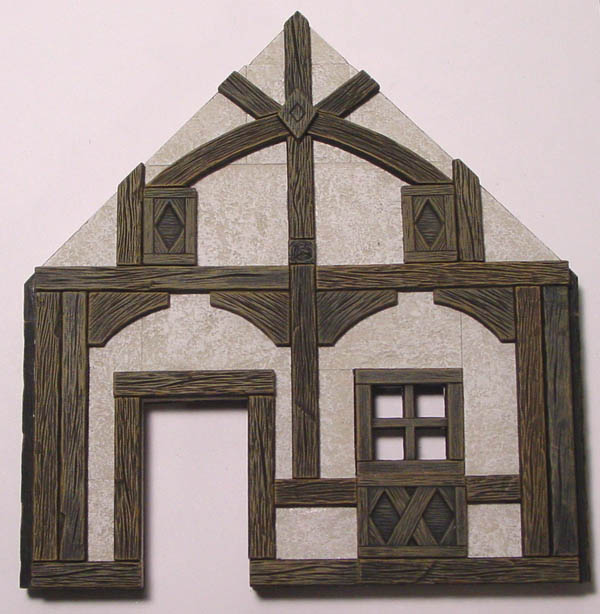
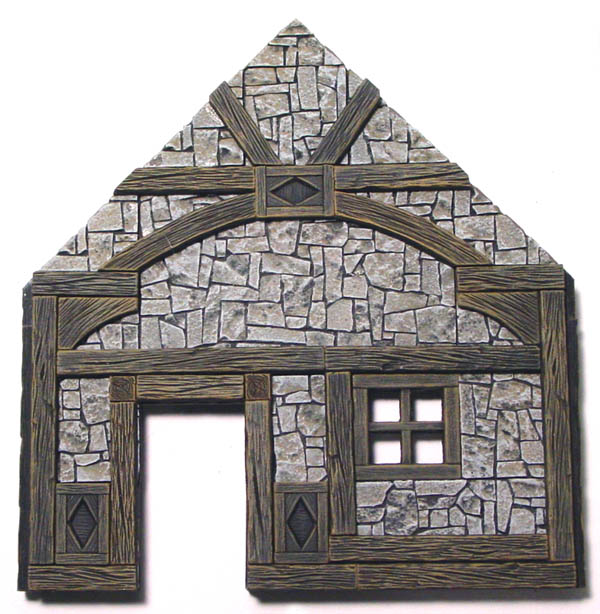
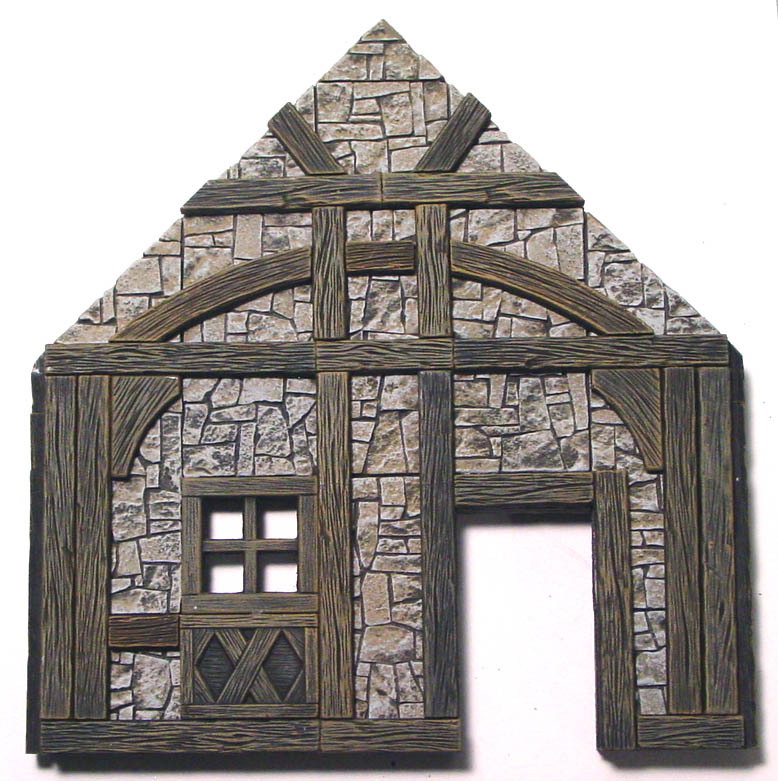
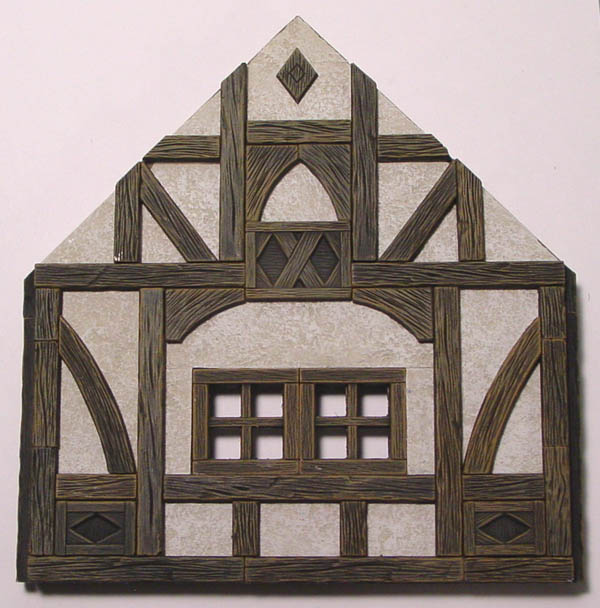
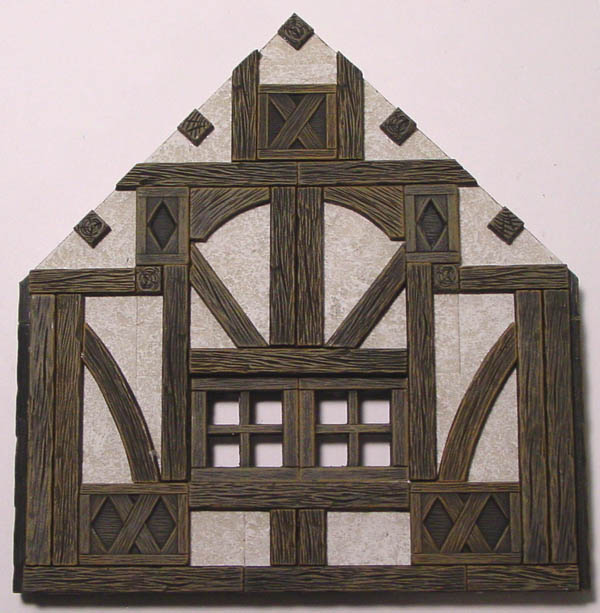
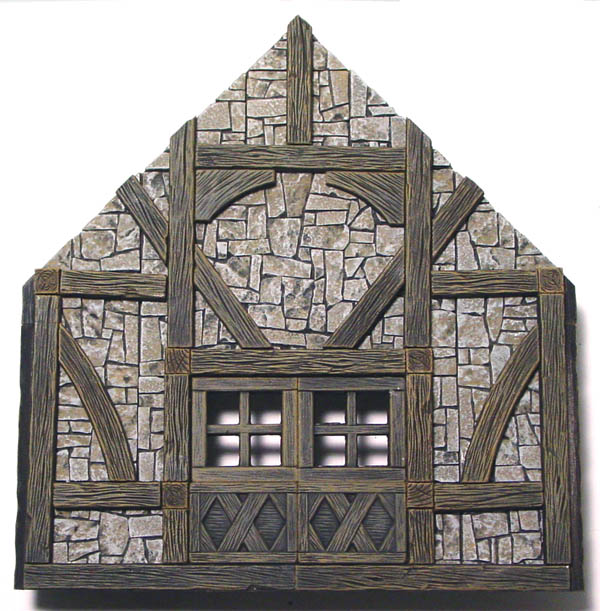
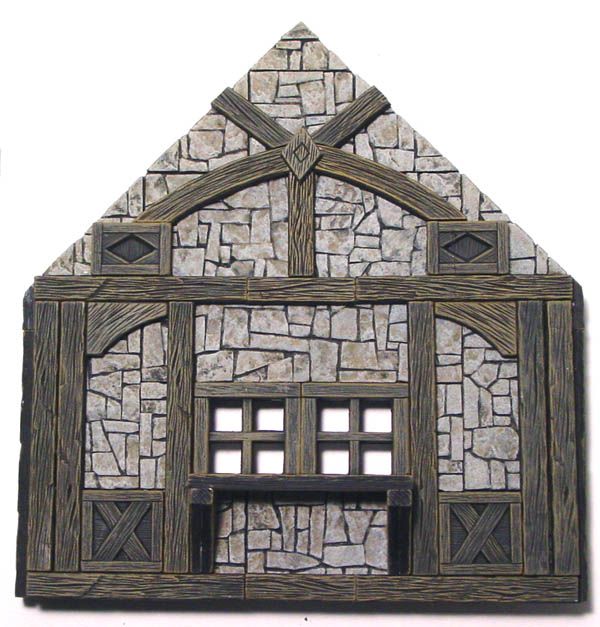
Finished Photos
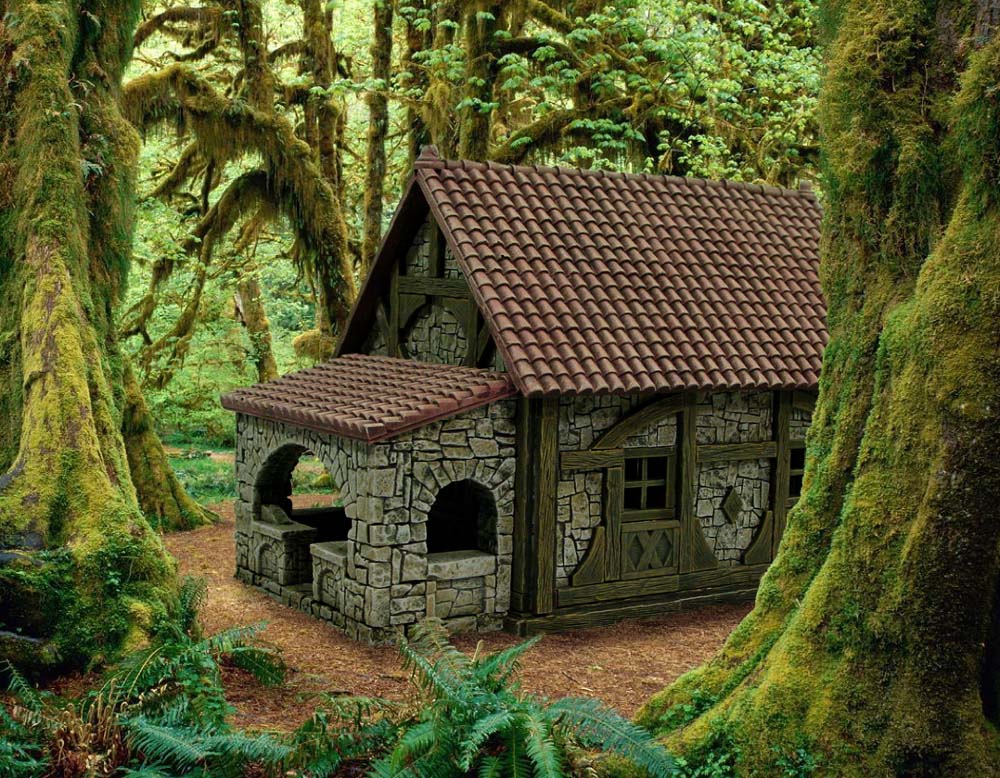
I have made three different houses using the panel and timber molds to give you an idea of the variety of things you can do with these. If you want to build any of these houses, I believe these photos would give you enough information to do that.
Each wall section includes two photos: one as viewed from outside the house followed by one as viewed from inside. Click on each photo for a larger view.
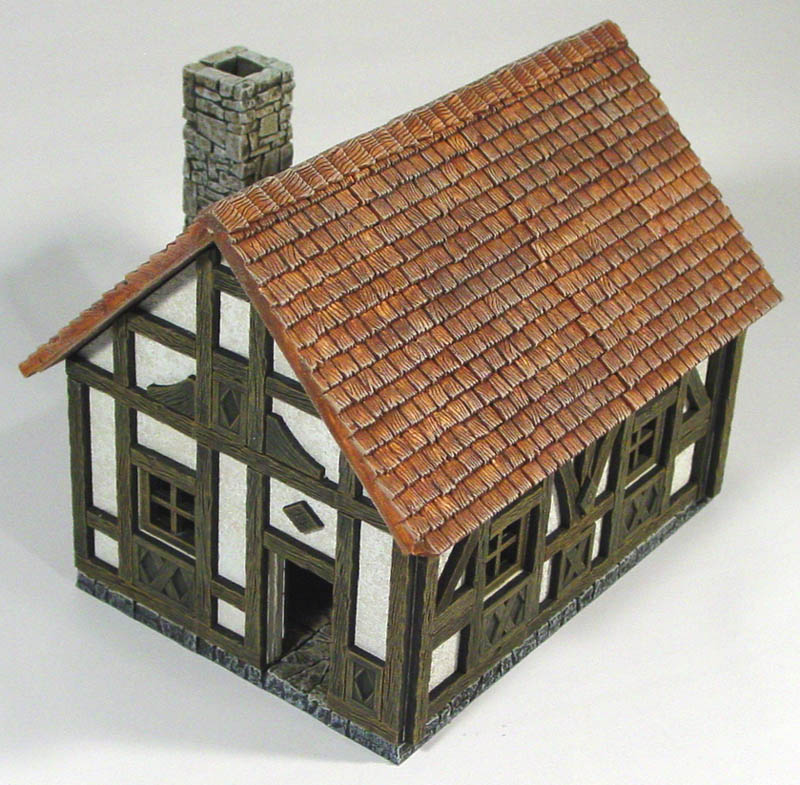
The houses in this example are 5" x 7" in size, which is the same size used in the Steps In Planning Your House section. To build one of these houses you will need 14 castings of a panel mold and 11 castings of the Half Timber mold. Roof instructions are on the Tips & Tricks 5 page.
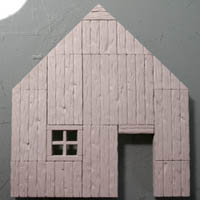
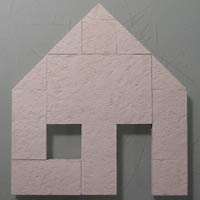
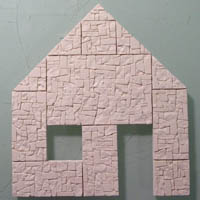
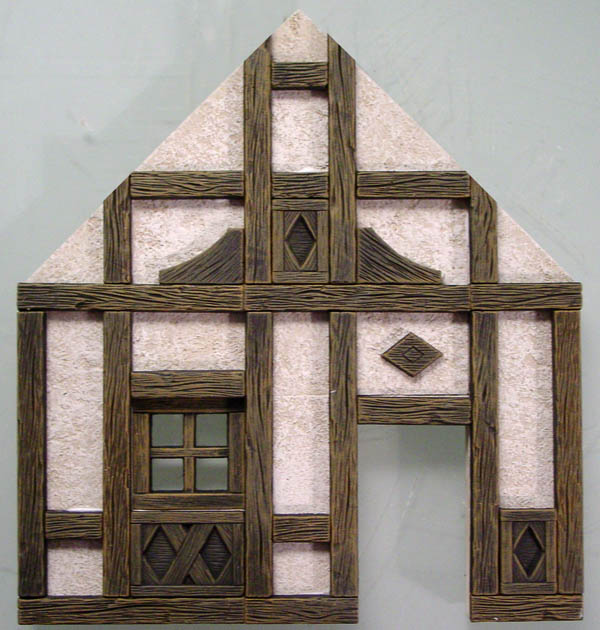
| Panel Design | Wooden | Stucco | Rubble |
|---|---|---|---|
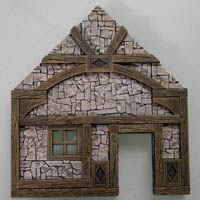
| Complete Model | 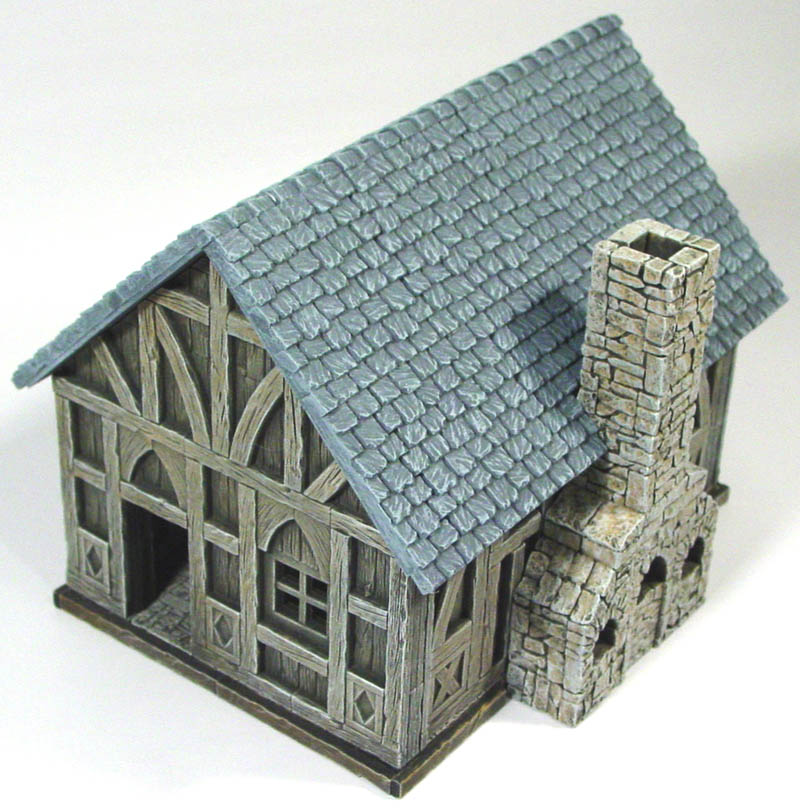 |
 |
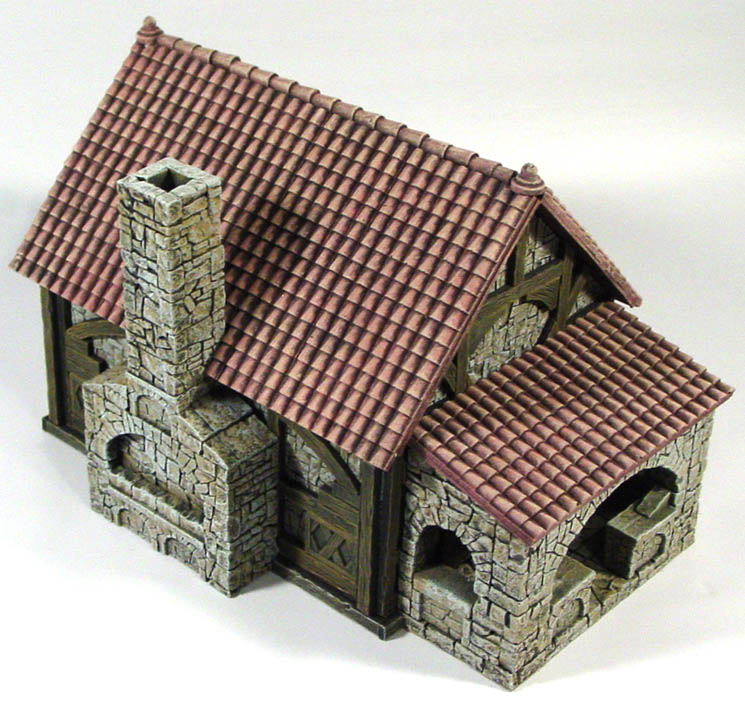 |
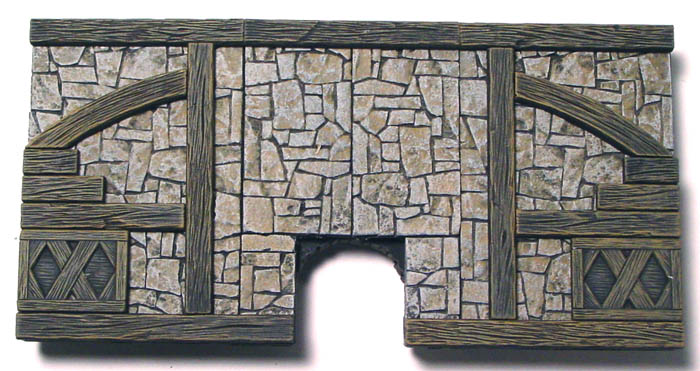
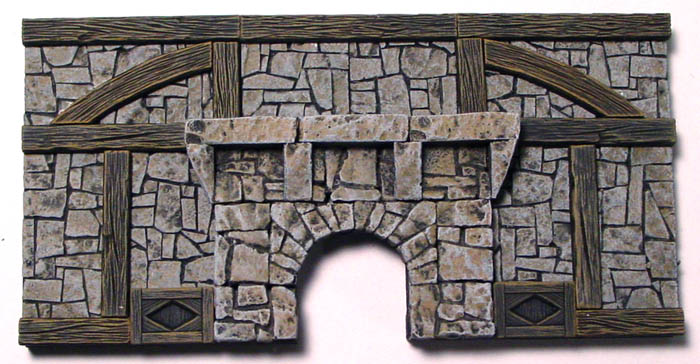
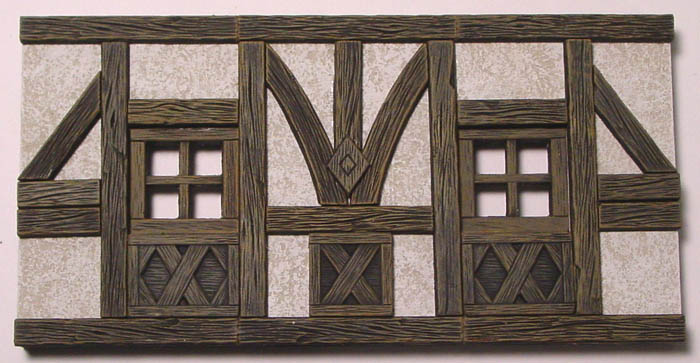
| Wall Molds | #224 and #225 | #251 and #225 | #252 and #225 |
| Roof Mold | #245 | #240 | #230 |
| Floor Mold | #252 | #264 | #224 |
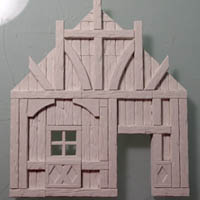
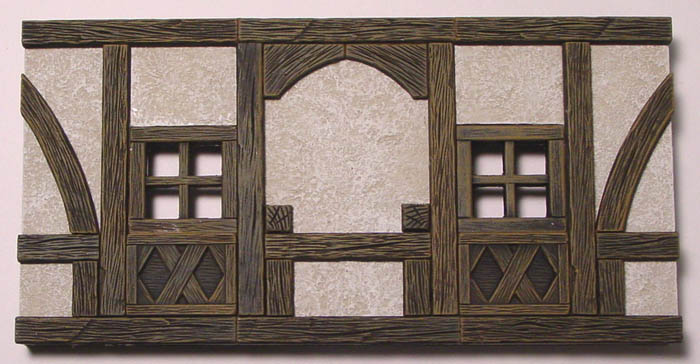
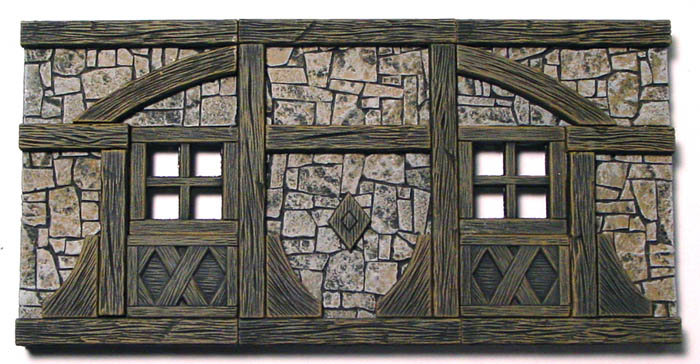
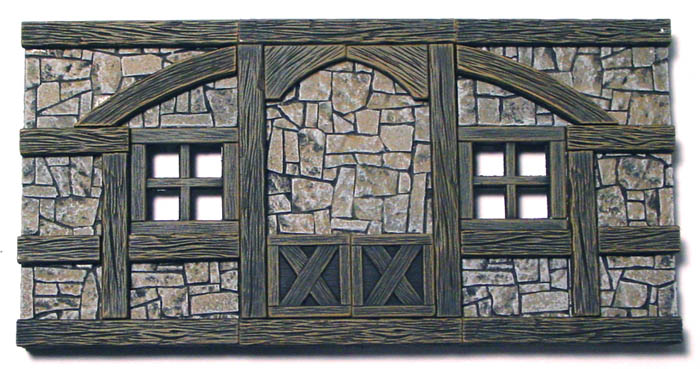
| Front Wall | 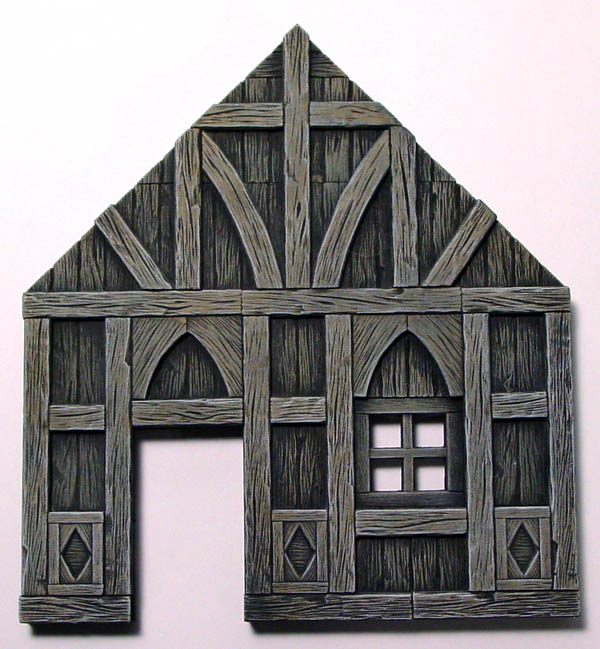
 |
 |
 |
| Back Wall | 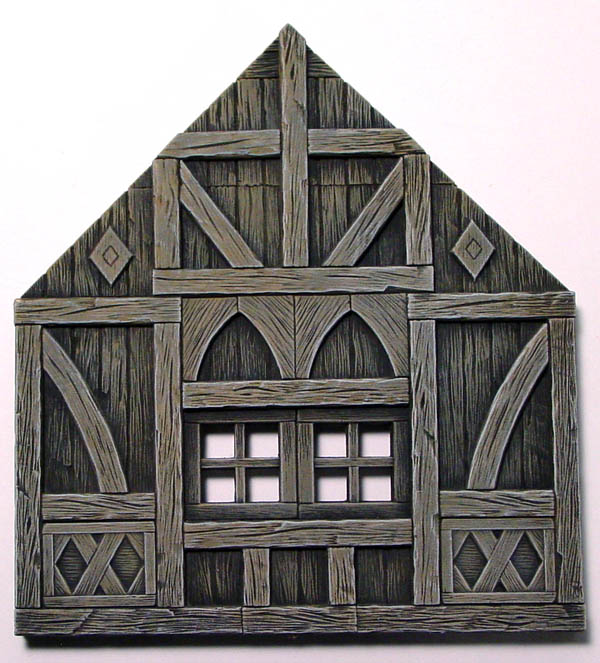
 |
 |
 |
| Chimney Side Wall | 
 |
 |
 |
| Other Side Wall | 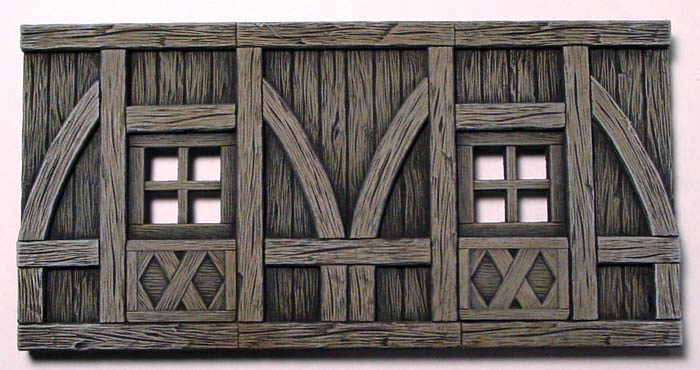
|
 |
 |
| Chimney and Floor | 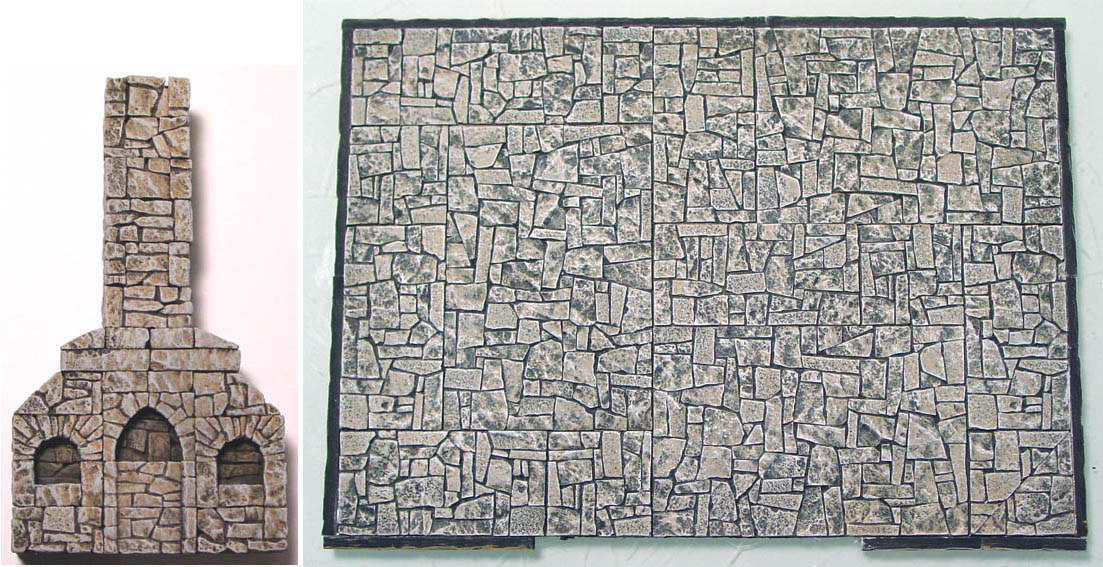 |
 |
 |
 Click on the photo to the right for a larger view of the porch.
The stone porch and chimney on the wooden house (left column) was made using pieces from molds #263 and #259. The slate roof was made using mold #245. The wooden house had a final drybrush of light gray.
The chimney on the stucco panel house (center column) was made using only mold #263 and the wood shingle roof was made using mold #240.
The chimney on the rubble house (right column) was made using pieces from molds #263 and #259. The clay tile roof was made using mold #230.
 |
 |