Zombicide Walls Building Instructions
|
This page contains instructions on how to use mold #344 to build walls for the Zombicide Black Plague board game. You will need 24 castings of mold #344 to build this set. Click the photo for a larger view. |
|
Casting and Gluing Tips for Mold #344
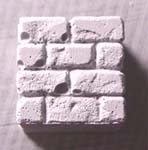
| 1. | These steps show helpful tips on casting blocks from mold #343. This is an extreme example of some of the problems you can have with casting this brick texture. This casting was done without any surfactant and without washing the mold before using it the first time. This texture is not very deep but there are still many tiny steep angled edges that the plaster must flow into to get a good casting. |
 |
|---|
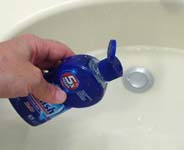
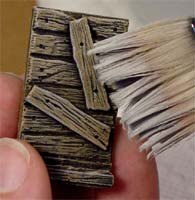
| 2. | Before your first casting, fill a sink with a couple inches of water and put one small squirt of Jet Dry into the water afterwards. Jet Dry is a rinse agent used in an automatic dish washer to help get rid of spots on your drinking glasses. It breaks the surface tension of the water so that water (and plaster) can flow into all the cracks. Do not use ordinary dish soap! It will cause more bubbles than it gets rid of. |
 |
|---|
| 3. | Next, submerge the mold in the water. Then use a small stiff bristled brush to work the air bubbles out of all corners of each block. I would have used a toothbrush for this but a toothbrush is just too large to fit down into the pockets of the mold. For the best casting results, follow the Advanced Casting Instructions by using a surfactant and a vibrating table. |
 |
|---|
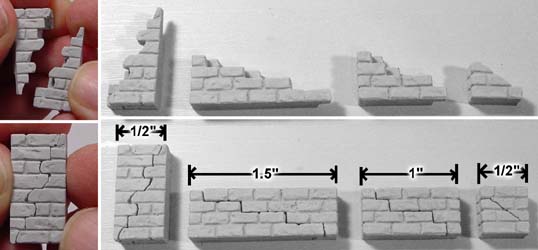
| 4. | The ruined blocks can be used to make full blocks. Simply take two identical blocks and fit them together to make a full block. These photos show the length of each of the blocks after being assembled. This way you won't waste any blocks if you don't want to use them as ruined blocks. |
 |
|---|
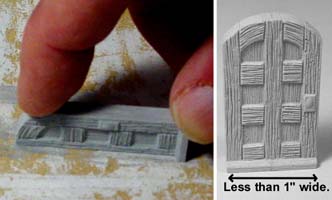
| 5. | To get the door to fit together properly, you will need to sand the scraped edge of the door slightly. This will make a better glue joint for a stronger door. The center seam should be hidden in the wood grain. Also, the width of the door is less than 1". It's skinny enough so that you can easily place and remove the doors from the doorways even after the walls are painted. |
 |
|---|
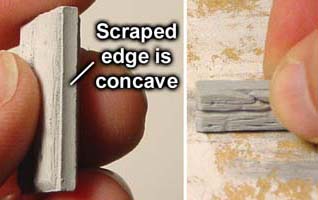
| 6. | The board sections are slightly short so that they will nicely fit into the windows after you paint them. However, the scraped edge may be concave which will make gluing them a problem. Sand the scraped edge before gluing them together to make a stronger bond. These board sections will be very weak at the joints. |
 |
|---|
Building Instructions
You will need 24 castings of mold #344 to build this set.
Assembling the Wood Sections
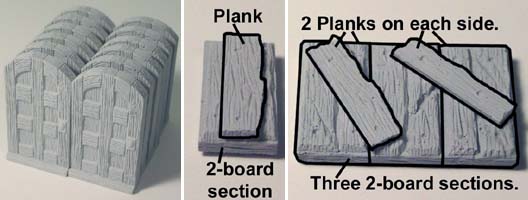
| 1. | Start by gluing together all 24 door halves to make 12 complete doors. For the other four doors, glue a plank onto a 2-board section. Also glue three 2-board sections together and glue 2 planks on both sides. |
 |
|---|
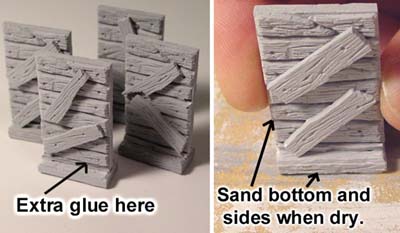
| 2. | Stand the longer section on top of the smaller one and put a lot of glue on the joint. When dry, sand the bottom so the door will stand up without rocking. Also, sand both sides of each door a lot. The plank sections are made to fit tightly for windows, but as a door you want extra room so you can easily place and remove them. Make 4 of these doors. |
 |
|---|
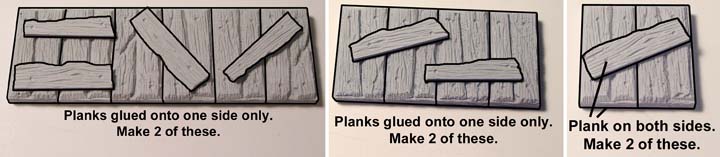
| 3. | Next we will make boarded up window sections. Make 2 each of these. The first two only have planks on one side. The last one has planks on both sides. |
|---|---|
 |
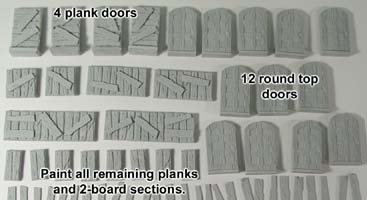
| 4. | Here is a complete list of wooden items to be painted. You will have 12 round top doors, 4 wooden slat doors, six of the larger slabs with planks glued across them and all of the remaining planks. |
 |
|---|
Assembling the Brick Sections
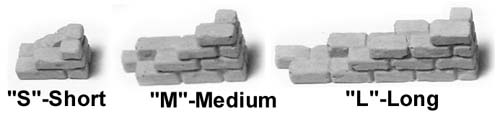
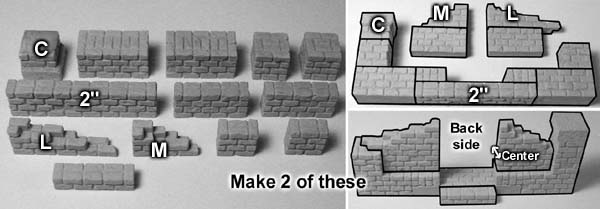
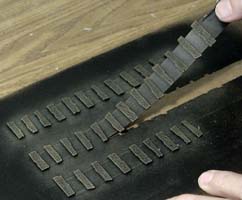
| 5. | When gathering the ruined brick pieces, I will label them as "S", "M" and "L" to represent short, medium and long pieces. |
 |
|---|
| 6. | There are also a couple of footer blocks that look almost the same. The one on the left is 1/2" wide. The one on the right is used for making a corner. Since these are easy to mix up, I have labeled the corner block with a "C" on the plans below. The regular 1/2" footer will have no label. |
 |
|---|
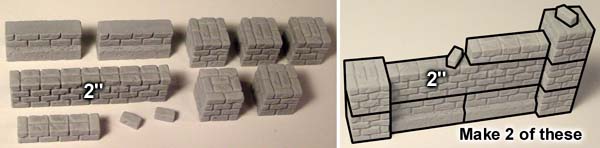
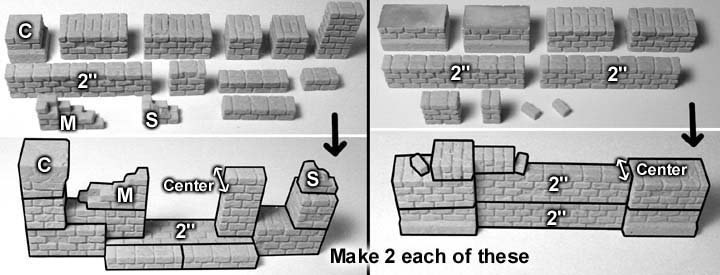
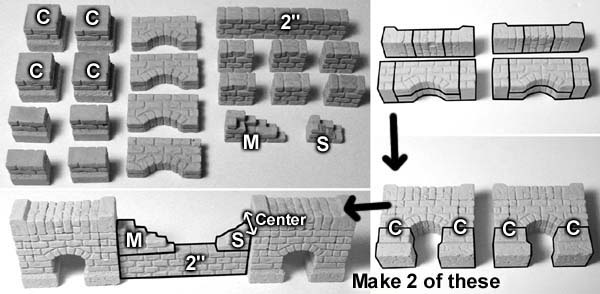
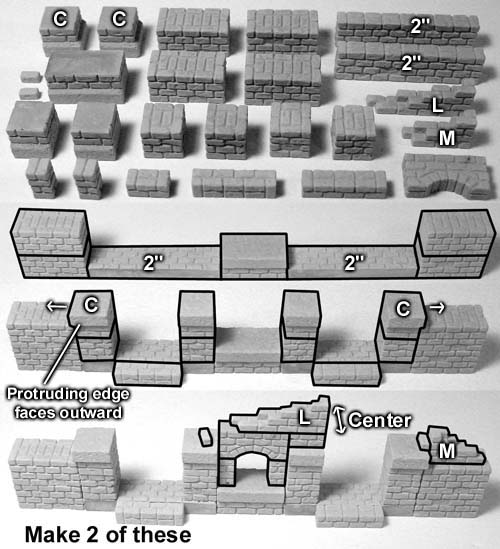
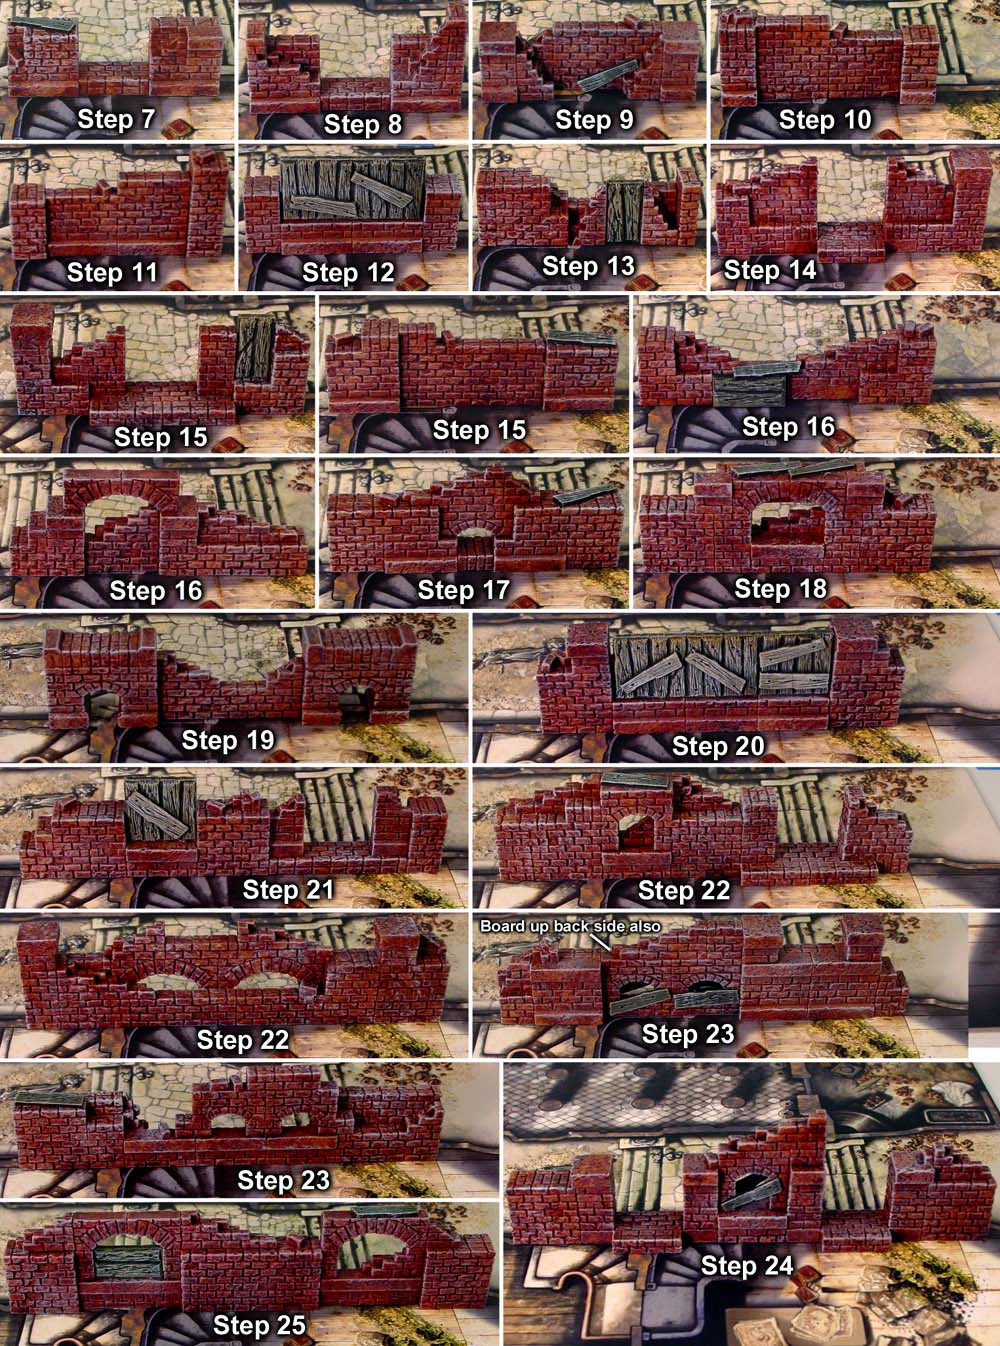
| 7. | 3" Wall SectionsThe longer blocks shown are all 1" long blocks. From now on, I will not label the 1/2" and 1" long blocks. I will only put a measurement on the odd length blocks. The bottom block on the doorway is just a regular flat block laid on its side. I will make 2 of every wall section. |
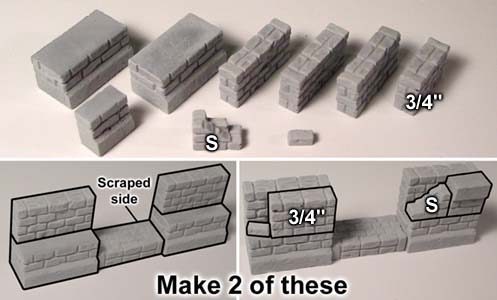 |
|---|
| 8. | Once again the bottom of the doorway is a regular block laid on its side. The two smallest blocks have brick running in different directions. One is used on the left side and the other is used on the right middle. |
 |
|---|
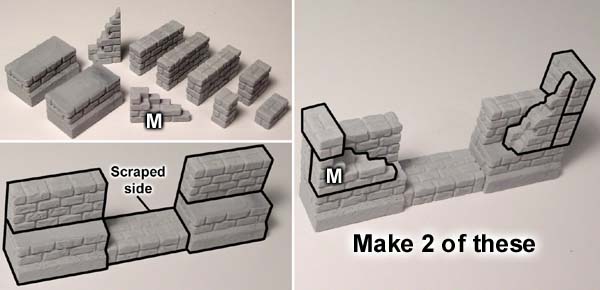
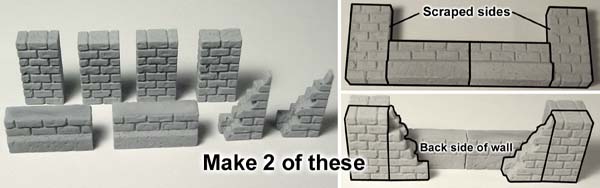
| 9. | For this wall section, the footer blocks are stacked on top of each other, scraped side to scraped side and are faced forward. The tall ruined blocks are placed on each side and a tiny brick is glued randomly on top. |
 |
|---|
| 10. | The top block on the left post is laid on its side, scraped side facing inward. The wall in the middle is centered between the front and back of the posts. |
 |
|---|
| 11. | The wall in the middle is centered between the front and back of the posts. |
 |
|---|
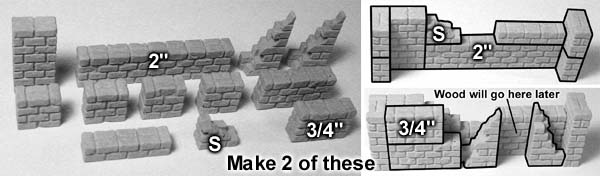
| 12. | Make the front side of the wall with the blocks laid down flat. Stand it up and glue the blocks onto the back side of the wall. |
 |
|---|
| 13. | On this wall section, the space between the ruined brick pieces will be filled with one of the board sections later on. |
 |
|---|
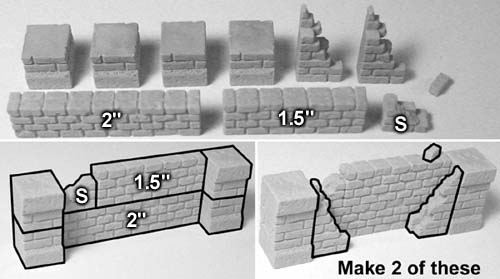
| 14. | 4" Wall SectionsThe thin walls are centered between the posts. |
 |
|---|
| 15. | Here are two different wall sections. |
|---|---|
 |
| 16. | Here are two more different wall sections. |
|---|---|
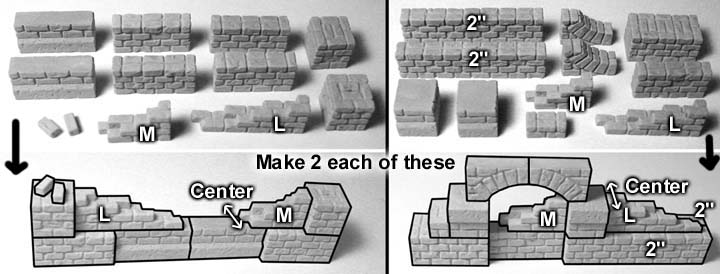 |
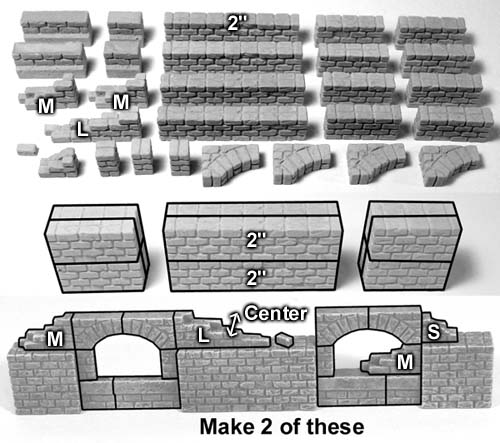
| 17. | This wall section has four of the 1.5" blocks and four of the 3/4" blocks. Center the arch between the wall halves. |
 |
|---|
| 18. | 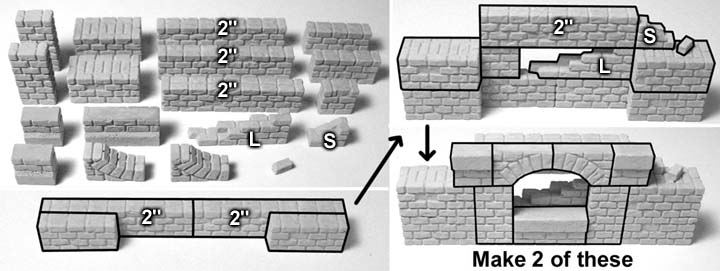 |
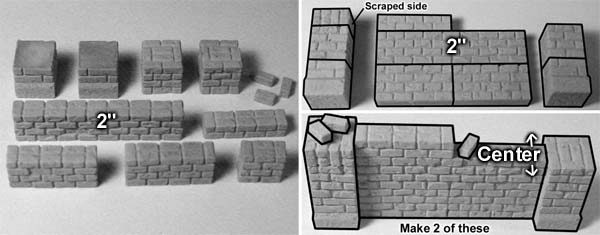
|---|
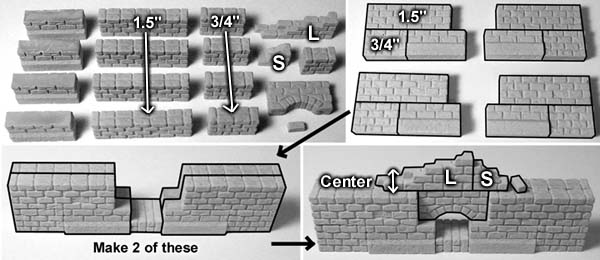
| 19. | 5" Wall SectionsThe thin wall is centered between the ends. The corner blocks stick out under the archway so the outside ends of the walls are flat. |
 |
|---|
| 20. | 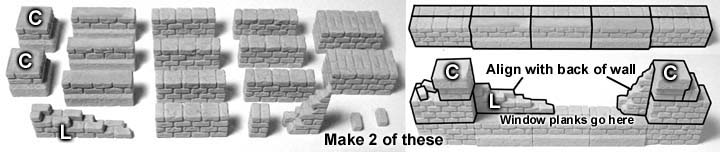 |
|---|
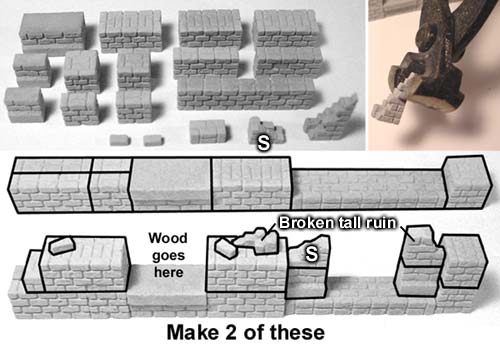
| 21. | 6" Wall SectionsOn this wall section, the tall ruined brick block will be snapped in half. The bottom half will go on the right and the top half will go on its side on the middle column. You can break it with a pair of pliers but I'm using tile nippers for this. |
 |
|---|
| 22. | Here are two more different wall sections. |
|---|---|
 |
| 23. | Here are two more different wall sections. |
|---|---|
 |
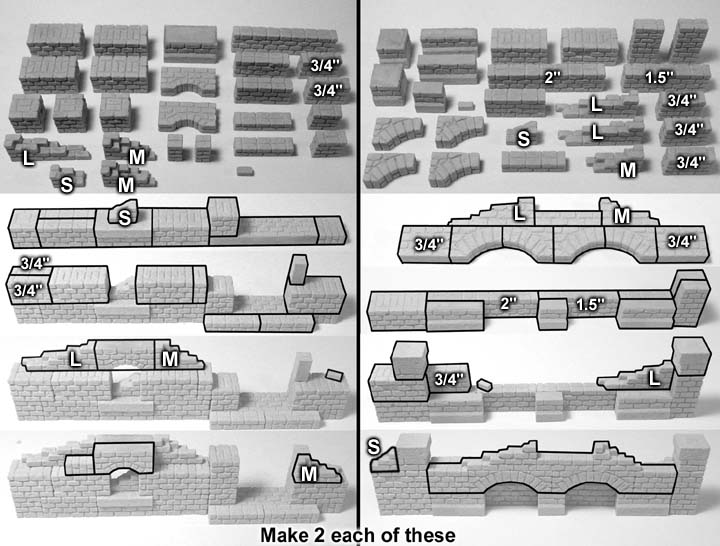
| 24. | 7" Wall SectionsOn this wall section, the window in the middle is centered between the posts on each side. The corner footer blocks on each end (labeled with a "C") have the protruding edge facing outward. If you face these blocks the wrong way, the protruding edge will get in the way of the door that needs to fit in the doorway. |
 |
|---|
| 25. | The thick wall sections are all made from two thin blocks glued together. The windows and ruined blocks are centered between the thicker sections. |
 |
|---|
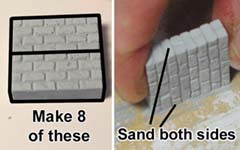
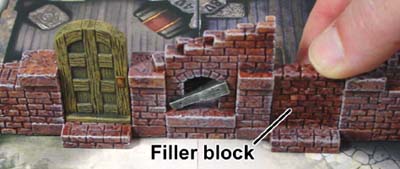
| 26. | The last pieces you need to make are the wall fillers. These are simply two 1" long blocks glued together and are used to fill doorways if you need a solid wall section. Make 8 of these. Also, be sure to sand the sides a bit so they will fit into the doorways after they are painted. |
 |
|---|
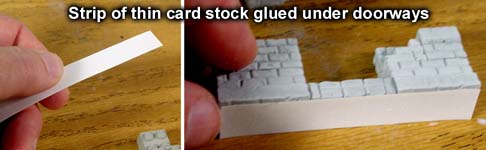
| 27. | Reinforce the doorways by gluing a strip of thin card stock under them. These can be fragile because of the thin glue joint. |
 |
|---|
Painting the Wood and Brick Sections
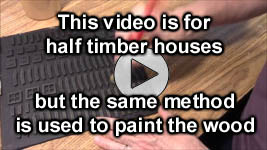
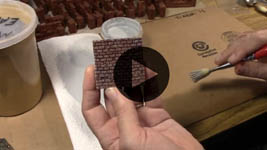
| 1. | Painting the Wood This video is actually from a different tutorial, but you will use the same method to paint the wooden sections for this project. |
 |
|---|
| 2. | Here is a complete list of wooden items to be painted. You will have 12 round top doors, 4 wooden slat doors, six of the larger slabs with planks glued across them and all of the remaining planks. |
|
|---|
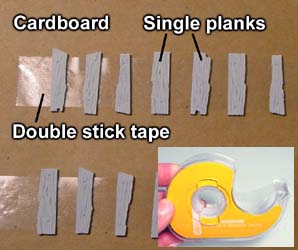
| 3. | Since we only need to paint one side of the planks, we can stick these down to a piece of cardboard. I'm going to use cheap permanent double stick tape. You need the permanent kind or the pieces will not hold down. Do not use too much pressure when pressing them down or you will break the planks. |
 |
|---|
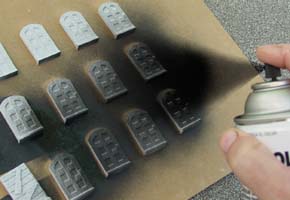
| 4. | The single planks only need to be painted on one side, but all other wooden pieces need to be painted on both sides. I suggest getting a second piece of cardboard to set the other wooden pieces on when painting. The first coat I am spray painting it flat black. Be sure to do this outside or in a well-ventilated area. Be sure to spray from all angles so that you get the sides and ends of each plank as well. |
 |
|---|
| 5. |
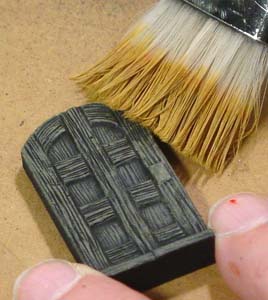
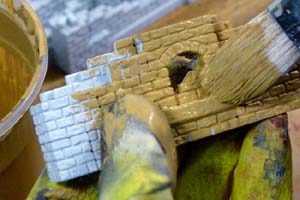
Click on the photo for a larger version of it. If you are using house paint, thin the paint slightly and make the brush as dry as possible. If you are using acrylic craft paint then you may not have to thin it. If the paint is too thick, you will get solid brown on the top of your planks. If you thin the paint but put too much on, the paint will run into the cracks. The trick here is to thin the paint slightly, dip your brush in and brush almost all of it off on a paper towel (even more than usual for dry brushing). What you want are lots of thin coats of paint. When first brushing over the planks, it will not look like anything is happening. This is exactly what you want. Don't go back for more paint but instead keep brushing over the planks. If the coat of pumpkin pie color is thin enough, the black transmutes through the brown and changes the color completely. Pumpkin pie turns into a dark oak. Remember to brush lightly, keep the paint thin and keep the brush really dry. |
|---|
 The second coat of paint is earth tone medium color from the
 | 6. | To gray up the planks a bit and have them match the brick better, I'm going to dry brush them with light gray from the Castle Gray Painting Instructions page. You want to do this very lightly, just to highlight the edges and grey out the wood sections a little. I did not do this to the round top doors because I wanted them to look well preserved, rather than looking like old planks. |
 |
|---|
| 7. | When finished, pull up the tape and the planks should come up with it. Your wooden planks are now completely painted and ready to glue on. The most time consuming part of the whole process is sticking them down onto the cardboard at first. When pulling them off of the tape, do it very carefully because the planks can break easily. |
 |
|---|
| 8. | Painting the Brick This video demonstrates what color is used for the base coat for painting the brick sections of this project. |
 |
|---|
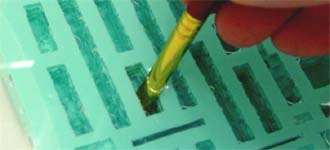
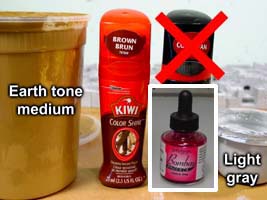
| 9. | To paint the brick, I'll use these colors:
The medium earth tone and the light gray are both from the painting instruction pages. I found the Kiwi shoe polish at my local Walmart in the shoe department. You can find magenta India ink at an art or crafts store with the calligraphy tools. |
 |
|---|
| 10. | The first coat of paint is the earth tone medium. It's kind of a pumpkin pie color. You can thin the paint slightly so it will go into the cracks easier. However, if the paint doesn't go into all the cracks, it's really not a problem because the shoe polish will end up going into the cracks anyway. It's a good idea to wear a rubber glove on the hand that is holding the piece to be painted. |
 |
|---|
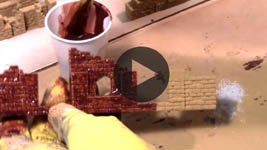
| 11. | Staining the Brick This video demonstrates how to apply the shoe polish mixture onto the painted surface of the brick. |
 |
|---|
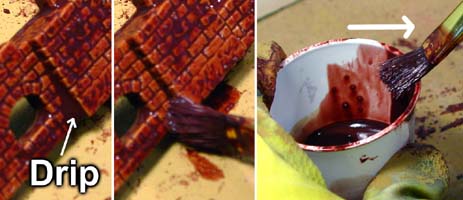
| 12. | After it's completely dry, I'm going to stain the piece with a mix of Kiwi liquid brown shoe polish and magenta India ink. Mix 1 tablespoon if liquid brown shoe polish to 1/2 teaspoon of magenta India ink and mix them into a cup. You may have to make about four batches of this to cover the entire project. I felt that the brown shoe polish alone just didn't have quite enough red in it for brick. However, you may feel differently about the color when you try it. Be sure to always test your paint colors on some extra castings before applying them to your project. It's not just a matter of getting the colors right, it's also a way to practice how to apply the stain to the surface. |
 |
|---|
| 13. | Jam the brush into all the cracks when applying the shoe polish and apply it liberally to all the surfaces. Afterwards, scrape the excess stain off of the brush by scraping it on the side of the cup. Then dab up any excess drips you can find. The shoe polish will get sticky as it starts to dry. |
 |
|---|
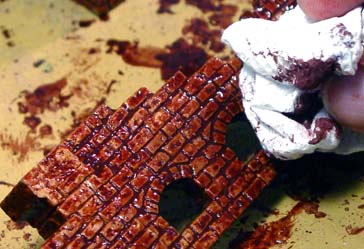
| 14. | Afterwards you can dab up a little of the stain with a paper towel to mottle the texture somewhat. Dabbing the surface is optional. If you wipe up too much of the stain, you won't leave enough brick color on the surface. You will also find that the rubber glove will leave prints on the brick, so dabbing the surface helps to blend these fingerprints away and give your brick a more random look. The shoe polish is water based so you can clean your brush out with water. |
 |
|---|
| 15. | Dry Brushing the Brick This video demonstrates the method to dry brush the surface of the brick with light gray paint. |
 |
|---|
| 16. | After the stain, I'm doing a light dry brush of the light gray. Doing this brings out the details and texture on the surface, as well as toning down the color of the brick. This step is optional! If you like the color of the brick after you stain it, then don't worry about doing the dry brush because brushing on the gray is kind of difficult and easy to mess up. Here is what makes the dry brushing difficult. You notice that in the top photo we have a nice flat surface to cover. You'll get the best results on a flat surface. However, these wall sections have a lot of uneven bricks and protruding bits all over. The same amount of paint it takes to dry brush a flat wall will be way too much paint for the random protruding brick edges. For my set, I ended up frosting the edges of the brick too much. It's really easy to get too much paint if you're not careful. However, it seemed to work out okay because this extra frosting helped set the walls apart from the busy game board. Below is a photo of a wall section set onto the game board. |
 |
|---|---|---|
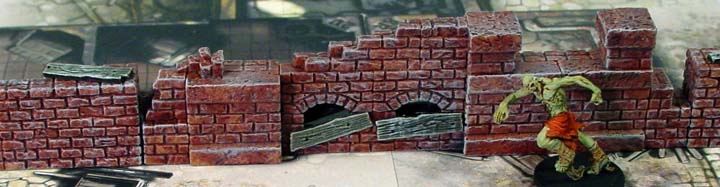 | ||
| 17. | After painting, the last step will be to glue the wooden plank sections onto the walls. The double board sections are meant to go in specific spots. However, you can place the individual planks anywhere you want. This photo is a sample of where I have glued the planks onto the finished walls. Click on the photo to see a larger complete version which includes all of the wall sections. I have referenced the step numbers above to each wall section on this photo. |
 |
|---|
Arranging Walls on the Game Board
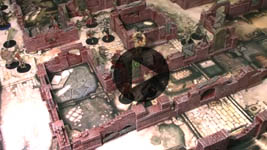
| 1. | Click on the video to watch it on YouTube. This video describes the best way to arrange the walls for whatever kind of mission you want to create in Zombicide Black Plague. It also gives a complete look at the arrangement for the last quest of the game, "Trial by fire". |
 |
|---|
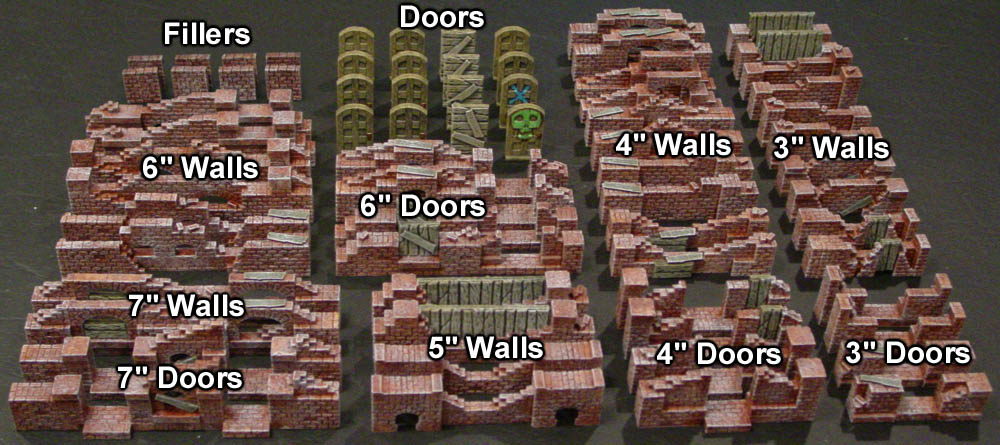
| 2. | What you see here is the complete set of walls for the Zombicide set. Click on the photo for a larger view. If you sort the walls in this manner, it will be easier to lay them out on the game board and find the wall sections that you need. |
 |
|---|
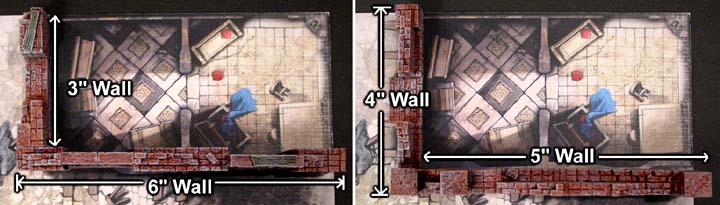
| 3. | The walls we make will float on the table. In other words, they can be moved in or out a bit and still cover up the wall lines printed on the game board. In the example below, we can cover the same wall area with two different sizes of walls. |
|---|---|
 |
| 4. | To arrange the walls on your game board, first lay out your game board tiles and place all the doors that need to be on the map. Then place long wall sections with doorways in every possible spot. Try to take care of as many doorways as possible with the longer wall sections. |
|---|---|
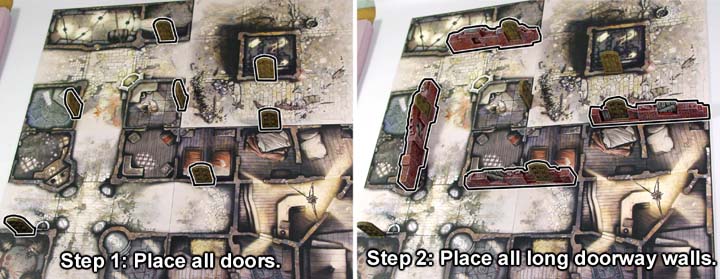 |
| 5. | Next place all of the short doorway walls in all the places that the long walls with doorways could not fit into. Finally, place all remaining wall sections. It's best to use long walls first and then use the short walls to fill in where the long walls do not fit. |
|---|---|
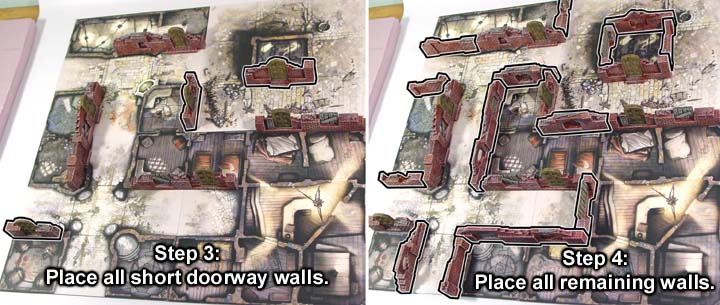 |
| 6. | Sometimes you will need to use a wall section with a doorway as a normal solid wall. In these cases, use the filler blocks to block up the doorway temporarily. |
 |
|---|
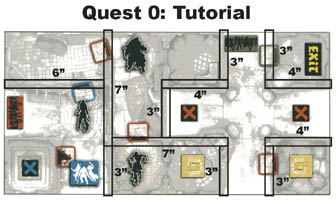
| 7. | To make arranging the walls a bit easier, I've created a PDF file of each of the game quests and show you exactly which length of wall section you need in order to play it. Just click on the picture to load up the PDF file. |
 |
|---|
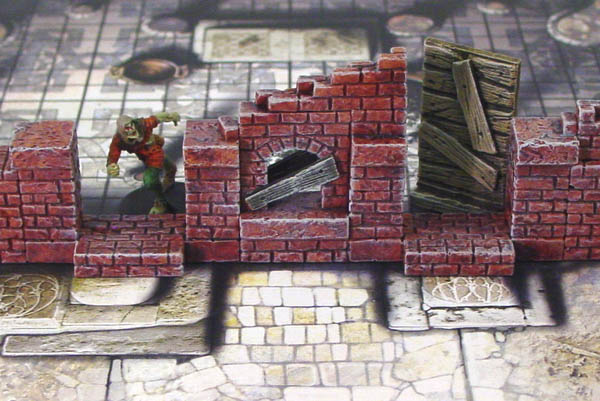
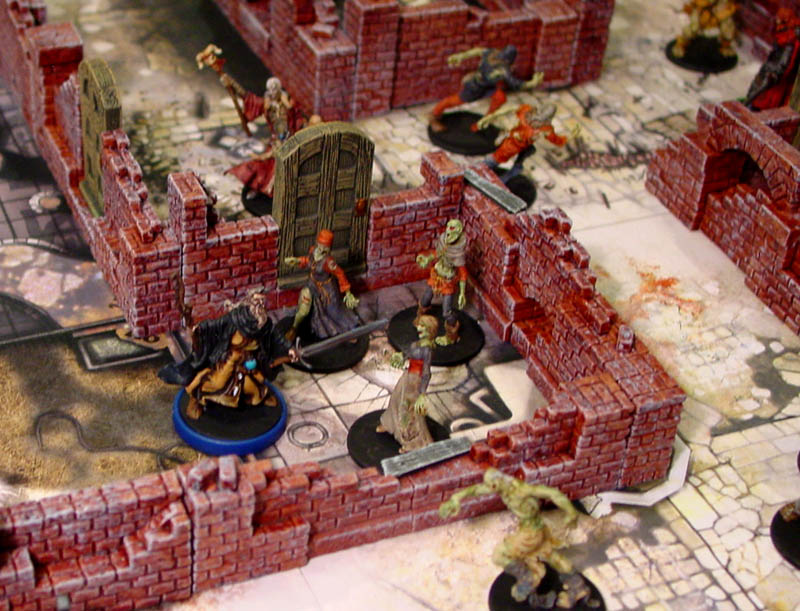
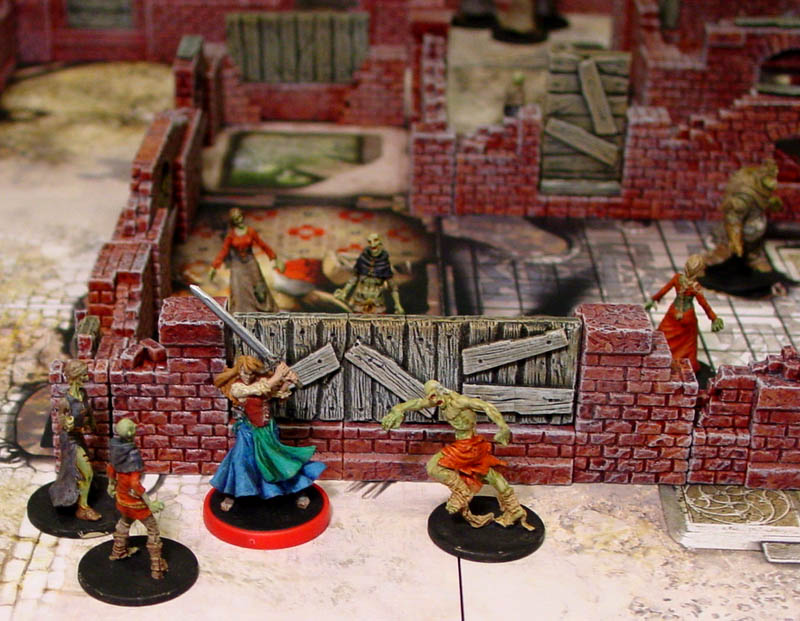
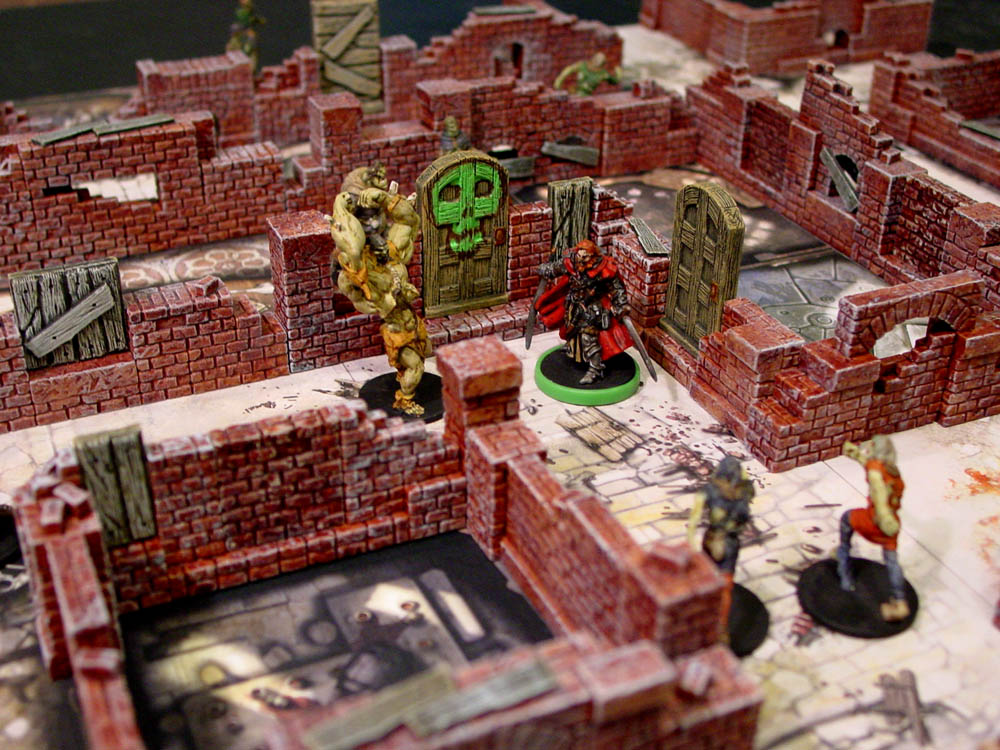
Finished Photos
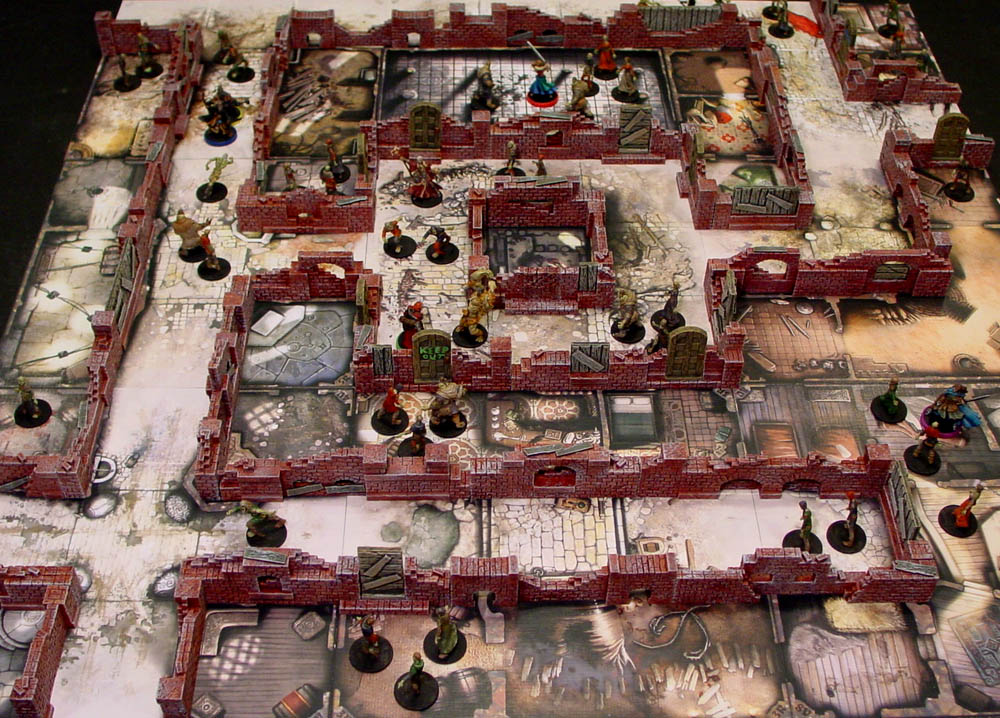
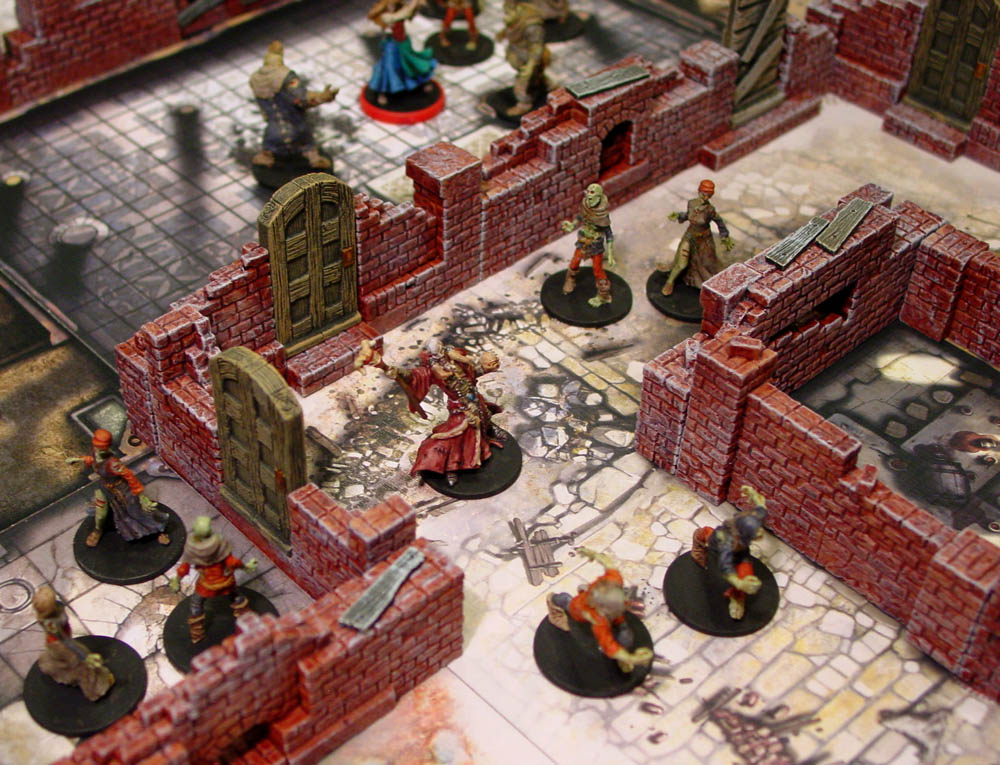
Here are several photos of the walls set on top of the Zombicide game board tiles. I borrowed the painted miniatures from Knight Watch Games who were kind enough to lend them to me. Click on the photos to see a larger version of each. |
 |
 |
 |
 |
 |