How to Use the Station Builder Mold
This page shows different ways to use the Station Builder mold #300.
|
|
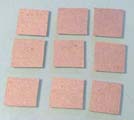
About This Mold
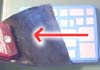
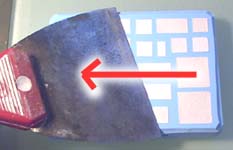
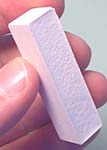
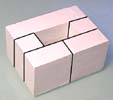
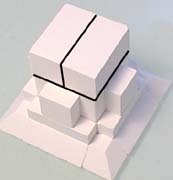
| 1. | This mold is made of a stiffer rubber than the other molds. Since there is no surface detail or undercuts, the blocks will still come out of the mold fairly easily. The stiffer rubber will also ensure the pieces come out straight. When you scrape the mold, you will get the best results when the plaster is the consistency of toothpaste. Angle the scraper (as shown) but still pull straight across the mold. With the scraper angled, it won't catch on the walls of the mold. |
 |
|---|
| 2. | If you scrape too hard or with the blade too vertical, the blocks will be short on the back side (or concave). If you scrape too lightly or lay the blade down too much, the bottom of the blocks will be too high or rounded over on the bottom. You want the bottom of the blocks to be perfectly flat with the top of the mold, so it will take a little practice to get them to come out right. Even though the rubber is more stiff, you can still flex it and remove the pieces easily. |
 |
|---|
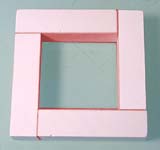
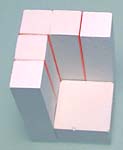
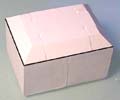
| 3. | Even when trying your best, some blocks may still come out slightly concave or short. To keep your building more exact, it's best to place the scraped side so it doesn't affect the size of the building. The areas shown in red represent the scraped side of the block. | |||
|---|---|---|---|---|
If you don't need to see the inside of an area, it's best to put the scraped side towards the inside (second photo). When you want to see the inside of a room, it's best to place the blocks so the scraped sides are facing each other. Try not to put a scraped side on the outside where you will see it. |
 |
 |
 | |
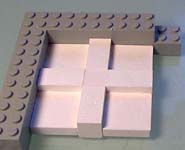
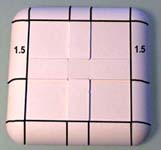
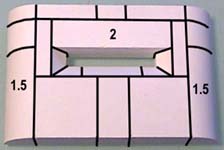
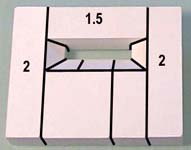
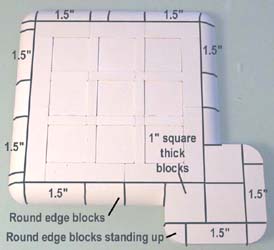
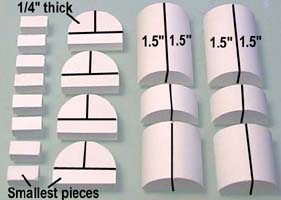
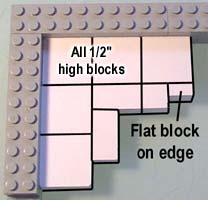
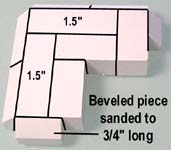
| 4. |
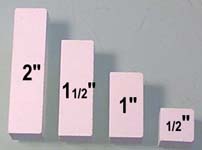
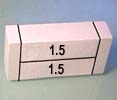
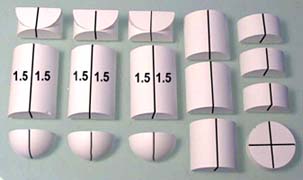
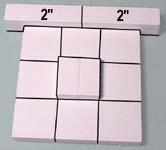
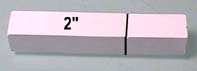
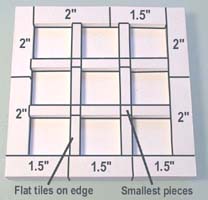
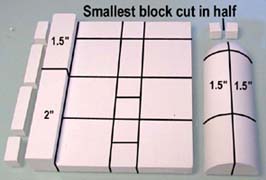
During the instructions, I will label any blocks that are 2" or 1 1/2" long. This will help you find the right block length for your project. |
 |
|---|
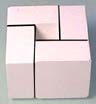
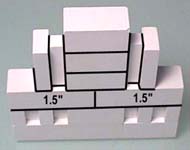
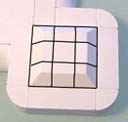
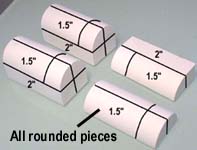
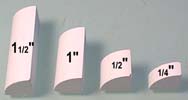 The lengths of the rounded and square shaped blocks are shown here.
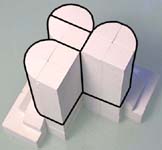
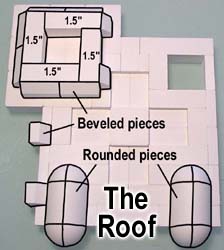
| 5. | The rounded pieces can be used to make rounded edges on buildings, a rounded brace at the foot of buildings or to make large diameter pipes. The inside and outside corner pieces are shown in the bottom left of the photo. |
 |
|---|
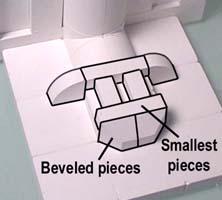
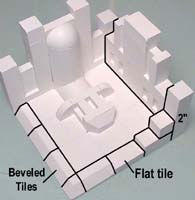
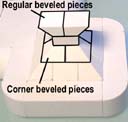
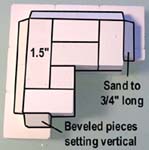
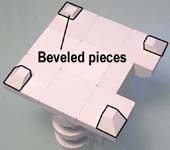
| 6. | The beveled pieces can be used to make the inside of bunker windows and doorways, or can be used to add an angled edge to flat pieces. |
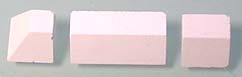 |
 |
|---|
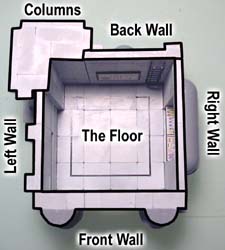
The Bunker
| 1. | You will need to cast the station builder mold 6 times to build this bunker. There are no building plans for this except for the photos you see here. We'll start with the roof of the bunker. Lay all the blocks scraped side up because we're making this roof upside down. Since I want the panels to be slightly recessed, I'm putting four pieces of matt board under each of the flat 1" square pieces. |
 |
|---|
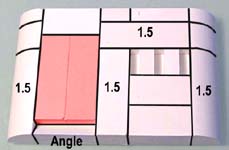
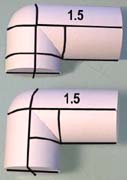
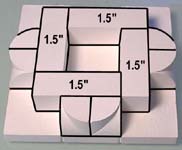
| 2. | Make sure the flat tiles are laid down scraped side up and glue the pieces together. I'm using Legos as a guide to help make the corners square. When the glue dries, flip the roof over and glue on the outside rounded shapes as shown. The 1.5 means that you need a 1 1/2" rounded piece in that spot. |
 |
 |
|---|
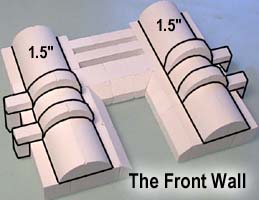
| 3. | Here's the front of the bunker. The window slit uses the small sloped pieces. Lay down two sloped corners as shown. Rotate one of them up 90 degrees to form the inside corner of the window slit. The bottom center of the window uses a 1" sloped piece. On the 2 large bottom squares, be sure they are put scraped side down so you don't see the rough texture on the outside. |
|
 |
|---|
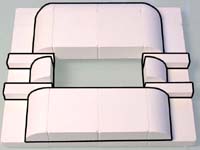
| 4. | Here are the sides of the bunker. Be sure the scraped sides of the blocks are not showing. Make 2 of these. After the glue dries, flip the walls over and add the small pieces onto the top as shown. These should be flush with the outside face of the bunker. |
 |
 |
|---|
| 5. |
Assemble the back side as shown. Place an angle block at the bottom of the doorway. Do not glue the blocks in red! There are placed there to help the doorway stay square. Remove them once the glue is dry. |
 |
|---|
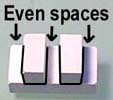 For the back of the bunker, start by gluing 2 of the smallest pieces onto a flat tile (1" x 1/2" x 1/4"). Be sure to leave an even amount of space between the 2 blocks.
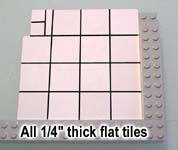
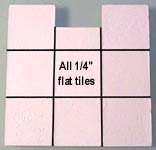
| 6. | The last piece is the floor. This is made of 1/4" thick flat tiles. Be sure the scraped sides of the blocks are facing down. You should have 6 pieces that make up the finished bunker. |
 |
 |
|---|
| 7. |
To see how to add the weathered effect to the concrete, check out the Tips & Tricks 10 page. |
 |
|---|
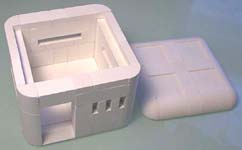 Here's the finished bunker. Glue the walls and floor together, but don't glue the roof on! You want to be able to place your miniatures inside.
The Pump Station
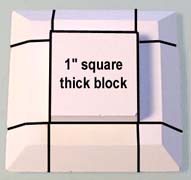
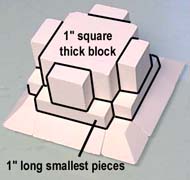
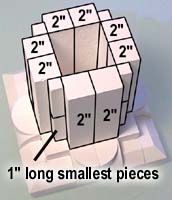
| 1. | You will need to cast the station builder mold 6 times to build the pump station. There are no building plans for this except for the photos you see here. We're going to make 2 boxes with cap pieces that the pipes will come out of. First, make the 2 cap pieces using the sloped blocks and flat tiles. The next photo shows a piece made from four 1" square thick blocks. The smaller cap is glued onto this one. We'll use the other cap below. |
 | |
|---|---|---|---|
 |
 | ||
| 2. | Build a wall using 2 flat tiles and long blocks. Add to this wall with the 1" square thick blocks and regular blocks. Lastly, cap this off with the second cap you have made. |
 |
 |
 |
|---|
| 3. | Assemble all of the tube sections you see here. It will make the pipes easier to put together if you do. When dry, use some of them to make the two pipe sections in the second photo. We'll use the remaining pieces later. |
 |
 |
|---|
| 4. |
Now glue 8 flat square tiles around the outside. Along the top edge, glue two 2" long blocks. |
 |
|---|
 Now for the floor of the pump station. Start with 2 regular blocks glued together.
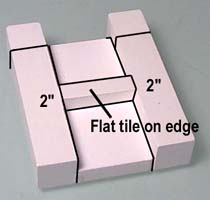
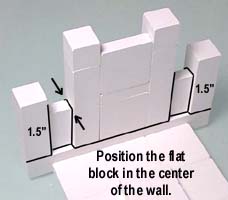
| 5. | Build an "H" shape with the pieces shown here. The block in the center is a 1" x 1/2" x 1/4" block.
When dry, turn the piece around and place it in the center of the wall we're making. Next, add the flat blocks and long blocks onto the ends as shown. Be sure to center the flat blocks between the long blocks. |
 |
 |
|---|
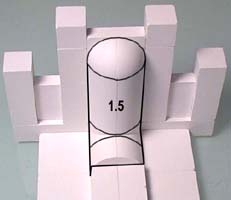
| 6. | Use the remaining round pieces to form the pipe on the wall.
Finish the small square in the center of the floor using the thin rounded pieces, the smallest pieces and the corner beveled pieces. |
 |
 |
|---|
| 7. | Build the second wall using the pieces shown. The recessed panels are made using the smallest pieces and centering them in the wall. Be sure you turn the scraped side of the pieces to the side so they don't face to the front or back. |
|
 |
|---|
| 8. | Add the wall to the pump station. Also add the final pieces onto the base as shown. Turn the station around and add the pipes onto the back. The pipe on the right will set into the wall slightly. The pipe on the left will just glue against the wall. |
 |
 |
|---|
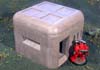
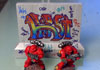
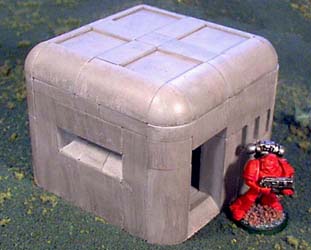
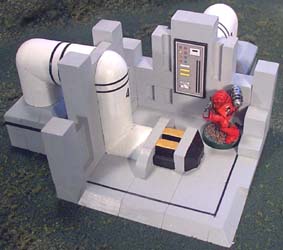
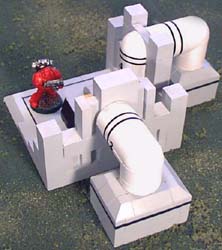
| 9. | Here's the finished pump station. The figure inside is a space marine from Games Workshop(TM). To see how I painted and finished this model, check out the Tips & Tricks 10 page. |
 |
 |
|---|
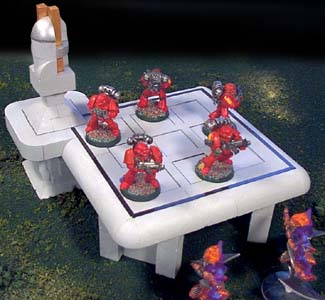
The Landing Pad
| 1. |
I want the tiles in the floor of the landing pad to be recessed slightly. To do this, cut nine 3/4" squares of card stock from a cereal box and lay them out. I'm making this pad upside down to be sure the scraped sides of the blocks are facing up. Lay the 1" square flat tiles on top of the cereal box squares. Then glue the framework of blocks around the outside of these squares as the photo shows. |
 |
|---|
 You will need to cast the station builder mold 6 times to build this landing pad.
| 2. | After the glue dries flip the platform over and discard the cereal box squares. Add the rounded edge pieces as shown. The smaller platform is made of 1" square thick blocks and 1/2" long rounded pieces standing on end. On top of this smaller platform, add 2 layers of beveled pieces and finally cap them off with a 1/2" flat block and two regular beveled pieces. |
 |
|
|---|
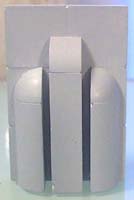
| 3. | The signal tower is made from a thick square block as the base. Add a couple of inside corner blocks (for the rounded pieces) and a couple of the smallest pieces. Add two 1/2" and 1/4" tall rounded pieces here. The last photo uses 2 rounded outside corners and two 1" long small blocks. |
 |
 |
 |
|---|
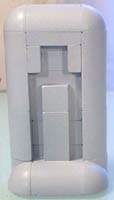
| 4. | The main pillar base goes together using the pieces shown. This pillar will go directly under the smaller platform. |
 |
 |
 |
|---|
| 5. |
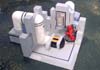
Here's what the finished landing pad looks like. The space marines are defending the pad from intruders. To see how I painted and finished this model, check out the Tips & Tricks 10 page. |
 |
|---|
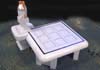
 The last pieces needed are three supports to hold the landing pad up. These supports are glued diagonally under the 3 remaining corners of the pad.
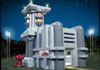
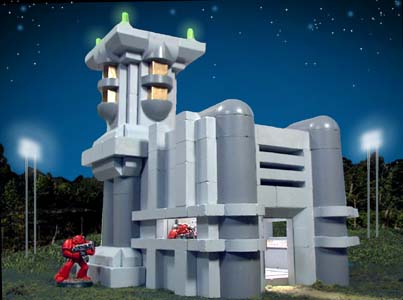
The Power Station
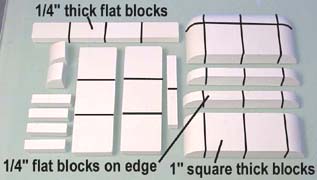
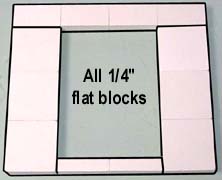
| 1. |
We'll start with the floor. It's made of 1/4" thick flat tiles. Next we'll make the front wall. Do not glue the block shown in green. It's used to hold the place of the doorway. |
 |
|---|
 You will need to cast the station builder mold 22 times to build the power station. There are no building plans for this except for the photos you see here.
| 2. | Pre-glue the round pieces as shown. Add these on top of the wall to finish the front wall. |
 |
 |
|---|
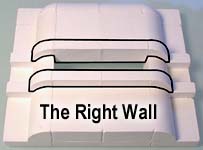
| 3. | For the right wall, pre-glue the pieces shown. Use the 4 shown here to make a basic framework. |
 |
 |
|---|
| 4. | Add the pre-glued rounded sections on top along with the 1" smallest pieces in between them. Finish the wall by adding the thin sections in the center. This completes the right wall section. |
 |
 |
|---|
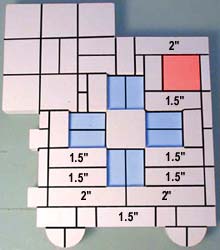
| 5. | For the back wall, pre-glue the pieces shown. The finished wall is shown here. Be sure the stripes on the left side line up with the stripes on the other walls! I put some dimensions there also. |
 |
 |
|---|
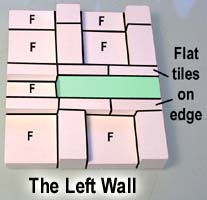
| 6. | Here's how the left wall goes together. The "F" stands for a "flat tile". Do not glue the block shown in green! It's holding the place for the window there. Next we'll make the tower base. It's made from regular 1/2" thick blocks. I use Legos as a guide to help make the corners straight. |
 |
 |
|---|
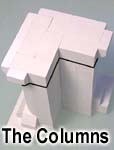
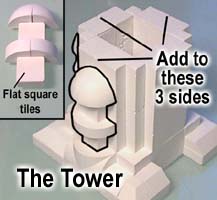
| 7. | Glue these blocks onto the tower base. The beveled pieces are setting vertically. You will have to sand or trim one of the beveled pieces to 3/4" long. Now assemble the column pieces shown in the second photo. |
 |
 |
|---|
| 8. | Glue the column pieces onto the base. The other beveled block will need to be trimmed to 3/4" long on the column top. Flip this over and glue it onto the columns. |
 |
 |
 |
|---|
| 9. | For the roof, assemble the regular blocks as shown. Do not glue the block in red! There will be a hole in that spot for a ladder. The blocks in blue are flat tiles. Stack a several layers of card stock under these tiles to raise them up a halfway. We don't want them to recess too much. Finish the roof by adding the pieces shown. |
 |
 |
|---|
| 10. | The final piece is the tower top. Start with the layer of flat tiles (scraped side up). Be sure you don't put pieces on the back edge. We eventually want to put a ladder there. |
 |
 |
 |
|---|
| 11. | Continue adding pieces to finish the tower. The finishing touch is the beveled blocks on the very top. |
 |
 |
 |
|---|
| 12. |
There are several details you can add such as landing lights, a hatch door and control panels. To see how I painted and finished this model, check out the Tips & Tricks 10 page. |
 |
|---|
 Do not assemble the power station until you paint it first! Otherwise it's hard to reach the inside of the building to add the finishing touches.
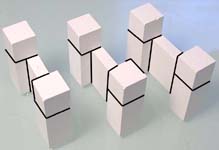
Other Uses
For large flat areas, it's better to use products such as foam core board or other durable light weight materials for the basic walls and floors of buildings. However, the blocks do a wonderful job of decorating the outside and inside of the buildings.
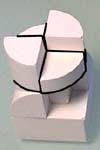
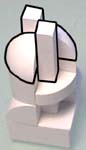
I'm continually surprised at the number of ways this mold can be used. There are many occasions where it's difficult to make machinery, cabinets, transporter pads, cryogenic chambers and a myriad of other sci-fi furnishings. The blocks are basic enough to make geometric shapes that can be dressed up with paint, levers, control panels and model bits to make all of these items.
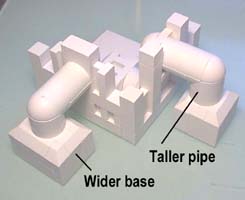
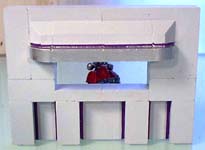
The second example is of a futuristic buttress that can dress up the side of a large flat wall. Just make it as tall as you need. The third example can also be used as a buttress, wall decoration or a control station for some type of equipment. |
 |
 |
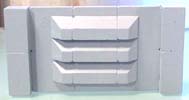 The beveled blocks can be used to make a vent design on the sides of buildings.
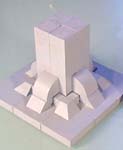
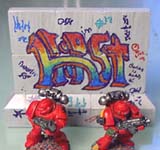
Here's an example of a pillar base to a warehouse or garage. The second is a shop window. The silver canopy is rounded on the ends. The simple wall section has weather effects and graffiti added to it. |
 |
 |
 |
I hope you enjoyed this page on using the station building mold. Hopefully it has sparked your imagination so you can start building your own futuristic settings easily. To see several painting and finishing techniques, please visit the Tips & Tricks 10 page. -Bruce Hirst