Tips & Tricks 26
|
Instructions for building these layouts are on our Chemical Plant Building Instructions page. Instructions for painting the new pipe sections are on our Modern Plant Finishing Instructions page. Instructions for painting the aged pipe sections are on our Abandoned Plant Finishing Instructions page. |

|
How to Use Mold #320
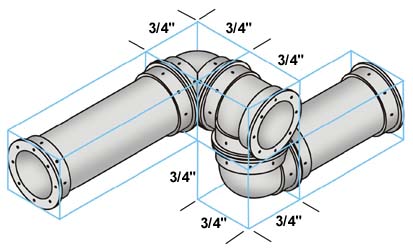
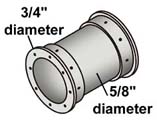
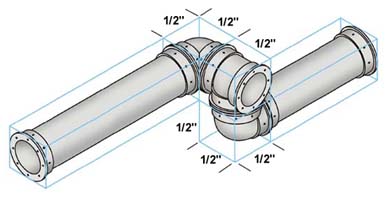
| 1. | The actual pipes themselves measure 5/8" diameter, but the flanges measure 3/4" diameter. So if you are using elbows and tees when building, just pretend you are stacking 3/4" square blocks.
|
 |
|---|
 This will make it easier when trying to wind pipes along walls or over edges.
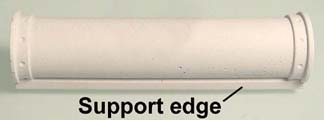
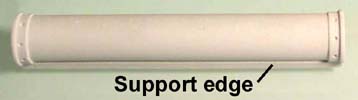
| 2. | One of the first things you will notice about the pipes is they have a support edge along the bottom of each piece. Many people do not like this edge, but without it you could not remove the pipe pieces from the mold. |
 |
|---|
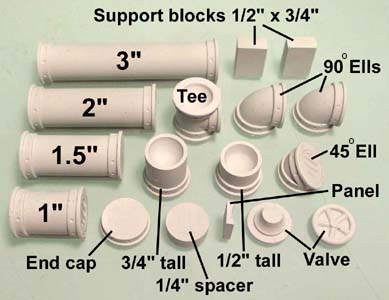
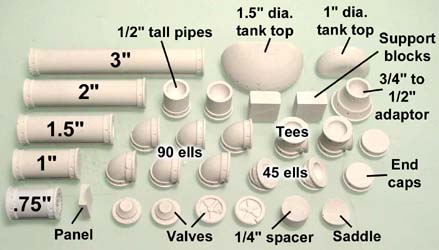
| 3. | Here is a photo of the pieces you get with one casting of mold #320. I strongly suggest you use a hard material to cast these pieces in such as dental stone. If you cast them in regular plaster some of the flanges may break off when you try to remove them from the mold. The remainder of this article will try to describe how these pieces are used. |
 |
|---|
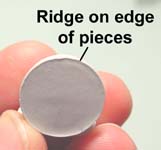
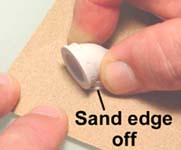
| 4. | After the pieces are cast, you may find that some of the pieces have a ridge on the scraped side of the piece. This ridge will make it difficult for you to glue the pieces together because only the ridge will touch the next piece and not the flat surface. The easiest way to fix this is to sand the ridge off lightly with a piece of fine sandpaper. |
 |
 |
|---|
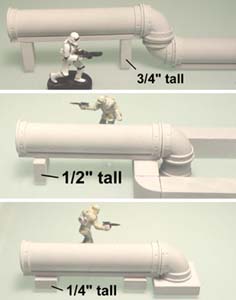
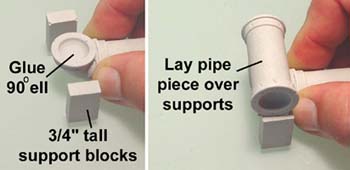
| 5. | Support BlocksEach support block measures 3/4" x 1/2" x 1/4". Depending on how you stand the block, you can support a variety of heights. The most used position of this block will be with the 3/4" side standing up. Because ells and tees all measure 3/4" tall, this will support the pipe at the perfect height for adding these pieces on the ends. If you use the support pieces with the 1/2" side standing up, this will be a good height for going over short walls, since most of the basic building blocks in the Hirst Arts line happen to be 1/2" tall. You can also lay the support blocks flat to raise the pipe enough to set onto standard floor tiles. This is handy if you want to use an ell pointing down into the floor. |
 |
|---|
| 6. | 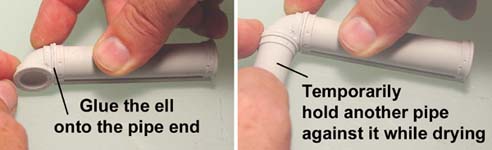
EllsElls are pretty easy to figure out. However, when gluing an ell you want to be sure that it is actually set at 90 degrees when gluing it on. One of the best ways to do this is to set another pipe section against the other end of the ell temporarily so you can be sure it's at 90 degrees while the glue is drying.
|
|---|
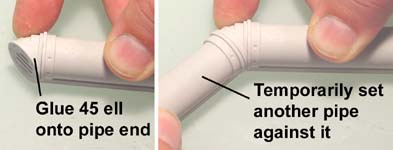 The same thing is also done when using a 45 degree ell. After you glue one end of the ell, place a pipe against the other end to make sure that the ell is rotated to the correct angle before the glue dries.
| 7. | Gluing an ell facing straight up can also be tricky. One way to be sure it is facing exactly straight up is to place support blocks on each side of the ell. Glue the ell on, then place a piece of pipe bridging across the support blocks. This will ensure that the ell's flat face is parallel to the table surface. |
 |
|---|
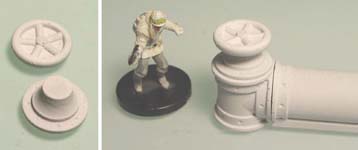
| 8. | Valves and TeesValves are made from 2 pieces, the round handle and the base. To make a complete valve, just glue this combination on top of a tee piece. |
 |
|---|
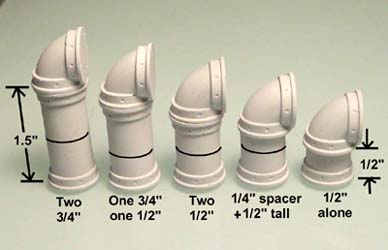
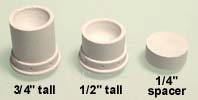
| 9. | Standing Pipes and Spacers
Included is a diagram showing how to make various pipe lengths in 1/4" increments. These are good to use when you want a standing pipe without a support strip showing on one side. |
 |
|---|
 The standing pipes and spacers are used to make sections of pipe any length you want.
| 10. | 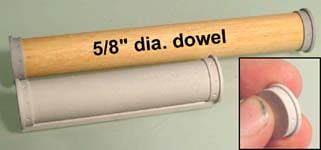
End CapsEnd caps have two main uses. First, they can be glued to the ends of dowel rods to make long lengths of pipe. Simply glue these onto the ends of a 5/8" diameter dowel rod. The pipe will be the exact same diameter as the rest of the pipes on the mold. The advantage of this is that you can make pipes any length you want and they will not have the "support strip" underneath them. The disadvantage is that dowel rods are not easy to cut in the exact length you need. Also, the wood texture on the dowel rod may show up and give your pipes an odd texture. |
|---|
| 11. | The second use of these end caps is to fill in odd lengths that may happen. On the right photo, I have a gap when using a 45 degree ell to join pipe sections together. Using an end cap as a filler, I can now span the distance completely. |
 |
|---|
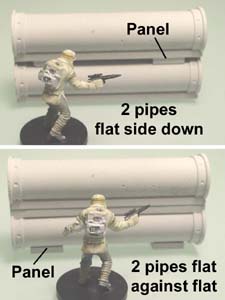
| 12. | 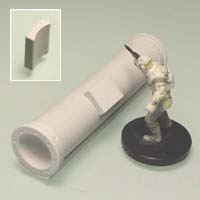
PanelsThese odd little shaped pieces you see have a couple of uses. The first use is to add flat control panels onto round pipes. You can also use them for warning or factory signs. The other use is to give a flat support side to round pipes. In the first photo, I've stacked 2 pipes, both with the scraped side down. The panels allow me to support the second pipe on top of the first easily. The second photo is almost the same, but the scraped side of both pipes are glued together and the panels are placed under the bottom pipe. I like this arrangement a little better. |
 |
|---|
How to Use Mold #321
Be sure to read the article directly above this one. Many of the pieces on mold #321 are very similar to the above article.
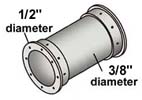
| 1. | The actual pipes themselves measure 3/8" diameter, but the flanges measure 1/2" diameter. So if you are using elbows and tees when building, just pretend you are stacking 1/2" square blocks.
|
 |
|---|
 This will make it easier when trying to wind pipes along walls or over edges.
| 2. | These pipes also have a support edge along the bottom of each piece. Many people do not like this edge, but without it you could not remove the pipe pieces from the mold. |
 |
|---|
| 3. | Here is a photo of the pieces you get with one casting of mold #321. I strongly suggest you use a hard material to cast these pieces in such as dental stone. If you cast them in regular plaster some of the flanges may break off when you try to remove them from the mold. The remainder of this article will try to describe how these pieces are used. |
 |
|---|
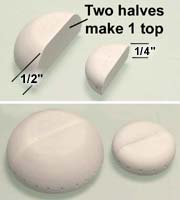
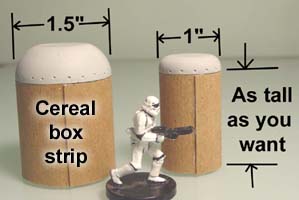
| 4. | Tank TopsThese come in two sizes, 1.5" diameter and 1"diameter. Simply glue 2 halves together to make a complete tank top. The larger top is 1/2" thick and the smaller is 1/4" thick. We're going to glue a strip of cereal box around the bottom for the base of the tank. |
 |
 |
|---|
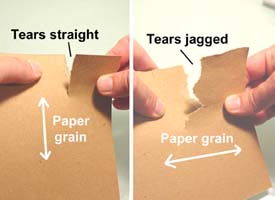
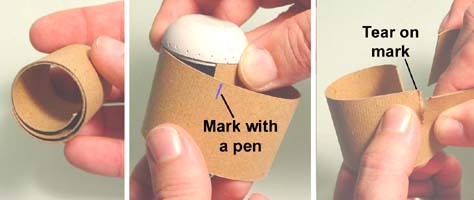
| 5. | Before we cut the strip of cereal box, you want to determine the grain direction of the paper. It's much easier to roll the paper with the grain than to roll it against the grain. To determine this, tear a corner of the paper. If you're tearing with the grain, the tear will be straight. If you're tearing against the grain, the tear will be jagged. You can mark the grain direction with an arrow (like the white arrow I show in the photo). |
 |
|---|
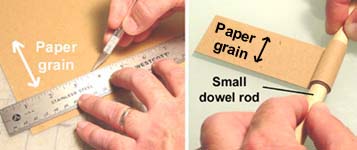
| 6. | Using a hobby knife, cut a strip of cereal box the width you want. It's best to keep the width in even 1/4" increments. This will make it easier to get the other pipes to stack up around them. Roll the strip up around a small dowel rod. This will curve the paper strip and make it easy to fit around the tank top. |
 |
|---|
| 7. | After rolling, the paper strip will hold its shape. Wrap the paper strip around the tank top and mark the strip where the paper will overlap itself a little. Then, tear the paper strip on the mark. Since you're tearing with the grain, the strip should tear fairly straight and easily. |
 |
|---|
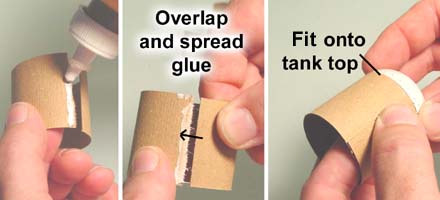
| 8. | Spread a bead of glue on the torn edge.
Overlap the clean edge onto the glue and spread the glue nice and thin. Fit the paper around the tank top and pinch the paper edges together to get the glue to stick. After a minute you can pull the tank top off the ring and glue it onto the paper strip permanently. |
 |
|---|
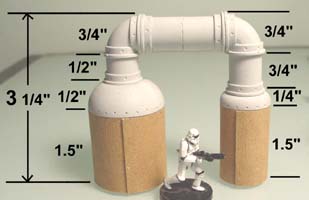
| 9. | The large tank top is 1/2" thick and the smaller tank top is 1/4" thick. When planning your layout, be sure that you keep your paper strips in 1/4" increments. This photo shows how you can use different pipe lengths to make the overall height come out the same. This way you can bridge across the tops of tanks. |
 |
|---|
| 10. | 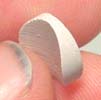
The SaddleOne side of this little piece is curved to fit against a large pipe. It can be used as a dial face or the base of a valve. However, its main use is to connect small pipes onto the larger pipe. |
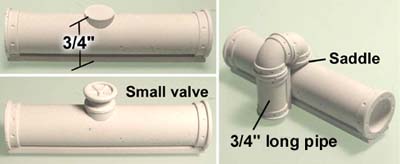 |
|---|
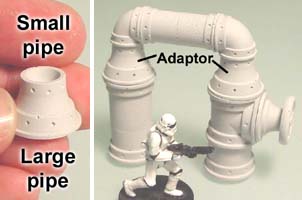
| 11. | 1/2" to 3/4" AdaptorThis little piece is handy for making a large pipe convert down to a small pipe. The large 3/4" size is the exact size of the large pipe rim and the smaller end is the exact diameter of the smaller pipes. |
 |
|---|
| 12. | 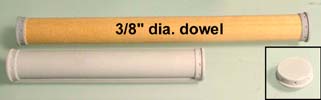
End CapsEnd caps can be glued to the ends of dowel rods to make long lengths of pipe. Simply glue these onto the ends of a 3/8" diameter dowel rod. The pipe will be the exact same diameter as the rest of the pipes on the mold. The advantage of this is that you can make pipes any length you want and they will not have the "support strip" underneath them. The disadvantage is that dowel rods are not easy to cut in the exact length you need. Also, the wood texture on the dowel rod may show up and give your pipes an odd texture. |
|---|