Tips & Tricks 29
This page will show how to use and combine molds #57, 58 and 59. Below is a photo of pieces from these molds used inside of an inn. Look at the Inn Building Instructions to see how to make the inn interior walls.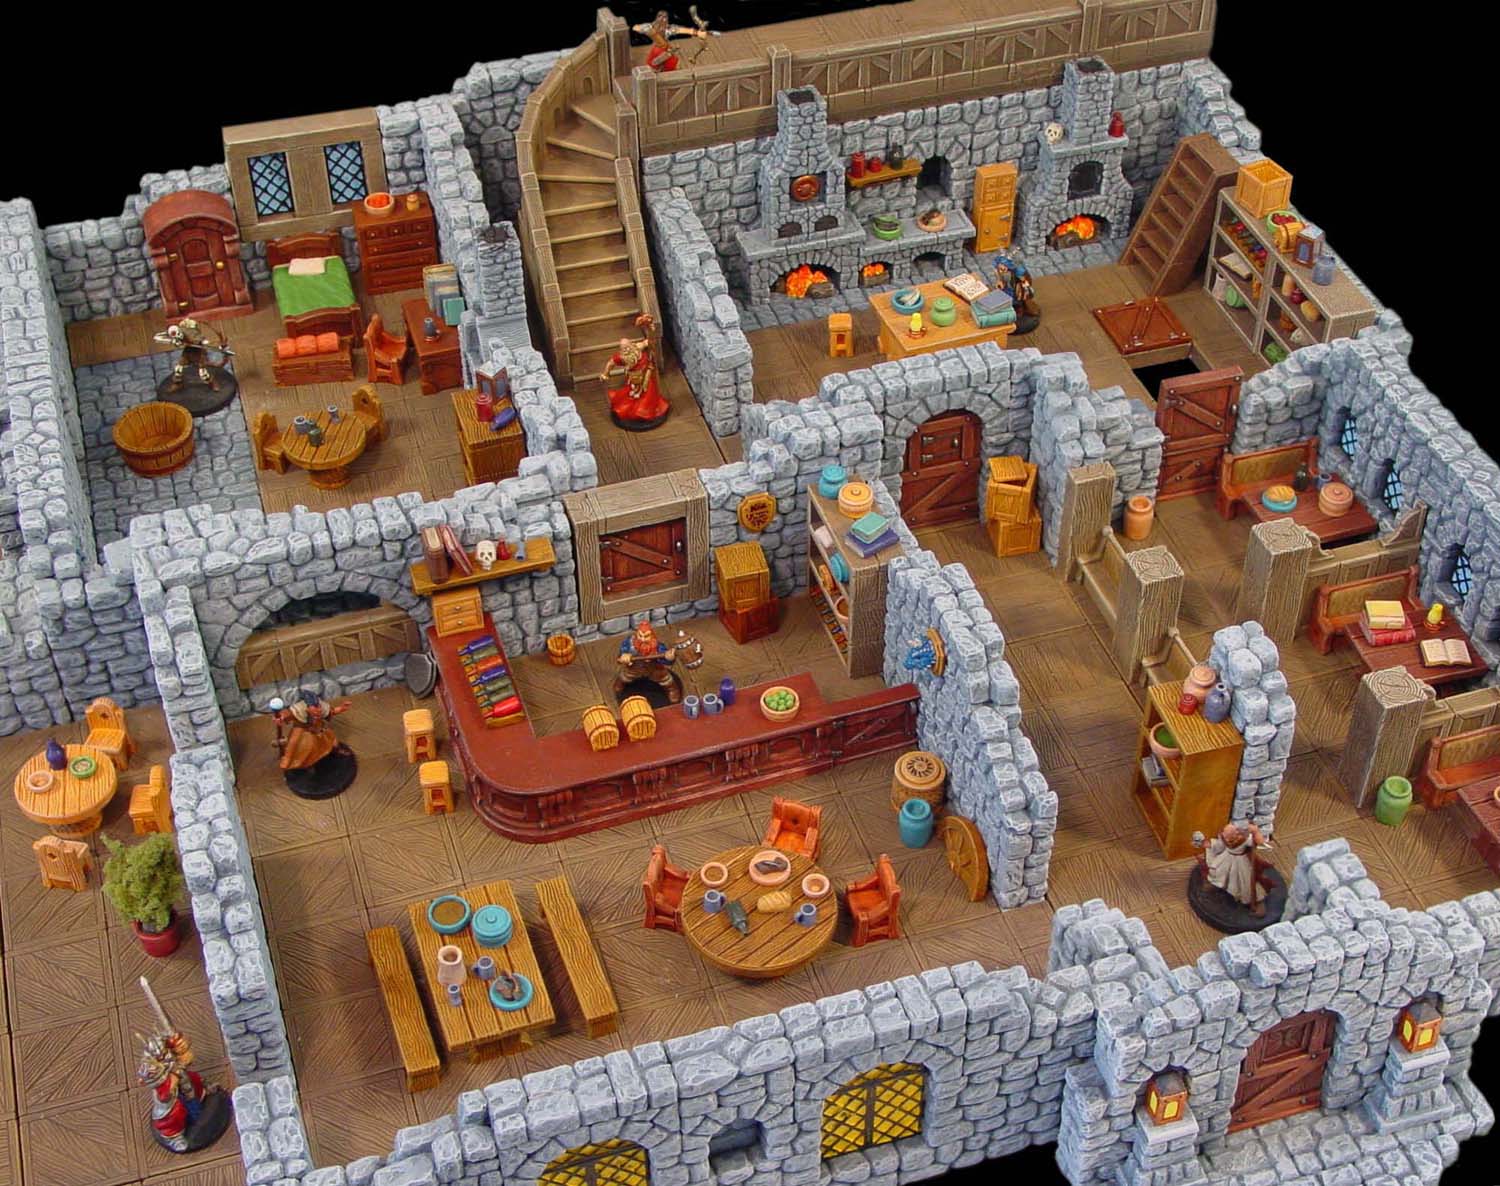
Click on the photo above to see more detail. The miniatures used in this photo are 28mm in size. This photo is repeated again below but pieces from each mold are highlighted while the rest is grayed out. This way you can see where pieces from each mold are used.
Special Care Needed When Casting These Molds
These three molds have a lot of tiny bits and fine detail. If you are a beginner in this hobby and are only using plaster of Paris, then you will probably not get good results using these molds.
To get good results you will need the following:
- A good casting material such as dental stone. You can find out all about this casting material on our Dental Stone web page.
- A spray surfactant or debbublizer. You can find out what this is and where to get it on our Advanced Casting page.
- A vibrating table. You might get fair results without one but you'll only get the best results if you use it. You can make one yourself for around $40 and I show how to do this on our Advanced Casting page.
How to Use Mold #57
Mold #57 is mainly used for interior construction. This mold will probably be cast the most number of times compared to the other two molds shown. While this mold does not contain many fancy bits, I believe it is one of the more useful molds for building (as compared to simply decorating).
| 1. | Some of the pieces on this mold are miniature fieldstone blocks which are meant to be used for small stone objects such as ovens, fireplaces, stone tables and any type of small objects made out of stone (shown next to a 28mm figure). 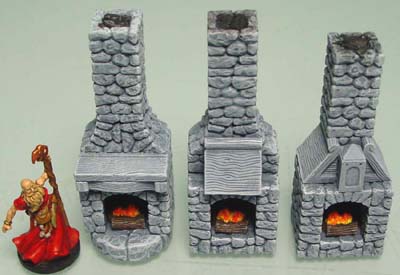 These examples are made mostly from the fieldstone bits but some of the decorative parts are from the other molds. This shows how you can combine the molds for more options. |
Below is one example of a stone fireplace made using these blocks. The wooden beam going across the center (made from two smaller beams) is also found on this mold. The miniature figure used throughout this page measures 1 1/4" tall from the top of his head to the bottom of his feet. 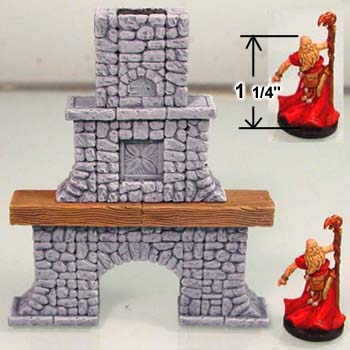 |
|---|
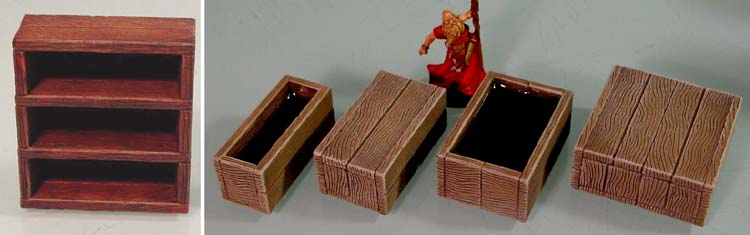
| 2. | There's nothing very fancy about them but the shelf pieces are very useful. Most of the small items on the other molds are sized to fit onto these shelves. For the best result, you should put the thin flat plank on the bottom of the shelving unit. Otherwise your shelves will slope forwards. The reason the shelves are sloped is so you can remove them from the mold without breaking them. Using the shelves, you can also make items such as water troughs, platforms and large crates as shown below. For the crates, you will need to put planks on the top and the sides in order for the size to work out properly. |
|---|---|
 |
| 3. | This mold also contains a small booth table and benches. Glue two halves of the table together for a full table. The photo below also shows how you can use the short beams along with the decorative braces in order to build booths for your inn. |
|---|---|
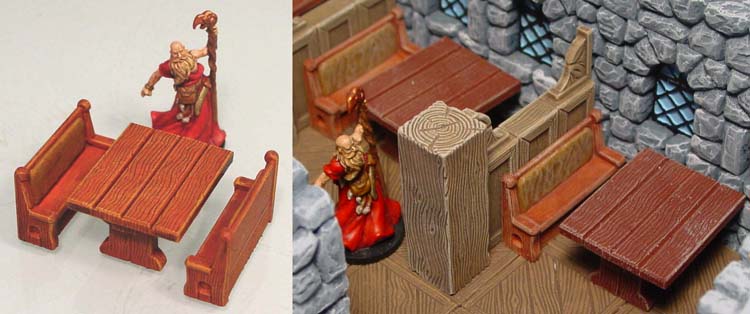 |
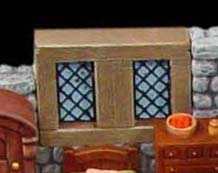
| 4. | Don't forget that the wooden beams are useful as well. The beams measure 1/4" thick x 1/2" wide x 1.5" or 2" long. I used these for framing square windows but I also used them for fireplace mantles, stair platforms, wooden walls and building in general. The 1" long wooden planks shown for the vertical beams in this photo are from mold #221 (inn floor mold). The planks from the floor mold perfectly match the beams. The window inserts are from mold #58. |
 |
|---|
| 5. | Finally, this mold includes stair building pieces to make circular or straight stairs. Instructions on how to build using these pieces are shown below. |
 |
|---|
Circular Stair Pieces
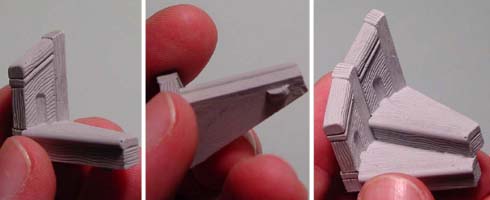
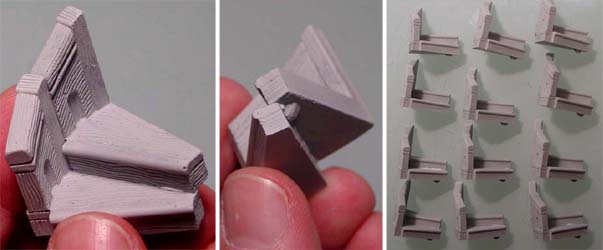
| 1. | The circular stair piece is a funny looking "L" shaped piece. On this piece the front step sticks out a little and there is also a little bump on the bottom. To fit these pieces together, line the side railing up and place the second step so it overlaps the first step slightly. |
 |
|---|
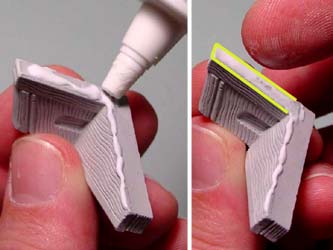
| 2. | To glue these steps together, it's best to start with only 2 steps at a time. Place a small bead of glue along the top back edge of the step. Also put some glue along the back edge of the rail. Spread the glue out on the back side of the rail so that glue covers the area shown in yellow. Because you are gluing the scraped side of the block, the side you glue will not be perfectly flat. You may notice that the back rail dips in slightly in the center. To make a strong glue joint, be sure to get glue on the raised outside edges of the railing shown in yellow. |
 |
|---|
| 3. | When glued correctly you can see that the top step overlaps the bottom slightly and the side rails are firmly pressed together. Glue the steps in groups of two and let them dry completely. |
 |
|---|
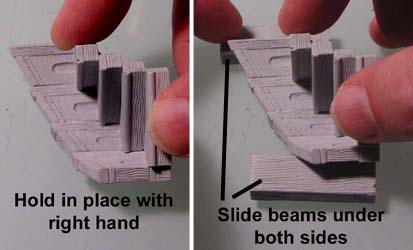
| 4. | When they are completely dry, glue the groups of 2 together to make groups of 4 steps. To get these to hold together while drying, lay the steps down so the railing side lays flat on the table. While holding the steps together with your right hand, use your left hand to slide the wooden beam blocks under each side of the raised railing. Now you don't have to hold the stairs in place while the glue dries. |
 |
|---|
| 5. | Since there is a bump on the bottom of each step, you may realize that this will be a problem for the bottom step To make it so the very bottom step will set flat, sand off the bump on this piece. Then it will set flat on the floor as it should. |
 |
|---|
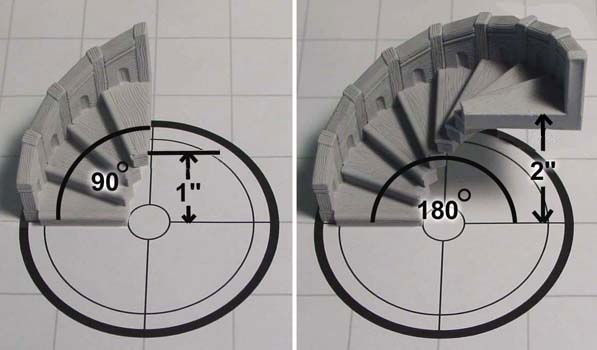
| 6. | For every 1/4 circle Also, the outside measurement of the staircase will be 3" diameter. |
 |
|---|
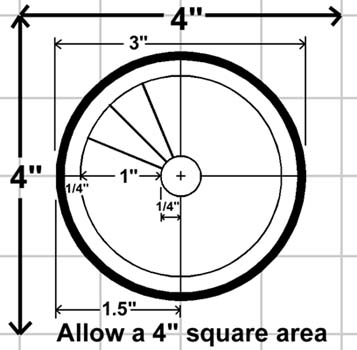
| 7. | Here is a diagram of the staircase specifications. The outside diameter of the staircase is 3" in diameter. For one half of the circle, the railing takes about 1/4", the step is about 1" wide and the circular center post is 1/2" across (1/4" to the very center). When planning a building using the stairway, be sure to allow a 4" x 4" square area for the staircase. The reason you must allow a 4" x 4" square area is so the steps can line up to the upper level grid. |
 |
|---|
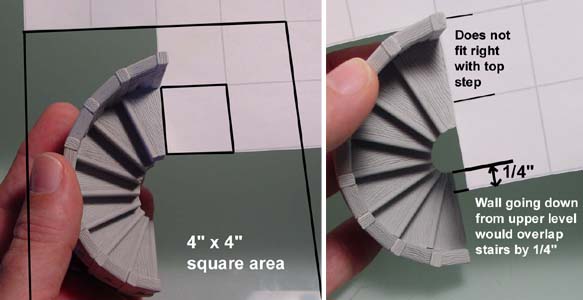
| 8. | The first example works fine. In the second example, the wall coming down from the upper floor would overlap the bottom steps by 1/4". If you removed the bottom row of squares to solve this problem, the top of the stairway would not match up to the floor grid, making the opening to the top step too narrow. |
 |
|---|
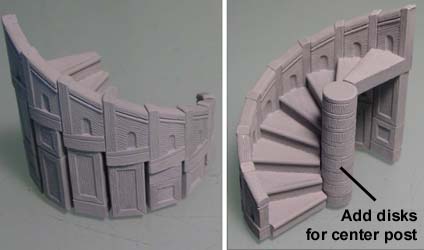
| 9. | The final touch is to glue several of the small round disks together the height you need and glue them into the center of the stairs. They won't completely fill the space, but they should touch every step as they go around. |
 |
|---|
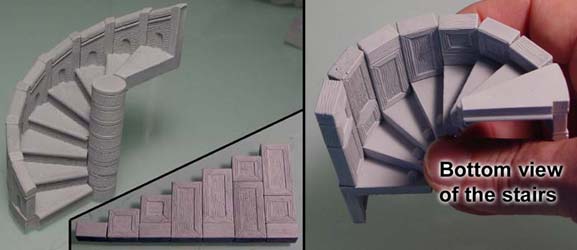
| 10. | If you want to fill up the outside area around the steps, collect the panel pieces you need (shown in the upper photo).Glue these into strips and then glue these strips around the outside edge of the stairs. They won't perfectly fit but the strips will touch each other in the center as they go around. Don't forget to finish the center of the stairway by stacking up the disks to make the center post. |
 |
|---|
Straight Stair Pieces
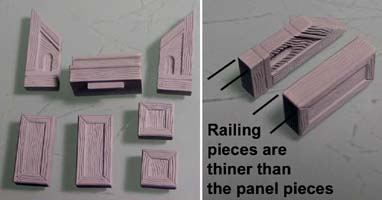
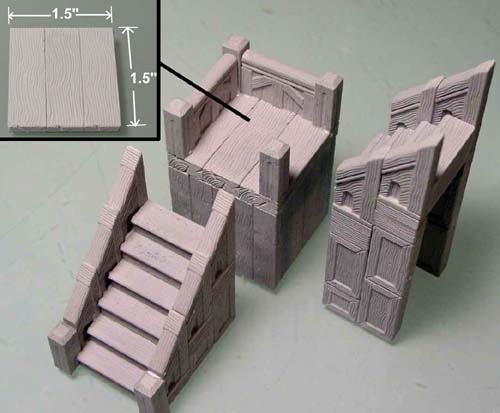
| 1. | For the straight stairs, you will need the following pieces. The center piece is the step, the top pieces are the railings and the bottom pieces are used to fill in under the rails. It is important to note that the railing pieces are thinner than the panel pieces. This was done on purpose (which you will see later). |
 |
|---|
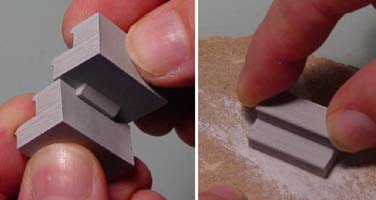
| 2. | The step blocks fit together as shown. You will notice that the upper step overlaps the bottom step slightly. Since there is a bump on the bottom of each step, you will need to sand the very bottom step to remove this bump. I will start by making a 2" tall step section. Since each step block is 1/2" tall I will need 4 step blocks and 4 railing blocks on each side. |
 |
|---|
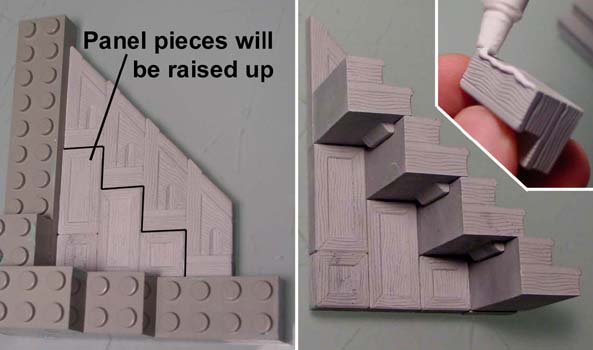
| 3. | Glue together the railing and panel pieces as shown. I'm using Legos to make a nice clean 90 degree angle while gluing the blocks together. Since the panel pieces are thicker than the rails, these panel pieces will be raised up slightly. Now glue the step blocks as shown. You will notice that the raised panel pieces give you a guide to exactly where the step blocks will set. |
 |
|---|
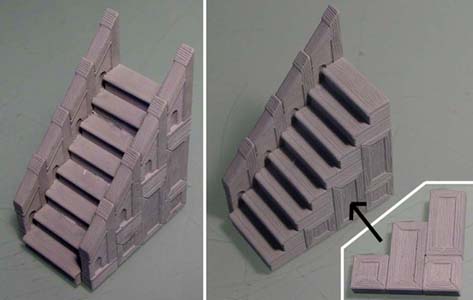
| 4. | Here is what a finished step section looks like with railings on both sides. If you only want railing on one side, then you need to fill in under the steps using the panel pieces. Glue the panel pieces as shown and set them under the steps. If this stairway is setting against a wall, then you may not need railings or fill-ins on that side of the steps. |
 |
|---|
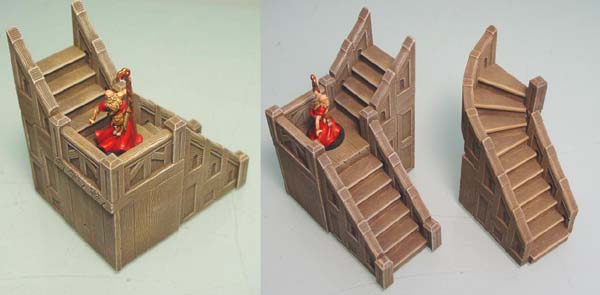
| 5. | Straight stairways with landings are fairly easy to do. The main thing you have to remember is to make the landings 1.5" x 1.5" in size. You can do this by using 3 of the shorter wooden beams on this mold. You can fill in the walls around the platform using the panel pieces or the wooden beam pieces. The top stair of the lower staircase will fall 1/4" below the platform and the first stair of the upper staircase will be 1/4" higher than the platform. You can finish the platform by adding the railings to the sides. |
 |
|---|
Combining Straight and Circular Stairs
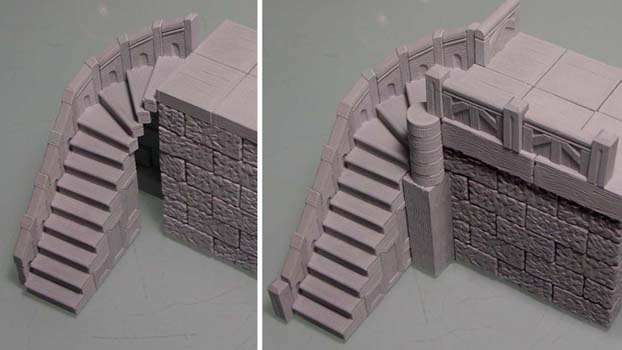
| 1. | Adding a circular stair section on top of a straight section is not difficult. If you do not have a railing on the inside, then simply set the circular stairs on top of the straight stairs. However, you will need to fill the gap left by the circular stairs somehow. I've used beams and circular disks. |
 |
|---|
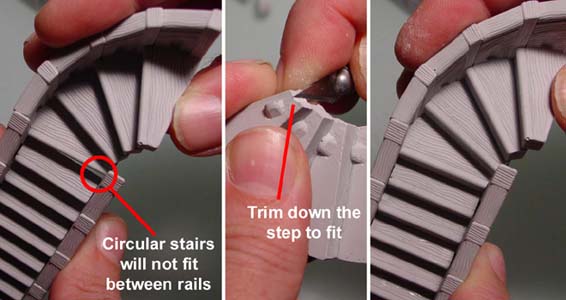
| 2. | If you do have a railing on the inside, then you will need to trim down the inside of the bottom step in order for it to fit between the rails. |
 |
|---|
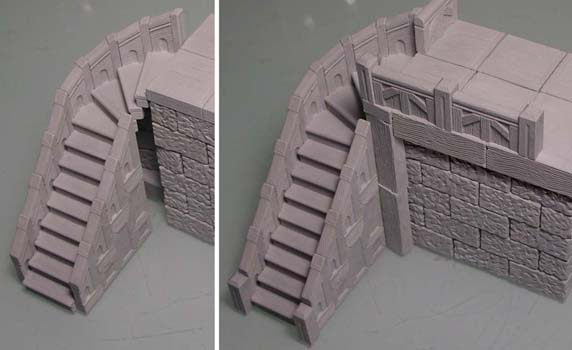
| 3. | Once again you will need to fill the gap left by the circular stairs. This time I only used 2 half beams (stacked) and put beams along the front face of the upper landing. When filling the circular gap at the top, some pieces will need to be sanded and fitted into this area. |
 |
|---|
How to Use Mold #58
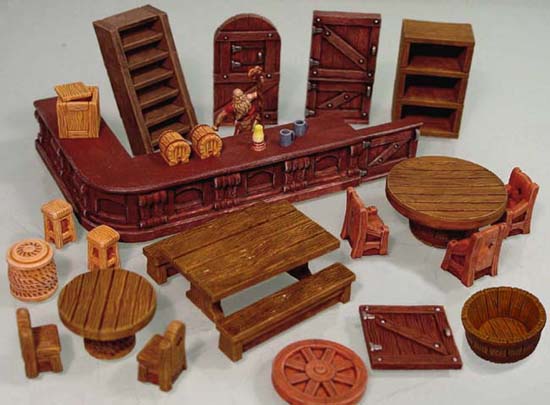
| 1. | Mold #58 has some good general furniture pieces for the inside of an inn. These are pieces you would cast a little more often since you will probably need several doors, counters, tables and chairs. This mold also has window inserts shown below. The round topped door and inserts will fit arches from molds #51 and #75. 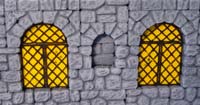 |
 |
|---|
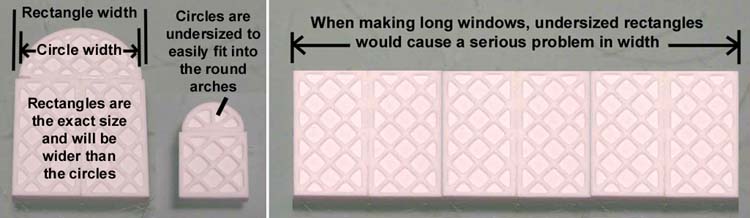
| 2. | If you look at the window inserts, one thing that will confuse most people is that the circular inserts are undersized and the rectangle inserts are exact size. Because of this, when you line the circular pieces on top of the rectangles, the circles will be smaller. You will need to sand the rectangles down in order to get them to fit into the window easily. Oddly enough, this was intentional. If I made the rectangles undersized, what would happen if you wanted to make a long window? The resulting long window would be so undersized that it wouldn't fit anything. I made the round pieces undersized because you can't compound the size error by grouping together a bunch of round pieces. Also, it's difficult to sand down round pieces. However, since it's easier to sand down flat edges and I didn't want to cause compound size errors in large windows, the rectangles are exact in size. I hope this explanation makes sense to everyone. |
|---|---|
 |
| 3. | Painting the window inserts isn't too difficult because the cross bars are raised. You can paint the whole window the color you want and when it's dry you can lightly go over them with black or dark grey paint. However, you will need to be very careful when you do this and you will need a very stiff brush. After doing this a few times, I realized that one of those foam brushes used for stenciling would have worked better for this instead of a paint brush. The slats don't stick up much (so they can be cast from the mold easily) so this will take some practice. |
 |
|---|
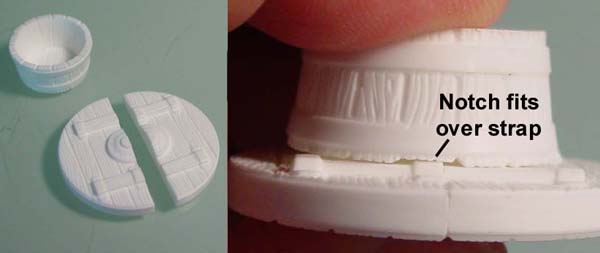
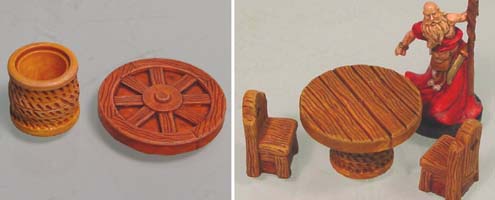
| 4. | The large table is made using two halves of the large round circle glued together and placed on top of the wash tub. The wash tub has recessed notches that fit over the center metal strap on the underside of the table. |
 |
|---|
| 5. | Once painted, this large table works well with the large chairs which are also on this mold. The underside of the table can be painted to resemble a large wheel. This photo shows the wheel fitting into one of the large arches on mold #75. Be warned, I had to do a lot of sanding on this wheel to get it to fit into this arch. |
 |
|---|
| 6. | The small table is made from the basket and the wagon wheel. These glue together easily. The right photo shows the small table put together with the small chairs. |
 |
|---|
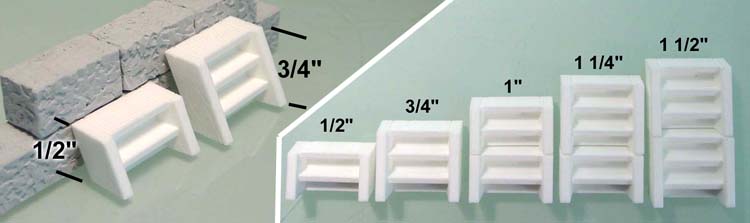
| 7. | The ship's ladder stairs come in two sizes, 1/2" tall and 3/4" tall. Keep in mind that this height is exact only when the steps are leaned at the proper angle. The combination of these two sizes will give you stairs in 1/4" increments. The stair section is exactly 1" in width. |
|---|---|
 |
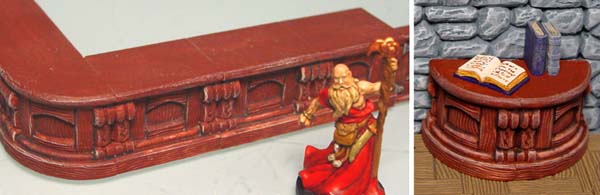
| 8. | The bar sections are easy to put together. You can also put several of the small round sections together to make round tables. |
 |
|---|
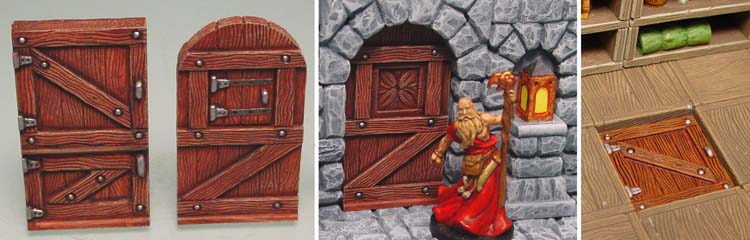
| 9. | The doors are useful in a number of ways. The top of the split door on the left is slightly less than 1" square so it can be used for trap doors in the floor (right photo). The bottom of this split door is the same height as the bar sections, so you can also use it for the swinging door the bartender uses to get behind the bar. The round topped door has a small window that measures 1/2" square. You can use a knife to trim out this little door and use it for cabinets or tiny trap doors. Also, the empty hole in the door can be filled with the decorative braces from mold #57 (center photo). The round topped door fits the arches found on molds #75 and #51 |
|---|---|
 |
| 10. | The 1" wide shelves can also be used to make crates, water troughs and cabinets. For this photo I've put two shelf sections together and used the upper door (photo above) for the front. |
 |
|---|
How to Use Mold #59
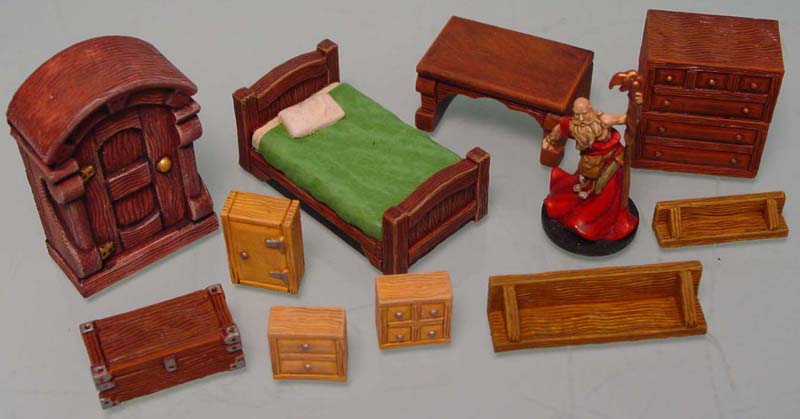
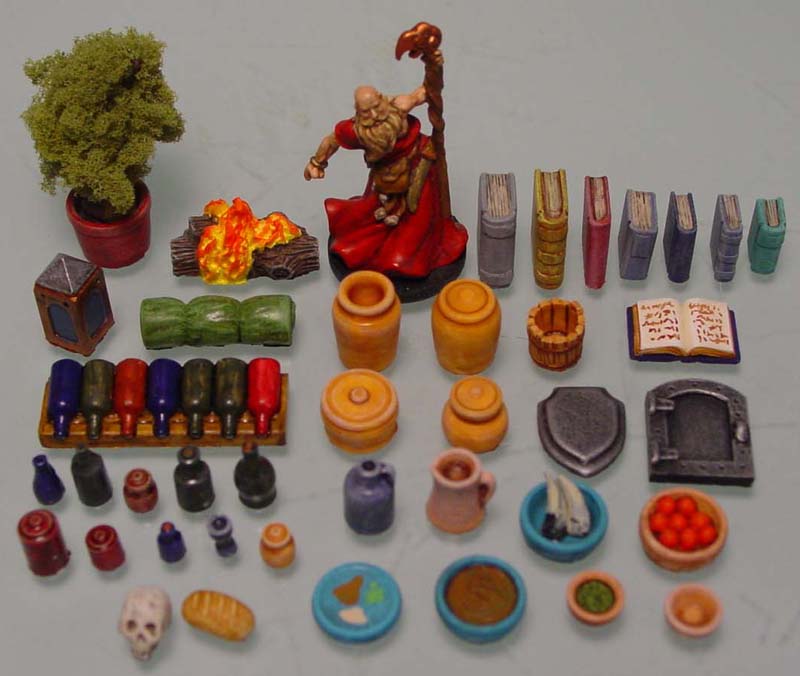
| 1. | There's not much you need to know about mold #59. Most of these pieces are not meant to be stacked together to build things. Instead, this mold has decorative bits used to fill shelves and also has some rarely used furniture pieces such as a wardrobe, bed and desk. This mold will probably be cast the least number of times. | |
|---|---|---|
 |
 | |
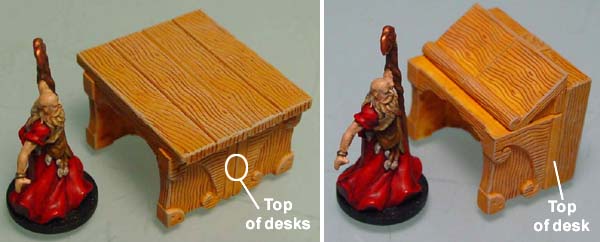
| 2. | This kitchen cutting table was made from 2 desks and topped with wooden planks from mold #57. This scribe's desk was made from a regular desk rotated forward. The front is made from wood panels from mold #57. |
 |
|---|
| 3. | The shields on this mold can be trophy plaques. Just cut the head off of your favorite miniature. The bottom of this dresser is a bar section from mold #58.  |
 |
|---|
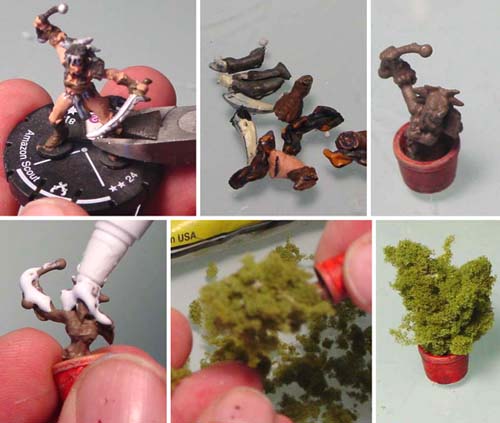
| 4. | Here's a good way to make potted shrubs. Take an unused miniature and cut off a few parts. Save these parts later on to be glued to plates as food. Glue what's left of it into one of the large flower pots on mold #59. Paint the pot red and the figure (trunk) a gray-brown. Cover the trunk with glue and push on some Woodland Scenics ground foam. I'm using the extra coarse ground cover for this one. Once the glue dries, you'll have a potted shrub you can place in the tavern for decoration. |
 |
|---|
To see how I used all of these bits when making my own inn, look at the Inn Building Instructions.