Tips & Tricks 4
Making a Fire for the Forge
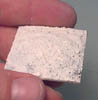
| 1. | Here's how to make smoldering coals in the forge. To see how to build the forge, check out the Small Block Mold page. Start by cutting a piece of card stock 1 1/2" square. Fit it under the forge to see if it needs any more trimming. |
 |
|---|
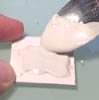
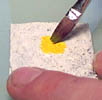
| 2. | Mix up some plaster and spread it on the card stock. It will thicken up quick because the paper will soak up the water. Use a spoon the shape to plaster into a pile in the center to simulate a pile of ashes. Let the plaster dry completely. |
 |
 |
|---|
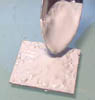
| 3. | Once dry, spread a thick layer of white glue over the plaster and sprinkle dirt onto it. Let it dry completely again. Now spray paint the piece white and let it dry again. |
 |
 |
|---|
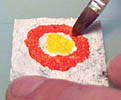
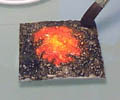
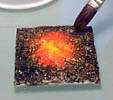
| 4. | I'll be using acrylic paint, the same paint you would use on miniatures. Paint a circle of yellow in the middle. Clean the brush and immediately paint a ring of red around the yellow. |
 |
 |
|---|
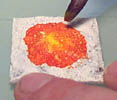
| 5. | Clean the brush and keep it wet. Use the water to blend the red and yellow together. Now paint black around the outside edge. |
 |
 |
|---|
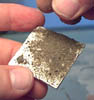
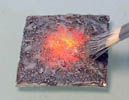
| 6. | Clean the brush and use the water to blend the red and black together. Let it dry completely. Now dry-brush a light gray on top. |
 |
 |
|---|
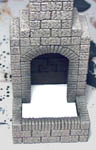
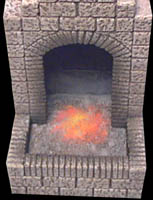
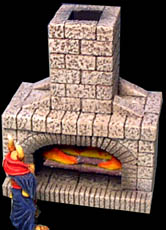
| 7. | Here's the finished forge with the fire inside. I also dry-brushed some gray on the back of the forge to make it look like the ashes had scattered against the side as well. |
 |
|---|
Making a Fire for a Fireplace
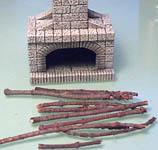
| 1. | Here's how to make a fire for your fireplace. To see how to build the fireplace, check out the Small Block Mold page. Start by collecting some small sticks to use as logs. Compare the size to your fireplace. Cut them down with wire cutters to fit inside the fireplace. |
 |
|---|
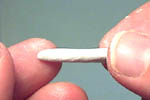
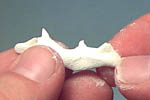
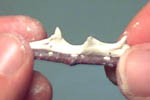
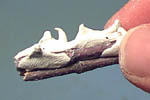
| 2. | Take some epoxy putty and form a small stick. Press out the top edges and form them into flame shaped peaks. Place it between two sticks and press it together. If you have problems with the clay adhering to the sticks, use a little white glue. Make more flame shapes and add more sticks. |
 |
 |
|---|---|---|---|
 |
 |
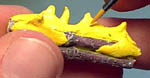
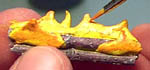
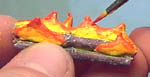
| 3. | When the putty cures, paint all of the flames yellow. Use the same acrylic paint you would use on miniatures. Next, add orange to the tips and brush it halfway down onto the flames. Finish it off by adding red to the tips of the flames. Try to blend the paint nice and evenly. Your fire is finished! |
|
 |
|---|
Making Raised Images
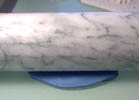
| 1. | Here's how to make raised images for tombs and doors. To see how to build the tombs shown, check out the Small Block Mold page. Start by rolling out some modeling clay no thinner than 1/2". |
 |
|---|
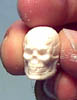
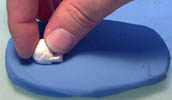
| 2. | I'm using a small skull from a "Goosebumps" game. It works really well because there are no sharp details on it. Press the skull deeply into the clay. |
 |
 |
|---|
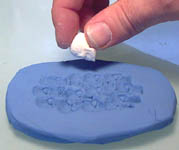
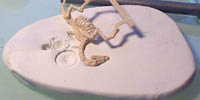
| 3. | Press the skull about halfway into the clay. If you press too far, you won't be able to remove the skull from the clay. Do this several times to make a pattern of skulls in the clay. You'll notice that new impressions will distort the ones already there. This will help give your door an eerie look from the distorted skulls. |
 |
|---|
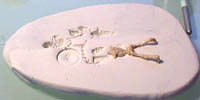
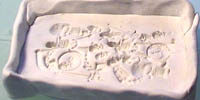
| 4. | Now you need to make a clay barrier around the outside. Be sure to seal it well so your casting material won't seep out. Fill the clay with casting plastic or Hydrocal (as shown further on). Plaster doesn't work well for this because you can't mix it thin enough to get into all the small details without it becoming very weak. Let the casting harden completely before removing the clay. |
 |
|---|
| 5. | When I removed the casting from the clay, I found that the clay stuck to the casting plastic in several spots. I think it's because the casting plastic heats up and melts the clay slightly. To clean the casting, I had to use paint thinner and a toothbrush to scrub the clay away (not a fun task). I also found that the casting plastic reacted to the clay, causing small pits to appear in the surface. I didn't mind because it gave the cast a corroded appearance. |
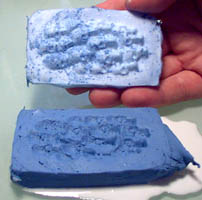 |
|---|
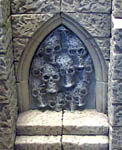
| 6. | Here's the finished door. I think the overall effect turned out great! Cutting the casting plastic to fit the door shape may not be that easy for some of you. I have a jigsaw and sander making my job much easier. Now I'm going to do the whole thing again using Hydrocal instead. |
 |
|---|
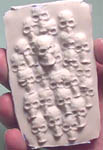
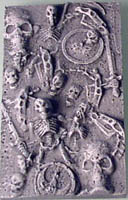
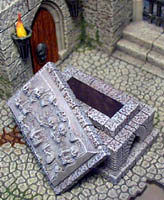
| 7. | The Hydrocal casting came out much smoother and cleaner. Notice that I pressed one skull deeper than the rest so it would stick out more. The clay didn't stick to the Hydrocal as much, so not much cleaning was required. I used this casting for the lid of a tomb shown here. |
 |
 |
|---|
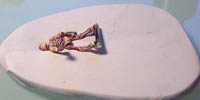
| 8. | For this example I'm using some bits from Games Workshop miniatures. I think skeletons give the best effects. Use shields, weapons and whatever else you can find. |
 |
 |
|---|---|---|---|
 |
 |
| 9. | Here's what they look like painted. The first one is made of casting plastic. I use it as a large steel door. The second is cast in Hydrocal which I used for the tomb shown on the Small Block Mold page. Be sure to experiment on your own and see what happens! |
 |
 |
|---|