Tips & Tricks 9
Designing Rocky Landscapes
This is one of the toughest areas to write about. To me, the best models and dioramas are ones placed in natural settings. I'm always looking for my buildings, bridges and towers to flow together with the land and become a part of it.
The question is how to create natural settings that look realistic. This is the only thing holding me back on truly expressing my architectural dreams. I would like to make easy-to-follow instructions so anyone can make realistic natural settings.
But before I can show you how to make it, I have to figure it out myself and try to explain why certain things look natural - and why others don't. Well - this shouldn't be too hard. You only have to look at what nature has already done and find the common elements. From there you can make a formula to follow so everything looks natural.
This was my line of reasoning when I started. So I began looking through hundreds of photos of mountains, hills and rock faces trying to find the common elements. Guess what? Nature has such wondrous variety that it doesn't always follow the same rules. You'll see a big difference in cliffs and rock faces depending on the climate, type of rock and location.
To make realistic hills with rock faces, I first have to narrow it down to one particular type of rock and setting. For this example, I'm going to use layered types of rock with cliffs near water.
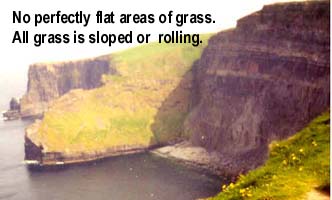
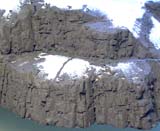
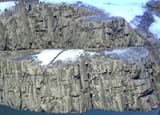
| 1. | I'm going to separate hill making into 2 categories, hill shape and rock texture. To get an idea about hill shape, let's look at a few photos. In this photo, notice that the hills roll around at gentle angles, then suddenly drop off as if chopped with a knife. There are very few flat places on the top grassy layer. |
 |
|---|
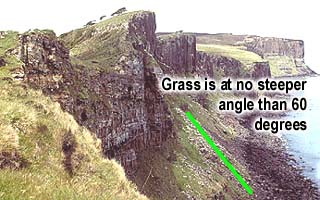
| 2. | The grassy areas can be very steep, but after about 60 degrees you won't see any grass. In fact, you won't see any slope steeper than 60 degrees. The land suddenly drops off to a sheer rock face. The angle of the grassy slopes varies. Some are steep, some are shallow, and some are a strip of grass that varies from steep to shallow (but not steeper than 60 degrees). |
 |
|---|
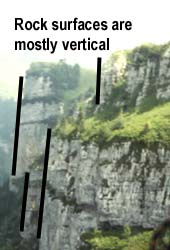
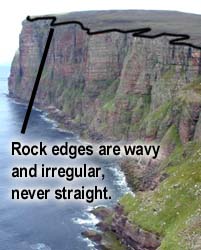
| 3. | All of the rock faces are almost straight up and down (at least for this type of rock formation). Not all hills are this way, just the seaside cliff types. Also, the line where the grass meets the top edge of the rock face is never straight. It curves and chops back and forth randomly. |
 |
 |
|---|
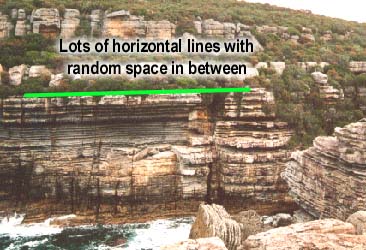
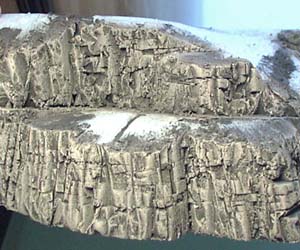
| 4. | Now for the rock texture. For this project, I'm going to look at sedimentary rock. This type of rock is made of compressed layers. These layers show up as the rock erodes. This photo shows the horizontal layers. Also notice that the horizontal lines are not the exact same distance apart. Some groups of lines are very close together, and some are farther apart. Some groups are cut really deep, and others are shallow. The key to making it look natural is to vary the depth and distance between the lines. |
 |
|---|
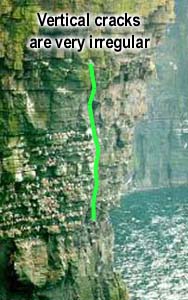
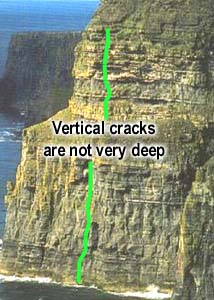
| 5. | Also notice that there are vertical lines as well. These aren't as apparent, but they are there if you look closely. These lines aren't as deep. They're also further apart and more jagged (not perfectly vertical). Next we're going to carve a simple clay model and you'll see how to use this information. |
 |
 |
|---|
Making a Clay Practice Model
The best way to get a feel for how your hill will look is by making a clay model of it. Practicing on a small piece of clay is much cheaper than messing up a large piece of foam. It also gives you confidence when you're ready to do the real thing.
If you screw up the piece of clay, you simply wad it up into a ball and start again. Once you successfully carve a few, you'll be ready to tackle the foam without as much hesitation. You can also use the clay model as a guide when you're ready to carve the foam.
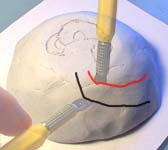
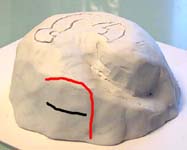
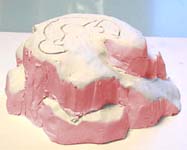
| 1. | Start with a small ball of modeling clay. Make a mound about the size of a tennis ball cut in half. I've drawn a little diagram of the ruin that goes on top of the hill. Use a hobby knife to make cuts into the clay. The marks shown in red are places where you make a vertical cut into the clay. The marks shown in black are where you make a horizontal cut. This first cut will be the road that leads up the hill to the tower. |
 |
|---|
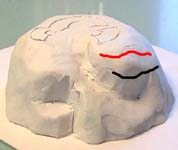
| 2. | Next I'll make a few cuts into the sides at random. When you make the vertical cuts (red lines) try to make them jagged and uneven, but always straight up and down. When you make the horizontal cuts (black lines) slope the blade at different angles as you cut, but make the cuts smoother (not jagged). |
 |
 |
|---|
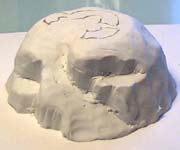
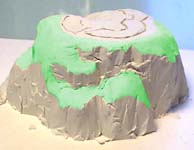
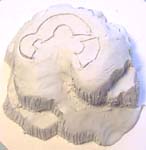
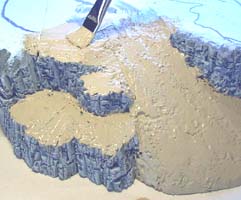
| 3. | I should have sloped the top flat areas more and made the rock faces more jagged. The second photo shows a different side of the hill. Areas shown in green represent where grass grows. These should slope from shallow to steep, but not steeper than 60 degrees. |
 |
 |
|---|
| 4. | The red areas represent the rock faces. To get a good idea how it will look, take a pencil and scratch in some lines to give them some texture. When you're finished, take a look at your hill. If you like it, you might use it as a guide for the real one. If you don't like it, make another and try to make it look better. |
 |
 |
|---|
The key to a natural looking hill is variety. Here's a review of the formula:
|
Carving The Hill
| 1. | The foam for the rock hill is polystyrene insulating board (also known a Dow Blueboard, but it comes in pink as well). This is used to insulate a house before they put on siding. You can find it at most building supply stores or lumber yards. I'm using a couple of 2" thick pieces. You can use 1" thick if you like but you'll have to glue several layers together. You'll also need a couple of knives to cut the foam. I'm going to use a small sharp paring knife and a bread slicing knife with a wavy blade. Be sure the knives are sharp or cutting the foam will be difficult. |
 |
|---|---|---|
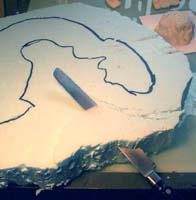
| 2. | Place the ruined tower model on the foam and draw around the base with a black marker. For instructions on how to build the ruin, look at the Ruined Tower Building Instructions page. Remove the model and use a knife to cut around the base. Be sure to leave a few inches of space around the model. |
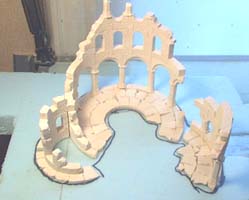 |
 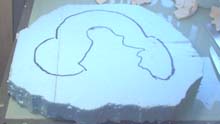
|
|---|
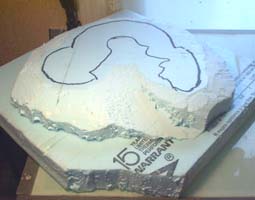
| 3. | Use the bread cutting knife to saw the pathway up to the tower. Also saw around the outer edge of the ruin so the grass area slopes down. Place this on top of another foam piece and glue it in place. If you're in a hurry, use a tube of super glue. Otherwise you'll have to wait for the glue to dry before you continue. |
 |
 |
|---|
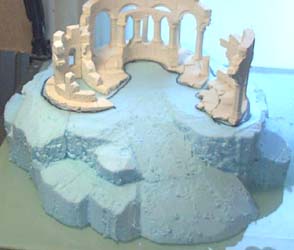
| 4. | Continue carving using the formula in the article above. The grassy areas should slope at different angles and the rock faces should be vertical and jagged. Set your model on top of it to see how it looks. This will give you a feel for how the whole model will look when put together. You'll find that carving foam is quite different from carving the clay model. At first I was going to follow the clay model, but found it difficult to do. Instead, the clay practice sessions gave me enough confidence to dive right into the foam cutting without hesitation. |
 |
|---|
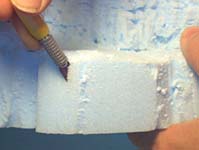
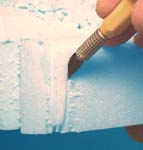
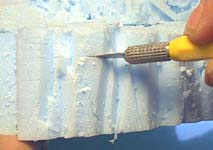
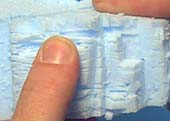
| 5. | Now to texture the rock faces. Start with a new, sharp hobby knife blade! Make several shallow cuts on each side and remove pieces by rubbing your finger across it. |
 |
 |
 |
|---|
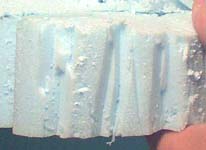
| 6. | Here's what it looks like with the vertical cuts. Next we'll make the horizontal cuts. You'll want to cut straight into the foam and put your cuts much closer together but be sure to vary the distance between the cuts. |
 |
 |
|---|
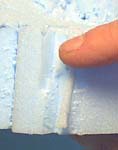
| 7. | Rub your thumb across the area to break out some of the foam layers. You may need to angle the knife slightly when you cut to remove a few layers also. Here is what the finished base looks like with all of rock texture carved into it. Be sure to do the carving someplace where you can clean up easily because bits of foam will completely cover the floor! |
 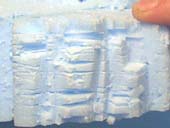
|
 |
|---|
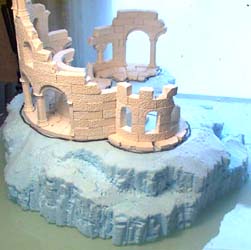
Adding The Finishing Touches
| 1. | Paint all of the rock faces first. I'm using the same colors and methods used to paint a regular building. The first coat is a dark gray paint thinned down so it will flow into all the cracks. Then I've dry-brushed 2 lighter coats of gray to finish the job. For more detailed painting instructions, refer to the Painting Instructions page. |
|
 |
|---|
| 2. | Apply an earth colored paint where the grass will go and let it dry completely. That way if you have any bare spots in the grass the earth color will show through. The best way to get an earth colored paint is to go outside, pick up a handful of dirt and put it in an envelope. Then go to the nearest paint store and look through their color samples. Try to find a color that matches the dirt, but make it about 2 shades lighter. The color you pick must be lighter because you're trying to represent the color of dirt as if sunlight was shining down on it. |
 |
|---|
| 3. | Glue the tower model down onto the hill. For instructions on building the tower, look at the Ruined Tower Building Instructions page. At this point I've already added vines and grass peeking up through the cracks between the blocks. Next paint a layer of water based glue onto a small area and sprinkle on ground foam scenic materials for the grass and weeds. You can find this type of ground scenic foam at most railroad or hobby shops. You can also buy it online at www.woodlandscenics.com. |
 |
|---|
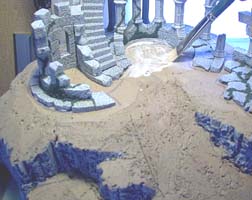
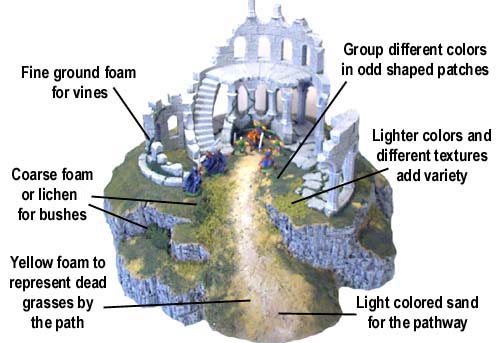
Here's a diagram showing how to apply the ground foam. You want to apply different colors of foam in patches - just like different kinds of grass grow in patches. Make these patches in random shapes. Also, vary the texture by alternating coarse and fine types of ground foam. For bushes, use the really coarse foam or lichen. That completes the instructions for the rocky hill. I hope this gives you enough information to try it out yourself! |
 |