How to Build a Wiz War Game Board

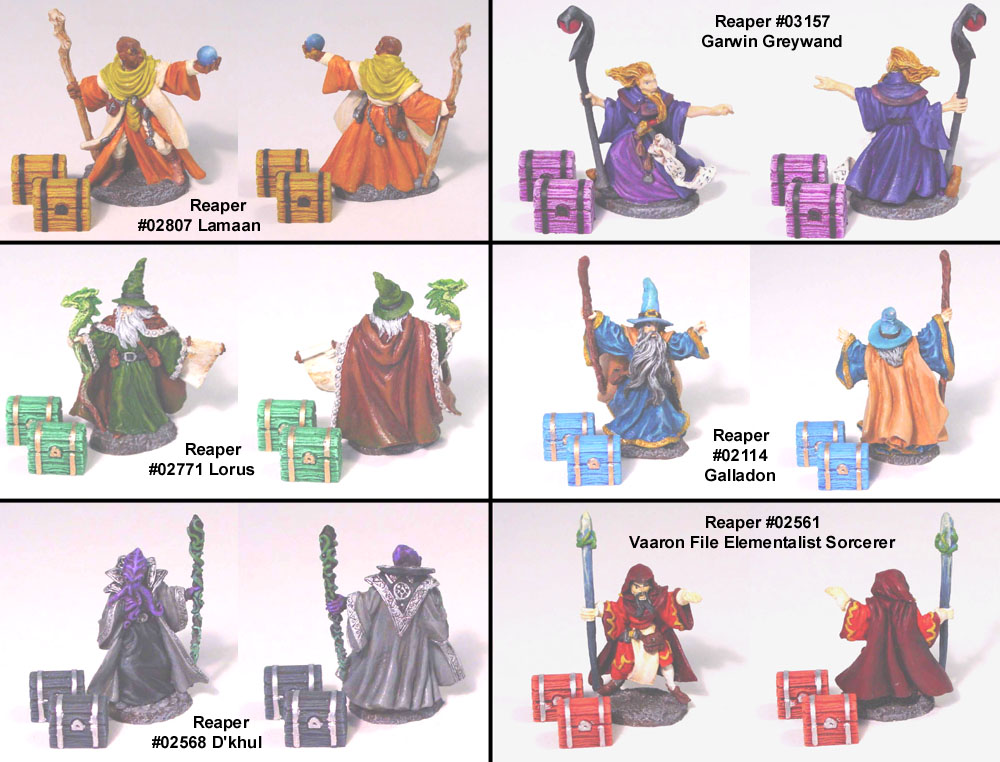
Wiz War is a board game created by Tom Jolly. It's still one of my favorite games to play. It is currently waiting to be released again by Chessex at the writing of this article. However, it has been due to be released for a long time so there's no telling when it will show up again. There is also an unofficial Wiz War site that can give you more up-to-date news about it. All of the wizards shown in the photos are from Reaper Miniatures. Wizard figures were painted by Laura Larsen. You may wonder why I created a board for a game that's not available yet, but mold #88 can also be used to make a Dungeon Twister board. You can also see other layouts that can be made with mold #88 on our Tips & Tricks 25 page. |
Wiz War Board Basics
Wiz war uses one board section for each wizard. So if you want a 6-player game, you will need 6 board sections.
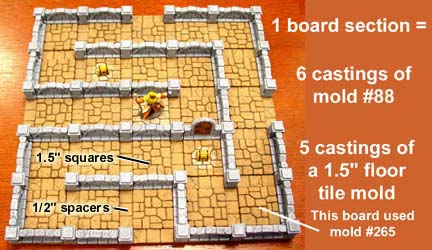
| 1. | Wiz War Board SectionsEach player needs one board section. The list below will help you determine how many castings you need (maximum 6 players): 1 board section 6 board sections |
 |
|---|
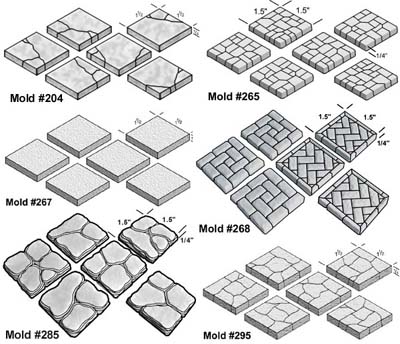
| 2. | 1.5" Floor TilesAt the writing of this article, there are currently 6 molds available that make 1.5" floor tiles. You can use any of these molds for the floor. To save money, you may choose to use only one of them to make all of your board sections. You'll notice that mold #268 is kind of an exception since it has 2 different kinds of textures on the mold. You will need 10 castings of this mold instead of 5, but it will make 2 complete floor sections for you instead of 1 (if you want each floor to be all one texture). |
 |
|---|
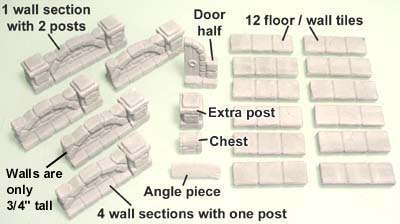
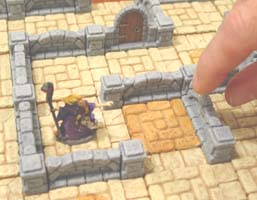
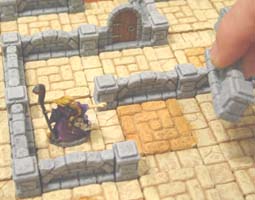
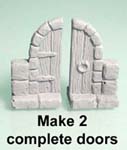
| 3. | Mold #88 will make all of the pieces for the walls. The flat tiles will be used to space apart the 1.5" floor tiles and make a place to set the walls. This mold will also make the walls, a wooden door and treasure chest. For a complete description of what you can do with these mold pieces, take a look at our Tips & Tricks 25 page. |
 |
|---|
| 4. | The wall sections on these Wiz War boards are not glued down. During the game, wizards can destroy walls and create walls, so you want to be able to remove and replace wall pieces during the game. |
 |
 |
|---|
Making a Board Section
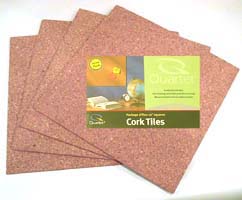
| 1. | I am going to base the game board onto cork. You can find cork tiles at most office supply stores for around $15.00 for a package of four 12" square pieces. To find cork tiles near you, search the internet for "Frameless cork panels" and you should find some. These are 1/8" thick. I liked using cork the best because it's easy to cut, it glues easily and it grips the table nicely so the pieces don't slide around. |
 |
|---|
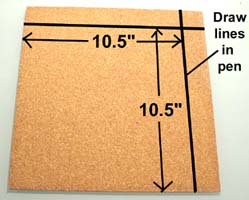
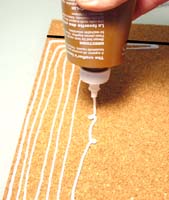
| 2. | Using a ruler and ink pen, draw a box that is 10.5" square. This will give you a border to glue within. Take white glue (I like Aleene's Tacky glue) and squeeze out a generous amount on the surface. Try not to go over the line you drew in pen. You'll need quite a bit of glue because the cork soaks it up. |
 |
 |
|---|
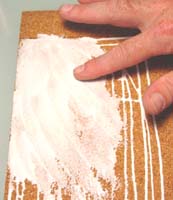
| 3. | Use your finger to spread out the glue. This will help it cover more evenly. Then, lay down the floor tiles on top of the glue. Don't do more than one half at a time. It takes a while to lay down all of those 1/2" wide flat tiles and you don't want the glue to dry before you can lay them down. |
 |
 |
|---|
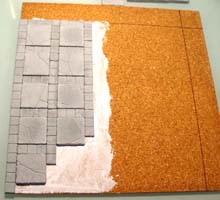
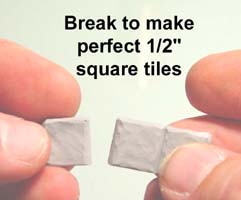
| 4. | Lay out all of the tiles to complete the square. Click on the photo to see a larger version of the board. If you run into trouble with the 1/2" flat tiles, you can simply break them to fit. |
 |
 |
|---|
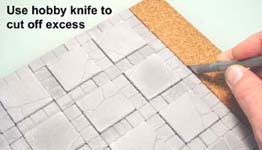
| 5. | When the glue is dry, use a hobby knife to trim off the excess cork. The only thing left to glue is a couple of doors. That's it! All of the wall sections you cast do not need any gluing and are ready to paint (shown below). |
 |
 |
|---|
Painting the Walls and Floors
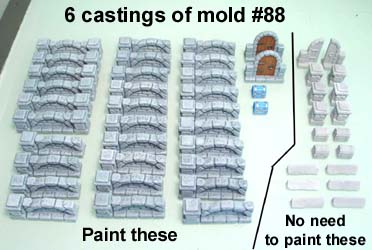
| 1. | You need 6 castings of mold #88 to make enough walls for one game board section. However, that does not mean you have to paint all of the pieces you cast. This photo shows what I have painted and what I did not end up using. Paint the angle pieces (bottom right) only if you want to use them for the wall markers. I painted the wall pieces using the Castle Gray Colors shown on the painting instructions page. |
 |
|---|
I must warn you that these wall sections take a long time to paint. You'll spend more time painting these than you will doing anything else on this project. The wall sections shown above are for only one board section. If you have 6 board sections then you will have 6 times as many wall pieces to paint. One thing I did to speed up the process was to dip the pieces in the darkest color of paint. Put a rubber glove on one hand and dip each end of the wall section into the paint. Then with the other hand, use a brush to push off the excess paint and set each wall piece onto a piece of wax paper. This first coat of paint (the darkest color) is the most time consuming to do. Once you get through it, the rest of the painting will go more quickly. |
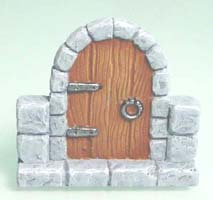
| 2. | The doors will take a little time to paint. Start by painting the outside stone the exact same way as you did the wall pieces. Don't worry if you get gray paint on the wood part of the door. Next, paint just the wood of the door dark brown. When dry, dry-brush light brown on top of it. To make this dry-brushing job a little easier, look at my door template from my Tips & Tricks 25 page. Finally, I painted the hinges and ring black, and then lightly painted silver on the very tops of them. |
 |
|---|
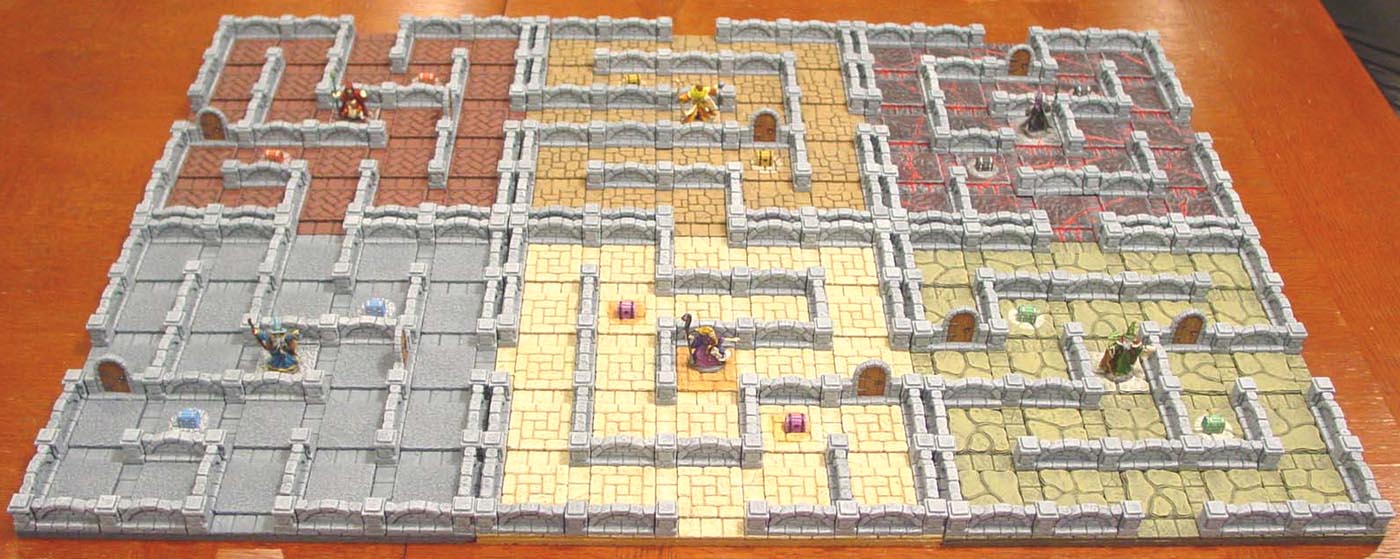
Below are the 6 board sections that I had made for my Wiz War game. I painted each a different color and tried to match the color of the board with the color of the wizard and treasure chests for each. As mentioned above, you do not have to buy every floor mold I show here. You can simply use one type of floor tile and paint it a different color for each board section. |
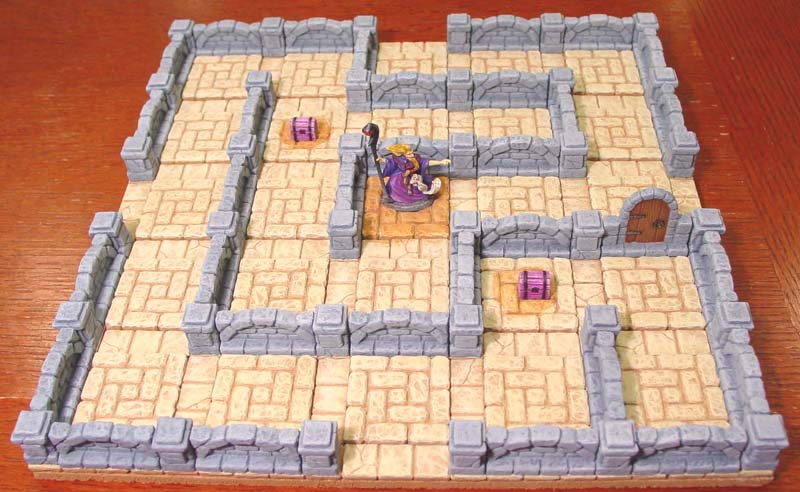
| 3. | Click on the photo to see a larger version. The floor of this board section was made using mold #268. All of the wizards shown here are from Reaper Miniatures. A clear photo and description of each miniature is shown at the bottom of this article. I painted the floor using the Desert Stone paint colors. The center square was darkened using some flesh colored ink wash along with the two circles that mark where the treasures start. |
 |
|---|
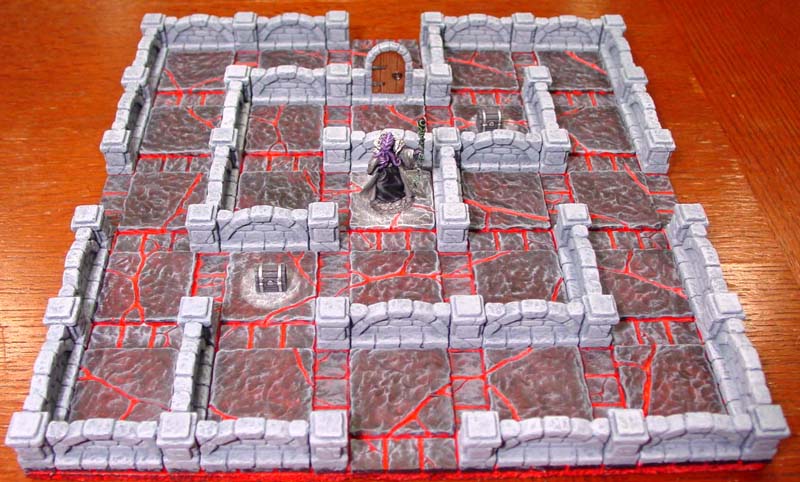
| 4. | Click on the photo to see a larger version. The floor of this board section was made using mold #204. I painted the floor using the Lava Floor painting instructions. The center square was dry-brushed using some light gray paint along with the two circles that mark where the treasures start. |
 |
|---|
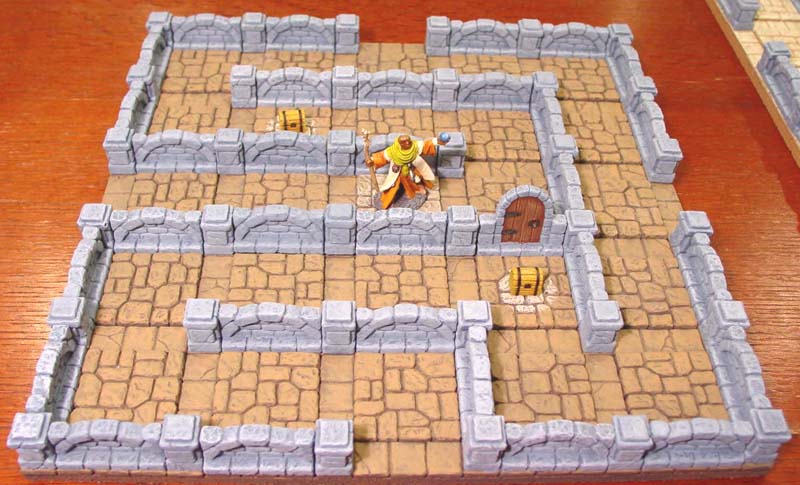
| 5. | Click on the photo to see a larger version. The floor of this board section was made using mold #265. I painted the floor using the Earth Tone paint colors. I only used the first two (darker) colors of paint so the floor would be darker and the walls would stand out better. The center square was dry-brushed using some light cream colored paint along with the two circles that mark where the treasures start. |
 |
|---|
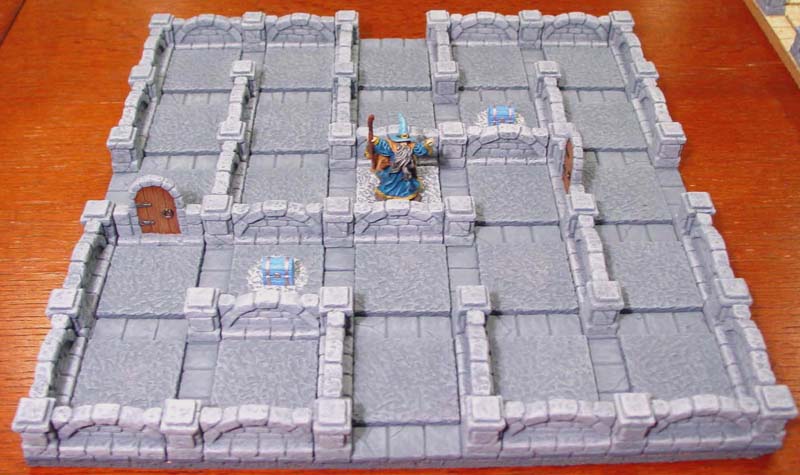
| 6. | Click on the photo to see a larger version. The floor of this board section was made using mold #267. I painted the floor using the Castle Gray paint colors. I only used the first two (darker) colors of paint so the floor would be darker and the walls would stand out better. The center square was dry-brushed using some light gray colored paint along with the two circles that mark where the treasures start. |
 |
|---|
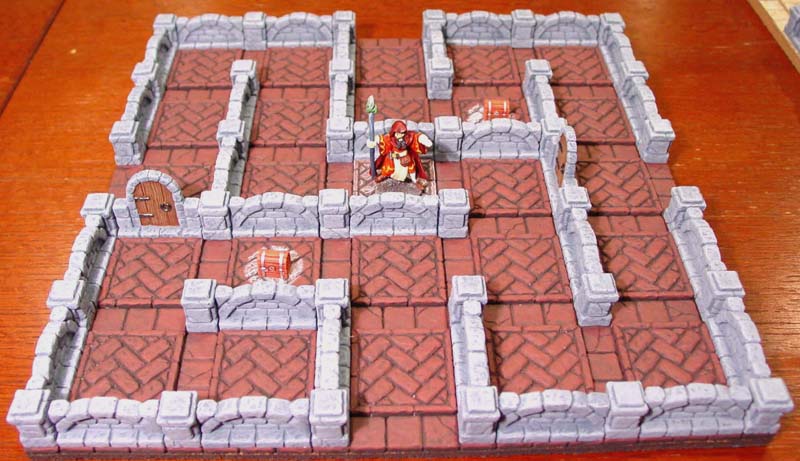
| 7. | Click on the photo to see a larger version. The floor of this board section was made using mold #268. I painted the floor using the Red Brick paint colors. I only used the first two (darker) colors of paint so the floor would be darker and the walls would stand out better. The center square was dry-brushed using some light red colored paint along with the two circles that mark where the treasures start. |
 |
|---|
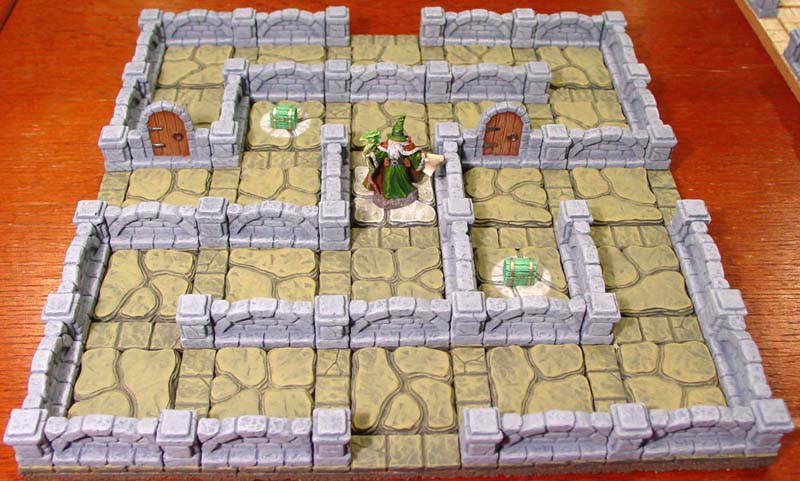
| 8. | Click on the photo to see a larger version. The floor of this board section was made using mold #285. I painted the floor using the Cavern Floor paint colors. I only used the first two (darker) colors of paint so the floor would be darker and the walls would stand out better. The center square was dry-brushed using some light green colored paint along with the two circles that mark where the treasures start. |
 |
|---|
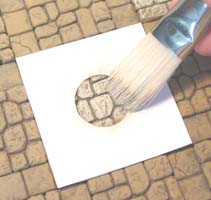
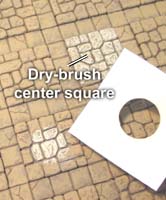
| 9. | To make the circles a little easier to paint, I made a quick template that can be found on our Printed Plans page. It's near the bottom labeled Wiz War Markers. Simply print the page on your printer, cut out the template with a hobby knife and lay it down to cover the center of the square. Then take a lighter version of the floor paint you are using and dry-brush it on top. Also dry-brush the center square. |
 |
 |
|---|
The Wizards
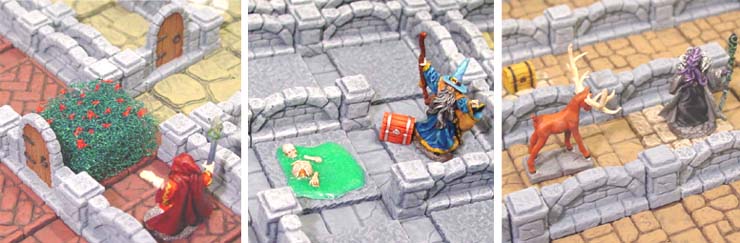
All of the wizards shown here are from Reaper Miniatures. They are one of my favorite makers of fantasy miniatures. If you click on the photo, you will see an enlarged version of the miniature along with its item number and description. The painting was done by Laura Larsen and I thought she did an excellent paint job on the figures. I painted the chests myself to try and get them to match the color of each board section. |
 |
Here is what all 6 boards look like when set together. Click on the photo to view a larger version. To see how to make accessories for this board shown below such as a slimecube, killer ooze, chunk of stone and various effects markers, take a look at our Tips & Tricks 25 page. |
 |