Water Cavern Building Instructions
|
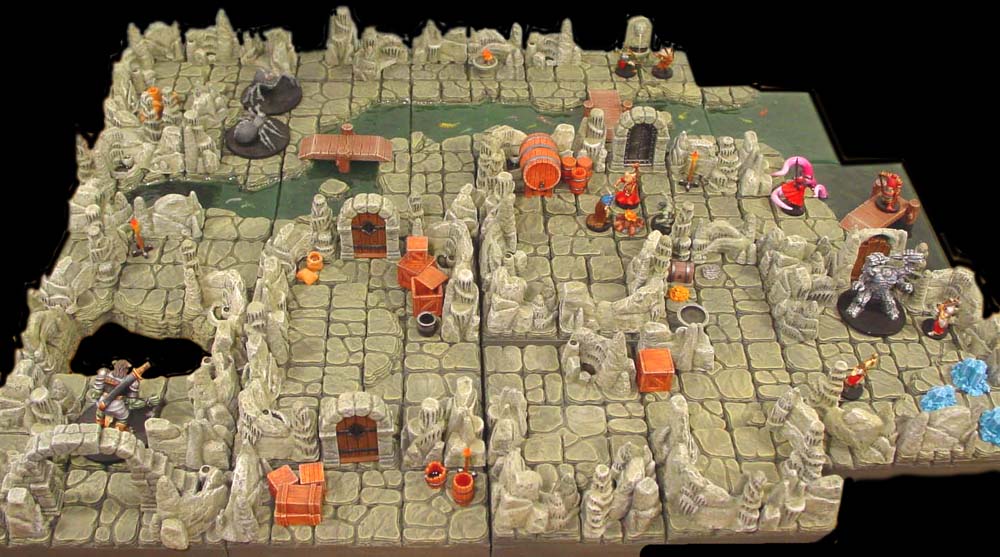
This page contains instructions for building water caverns. The molds used for this layout are #81, 82, 85, 281 and 282. The hero and monster figures shown are from the Descent board game from Fantasy Flight Games. |
|
Cavern Layout Basics
These caverns are made of rooms and hallways which fit together to make the complete layout.
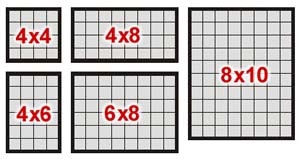
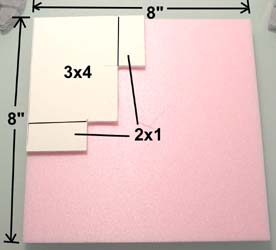
| 1. | RoomsRooms should be in 2" increments. They should be no smaller than 4" on a side and as large as you want to go. In the diagram are a few examples of room sizes you can use. |
 |
|---|
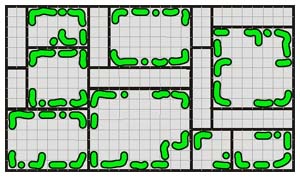
| 2. | The cavern wall pieces will be placed around the outside of the room. The cavern walls are represented in green. If you want the doorway openings to line up, leave 2" of space beside each doorway, or leave the entire corner open as shown in the example. |
 |
|---|
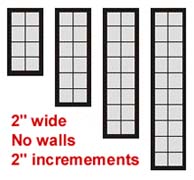
| 3. | HallwaysHallways should be 2" wide by whatever length you want in 2" increments. I would suggest going no longer than 8". Hallways will have no walls glued to them. Shorter lengths will be more usable, so be sure to make more 4" and 6" long hallways. |
 |
|---|
| 4. | When the rooms and hallways are put together, the walls on the rooms surround the hallways. You will end up with most of your movement area to be 2 squares wide at least. This works well for D&D and many other board games. Placing doorway openings as shown above will help doorways line up when putting rooms against each other. |
 |
|---|
If you think these suggestions are too restrictive, feel free to break the rules. Make rooms any size you want (even "L" shaped), put doorways anywhere, make them any width or make the hallways wider. You may also choose to make floors rise up to different heights (as shown below).
The only difference it will make is that the rooms, doorways and hallways may not line up evenly. The more random the pieces are, the less likely they will line up. However, making random changes will also give your cavern a more natural and spontaneous look.
Adding Height Variations
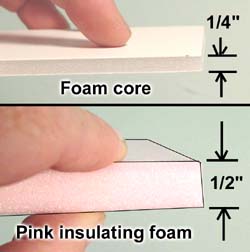
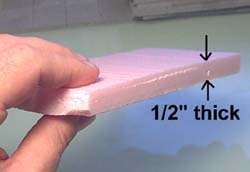
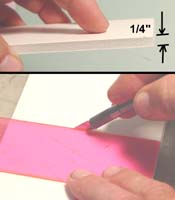
| 1. | If you want to add height variation to your caverns, you will need some 1/4" and 1/2" thick spacing material. The 1/4" material I will be using is foam core board, which has a layer of foam sandwiched between two layers of paper. If you cannot locate foam core, then you might use a 1/4" thick piece of cardboard instead, or two layers of cardboard glued together. The 1/2" material is polystyrene foam insulating board. This is the stuff they use for sheeting on houses before they put siding on. You can get it at most lumber yards and it usually comes in pink or blue. Be careful though, even though it says 1/2", some kinds may be slightly thicker. |
 |
|---|
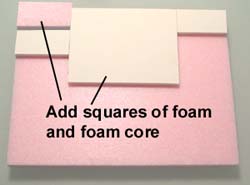
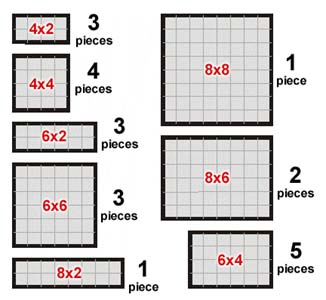
| 2. | Cut the foam and foam core into rectangles in even inches. If they're not in even inches, then the floor tiles won't match up on top of them. Stack these pieces up on top of your base material to give kind of a "stair step" effect going down towards one edge and glue them into place. |
 |
|---|
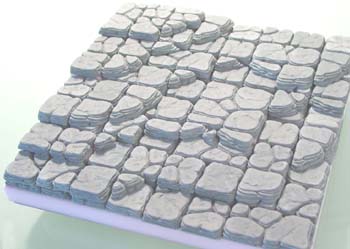
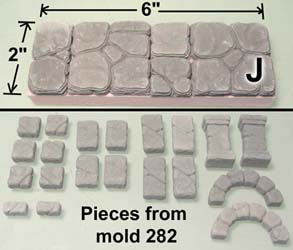
| 3. | Stack the floor tiles on top of the raised layers. To give a more natural look, I used rounded tiles and small pieces from mold #282 to finish the edges. This helps give each step a nice natural flow down to the other end. Be sure to test fit wall sections around the outside edges of the room. If there are too many steps, then you may not have enough short wall pieces to fit where you want them to. |
 |
|---|
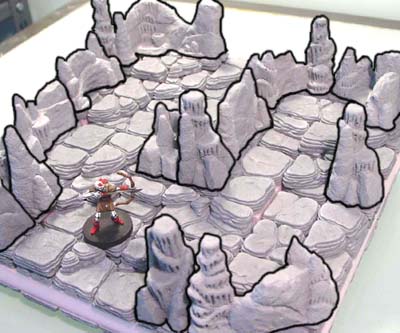
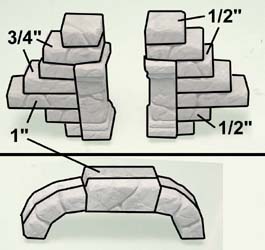
| 4. | The nice thing about cavern walls is they are separate pieces that do not fit together. Because of this, you can stack the individual pieces along the sides of a stair stepped floor. This example shows wall pieces placed along the outside stepped edge without looking out of place. Wall pieces can even be used in the center of the room as shown. If you want to use this variable height idea, you will have to design the rooms yourself. The instructions below do not include this drastic of a height change. I just placed the idea here for inspiration and to show what was possible. |
 |
|---|
Making the Water Cavern Set
To make the set shown below, you will need to cast these molds as follows:
You will need to cast mold #281 a whole lot more times than the other molds. Some people purchase a second copy of this mold to speed things up. Click on each photo to see a larger version. |
 |
 |
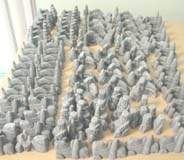
| 1. | After the pieces are cast, I like to sort them all out and pre-glue the wall pieces together. For instructions on how to glue the wall pieces, please look at our Tips & Trips 21 page. |
 |
 |
|---|
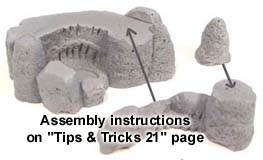
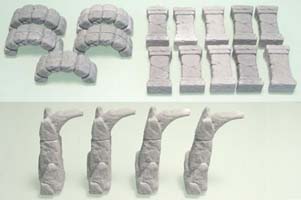
| 2. | Glue together 10 arch pieces and collect 10 posts. These will be used to make 5 stone arches later on. Also glue 4 of the cavern arch tops to the cavern bases. Add these arches and posts to your group of wall sections. These pieces will be painted along with the wall sections. |
 |
|---|
| 3. | I'm going to mount the cavern floors onto 1/2" polystyrene foam insulating board. This is the stuff they use for sheeting on houses before they put siding on. You can get it at most lumber yards and it usually comes in pink or blue. Be careful though, even though it says 1/2", some kinds may be slightly thicker. |
 |
|---|
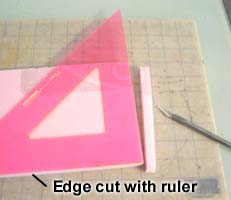
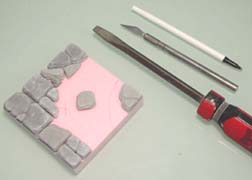
| 4. | We will pre-cut the foam into the pieces shown in the diagram. To cut the foam, it is helpful to have a hobby knife, ink pen, triangle, ruler and cutting board. 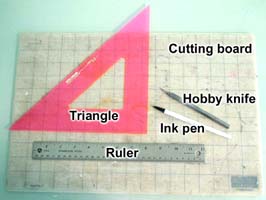 |
 |
|---|
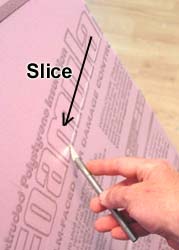
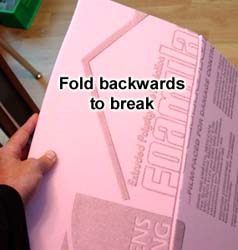
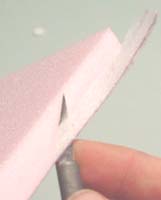
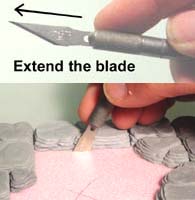
| 5. | Extending the blade on your hobby knife will allow you to cut more deeply. 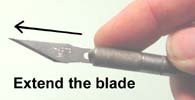 Cut a large strip of foam by slicing halfway into it then folding it back to break it. |
 |
 |
|---|
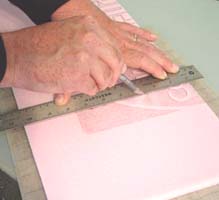
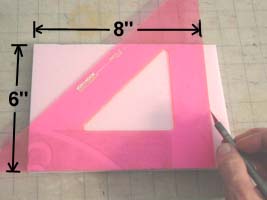
| 6. | Use the ruler and knife to cut off a large section of the foam. Lay the triangle on a good straight side of the piece and cut a 90 degree edge. |
 |
 |
|---|
| 7. | Use the ruler and triangle to cut the pieces you need (from step 4 above). If the edges of the foam end up being cut at an angle, use the knife to trim the excess off. This will ensure that the pieces will butt together without gaps. |
 |
 |
|---|
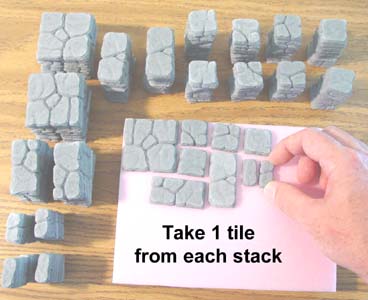
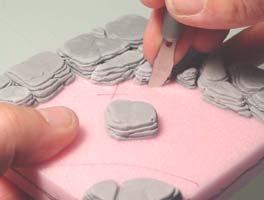
| 8. | When gluing the tiles down to the foam, here is what I suggest: Sort and stack all of your floor tiles cast from mold #281. Then place one of each tile down onto the floor and arrange them randomly. If you do this, you will not have repeats of the same tile next to each other and you won't run out of one tile faster than the others. |
 |
|---|
The Rooms
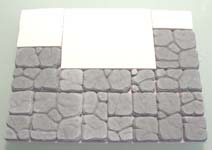
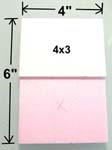
| 9. | I am going to use 1/4" foam core board to give my rooms a little variety in height. This means that one end of a room will step up by one tile. You do not have to do this. If you do not want part of your rooms to step up slightly (or you can't find a 1/4" thick spacing material), then just ignore putting white foam core down. Instead, just cover the floor flat with tiles. |
|---|
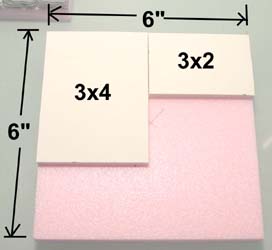
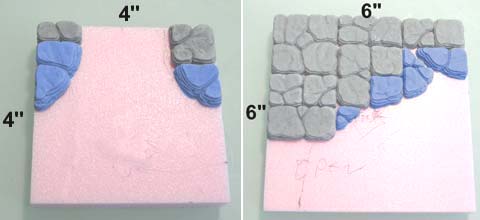
| 10. | For the first room, glue the squares of foam core onto an 8" x 6" piece of foam. I used a ruler and triangle to cut the pieces of foam core exactly. |
 |
 |
|---|
| 11. |
The tiles shown in blue are from mold 282, and are used to make a more natural step. Glue these odd shaped tiles exactly as you see them here or you may run out. |
 |
|---|
 Glue random tiles down to cover the entire surface of the floor.
| 12. | 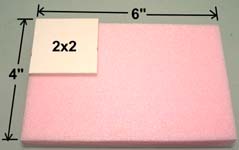 The second room uses the tiles shown here. The tiles in blue are from mold 282. |
 |
|---|
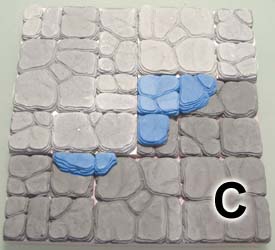
| 13. | The third room uses the tiles shown here. The tiles in blue are from mold 282. |
 |
 |
|---|
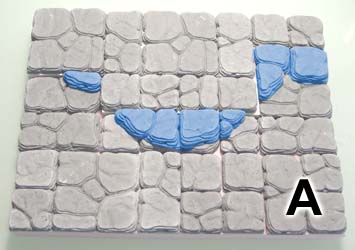
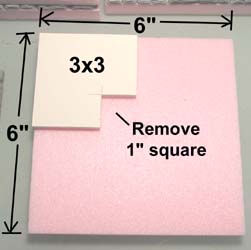
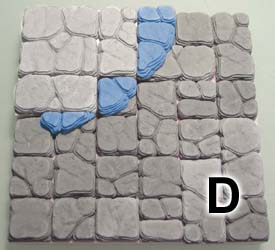
| 14. | The fourth room uses the tiles shown here. The tiles in blue are from mold 282. |
 |
 |
|---|
| 15. | The fifth room uses the tiles shown here. The tile in blue is from mold 282. |
 |
 |
|---|
| 16. |
The tiles in blue are from mold 282. The next 2 pieces will be used for a bridge. Use 2" x 4" foam and position the bridge ends (shown in blue) into the center of each piece. |
 |
 |
|---|
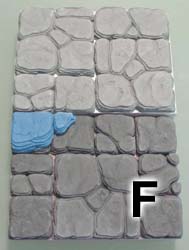
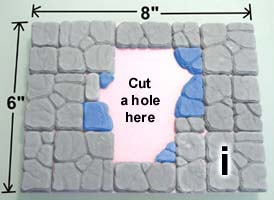
 The sixth room uses the tiles shown here.
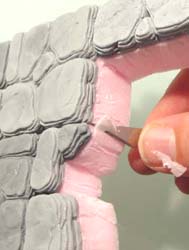
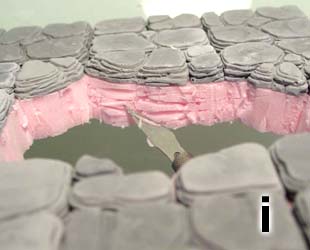
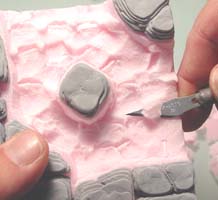
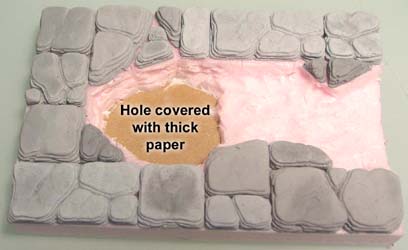
| 17. | This room will have a hole in the floor. After the glued down tiles are dry, extend the blade of your hobby knife and chop out the opening. |
 |
 |
|---|
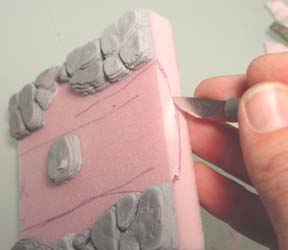
| 18. | Use a hobby knife to cut vertical grooves into the foam between the tiles. Then cut "V" shaped horizontal grooves as shown. Rub your thumb over the grooves to remove strips of excess foam. |
 |
 |
|---|
| 19. | This 2" x 6" section will be used for a large archway. The small pieces under it are from mold 282. Snap the round arches in half. Glue these small pieces together to make the walls and arches shown. |
 |
 |
|---|
The River Sections
| 20. | The river sections are fairly simple. Just glue the floor tiles down as you see them in the photos. Once again, the blue tiles are from mold 282. Glue all of the sections shown below. |
 |
|---|
| 21. | 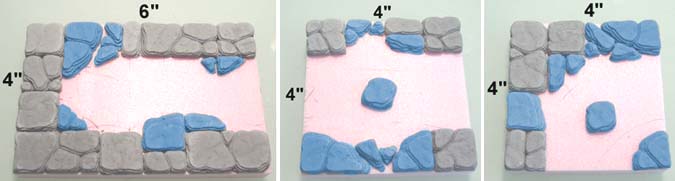 |
|---|
| 22. | 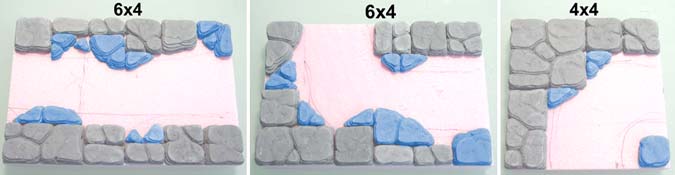 |
|---|
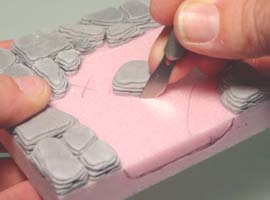
| 23. |
To do this, I'm going to use a hobby knife, screw driver and ink pen. Use the ink pen to mark the river bottom and then use a hobby knife to cut the bottom contour. |
 |
|---|
 To make the water look deep, we need to scoop out the foam to make the river bed.
| 24. | Using the knife, cut about 1/4" down into the foam on all sides. Don't forget to cut around the rocks in the middle. |
 |
 |
|---|
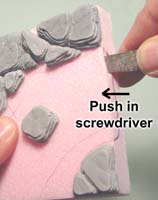
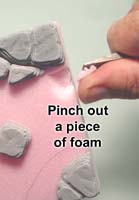
| 25. | Shove the screwdriver into the foam, place your thumb over the top and pinch out a chunk of foam. Continue pinching out chunks, but do not go any deeper than 1/4" into the foam. |
 |
 |
 |
|---|
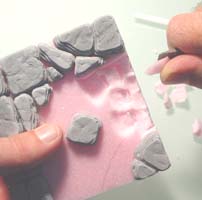
| 26. | Pinch out the rest of the river bed using the same method. When finished, you will have uneven peaks that need removing. Use a knife to cut the peaks off and smooth the floor up a little. It's OK if the floor is still very rough. Do this for all of the river pieces. |
 |
 |
|---|
| 27. | For this river piece, I'm going to make a spring. I've cut a hole completely through the foam and then cut grooves around the edges to look like rock. Then I've glued a piece of cereal box under it to close off the hole. The rest of the bed is dug out just like all of the other river pieces. After the pieces are painted, we will add the water (check further down on this article for details). |
 |
|---|
The Hallways
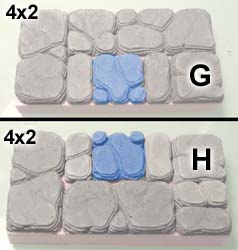
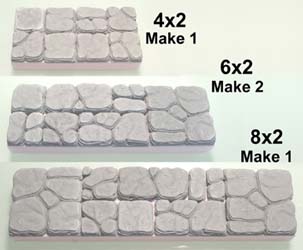
| 28. | The hallways are very simple. Just glue the basic floor tiles down onto the foam bases. You will make one copy of the 4x2 hallway. Make two copies of the 6x2 hallway. Make one copy of the 8x4 hallway. If you have any extra tiles, feel free to make extra hallway sections. |
 |
|---|
Painting and Assembling the Set
For directions on painting your pieces visit our Painting Instructions page. The pieces are painted using the cavern floor colors. Be sure to paint all the pieces before gluing any of them together.
Directions for making the rivers are on our Tips and Tricks 24 page. The instructions below will show you how to assemble the painted pieces to make the finished rooms and hallways.
Be sure that all of the floors and walls are painted and the rivers are poured before gluing any of these rooms together.
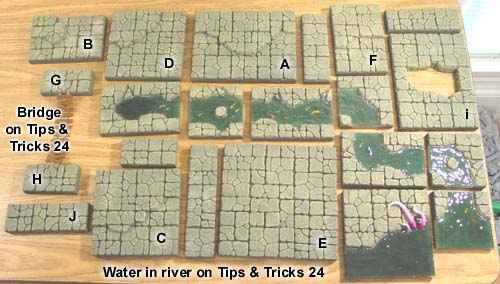
| 1. | This photo shows all of the room, hallway and river pieces in the set. At this point they have all been painted. For directions on painting your pieces visit our Painting Instructions page. After painting, the rooms are ready to be assembled (the rooms have the letters on them). |
 |
|---|
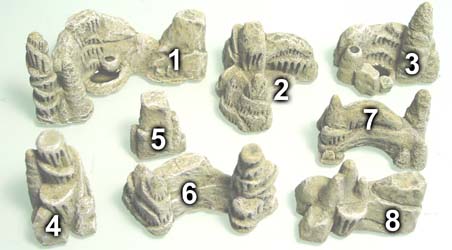
| 2. | For directions on painting the walls, see our Painting Instructions page. Be sure that you not only paint the wall pieces, but also paint the doorway arches and other small pieces listed in the instructions above. This photo shows all of the wall sections in the set. Use this photo as a guide. It will help you recognize which wall sections are being placed. |
 |
|---|
| 3. | 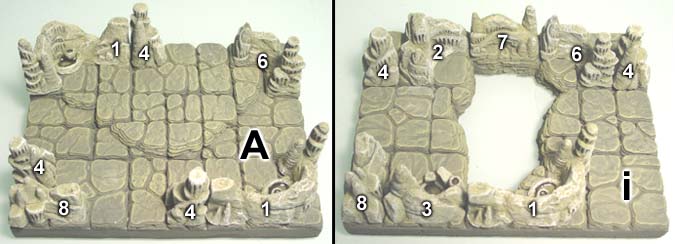 |
|---|
| 4. | 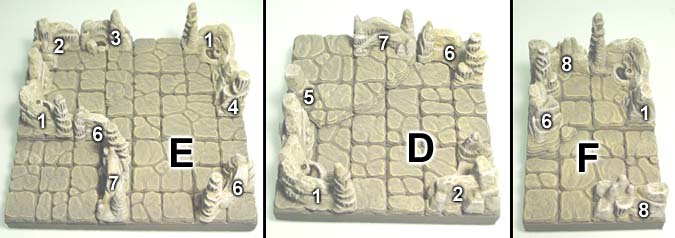 |
|---|
| 5. | 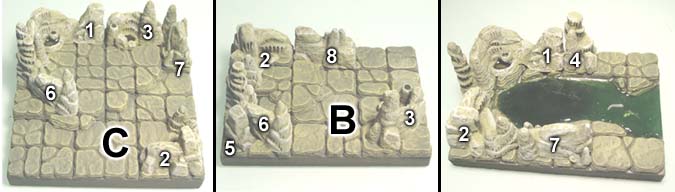 |
|---|
| 6. | 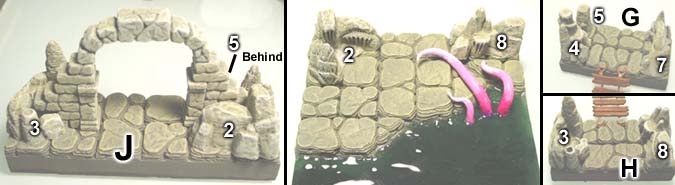 |
|---|
Finishing Touches
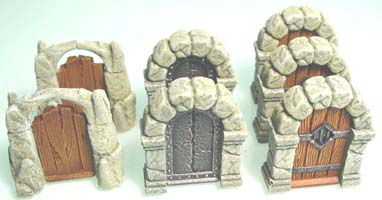
| 1. | These are the doors I've made for the set. The rough wooden doors are from mold #81, and were painted brown and dry-brushed with light brown. The iron doors are from mold #85 and were painted black and dry-brushed with silver. The secure wooden doors are from mold #282 and were painted brown and dry-brushed with light brown. The iron parts were painted black and dry-brushed with silver. |
 |
|---|
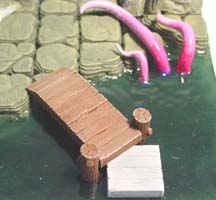
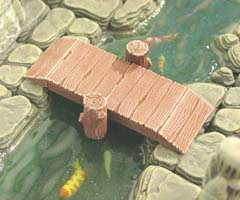
| 2. | The dock and bridges are made from the plank and post pieces from mold #85. The flat plank squares and angle pieces were glued together, then painted. The posts were painted separately. | ||
|---|---|---|---|
One end of the dock was placed on the shore and the other end propped up by a spare tile. Then the posts were glued onto the sides. The bridge was laid across the river and posts were glued onto the sides of the bridge. If you don't glue the dock and bridge to the river, then you can move them wherever you like. |
 |
 | |
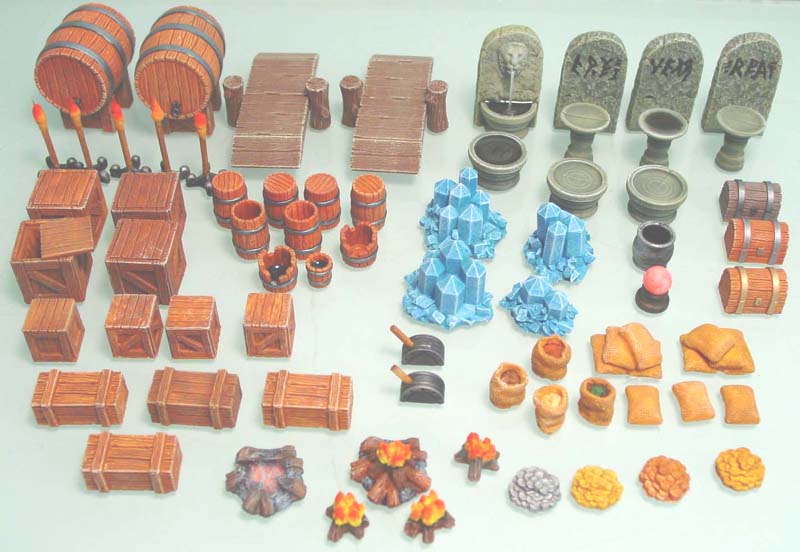
| 3. |
(A) The large barrels were painted reddish brown and dry-brushed with light brown. The steel bands and valve were painted black with a coat of silver on top. (B) The bridges were painted brown and dry-brushed with light brown. (C) The stone pieces were painted the same color and method as the cavern wall pieces shown on the Painting Instructions page. Water was added using Envirotex Lite as described on the Tips & Tricks 24 page. (D) The torches are made following the instructions from the Tips & Tricks 24 page. (E) The crates were painted brown and dry-brushed with light brown. (F) The barrels were painted reddish brown and dry-brushed with light brown. The steel bands were painted black with a coat of silver on top. Water added to the barrels or bucket is made using Envirotex Lite. (G) The crystals are made following the instructions from the Tips & Tricks 24 page. (H) The crystal ball was painted white and red glaze was lightly brushed onto it. The base was painted black with silver lightly dry-brushed over it. (I) The chests were painted various colors of brown with light brown dry-brushed on. The bands were painted various metallic colors. (J) The levers are made following the instructions from the Tips & Tricks 24 page. (K) The grain sacks were painted tan and dry-brushed with light tan. The contents of the sacks were painted with various colors of ink wash. (L) The fires are painted using yellow blended into red at the tips. The wood is brown, the bed is black, and both wood and bed are dry-brushed with gray. (M) The coin piles were painted using metallic colors and given a colored ink wash. Gold piles use a flesh wash, silver uses a black wash, and copper uses a brown wash. |
|---|
Photos
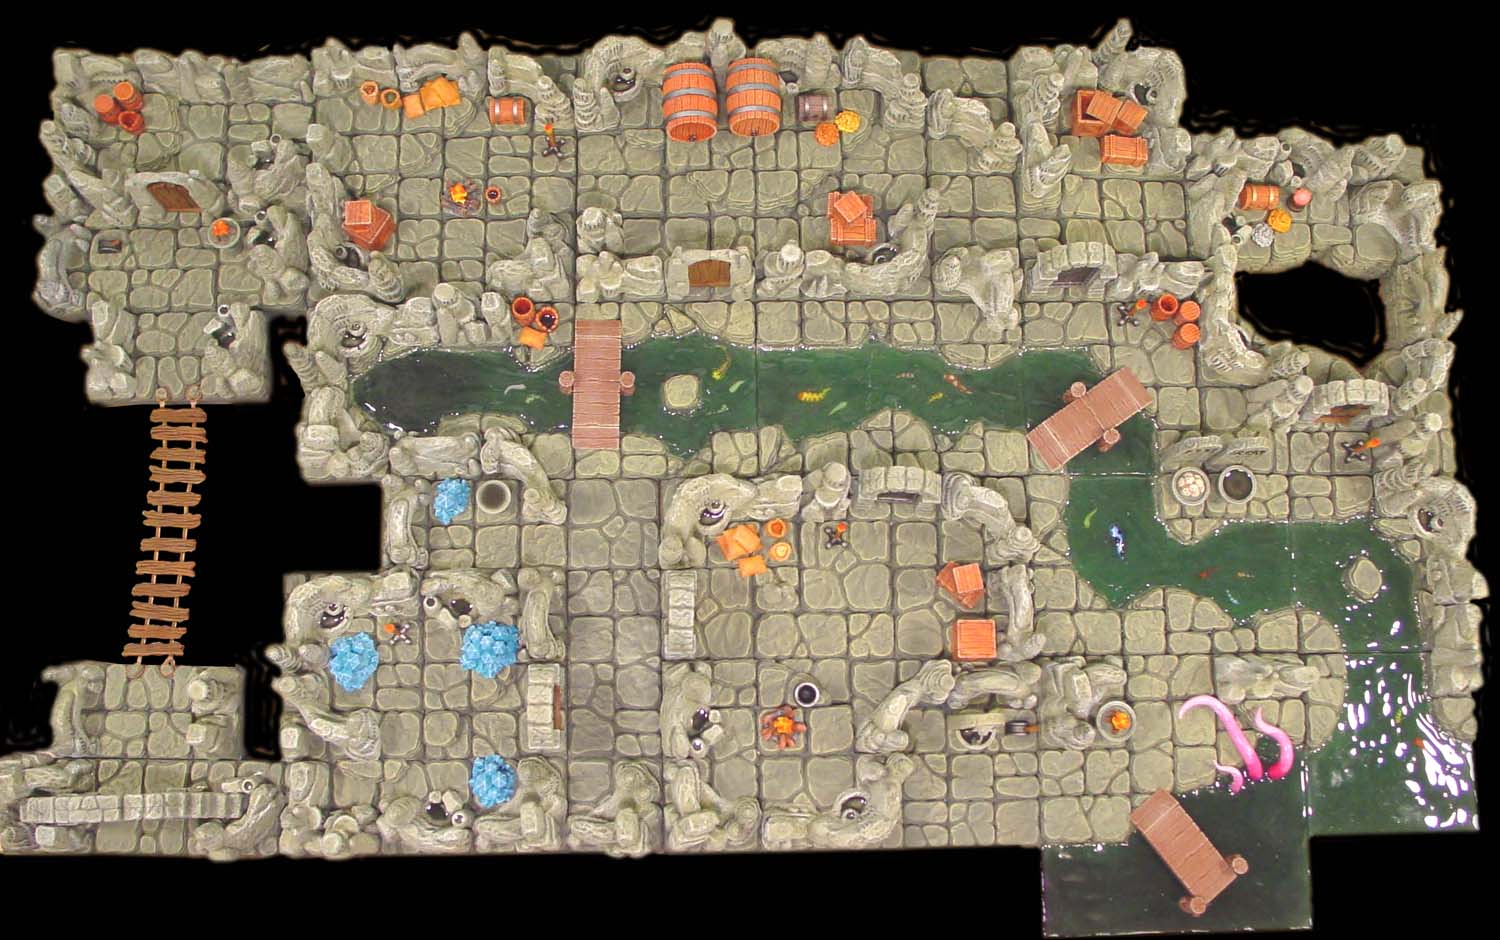
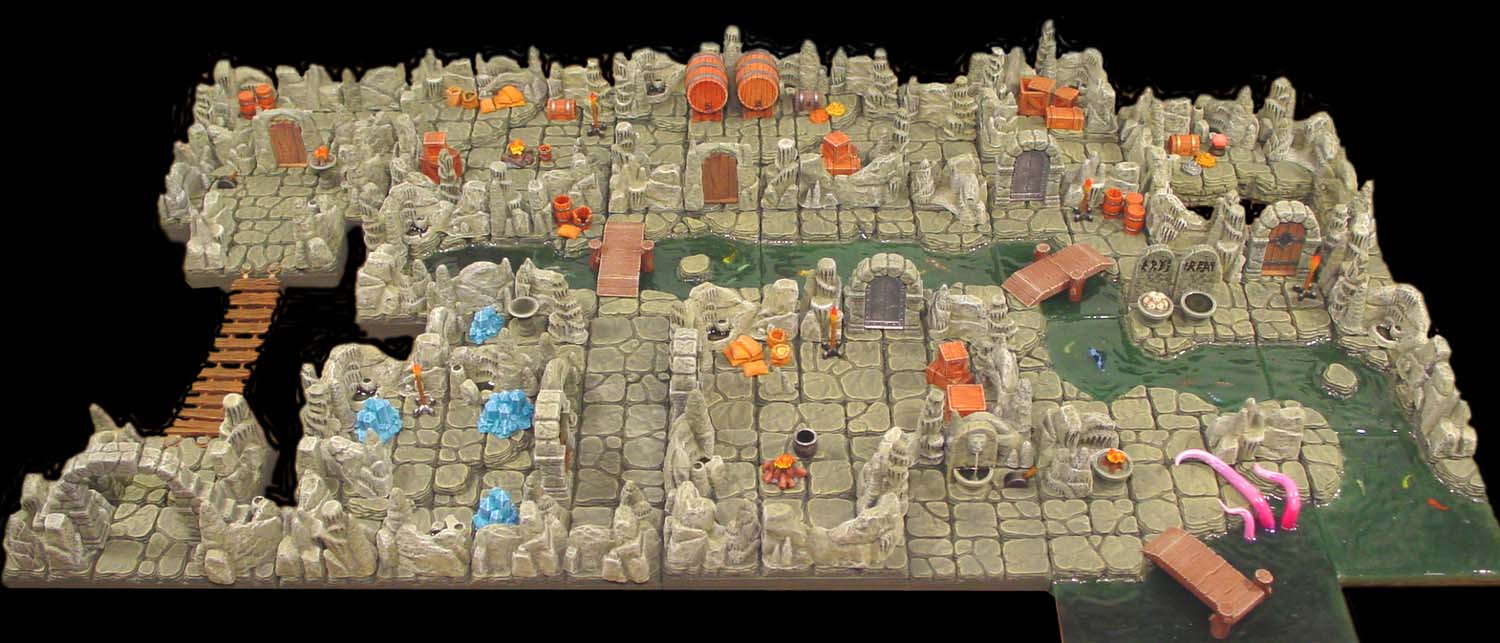
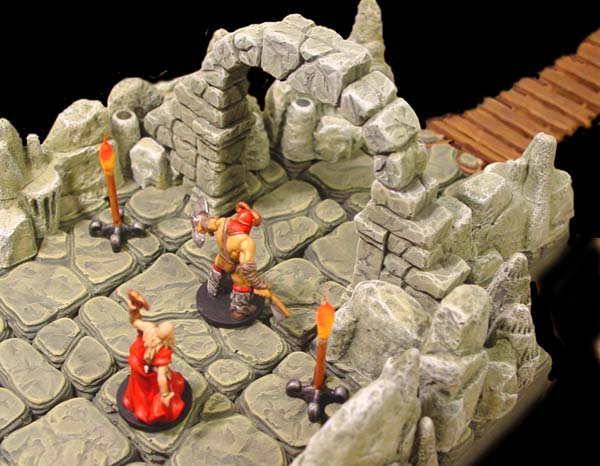
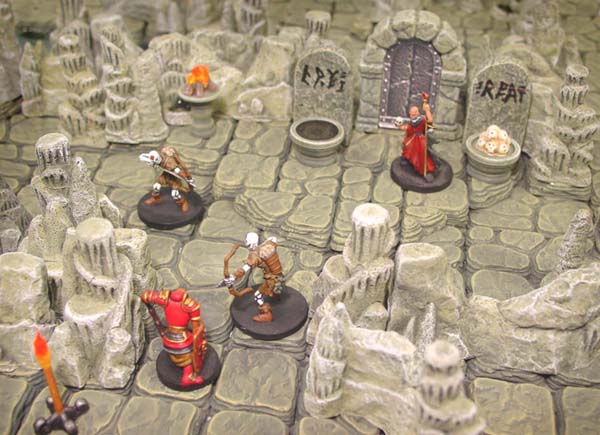
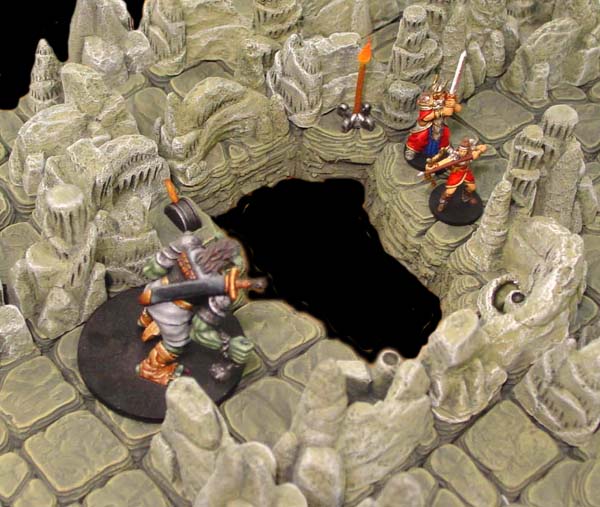
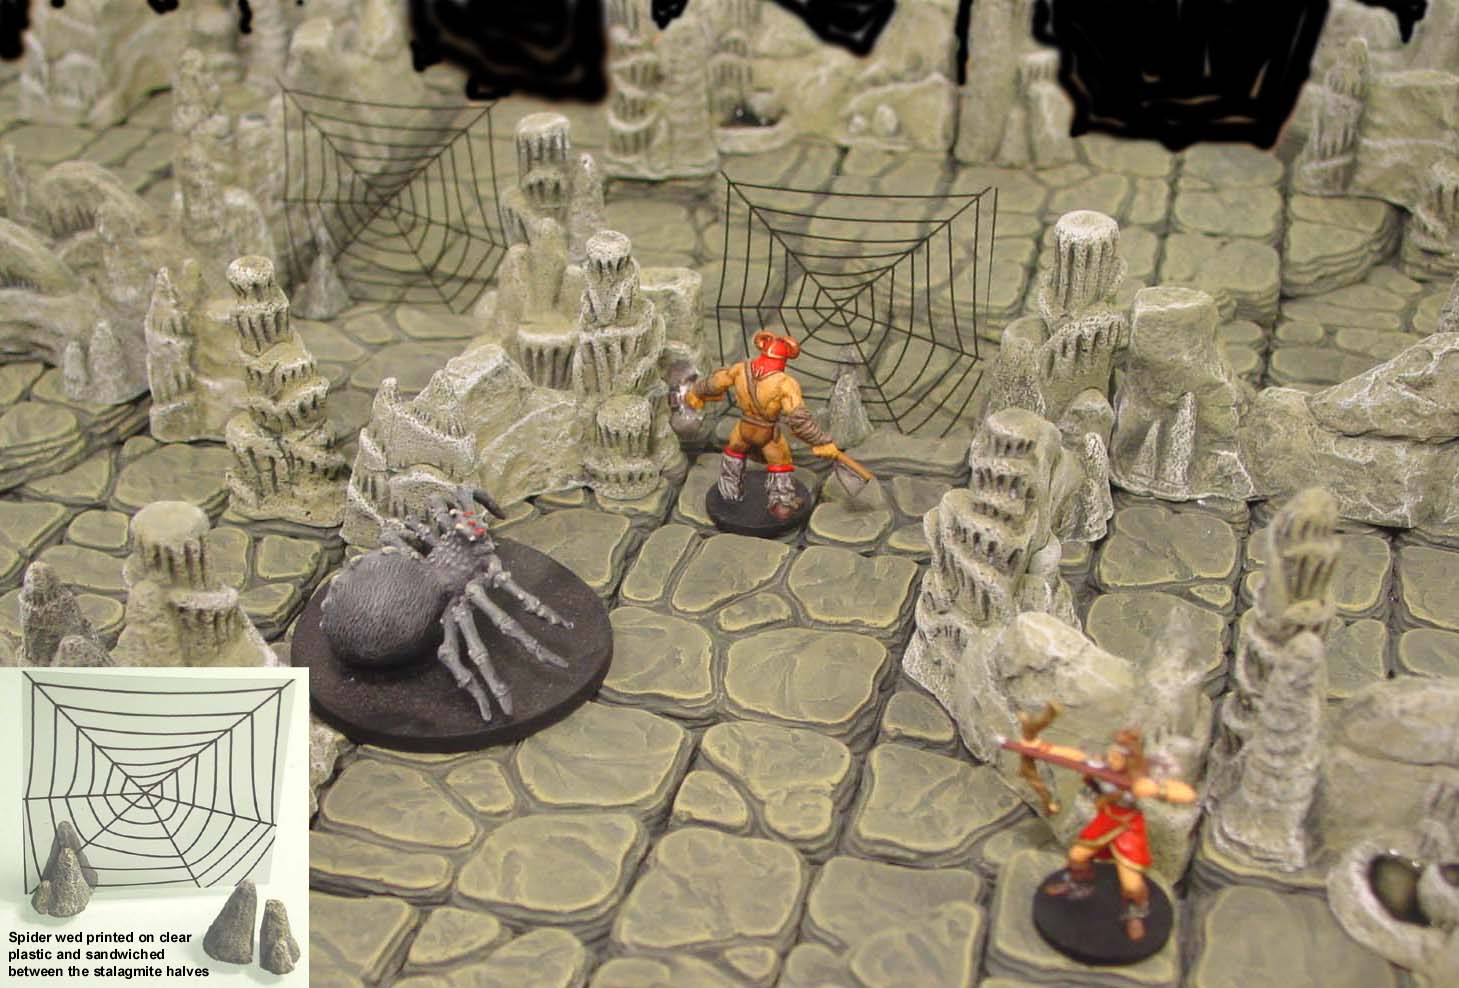
Here are a few photos of the finished cavern layout. Click on a photo to see a larger version of it. For directions on painting your pieces visit our Painting Instructions page.
Directions for making the rivers and accessories are on our Tips and Tricks 24 page. The miniature figures shown below are from the Descent board game produced by Fantasy Flight Games.
 |
 |
 |
 |