Tips & Tricks 21
|
To see complete instructions on using these cavern wall molds, please see our Water Cavern Building Instructions page. For instructions on how to paint the caverns, visit our Painting Instructions page. |

|
How To Assemble Mold #81
| 1. | When casting mold #81, be sure to scrape it completely flat! You do not want any plaster humping up out of the pockets of the mold. If any plaster rounds upward then your blocks will not fit together correctly. Scraping off a little too much is OK. The pieces will still fit together if the bottom of them is a little concave. |
 |
|---|
| 2. | If any of the blocks hump up on the bottom, you can lightly sand the bottom to make them flat. If the bottom is concave, do not sand off any ridges around the outside edge of the piece. Removing these ridges will make the piece too short to fit well. |
 |
|---|
| 3. | These are the blocks you will get with one casting of the mold. These have been cast in dark gray dental stone. If you happen to cast mold 81 and 82 at the same time, then I strongly suggest you group together the blocks from mold 81 and put them in a separate pile from mold 82. This will make sorting the blocks a lot easier. You will find that sorting the blocks is a little more difficult with these molds. |
 |
|---|
| 4. | The 3 inch "L" pieceGather the pieces shown here. Glue the ridge piece on top of the center of the base. |
 |
 |
|---|
| 5. | Check the shape of the bottom to make sure it fits in the correct place on the base. These two pieces form the first stalagmite. |
 |
 |
 |
|---|
| 6. | Always check that the shape on the bottom of the piece matches the shape on the base you're gluing it to. With this last stalagmite and rock glued in place the piece is finished. |
 |
 |
 |
|---|
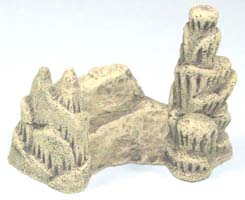
| 7. | This is what the finished "L" shape cave wall piece looks like when painted. This piece is meant to cover 4 squares as shown on the grid. |
 |
 |
|---|
| 8. | The first corner pieceGlue the ridge piece on top of the left of the base. Glue the lower section of the stalagmite onto the base. |
 |
 |
 |
|---|
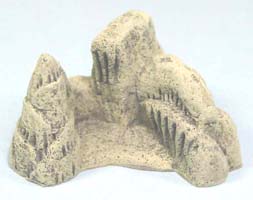
| 9. | Finish the piece by gluing the top of the stalagmite on. This is what the finished corner wall piece looks like when painted. This piece is meant to cover 3 squares as shown on the grid. |
 |
 |
 |
|---|
| 10. | The 2" wall pieceGlue the ridge piece on top of the left of the base. Glue the stalagmite onto the right side of the base. |
 |
 |
 |
|---|
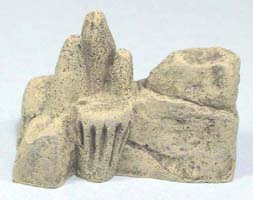
| 11. | This is what the finished corner wall piece looks like when painted. This piece is meant to cover 2 squares as shown on the grid. |
 |
 |
|---|
| 12. | The door postGlue the rock on top of the base. This block is 1/2" wide x 1" deep and can be used as a half square spacer. |
 |
 |
 |
|---|
| 13. | The doorwayThis strange looking piece is the doorway arch. The only way to cast it on the mold was to put the spacer under it. To remove the spacer, break it off with your fingers and clean up the under edge and tip of the arch with a hobby knife. |
 |
 |
 |
|---|
| 14. | The wooden door halves glue together edge-to-edge. The arch is glued on top of the door post, but be sure the flat side of the door post is facing towards the door. If you want to glue the door in permanently, you will need to sand the tips of the door arch down. |
 |
 |
 |
|---|
How To Assemble Mold #82
| 1. | These are the blocks you will get with one casting of the mold. These have been cast in dark gray dental stone. If you happen to cast mold 81 and 82 at the same time, then I strongly suggest you group together the blocks from mold 81 and put them in a separate pile from mold 82. This will make sorting the blocks a lot easier. You will find that sorting the blocks is a little more difficult with these molds. |
 |
|---|
| 2. | The stair builder pieceGather the pieces shown here. Glue the ridge piece on top of the center of the base. |
 |
 |
|---|
| 3. | Glue the top of the stalagmite. With this piece you can stack up floor tiles around it for a circular staircase. This can also be used for a 2" wall piece even though it sticks out into a room a little. |
 |
 |
 |
|---|
| 4. | The second corner pieceGather the pieces shown here. This corner takes up the same amount of squares as the "first corner piece" above. |
 |
 |
|---|
| 5. | The 2" wall pieceGather the pieces shown here. Glue the "3 stalagmite" piece on the left side of the base. Glue the rock onto the right side of the base. |
 |
 |
 |
|---|
| 6. | This is what the finished 2" wall section looks like. It takes up 2 squares on the grid. |
 |
 |
|---|
| 7. | The 1" wall pieceGather the pieces shown here. Stack them on top of each other to form the stalagmite pillar. This pillar takes up one full square on the grid. |
 |
 |
 |
 |
|---|
| 8. | Crate, barrel and skull pileThis mold includes a barrel, crate and skull pile. There is a hole in the top of the skull pile that you can stick a toothpick in and make a torch. However, you will need to nip off part of the pointed end of the toothpick so it will insert properly. The torch is made from cotton wrapped around and painted. |
 |
|---|
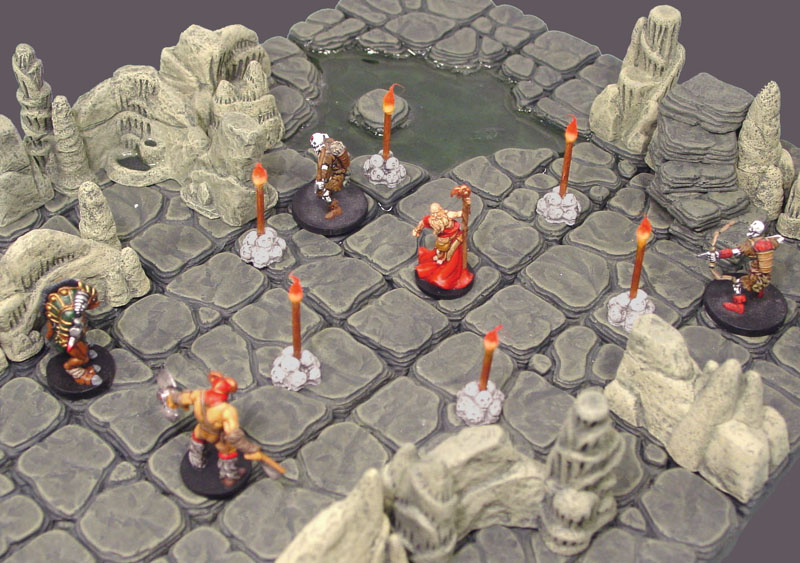
Sample Layouts Using the Molds
Here are a couple of sample layouts using the water cavern wall molds. Click on a photo to see a larger version of it. The floors you see are from molds #281 and #282.
To see complete instructions on using these cavern wall molds, please see our Water Cavern Building Instructions page. |
 |