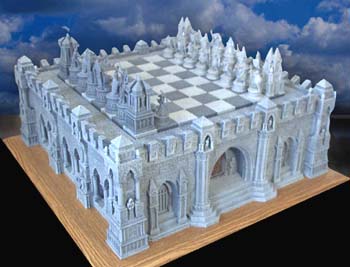
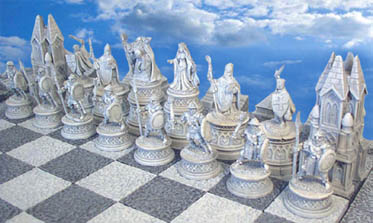
The Gothic Chess Set
Please note that this chess set is a fairly difficult and time consuming project. I strongly suggest building one or two easier models before tackling this one!
|
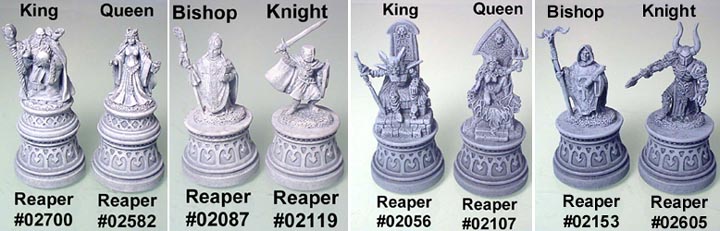
The miniatures used for the pieces are from Reaper Miniatures. You can see a full list of their products at www.reapermini.com. It may not look it, but this is a monster of a project. It measures 18" square, weighs about 25 pounds and takes almost as much casting as the Cathedral. Please keep this in mind before taking on this project. |
 See a video of the Gothic Chess Set |
Casting the Pieces
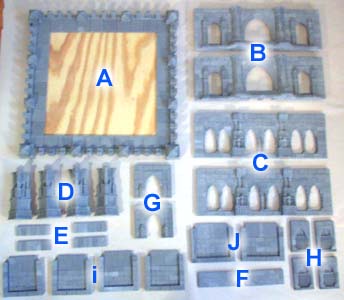
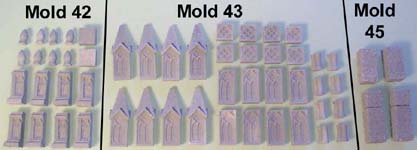
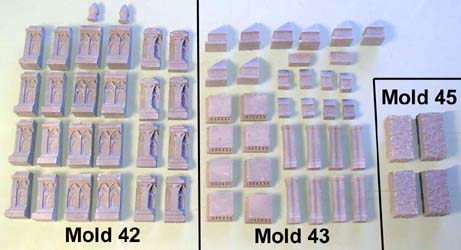
| 1. | The following molds are needed to complete this project: |
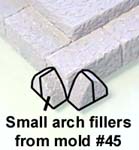
Since you need to cast mold #45 several more times anyway, (and will probably have some plaster left over after each cast), you can just pour the extra plaster into these pieces. |
|---|
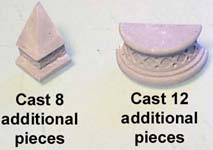 You will also need a few additional casts of the pieces shown here.
| 2. |
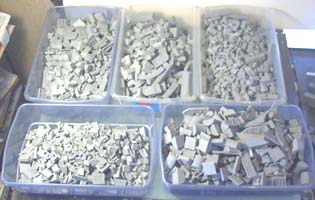
Sorting is very time consuming, but it's a lot quicker than searching for each block you need. Be sure the blocks are completely dry before you start gluing them together. |
 |
|---|
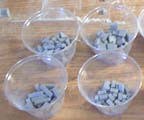 As I removed the blocks from each mold, I then sorted them into plastic shoe boxes. Once I had made all of the necessary casts, I the sorted the pieces from each box into small plastic cups.
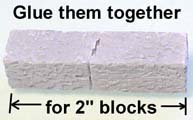
| 3. | Before you move on, take the secret door blocks from mold #44 and glue them together to form 2" long blocks. These are the blocks that have a slight angle on the ends. When finished you should end up with 30 extra 2" blocks. |
 |
|---|
Building Instructions
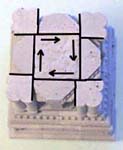
There are no printable building plans for this model. Instead, print out this instruction page which shows the placement of each block. The gothic pieces are so ornate that drawing building plans would have been extremely time consuming.
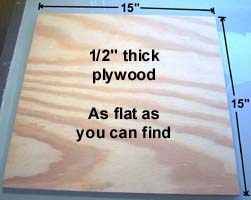
| 1. | The chess board top will be fairly heavy (maybe 8 pounds) so you'll need something durable to build it on. I took a two foot square piece of 1/2" plywood and cut it down to 15" square. Be sure you get a very flat piece! Warped plywood will cause real problems. If you get your plywood at a lumberyard, many times they can cut it down for you. Try to get this piece as exact as possible to 15" square. |
 |
|---|
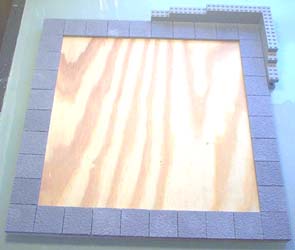
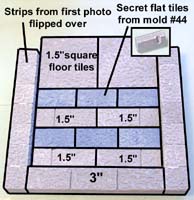
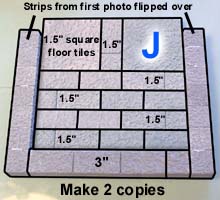
| 2. | Start by gluing a row of 1.5" squares around the outside of the plywood. I'm using an "L" shape made out of Legos to help keep the outside row straight. Make this row of tiles go flush against the outside edge of the plywood. You will be able to fit 10 tiles on each side of the plywood. You may notice that there are slight gaps between the flat tiles when you spread them out to fill the distance. This is a good thing because your painted tiles that go in the middle will take up slightly more room once they are painted in checkerboard fashion. |
 |
|---|
| 3. | You'll need to glue a row of blocks all the way around the plywood. The 1.5" flat tiles will stick up above this row by 1/4". The recesses are made out of square smooth flat tiles which measure 1/2" x 1/2" x 1/4" thick. |
 |
|---|
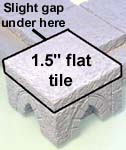
| 4. | Glue these blocks onto all 4 corners of the chess board top. You may find that there is a slight gap under the 1.5" flat tile where it overlaps the board. Don't worry about this because it won't be noticeable when the board is finished. |
 |
 |
 |
|---|
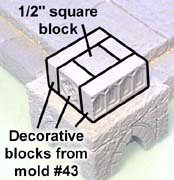
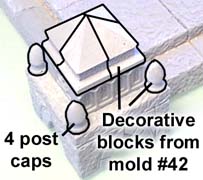
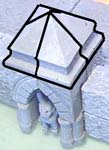
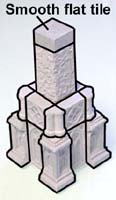
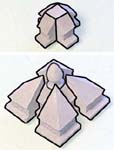
| 5. | To finish off the corners, start with a 1/2" square block surrounded by the decorative blocks from mold #43. Then add the 4 post caps on each corner, along with the 4 pointed top blocks which make the pyramid shaped peak. |
 |
 |
|---|
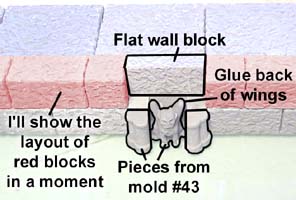
| 6. | Glue the pieces shown onto the recesses around the outside. I'll show the layout for the blocks in red in the photo below. |
 |
 |
|---|
| 7. |
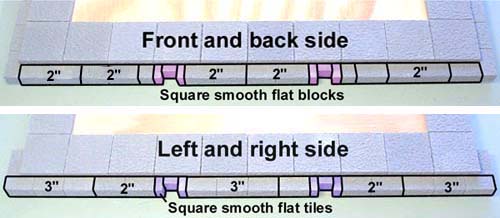
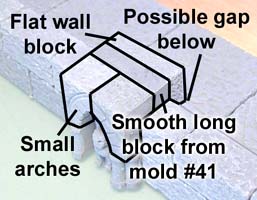
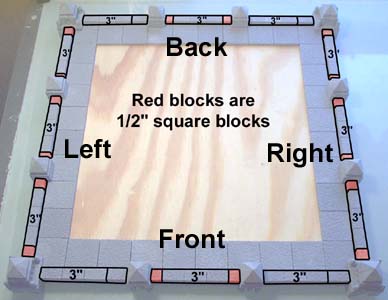
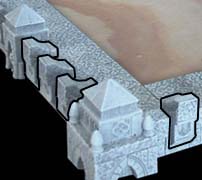
The final row of blocks is shown in the larger photo. The red blocks are the 1/2" x 1/2" square blocks. The remainder of the blocks are either 3" blocks or 1" blocks. |
 |
|---|
 Glue the pointed top blocks onto these posts to finish them. Do this for each of the 8 recesses around the outside edge.
| 8. |
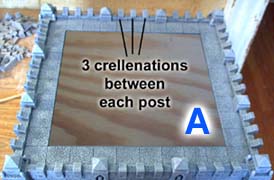
You'll need 36 of these pieces. Evenly space them out and put 3 crenellations between each post. |
 |
 |
|---|
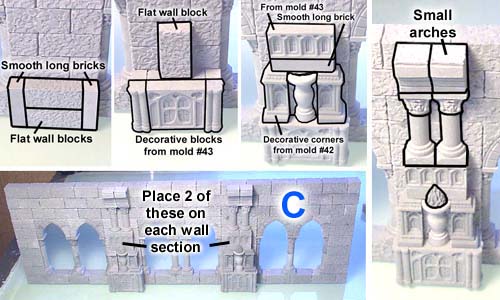
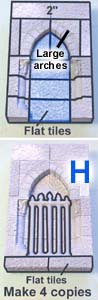
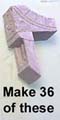 The top crenellation pieces are made by gluing a small arch to a decorative piece from mold
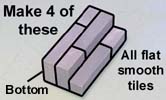
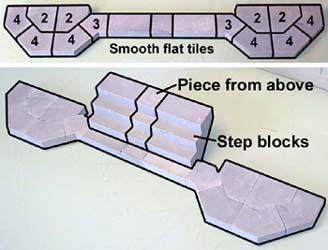
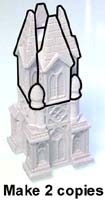
 | 9. | Next we'll start on the front and back walls. Glue together these smooth flat blocks as shown to make the step pieces. You'll need to make 4 copies of this. Notice I've laid this piece on its back. Be sure to put the bottom down when placing them in the wall below. |
 |
|---|
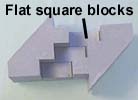
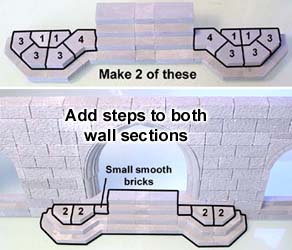
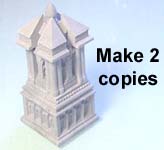
| 10. | Make 2 copies of this wall section. There are several flat wall blocks used in this wall section. |
|---|---|
 |
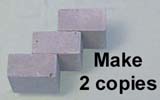
| 11. | Glue together 3 smooth flat square blocks to make a stair step. Place them between two step sections while they dry so they'll be exact. Make 2 of these. Next we'll use octagon step pieces from mold #41. |
 |
 |
 |
|---|
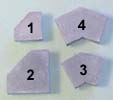
| 12. | You'll glue 2 step blocks (from mold #41) on each side to make the full steps. Glue the steps into the gap in the wall for both wall sections. |
 |
 |
|---|
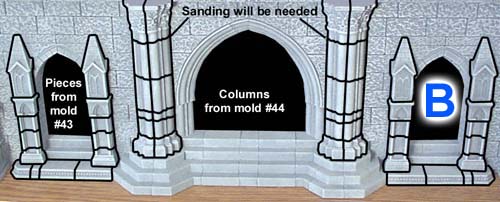
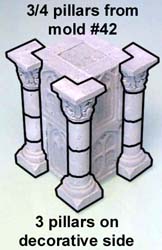
| 13. | Add the decorative pieces onto the front of the wall. You will need to sand the columns because they will be too tall otherwise. It's best to sand the bottom of the column faces because it will be less noticeable. Make 2 of these wall sections. |
 |
|---|
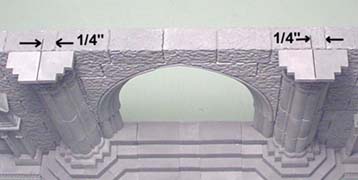
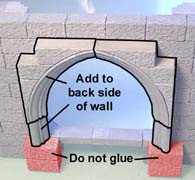
| 14. | When positioning the column tops, the center of the column should be 1/4" away from the nearest block joint. Add an arch onto the back of the wall. Do not glue the blocks in red. |
 |
 |
|---|
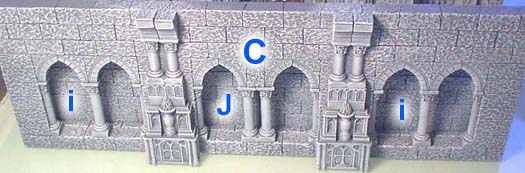
| 15. | Make 2 copies of this wall section. The pillars in the center are full pillars. |
|---|---|
 |
| 16. | We'll finish this wall section by adding the decorative blocks shown. The torch, pillars and small arches are all from mold #45. You may have to sand the pillars a little or they will end up being too tall and the decorations will stick up above the wall. Center these decorations between the windows as exactly as you can. Be sure to make 2 copies of this wall section. |
 |
|---|
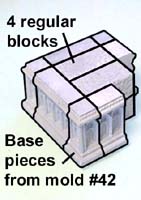
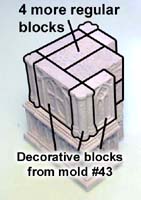
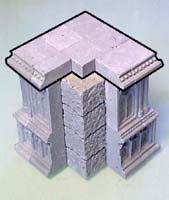
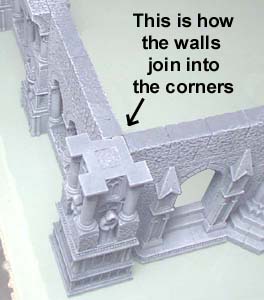
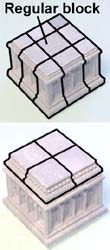
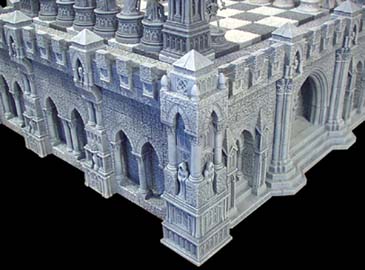
| 17. | The corners of the building are next. Stack up 4 regular blocks and add the decorative blocks around the outside. |
 |
 |
 |
 |
|---|
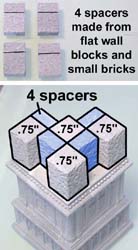
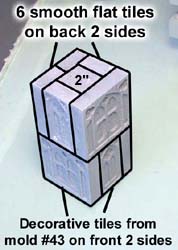
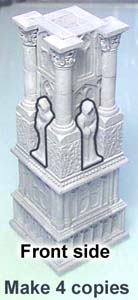
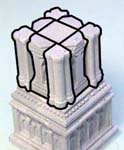
| 18. | Make 4 spacers out of flat square wall blocks and small bricks. The spacers will end up being 1/2" wide x 3/4" tall. Add these onto the base, along with several 3/4" long blocks on end. For the top, start with a 2" long block on end, and add decorative tiles on the front sides, and smooth flat tiles on the back sides. Add the pillars on 3 sides. |
 |
 |
 |
|---|
| 19. | Next, glue the pillar piece onto the base. Finish the corner by adding the robed figures onto the front sides. Look at the back and make sure the inside recesses line up. The side walls of the chess set will fit into these recesses. Make 4 complete corners. |
 |
 |
 |
|---|
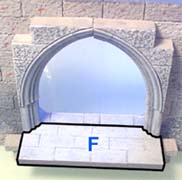
| 20. |
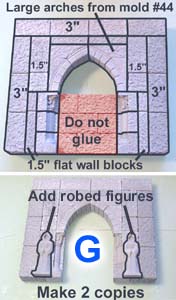
The next strip is made from smooth flat blocks and will be used for the floor in each doorway. Make 2 of these. Build the arch sections and glue the robed figures onto the front. These will form the main recessed doorways on each side. Make 2 of these arches. Finally, make the last pieces using the large arch from mold #45. Make 4 of these arches. |
 |
 |
|---|
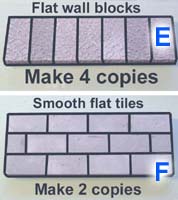 The first strip is made from flat wall blocks and will be used to cover the sides of the doorway. Make 4 of these.
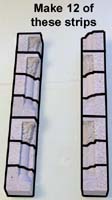
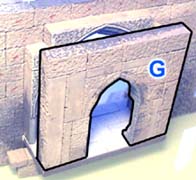
| 21. | We need to use up some extra pieces so we're making these strips out of corner pillar blocks. Try to use an equal amount of each type of block. Make 12. The back thin wall uses blocks from mold #44. The back side of the wall will look a little strange, but you won't see the back when we're finished any way. Make 4 of these wall pieces. |
 |
 |
 |
|---|
| 22. |
The last photo shows all of the pieces completed before painting. Of course you still have to complete the round bases for the chess pieces, and I'll show that below. |
 |
|---|
 We also need to make 2 more of these that are 1/2" wider. Use flat wall blocks for the back and the strips (from above) on each side.
| 23. | Test fit the outside walls, corners and top of the chess board. You may find that the corners are a little too tall and need to be sanded. You may also have to sand the edges of the walls "B" and "C" so they will fit flat against the corners. Just ignore the chess bases and squares set on top (I put them there to see how they would fit). Don't worry about fitting the other pieces, because they will fit properly without needing any sanding. |
 |
|---|
Making the Chess Pieces
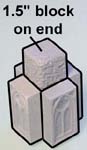
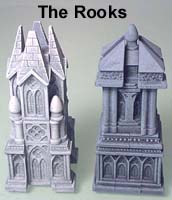
| 1. | We'll start by making the rooks. Gather the pieces shown. These are the pieces you need to make 2 white rooks. Stand a 1.5" long block on end and glue 4 decorative tiles around the outside. |
 |
 |
|---|
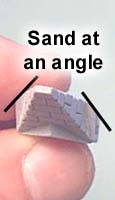
| 2. | Stack another 1" block on end and cap it off with a smooth flat tile. Add the decorative corner pieces around the base to finish the bottom. Add square tiles and posts to finish the second layer. You'll need to sand the roof pieces at a 45 degree angle on each side. This will allow you to put the roof pieces all around the outside. Make 2 of these rooks. |
 |
 |
 |
|---|
| 3. | Gather the pieces shown to make 2 black rooks. Stand a 1" block on end and glue the decorative base pieces around the outside. Glue the decorative tiles around the top to cap it off. |
 |
 |
|---|
| 4. | The pieces on the next row need to slide around to fit properly. Finish the piece by making the top cap as shown. Make 2 of these black rook pieces. |
 |
 |
 |
 |
|---|
| 5. | Assemble the bases for the pieces from molds #41 and 42. I've used Reaper Miniatures for the pieces. You can visit their web site at www.reapermini.com. |
|---|---|
 | |
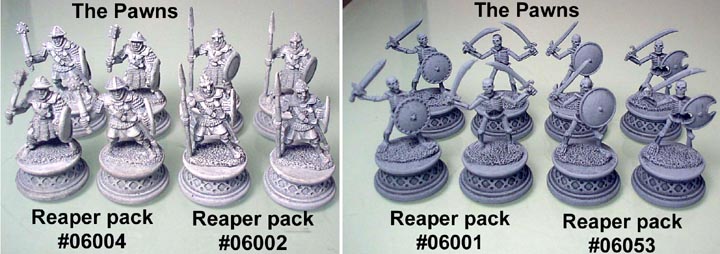 |
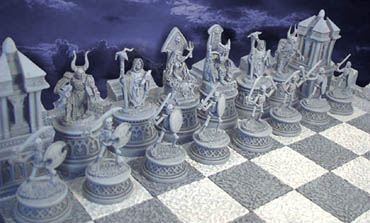
| 6. | For the white pieces, I've painted them using shades of medium gray to white. Since I wasn't able to get the detail to show up as well as I would have liked, I dipped them in a thin ink wash to help bring out the details. The black pieces were painted using shades of black to medium gray. They turned out really well without having to use any kind of wash. Spray a coat of flat varnish or lacquer over the pieces when you've finished painting them. This will seal the paint and keep it from chipping off when constantly handling the pieces. Do not use gloss varnish because glossy pieces may look odd. |
 |
|---|
Final Painting and Assembly
| 1. |
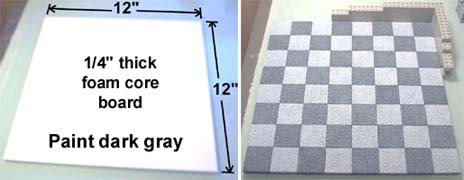
I'm using a 12" x 12" piece of foam core board to glue the square tiles down onto. Paint the board dark gray on both sides. Painting it on both sides will keep it from warping. I painted the squares the same color as the chess pieces. The light squares are painted medium gray to white and the dark squares are painted black to medium gray. For specific painting instructions, refer to the Tips & Tricks 12 page. I'm using a corner made of Legos as a guide to keep the squares straight and even. When you glue the square tiles down to the foam board, the wet glue will make the board warp. Set a couple of large heavy books on it until it dries. |
|---|
 When I reached this point, I decided that the chess board would look better if it were raised up above the surface slightly.
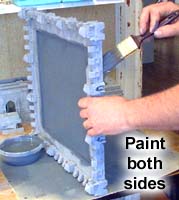
| 2. | When painting the top of the building, paint both sides at the same time. If you don't the plywood will warp and you won't be able to straighten it out. Paint all of the items you've built so far. I'm using the castle gray color scheme, which is the same one I used for the Wizard's tower. For complete information on types of paint and supplies you will need, refer to the Painting Instructions page. Once all of the paint is completely dry, then we can glue and assemble the final pieces. |
 |
|---|
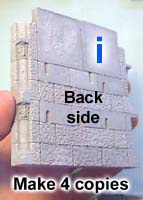
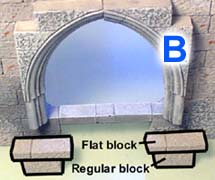
| 3. | Place regular and flat blocks down on the back side of piece "B". Glue these pieces onto the back as shown. |
 |
 |
 |
|---|
| 4. | 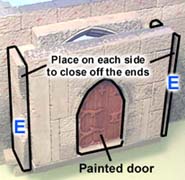 |
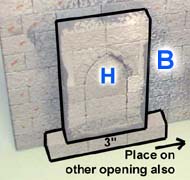 |
Glue these pieces onto the back to finish piece "B". The finished front side is shown below. |
|---|---|---|---|
 |
| 5. | 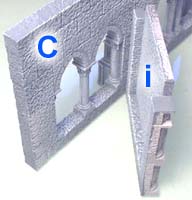 |
Glue these pieces onto the back to finish piece "C". |
|---|---|---|
 |
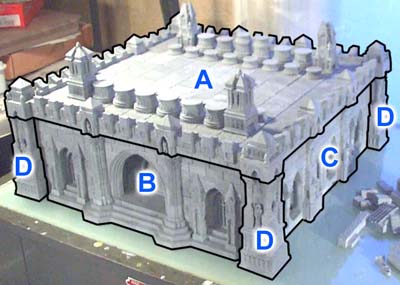
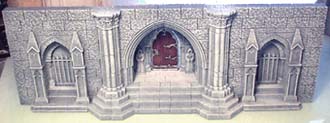
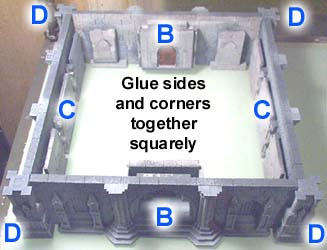
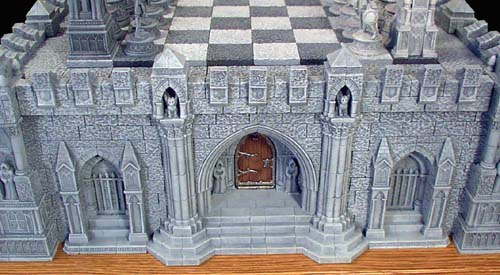
| 6. | Glue the walls and corners together and make sure they are square. You should also test fit the top to make sure it lines up correctly. I've created a wooden base made from 4" wide base trim board which I purchased at a lumberyard. I cut it in a 20" square frame and will glue the chess board down to it. |
 |
 |
|---|
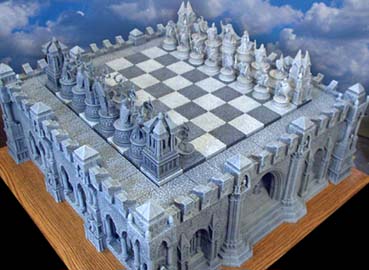
The Finished Chess Board
 |
 |
 |
 |
If you cut a hole in the plywood, you could have the chessboard lift off for storage beneath. 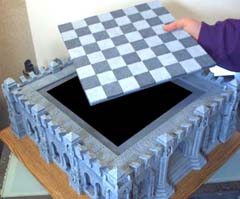 |
 |