Robot Factory Building Instructions
This page will show how to use molds #274, #280, #331, #421, #422, #423 and #424 to build the robot factory.
|
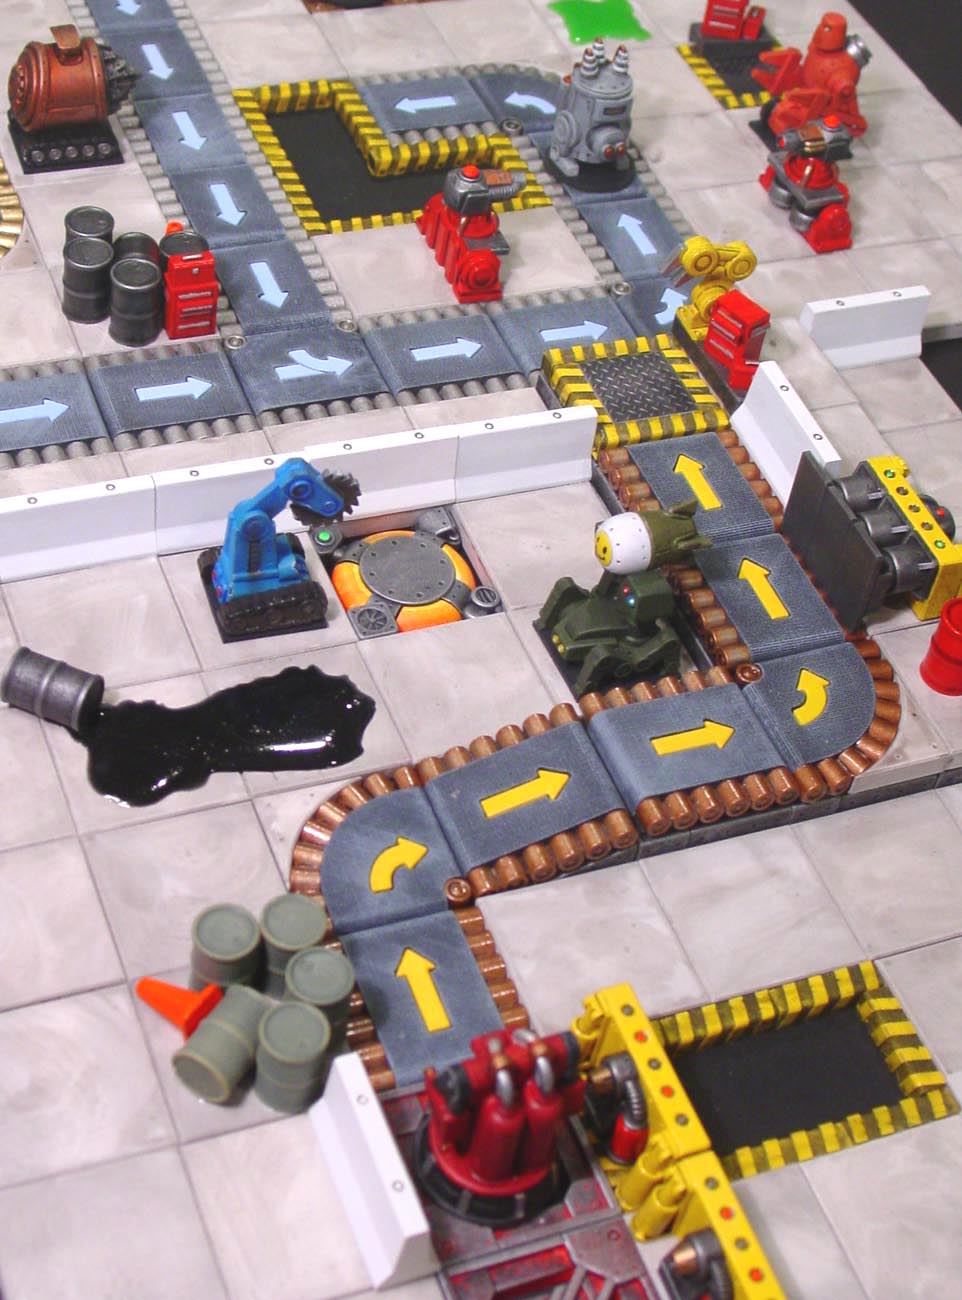
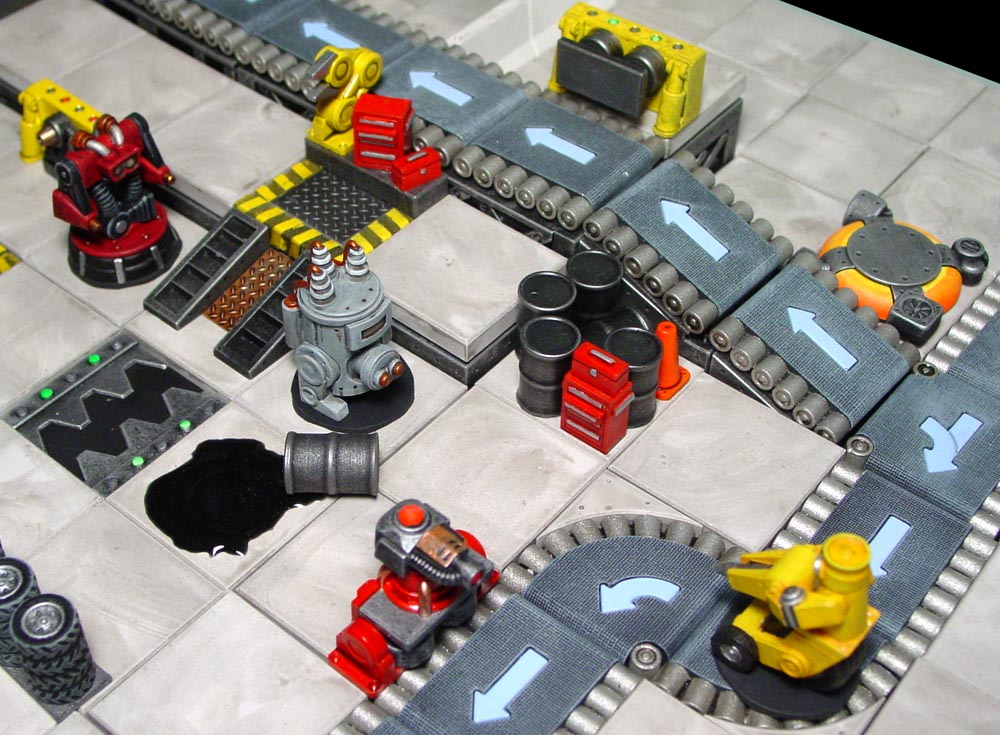
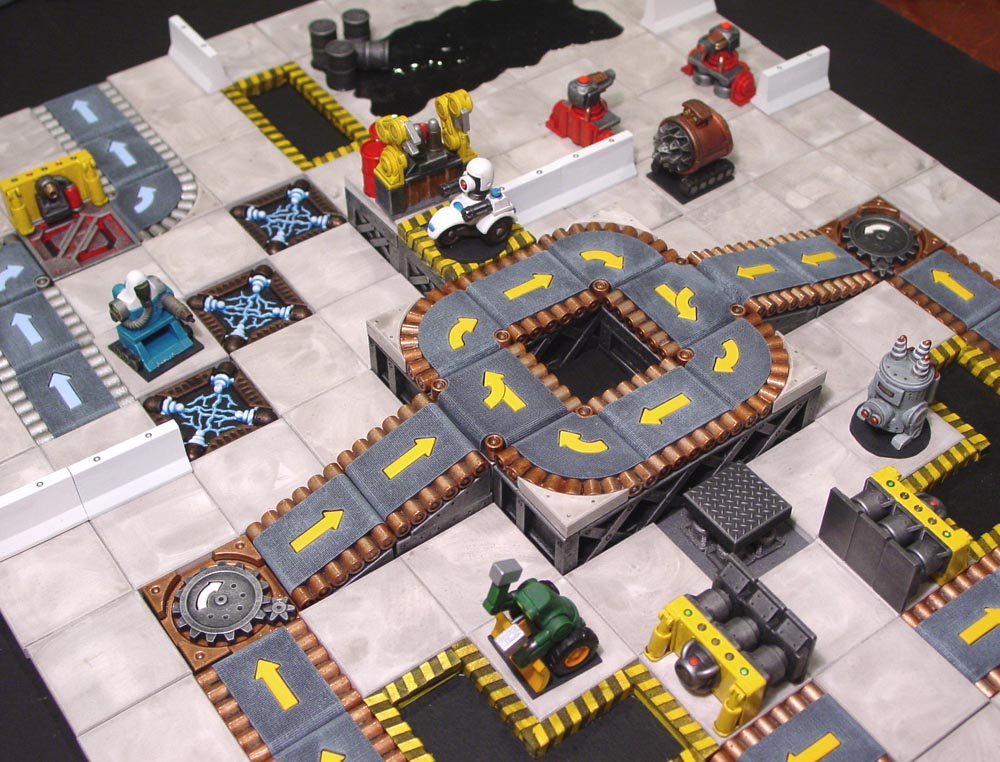
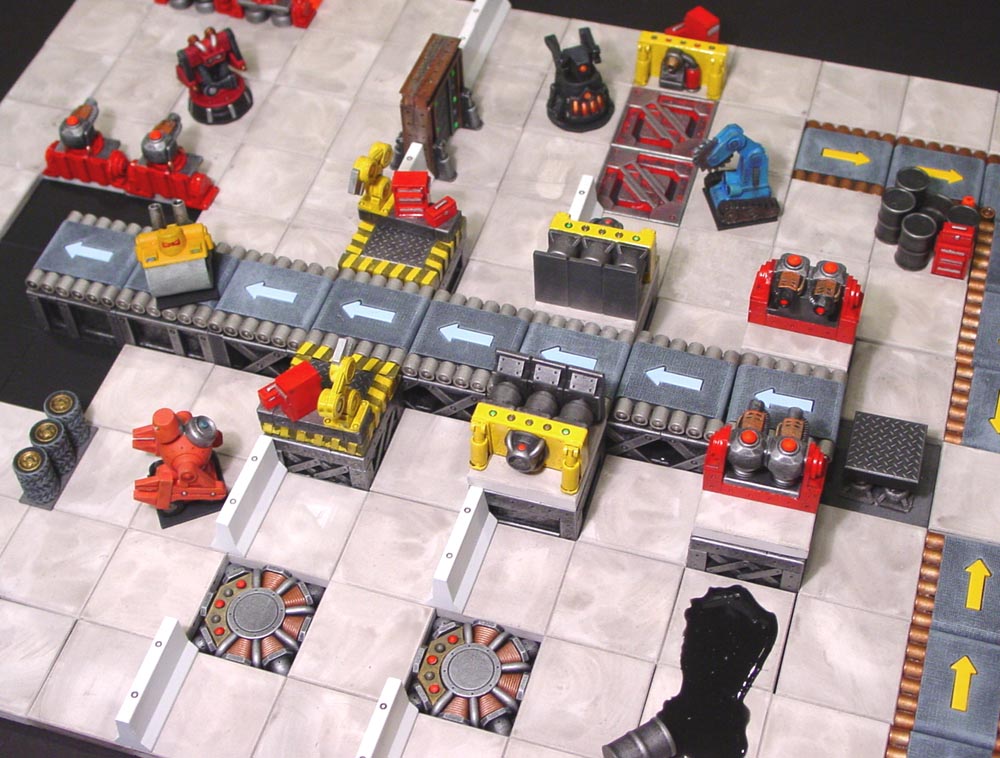
If you also want the robots shown, then add molds #328, #329 and #330 to the list and you would have a total of 10 molds which would qualify for the 15% discount when ordering molds. The example photo shows one example of a layout using these molds. There are more samples of finished photos at the bottom of this page. It's possible to use these molds to make a Robo Rally board. Robo Rally is a board game produced by Avalon Hill (which we have no connection or affiliation to). |
|
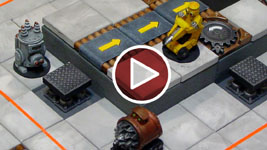
3D Robo Rally Demonstration This video shows the molds used for my Robo Rally game along with some custom home rules that our gaming group uses to play the game. |
 |
The Robot Factory Set
To make this set you will need the following number of castings from these molds:
Click on the photo to see more a more detailed view of the set. |
 |
Casting and Demolding
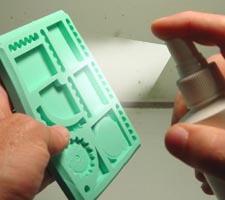
| 1. | Since this is a mold of modern equipment, if you get any air bubbles in the castings they will look very odd. The best method of casting these pieces is to use a spray "surfactant" and a vibrating table of some kind. I show how you can use these on the Advanced Casting Instructions page. Using this method, most of the air bubbles will be eliminated giving you nearly perfect castings. |
 |
|---|
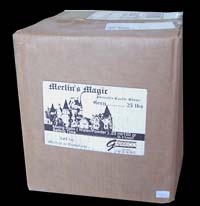
| 2. | For this mold, I suggest using a white dental stone such as Merlin's Magic. You can find out more about this product and where to buy it on our Dental Stone page. I suggest using white because it will be easy to stain it gray for the concrete slab floor tiles and any other items you want to give a concrete look to. I would not suggest using plaster of Paris because it's a softer material and the roller pieces would be difficult to get out of the mold without breaking. |
 |
|---|
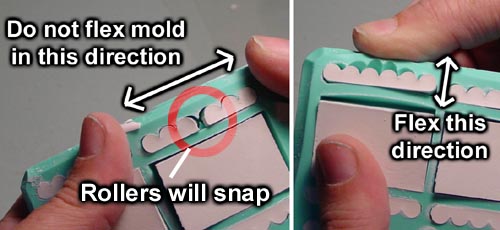
| 3. | Molds #421 and #423The best way to remove the roller strips from the mold is to spread the mold from the top and bottom of the rollers, not side to side. Side to side flexing will cause the roller strip to snap in half. |
 |
|---|
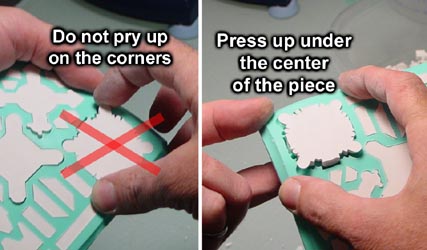
| 4. | Mold #424The piece you will have the most problem with is the magnetic lock. It's the round shaped piece with all of the small pockets in the front face. Do not pry it out by the edges. If you do this, you will break the edges off. Push up under the center of the piece instead. Do this a few times until the piece pops out of the mold. |
 |
|---|
Painting Techniques
| 1. | The pieces on these molds are designed to be painted before they are assembled. This is the first time I have tried something like this. For the factory, you will need a lot of castings and trying to paint a lot of small parts can be very time consuming. With the parts being separate, you can spray paint them all at once, put on a quick ink wash and you will have a very fast clean paint job after the pieces are assembled. To date, this project has taken the least amount of time to paint compared to any of my other projects of this size. |
 |
|---|
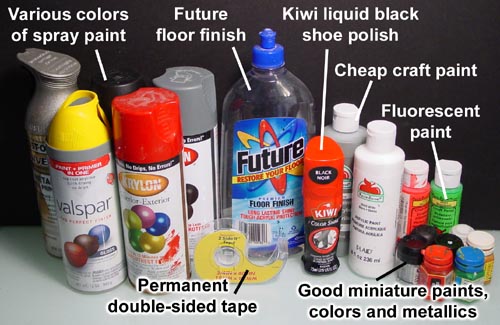
| 2. | For a large project like this, you will end up using a lot of spray paint. With it, you can cover a lot of area quickly and it also dries fast. The Future floor finish, now known as Pledge floor care and Kiwi liquid black shoe polish are used for the wash. The permanent double-stick tape will be used to hold down small pieces when spray painting them. You will probably need about 3 rolls. Finally, you will also need a variety of miniature and craft paints depending on what colors you like. You should at least have some metallic silver in this group. |
 |
|---|
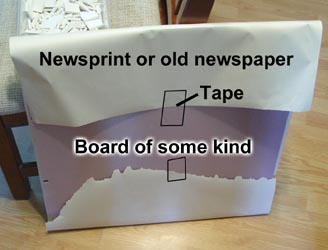
| 3. | Spray Painting BasicsThe base color for most of these pieces will be spray painted. I like to take a piece of board (I'm using a 1/2" thick piece of foam board) and tape a piece of newsprint down over it. If you don't have newsprint, old newspapers will work fine. You may also use plastic trash bags if you like but I think paper works better for this. It's a good idea to make several of these boards to speed things up. While one color is drying, you can be setting up another color to be painted next. |
 |
|---|
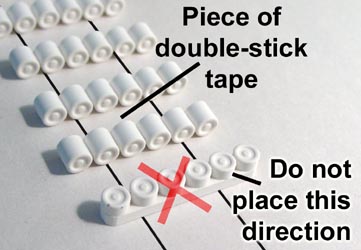
| 4. | Place long strips of permanent double-stick tape down on the paper. Next stick your small pieces and rollers down onto the paper, leaving about 1" between them. You want to leave enough room between them so the front face can be fully reached with spray paint. Orient your rollers as you would see them on the sides of your conveyors (on their sides, not on their backs). This will make the next step of ink washing easier. They will also stick to the tape better going this direction. |
 |
|---|
| 5. | Spray paint color options will be shown below. The larger pieces such as the conveyor belts do not need to be taped down. Spray a nice thin even coat on the pieces. If you put the paint on too heavy the paint will drip. Two thin coats is better than one thick coat. Do this outside or in a well-ventilated area. |
 |
|---|
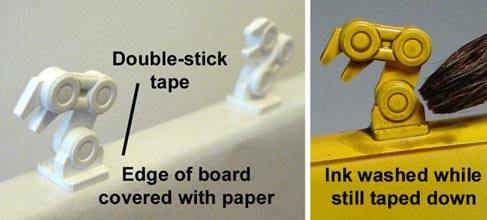
| 6. | Some of the pieces will be assembled then spray painted such as the robotic arm shown here. For these, cover the edge of the board with paper and tape the pieces to the edge. This way you can easily reach all sides of the object using a spray can. Leave the pieces stuck down when applying ink wash to them. |
 |
|---|
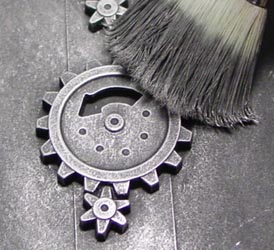
| 7. | Dry BrushingFor instructions on how to dry brush please look at our Painting Instructions page. For any metallic objects such as gears, iron bracing and hydraulic pushers, I spray painted them flat black. Afterwards, I dry brushed them with metallic paint from Games Workshop. I used a variety such as Mithril silver, Boltgun metal and other non-silver colors as well. I've found Games Workshop to have the best metallic paint for dry brushing. They just seem to have more metal in the paint. For most of these pieces, I left them stuck to the tape after spray painting. That keeps them from moving around when trying to dry brush small parts. |
 |
|---|
| 8. | Personally, I prefer to dry brush the conveyor belts with medium gray paint over a black base for the best look. However, this method is very difficult to do well if you are not used to dry brushing. The conveyor cloth texture is very fine and it's easy to ruin the look by getting in a hurry. If you do not want to dry brush, then use the shoe polish method shown below. |
 |
|---|
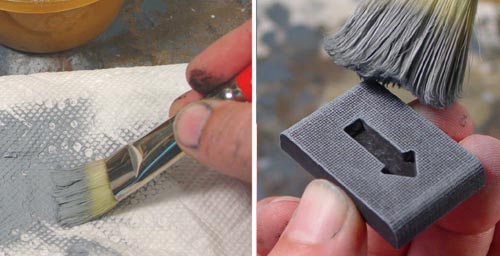
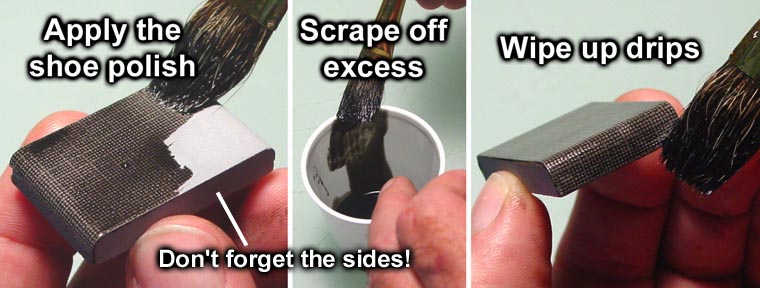
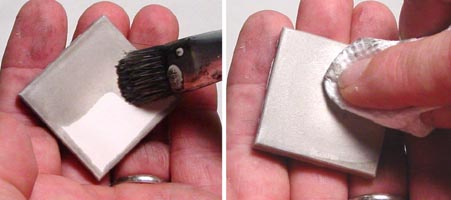
| 9. | This step describes the shoe polish method if you don't have good luck dry brushing your conveyor belts. I'm going to apply the shoe polish straight without thinning it or mixing it with anything else. For the example below, the base piece was spray painted with light gray paint. Use a 1/2" wide soft brush, dip it in the shoe polish and paint it over the surface evenly. After the surface is covered, scrape your brush against the side edge of the cup to remove any excess polish from the brush. Then wipe up any drips that happen on the sides of the belts. Be sure that you do not touch the surface of the piece until it's completely dry or you'll get fingerprints on them. Don't forget to paint the sides of the belt also! You'll be attaching rollers to the sides but they won't cover the whole side. You will see bare spots between the rollers if you don't cover the sides completely. |
|---|---|
 |
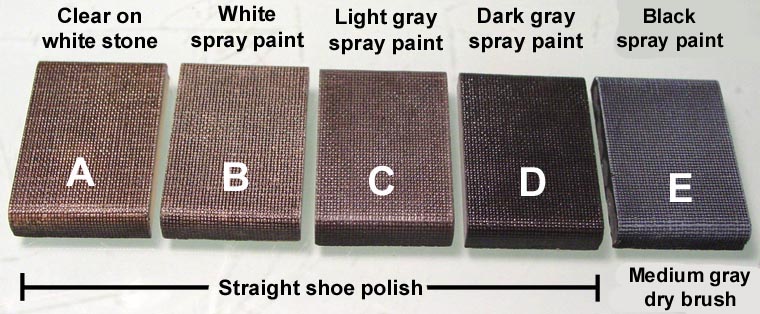
| 10. | Conveyor ColorsIf you do not like the colors I have chosen for the conveyors and rollers, I have done a few tests to show what other colors would look like. A) This was white dental stone spray painted with a clear sealer (Krylon clear coat) then painted with shoe polish. You will notice that the first four have a glossy sheen to them. If you don't like the sheen, you may have to spray them with "Testors dull coat" to get rid of it. Personally, I like the last example the best but dry brushing is more difficult to do. |
|---|---|
 |
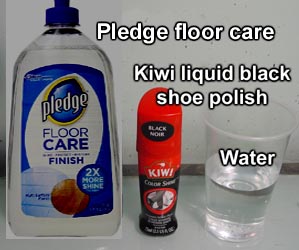
| 11. | Applying the WashesWashes will bring out the shadows in all of your pieces. My mixture uses Pledge floor care, Kiwi liquid black shoe polish and water You should be able to find Future in the floor cleaning supplies area at your local department store. The shoe polish is usually found in the shoe department. You can use black India ink instead but shoe polish is much cheaper and works very well. You may also use regular ink wash from Games Workshop (now called Citadel shade paints) but these are very expensive for the amount you may need. You also cannot make them any darker than they are. |
 |
|---|
| 12. | For staining concrete, I'll mix up a concrete wash. For darkening shadows on the rollers, I'll mix up a roller wash. Here are the recipes for each:
How much you mix up depends on how many pieces you are washing. I would start with teaspoon measurements (4 tsp., 4 tsp., 1 tsp.) and see how it goes. It's always easy to mix up more if you need it. |
|---|
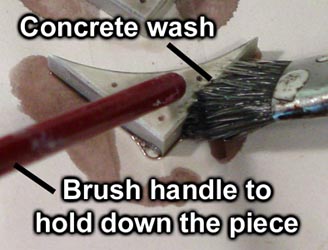
| 13. | Concrete WashI had cast all of these pieces in white dental stone. The main reason I chose white is so that I could apply the concrete wash straight on the pieces without having to paint a base coat. This saved me a lot of time. I'm using the concrete wash on the plain concrete pieces and corner pieces. The corner pieces are fairly small and will want to move around on you while applying the wash. Use a spare paint brush handle to hold them down. |
 |
|---|
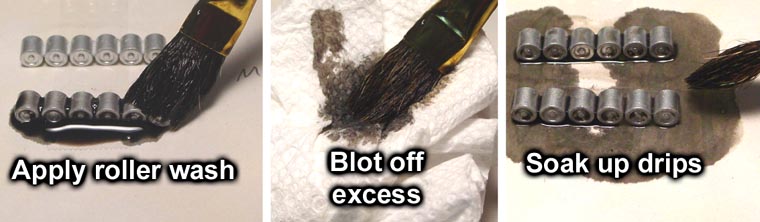
| 14. | Roller WashFor the rollers, leave them taped down to the original sheet they were spray painted on. There's no need to peel them up, just to stick them back down onto another sheet of paper. Brush the roller wash on heavily. You can do about 12 roller sets before cleaning up the drips. Blot off the excess roller wash and then soak up the excess using the brush around the base of each roller group. Try to leave as much wash on the rollers as you can without having excess drips around the bottom. |
|---|---|
 |
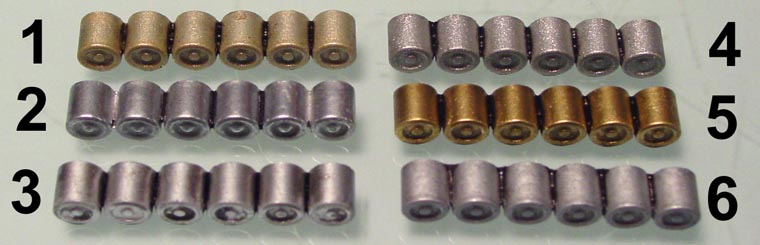
| 15. | Roller Colors1) This was spray painted with cheap gold paint and brushed with roller wash. My favorite ended up being #4 which used the satin nickel spray paint. It kind of has a "glittery" look to it and held the ink was very nicely. |
|---|---|
 |
| 16. | Here are a few belt and roller combinations. Click on the image to see a larger version. The letters and numbers refer to the photos in the steps above. |
 |
|---|
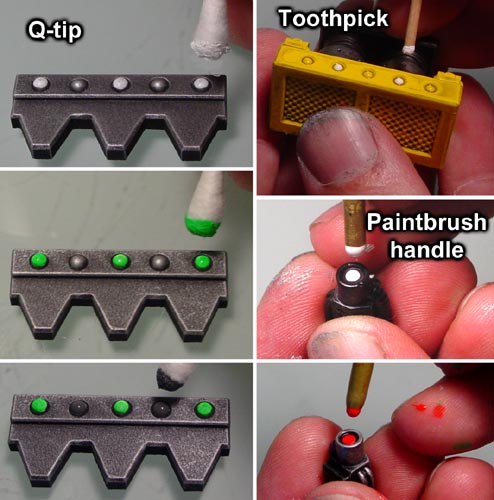
| 17. | Painting Small LightsMost of my lights use fluorescent paints. However, fluorescent paints are transparent and will not show up brightly unless you put down white underneath. The easiest way to apply the paint neatly is to dob on the paint using a small rod of some kind. The size of rod will depend on the size of light you are trying to paint. On the trap door halves I'm using a Q-tip cotton swab. On the steel wall I'm using a toothpick with the sharp tip cut off. On the lasers I'm using a paintbrush handle It works best to dab the stick into the paint and then touch it to an unused surface to get the excess paint off. Then gently dab it onto the light you want to paint. |
 |
|---|
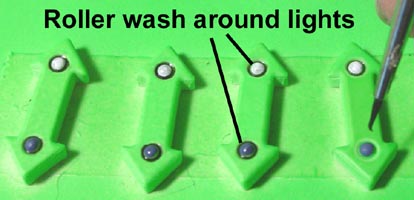
| 18. | To make the lights stand out, I took a very small brush and applied roller wash around each one. With a tiny brush, you can load it up with roller wash and it will give you just enough wash to circle one light without having to wick off the excess later on. |
 |
|---|
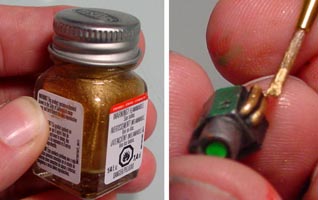
| 19. | Other DetailsI also found it handy to have some enamel model paints for small details. Especially for small metal objects. The paints I am using are from Testors and you have to use paint thinner to clean your brush. Enamel model paints can give you a bright metallic solid surface with a quick swipe of the paintbrush. Here I'm using metallic gold for the sides of the laser. |
 |
|---|
Mounting the Tiles on Foam
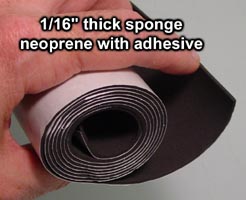
| 1. | I chose to mount all of my tiles of self-adhesive black foam. The foam I used was 1/16" thick and had a white backing that you peel off. To find this foam, you will need to do a search for "sponge neoprene with adhesive" and you should be able to find it on Amazon, Ebay or Google. On my set, I chose not to glue my floor tiles together so I could rearrange them for different layouts. The foam on the back keeps them from sliding around on the table. The foam also protects the tiles when you stack them up when storing them. |
 |
|---|
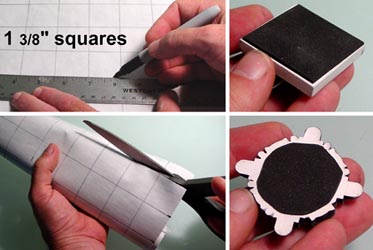
| 2. | For most tiles, I cut the foam into 1 3/8" squares. This made the foam about 1/16" short on all sides so I didn't have to get them perfectly centered on the tiles. You can draw on the back of the foam using a permanent felt tip marker and cut the squares with scissors. For some tiles I had to cut a round shape because I didn't want any of the sticky foam exposed. |
 |
|---|
| 3. | I also used this foam under my robots. I stuck a piece of black construction paper on top of a piece of black foam. Then I cut this to a size that would fit nicely under each robot. I then glued the robot onto the construction paper. Doing this helped my robots to be more stable and not fall off the ramps. |
|---|---|
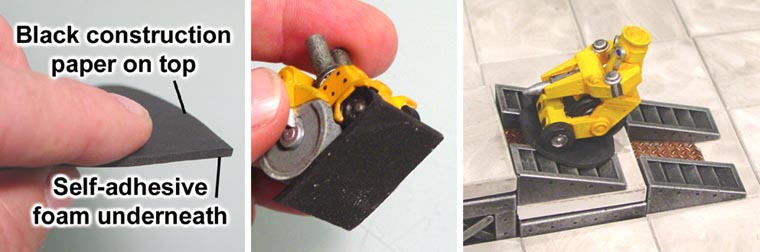 |
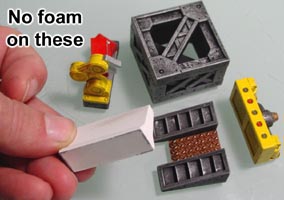
| 4. | There were many items I did not put foam on. These included the steel stands and ramps. The stands and ramps need to stay exactly 1/2" tall to elevate the floors correctly so adding foam would mess up their height. I also didn't put foam on the walls and other accessories because I thought they might fall over easier. |
 |
|---|
Concrete Floor Tiles
You will need 30 castings from mold #280 to make this set.
| 1. | Mold #280 makes the plain concrete floor tiles that will be used the most in this set. I cast these out of white dental stone to make finishing them easier. I gave them a quick coat of concrete wash and the tiles were finished. Lay down a sheet of newspaper. Then start by painting the edges of the tiles with the wash. |
 |
|---|
| 2. | Then paint the top surface of the tile with the wash. Finish by wiping off any excess with a paper towel. The surface of the tile will probably have a swirly or brushed pattern to it. I liked this and thought it was more interesting than having a solid flat gray texture. To me it looks more like the uneven colorings on a real concrete floor. |
 |
|---|
Arrow Conveyors and Turning Gears
You will need 24 castings from mold #421 and 6 castings from molds #422 and #423 to make this set.
| 1. | When assembling the conveyor tiles, I've used a corner made of Legos to help line up the pieces. Doing this helps to keep your pieces square. This is especially helpful on the corner tiles. Otherwise the concrete outside piece can slide around and really throw off the squareness of your tile. |
 |
|---|
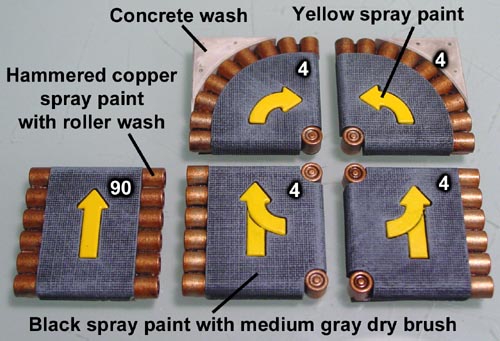
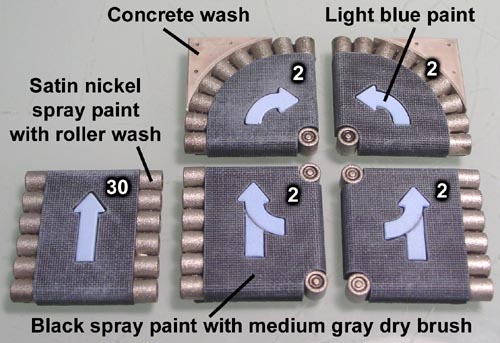
| 2. | Molds #421, 422 and 423 make the conveyors with arrows and turning gear tiles that will be used the most in this set. The white numbers in the corners are the number of conveyor tiles that belong in this set. The conveyor fabric is spray painted black and dry brushed with medium gray. The arrows are spray painted yellow. The rollers are spray painted with hammered copper and then washed with roller wash. |
 |
|---|
| 3. | The white numbers in the corners are the number of conveyor tiles that belong in this set. The conveyor fabric is spray painted black and dry brushed with medium gray. The arrows are painted with light blue craft paint. The rollers are spray painted with satin nickel and then washed with roller wash. Since there are so few blue arrows, I couldn't see buying a whole can of spray paint just for 38 arrows so I brushed the paint on instead. |
 |
|---|
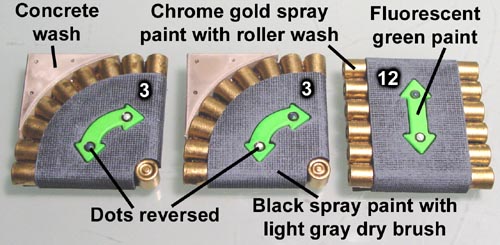
| 4. | The conveyor fabric is spray painted black and dry brushed with medium gray. The arrows are painted with fluorescent green craft paint. The rollers are spray painted with chrome gold and then washed with roller wash. Be sure to reverse the black and white dots on the turning arrows. |
 |
|---|
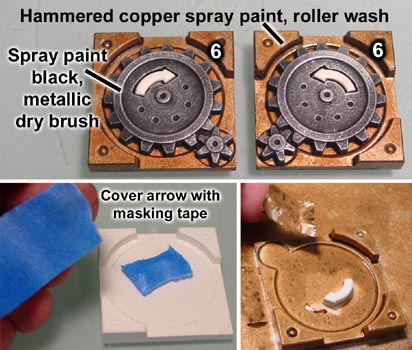
| 5. | The gear base is spray painted hammered copper and washed with roller wash. The gears are spray painted flat black and dry brushed with metallic silver paint. I used Games Workshop mithril silver. You don't have to paint the arrow white. Instead, cover it with a piece if masking tape, then spray paint and wash it. Remove the tape and you will have a white arrow. Be sure that you don't make the piece of tape too large or it will mask part of the base that you want to be copper colored. |
 |
|---|
Specialty Floor Tiles and Doors
You will need 6 castings from mold #424 to make this set.
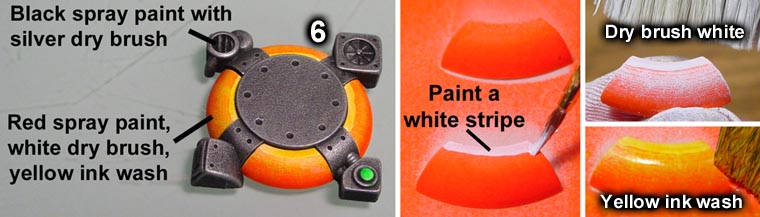
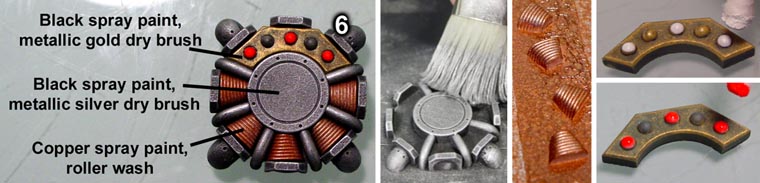
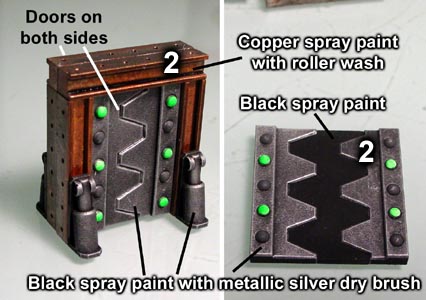
| 1. | Mold #424 is used to make all of the pieces in this section. The white number in the corner is the number of tiles you will make for this set. The main framework is spray painted black and dry brushed with metallic silver. The glowing rings are spray painted red. Then use a small brush to put a strip of white along the top edge of the ring. Dry brush white on the top edge of the ring. Finally, give it a coat of yellow wash to make the glowing yellow effect. |
|---|---|
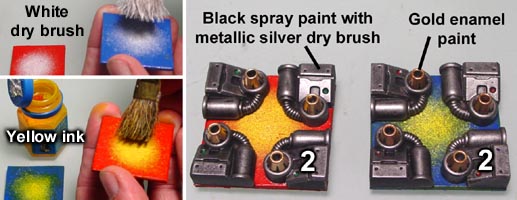
 |
| 2. | The main framework is spray painted black and dry brushed with metallic silver. The lighted panel is spray painted black and dry brushed with metallic gold. The copper coils are spray painted copper and given a coat of roller wash. |
|---|---|
 |
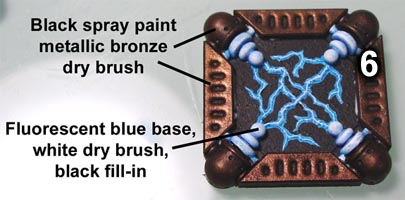
| 3. | The lightening arcs on these pieces will take some time and practice to look good. The center base is hand painted fluorescent blue. Then it is dry brushed in white. Then the black center design is hand painted. The corners and frame are spray painted black and dry brushed in dark bronze. |
 |
|---|
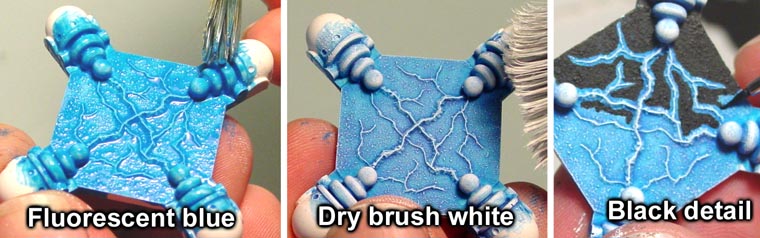
| 4. | Paint the center base fluorescent blue. Be sure to paint the knobs completely also. Then dry brush white over the lightening arcs and knobs. Next, use a small brush to fill in the black detail around the arcs. You want to leave a thin strip of blue on each side of the white arcs. It will look better if you leave very little blue around each arc. |
|---|---|
 |
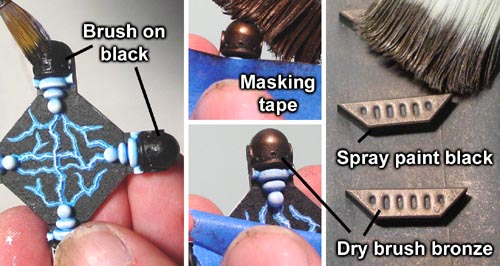
| 5. | Brush black onto the corner ends. Be sure to get the black paint down into the rivet holes. Place a piece of masking tape over the white posts and then dry brush metallic bronze paint on the ends. The vent strips are spray painted black with a metallic bronze dry brush. |
 |
|---|
| 6. | The white number in the corner is the number of finished pieces you will make for this set. The door frame is spray painted copper with roller wash. The door halves and supports are spray painted black with a metallic silver dry brush. The center strip on the trap door is flat black. The best way to assemble the standing door is to glue the front and back halves separately. Once dry, glue the halves together. |
 |
|---|
Elevated Platforms
You will need 24 castings from mold #274 to make this set.
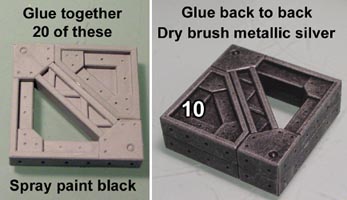
| 1. | These platforms are all made using mold #274. The white number in the corner is the number of finished piece you will make for this set. For all of these examples, you will glue together the groups shown on the left. After the glue dries, use black spray paint on both sides of these block groups. Next glue the completed platforms together. At the very end, dry brush metallic silver on all sides. |
 |
|---|
| 2. | Glue together the group shown on the left. After the glue dries, use black spray paint on both sides of these block groups. Half of these pieces will be painted on both sides without being glued to anything. Next glue the completed platform together. The strips are sandwiched between the square blocks. At the very end, dry brush metallic silver on all sides. You will end up with four of these platforms. |
 |
|---|
| 3. | Glue together the group shown on the left. After the glue dries, use black spray paint on both sides of these block groups. Most of these pieces will be painted on both sides without being glued to anything. Next glue the completed platform together. The strips are sandwiched between the square blocks. At the very end, dry brush metallic silver on all sides. You will end up with four of these platforms. |
 |
|---|
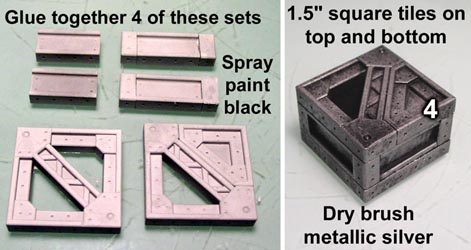
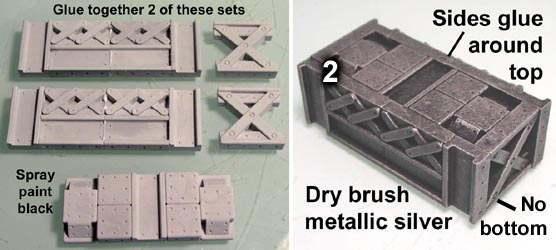
| 4. | Glue together 2 of these groups shown on the left. After the glue dries, use black spray paint on both sides of these block groups. Next glue the completed platform together. At the very end, dry brush metallic silver on all sides. These platforms do not have a bottom. |
 |
|---|
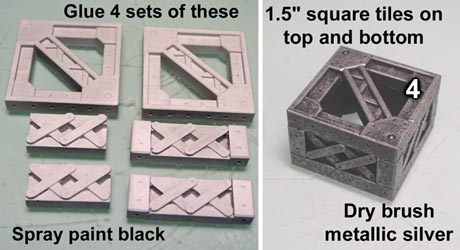
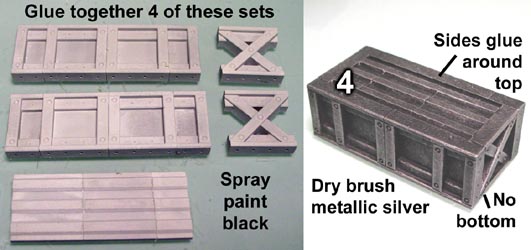
| 5. | Glue together 4 of these groups shown on the left. After the glue dries, use black spray paint on both sides of these block groups. Next glue the completed platform together. At the very end, dry brush metallic silver on all sides. These platforms do not have a bottom. |
 |
|---|
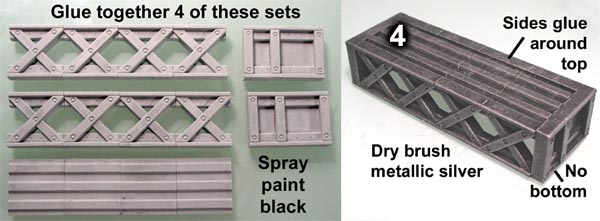
| 6. | Glue together 4 of these groups. After the glue dries, use black spray paint on both sides of these block groups. Next glue the completed platform together. At the very end, dry brush metallic silver on all sides. |
 |
|---|
Factory Equipment and Accessories
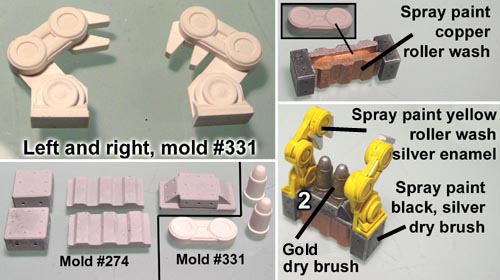
You will need 24 castings from mold #331 to make this set (plus left over castings from mold #274 above).
| 1. | Glue together the extra 1/2" striped blocks to make longer blocks. Make 4 pieces 1.5" long and 6 pieces 1" long.
Shoe polish no more than 6 strips at one time. If you try and do too many, the shoe polish will dry and you won't have time to wipe off the excess. Even with wiping off the excess, the yellow surface may still look a bit "dirty". For a much cleaner look, you can simply use a small brush and paint the shoe polish directly into the cracks. The cracks are deep so this is fairly easy to do neatly. |
|---|
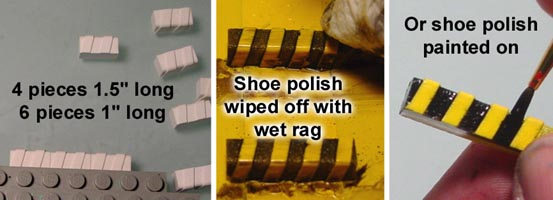 Spray paint all of these strips yellow. When dry, apply shoe polish straight to them and immediately wipe off the excess with a damp rag or paper towel.
| 2. | For the pits, tape or glue a piece of graph paper to some thick card stock. Cut out the shapes you see in the upper left. Then spray paint these shapes black.
Glue the striped strips on top of the black painted card stock. Using a corner made of "Legos" will help you get the sides straight. Also make 16 of the station tiles. The center is the 1" square diamond plate tile which has been spray painted black and dry brushed with metallic silver. |
|---|
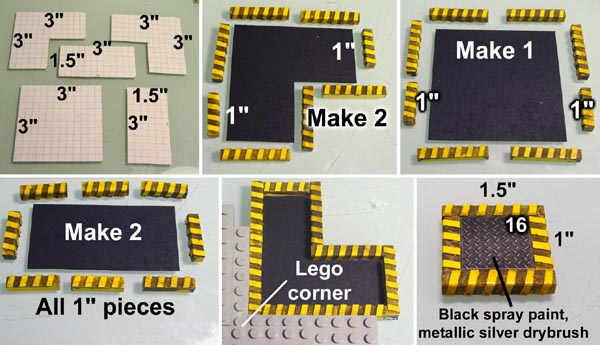 Assemble the pits according to the photos. I've only labeled the 1" long strips. All of the unlabeled strips are 1.5" long.
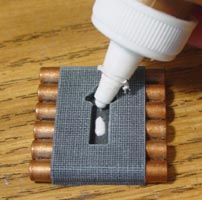
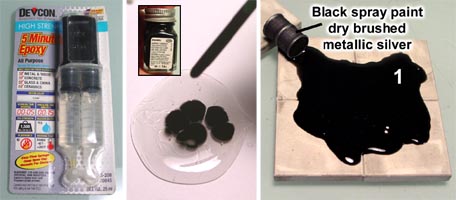
| 3. | For the oil spills, I'm going to use 5 minute epoxy and color it with Testors black enamel paint. I had tried using acrylic hobby paint to color the oil but it would not cure as hard and glossy as using this oil based enamel paint. Place several drops of paint into the epoxy when you mix it up. You want it dark enough so that even a thin coat of epoxy will give you a good solid black surface. |
 |
|---|
| 4. | Glue together the concrete floor tiles for each group. I only made one of each piece shown here. All of the barrels are spray painted black with a metallic silver dry brush. Place the barrel in the corner, half hanging off the corner of the square. Prop up the back side using another concrete floor tile temporarily. |
 |
|---|
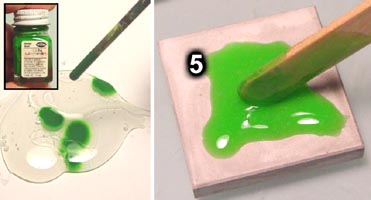
| 5. | For the hazardous waste spills, I'm coloring the 5 minute epoxy with Testors green enamel paint. Do not add more than a couple of drops if you want a bright green. Spread this onto the tiles you want. I made 5 hazardous waste tiles. |
 |
|---|
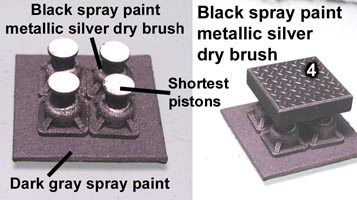
| 6. | For the elevator lifts, cut four 1.5" square pieces of thick card stock and spray paint them dark gray. Spray paint the shortest piston sets solid black. After dry brushing them in silver, glue them together and also glue them onto the card stock. Finally, glue a diamond plate floor tile on top that has been spray painted black with a silver dry brush. Make 4 of these. |
 |
|---|
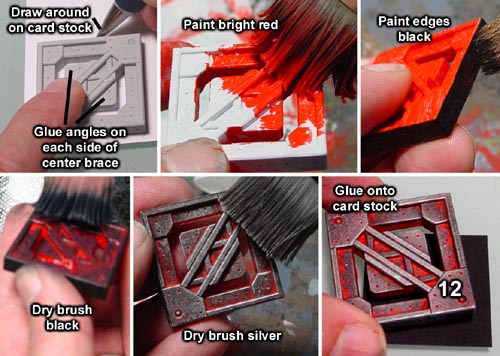
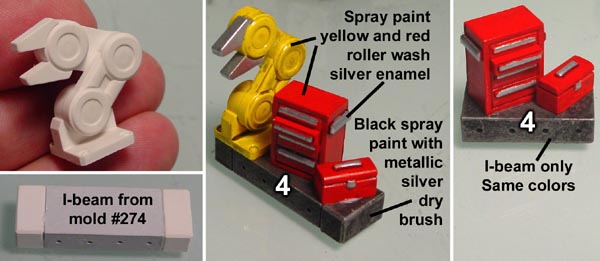
| 7. | These pieces are from mold #274. For the hot plate, cut twelve 1.5" square pieces of card stock and spray paint them dark black. Also glue 2 angle supports on each side of the center brace. Hand paint the whole thing bright red. Then hand paint the edges solid black. Dry brush the top black, then dry brush the top metallic silver. Finally, glue the piece onto the black card stock. Make 12 of these. |
 |
|---|
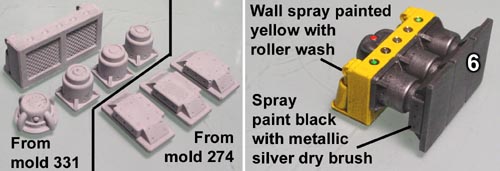
| 8. | For the mashers, collect the pieces shown from molds #331 and #274. Paint all of the parts before putting anything together. Spray paint the walls yellow and then give them a coat of roller wash. Spray paint all of the other parts black and give them a dry brush of metallic silver. |
 |
|---|
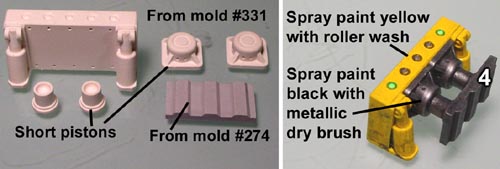
| 9. | For these shovers, collect the pieces shown from molds #331 and #274. Paint all of the parts before putting anything together. Spray paint the walls yellow and then give them a coat of roller wash. Spray paint all of the other parts black and give them a dry brush of metallic silver. |
 |
|---|
| 10. | For these shovers and flame throwers, spray paint the walls yellow and then give them a coat of roller wash. It's easy to see which parts to use here. Spray paint all of the other parts black and give them a dry brush of metallic silver. The other colored details are using Testors enamel model paint. |
 |
|---|
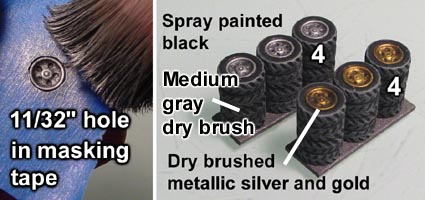
| 11. | For these tire stacks, spray paint them solid black. Dry brush the outside of the tires medium gray. To dry brush the rims, use a circle template to draw an 11/32" hole on masking tape and cut it out with a knife. Then dry brush the metallic paint onto the rims. Make 4 each of these. |
 |
|---|
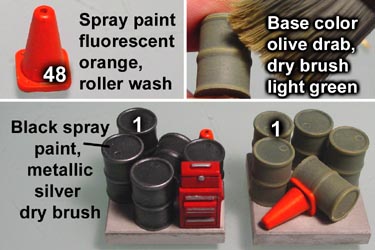
| 12. | For these barrel groups, I ended up gluing them down to a concrete tile. They're good for filling a whole square. The green barrels use the two darkest green colors of the cavern floor project. The cones are spray painted fluorescent orange and then hit with roller wash. All of the cones are this color. Make 1 of each group shown. |
 |
|---|
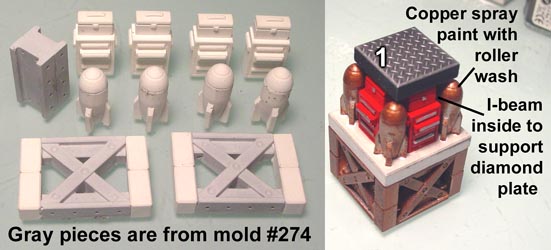
| 13. | For these repair stations, the left one has an I-beam for the bottom capped with small blocks on each end. The right station has only the I-beam with no caps. All of the I-beams are turned face-down. Make 4 each of these. |
 |
|---|
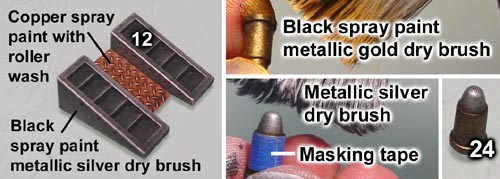
| 14. | These ramps are fairly easy. For the ammo counters, spray paint them black and dry brush them metallic gold. Afterwards, wrap a piece of masking tape around the center and try brush the tips metallic silver. |
 |
|---|
| 15. | For this ammo supply station, you need to make a left and right robotic arm. Glue these together before you spray paint them. All other parts are painted before gluing them together. The base has a robotic center piece sandwiched between 2 metal plates. The 2 bullets on top are shown in the step above. |
 |
|---|
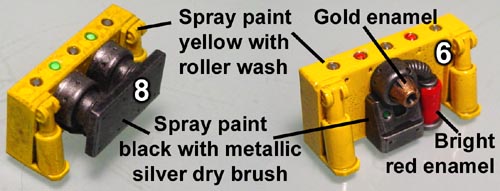
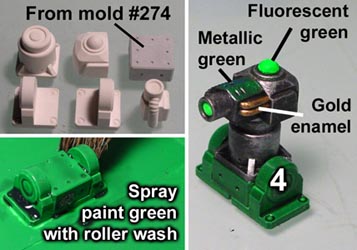
| 16. | Glue together the base for the green laser and spray paint it green. Then give it a coat of roller wash. The center post and gun top are spray painted black with silver dry brushing. Paint these pieces first before assembling the gun top. Finish the gun by adding the fluorescent green top light and laser lens, use metallic green for the gun top and gold enamel for the side tubes. Make 4 of these. |
 |
|---|
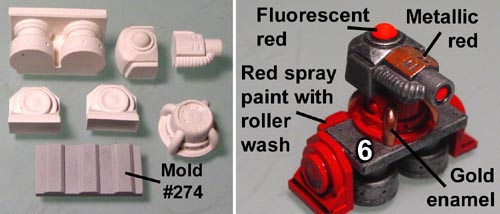
| 17. | There are 2 types of single red lasers. The only difference between them is the side supports. Paint all of the parts separately before putting anything together. The gun has a fluorescent red top light and laser lens, metallic red for the gun top and gold enamel for the side tubes. Make 6 of these. |
 |
|---|
| 18. | Here is the other style of red laser. The only reason there are 2 styles is because I ran out of blocks to make them all the same. Make 6 of these also. |
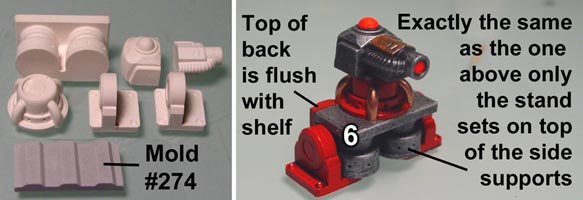 |
|---|
| 19. | Here is the double red laser. Be sure to glue the side blocks together before painting them red. The colors for this double red laser are exactly the same as the others above. |
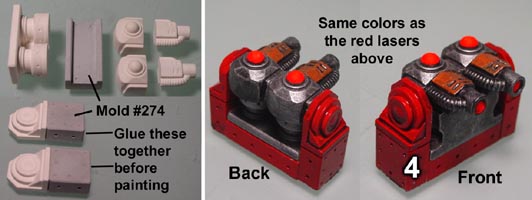 |
|---|
| 20. | For the portals I cut 4 pieces of thick card stock 1.5" square and spray painted them blue and red. I dry brushed the center in white then used yellow ink wash. The flame throwers are glued around the outside after painting. |
 |
|---|
| 21. | For the radio tower, pre-glue the pieces shown. The toolboxes are red, the missiles and underbracing is copper, the concrete slab is concrete stained and the diamond plate is the same black/silver combination as everything else. |
 |
|---|
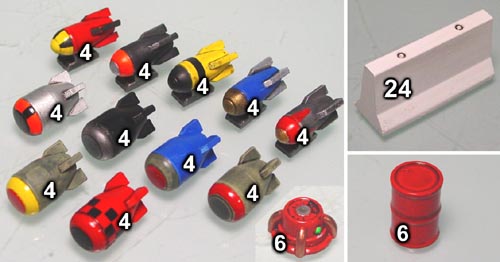
| 22. | The missiles and bombs are painted in a variety of colors. Just use your imagination on these. I painted 4 of each design on them. You can leave the Jersey barriers in plain white dental stone. I spray painted mine white so I could ink wash the rivets in the top. The last 6 barrels I spray painted red with roller wash. |
 |
|---|
Click on the photos to see a larger version. These layouts were made using less than half of the tiles that belong in this set. The robots you see in the photos are from molds #328, #329 and #330. You can see more information about them on our Robot Building Instructions page. It is possible to use these pieces for the Robo Rally game which is produced by Avalon Hill (which we have no connection or affiliation to). It's a wonderful game and you should pick up a copy even if you don't want to build a 3D board for it! |
 |
 |
 |