Mold Making
This page shows you how to create your own molds using several different molding compounds.
Important Notes
"Hey! Aren't you hurting your own business by telling others how to make molds?"
Not really... There is no way I can make molds to suit everyone's needs. Several people have asked for special pieces such as skulls, doors, tombstones and other items that I may not get around to making. Creating your own pieces and molding them can be fun and rewarding.
Besides, making exact blocks (within 1/1000ths of an inch) is fairly time consuming, not to mention shrinkage factors and other silicone problems. I doubt there will be very many people out there willing to repeat all the work I've done to make a mold they could easily buy.
Please note that my Castlemolds(TM) and all of the pieces made from the molds are copyrighted by Bruce Hirst (me). I give permission for anyone to sell models using blocks made from my molds. However, there are some restrictions so be sure and read my Legal Statement before you do. I even allow people to make molds of finished pieces such as large walls and stairways for your personal use only.
However, if you start selling molds made from my pieces you're violating the copyright and breaking the law. By the way, if you do sell models made from my molds, I would appreciate some mention of my web site somewhere.
Latex Moldmaking Compound
 Latex mold making compound costs around $10 for a pint, and you can find it at most any craft or model railroad shop. It's mostly used to make rock texture molds for model railroads. It's fairly cheap, it cleans up with water, and you don't have to use a lot to make tall skinny items like statues.
The main disadvantage is it takes you forever to make a mold. I don't recommend this stuff, but I thought you should at least see what it's like.
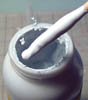
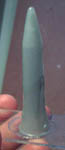
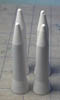
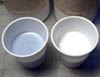
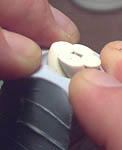
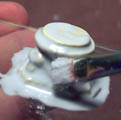
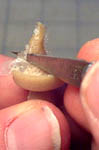
| 1. | I'm going to make a mold of this caulking tube spout. These will end up being spikes for the top of a tower. I've glued the spout down to a piece of plexiglass to make it easier to handle. This material is fairly thick, about the consistency of catsup. They make it thick so it takes fewer coats to cover an object. |
 |
|---|
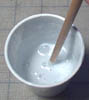
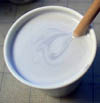
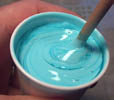
| 2. | Thin the material down with water until it's the consistency of heavy cream. Paint the material over your object and remove any air bubbles that form on the surface by blowing on it. |
 |
 |
|---|
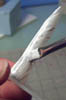
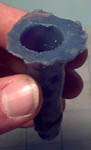
| 3. | Let the first coat dry completely (about 4 hrs). The second coat is full strength. You should put at least 4 coats (letting it dry completely between coats) for a complete mold. When finished, peel off the coat of rubber. Because of the drying time, it will take around 2 days to make a mold. |
 |
 |
 |
|---|
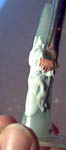
| 4. | One problem with this type of mold is how you hold it upright to cast items with it (I used Legos). When casting items, you may have to coat the inside of the mold with mold release compound occasionally. Overall, I don't like using latex material. |
 |
 |
 |
|---|
Silicone RTV Moldmaking Compound
Silicone RTV (room temperature vulcanizing) mold making rubber is the best choice for making molds. Below are some instructions on how to use this material to make molds. At the end of this article I will list some sources where you can purchase your own.
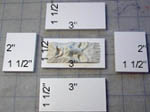
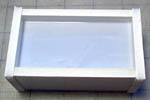
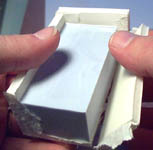
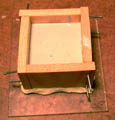
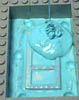
| 1. | Molding the FaceTo make a mold of the face, you must first have a box of some kind to pour the rubber in. For this example, I'm using foam core board. I cut pieces to the dimensions shown. This will make a box large enough to fit around the shape. Glue the face down to the bottom with a few drops of super glue. Glue the box together and let it dry. To see how the face was sculpted, see the Sculpting Page. |
 |
|---|---|---|
 |
| 2. | The kind of silicone I'm using for this mold is purchased from Micromark (www.micromark.com). It's called ONE-TO-ONE/RAPID mold making rubber. To use this material you measure out equal parts of A and B, which means you don't need a scale to weigh the parts. This rubber also has a 4 hour cure time, so you can start using your mold the same day you make it. |
 |
|---|
Micromark 1-to-1 rapid mold making rubber is a very weak material. Although it is easy to mix, you won't get many castings from it before the mold will split. It is also not a good material for items with undercuts, as the undercuts can tear off pieces of rubber when you remove the casting from the mold.
Instead, I would strongly suggest a product such as Mold Max 30 from www.smooth-on.com. You have to weigh the parts (as shown below), but the rubber will hold up much better.
| 3. | Open the jars and use a paintbrush handle to stir each part well. Measure equal parts of A and B. You can do this easily by eye (I always seem to pour too much and the extra gets wasted). Pour both halves into one cup and stir it thoroughly. Be sure to scrape the sides of the cup while mixing. The 2 parts of this mixture are different colors. This helps you to know when the parts are mixed completely. |
 |
|---|---|---|
 |
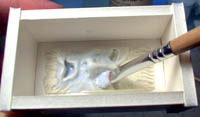
| 4. | Use a stiff bristled paint brush to paint a thin layer of the silicone rubber mixture on the face. Make sure it goes into all of the cracks and holes. This will ensure there are no air bubbles in the face of the mold. Rinse the brush out with paint thinner. |
|
|---|---|---|
 |
| 5. | Pour the remainder of the mixture on. Let the material set up for about 4 hours. |
 |
 |
|---|
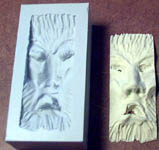
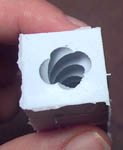
| 6. | Tear the box off of the mold and remove the original sculpture. Usually, the sculpture gets destroyed while taking it out of the mold. The last photo shows the finished mold and a cast in plaster. |
 |
 |
|---|
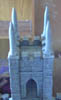
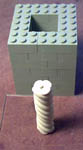
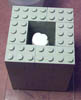
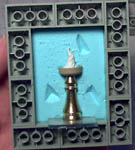
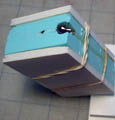
| 1. | Molding the Pillar and BaseThis time I'm making the box out of Legos. One of my customers suggested this and it's a great idea! Using them you can build a box any size you need easily, and it's fairly leak free. I've mounted the pillar on a piece of plexiglass using superglue. The plexiglass should be large enough to set the Lego box on. To see how the pillar and base was sculpted, see the Sculpting Page. |
 |
|---|
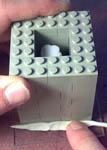
| 2. | Paint the silicone rubber mixture over the pillar with a stiff bristled brush. Rinse the brush with paint thinner. Place the Lego box over the pillar. There should be a little plexiglass sticking out all the way around. |
 |
 |
|---|
| 3. | To keep the rubber from leaking out under the Lego box, place a bead of modeling clay around the edge. Mix up your silicone rubber and pour it over the pillar in the box. |
 |
 |
|---|
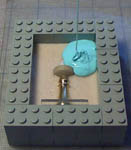
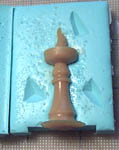
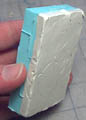
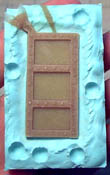
| 4. | When dry, remove the Legos from around the mold and snap the plexiglass off. The mold should look something like this. |
 |
|---|
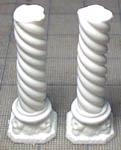
| 5. | Now for the hard part. I didn't consider how difficult it would be to remove the original from the mold. After a bit of forcing, it came out. A straight or fluted pillar would have come out easier. Regardless, I got it out and the mold works fine. |
 |
 |
|---|
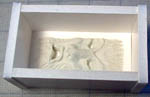
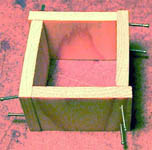
| 6. | Mount the skull base on a piece of plexiglass or wood. This time I'm going to make a box out of wood. It really doesn't matter what you make the box out of, as long as it will contain the rubber. |
 |
 |
|---|
| 7. | As before, paint with a coat of rubber. Place the wooden box over top and seal the outside edges with modeling clay. Pour the rubber mixture over top. |
 |
 |
|---|
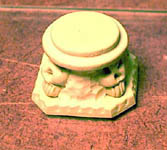
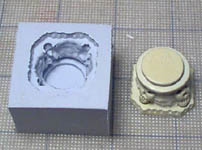
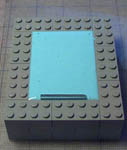
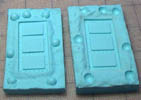
| 8. | Here's the finished mold. The next photo shows casts made from these molds in casting plastic. To learn about casting plastic, check out the Casting Instructions page. |
 |
 |
|---|
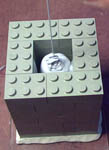
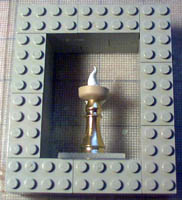
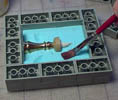
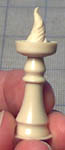
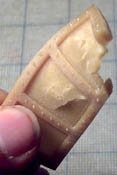
| 1. | Making a 2-Piece Mold of a TorchI mounted the torch on a small piece of plexiglass. You don't have to, but it will make casting a little easier because the bottom of the mold will be flat and level with the bottom of the torch. To see how the torch was sculpted, see the Sculpting Page. I've built a box out of Legos and placed the torch inside. Be sure the Lego box is at least 3/4" larger than the shape you're reproducing. To keep the torch laying horizontal, I've braced it underneath with a small wad of modeling clay. |
 |
|---|
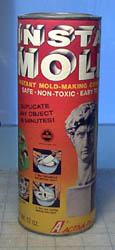
| 2. | To make a 2-piece mold, you have to submerge the bottom half of the object in something, so the rubber will only cover one half at a time. I'm going to use a product called Insta-mold. You mix it with water and it makes a temporary mold in minutes. The mold is only good for a few casts and only works on objects with a smooth texture and no steep undercuts. It may not be the best for mold making, but it works great for filling the bottom half of a 2-piece mold. You can find it at most craft shops or on the internet at www.activa-products.com |
 |
|---|
Instamold is a terrible product and I do not suggest it for anyone. I successfully used it for the bottom of this 2-piece mold but the consistency is difficult to mix (is very lumpy) and may take a long time to set up depending on how much water you add to it.
Instead, I would strongly suggest you use modeling clay to fill in the bottom or embed your sculpture in (as shown further down in this article).
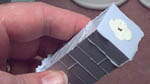
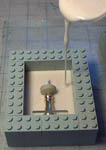
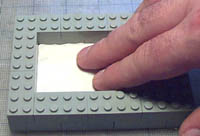
| 3. | Mix the Insta-mold according to directions. I usually mix it about 1 part water to 1 part powder. Try not to stir a lot of air bubbles in it while mixing. Carefully pour the Insta-mold mixture under the torch. Slowly fill the box until the torch is halfway submerged. You will notice that I didn't seal the bottom edge of the box. This stuff is so thick that it won't flow underneath. |
 |
|---|
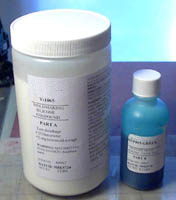
| 4. | I'm going to use a different silicone rubber this time. This is a sample from one of the mold companies I order from. I don't have the specifications for this stuff, but I thought you should see how different silicones are mixed. This silicone rubber has to be weighed. The disadvantage is that you have to buy a scale in order to mix it (which is the way with most silicone products). The scale I'm using will measure in grams and ounces. I've poured about 40 grams of rubber base (part A) in a cup (it's white so it's hard to see in the photo). This silicone requires 10% of catalyst by weight. Next I'll add 4 grams of catalyst (part B) to the cup. |
 | |
|---|---|---|---|
 |
 | ||
| 5. | Stir both together thoroughly. Be sure to scrape the sides of the cup while mixing. The 2 parts of this mixture are different colors. This helps you to know when the parts are mixed completely. |
 |
|---|
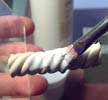
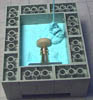
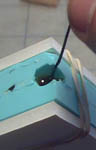
| 6. | Since the torch is fairly smooth with no steep undercuts, I'm going to pour the silicone instead of brushing it on. Start pouring from one corner in a very thin stream. The rubber will slowly creep around the entire object without air bubbles forming. |
 |
 |
|---|
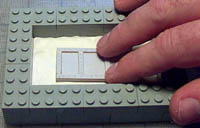
| 7. | This type of silicone rubber has to cure overnight. When cured, peel the Insta-mold off of the back. Leave the mold in the Lego blocks for the moment. |
 |
|---|
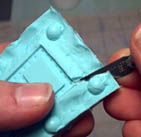
| 8. | Use a hobby knife to cut several pyramid shaped depressions around the outside edge of the mold. These will act as keyways, which will help both halves of the mold line up and lock into place when the mold is finished. |
 |
|---|
| 9. | You want to use mold release compound to keep the two halves of the mold from sticking together. It's sort of like a greasy wax dissolved in alcohol. Brush it on all rubber surfaces. Try to avoid getting it on the torch. |
 |
|---|
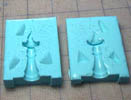
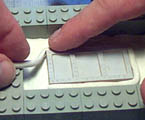
| 10. | Pour rubber over the other half. When cured, remove the Legos and peel them apart. The two halves should fit together perfectly and the keyways will help them line up. |
 |
 |
|---|
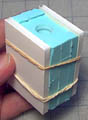
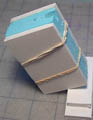
| 11. | Before putting the halves together, coat them with talcum powder. This will help remove air bubbles. Place a piece of heavy stock on both sides of the mold (I'm using foam core board). Put a couple of rubber bands around it. Don't get them too tight or they'll distort the mold while casting. I've poured casting plastic in this mold. To learn about casting plastic, check out the Casting Instructions page. |
 |
 |
|---|
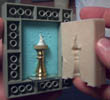
| 12. | Open the mold to reveal the finished cast. It will probably need some trimming. Here's the finished torch. Now you can make as many as you like! |
 |
 |
 |
|---|
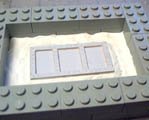
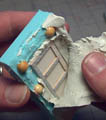
| 1. | Making a 2-Piece Mold of an Iron DoorStart with a box made from Legos, and make it large enough to leave at least 3/4" around the door. Place a bed of modeling clay in the bottom and try to spread it out nice and even. |
 |
|---|
| 2. | Lay the iron door down onto the bed of clay and press it in. To see how the door was made, see the Sculpting Page. |
 |
|---|
| 3. | Place a bead of modeling clay around the edge of the door. Press it against the edge of the door, so the door is halfway submerged in clay. |
 |
 |
|---|
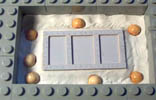
| 4. | I've embedded round wooden beads in the clay. These will act as keyways and will help both halves of the mold to line up. |
 |
|---|
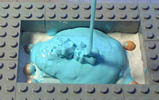
| 5. | Mix up some silicone rubber and paint on a thin layer. Pour the remainder in to fill the box. Allow the rubber to cure completely. |
 |
 |
|---|
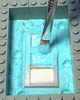
| 6. | Remove the mold from the Lego box. Peel the modeling clay away from the rubber mold. Remove the wooden beads and any trace of the clay that's left. Don't remove the door. |
 |
 |
|---|
| 7. | Coat the rubber completely with a layer of mold release compound. This will keep the two halves of the mold from sticking together. Try to avoid painting the door. |
 |
|---|
| 8. | Paint a thin coat of rubber on the door. Fill the box with mold rubber and let it cure. When cured, pull the halves apart and remove the door. |
 |
 |
 |
|---|
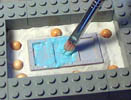
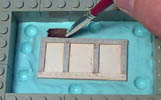
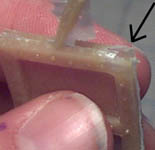
| 9. | Now for the tricky part. You have to get the casting material into the mold somehow. I'm cutting a slot in the mold to pour the material in. Be sure to cut a matching slot in the other half of the mold as well. The mold will have to set at an angle or air bubbles will get trapped in the horizontal slats of the door. There will also need to be another slot cut so air can escape while the material is being poured in. Once again, be sure to cut a matching slot in the other half of the mold. The arrow pointing down is where the casting plastic will pour in, the arrow pointing up is where the air will escape. |
 |
|---|---|---|
 |
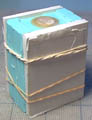
| 10. | Coat the insides of the mold with talcum powder. Place a piece of heavy stock on both sides of the mold. Put a couple of rubber bands around it. Don't get them too tight. I've poured casting plastic in this mold. To learn about casting plastic, check out the Casting Instructions page. |
 |
 |
|---|
| 11. | The door came out OK except for a large air bubble that formed at the neck where the material was poured in. To solve this problem, I widened the opening a little and wiggled a piece of wire in the opening after the casting plastic was poured in. |
 |
 |
|---|
| 12. | The door poured perfectly this time. I'm surprised all the rivets came out. Even the badly poured door wasn't a total waste. While the plastic was still soft, I twisted it, chopped off a few pieces and gouged holes in it. Now it looks like a door a monster bashed through. |
 |
 |
|---|
Sources for Buying your Own Silicones
Here's a little information about Silicone RTV (room temperature vulcanizing) mold making material. This type of silicone will not stick to anything - but itself. Therefore no mold release is needed.
It can be extremely strong, as flexible as you want and can handle fairly hot materials. The manufacturing industry uses this stuff extensively to mold any product you can think of. Every plastic product in your household was molded at one time using this material.
Now the bad news. Since silicone is so flexible and has so many different uses, there are literally thousands of silicone products out there, all with their own specific properties. Rather than drag you through the technical jungle, I'll suggest a few places that sell easy-to-use silicones specifically for molds like yours.
Smooth-On has an extensive selection of mold making products and casting materials. If you have questions on what kind of rubber to use, their sales department can point you in the right direction.
Micromark has a mold making product called One-To-One/Rapid mold making material. It has a couple of good points: You pour equal parts of A and B, which means you don't need a scale to measure it. It also sets in 4 hours so you can use the mold the same day you make it. I did notice that it wasn't as strong as other silicones I've used, however it should do well for any small projects.
Douglas and Sturgess, Inc has a good number of mold making silicones. Luckily, they also have good detailed descriptions beside their products as well.
I know this doesn't look like very many listings, but there's a wealth of information that's easy to find. Just type in "mold making silicones" on any search engine and you'll find plenty to choose from.
I'm afraid I won't be able to give you any more specifics on the subject. To give a proper description of silicones and their properties would take a whole web site on its own. I hope this information will help you make the pieces you need for your own special projects.