Tips & Tricks 6
Building and Using a Form
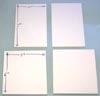
| 1. | To make building easier, I'm going to build a form. This will help me get the sides and corners of the tower nice and straight. You can make this out of cardboard, foam core board, or even thin wood. Cut two pieces 7" x 4" and two pieces 6" x 5". |
 |
|---|
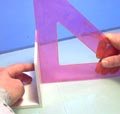
| 2. | Start by gluing the two 7" x 4" pieces together at right angles. You want to glue the 7" sides. I'm using a triangle to keep the pieces at right angles, but anything 90 degrees would work (corner of a book, piece of wood, etc.). |
 |
|---|
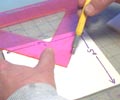
| 3. | Now I'll cut a 90 degree "L" shape out of the 6" side of the 6" x 5" piece. Once again, use something 90 degrees. Do this for both pieces. |
 |
|---|
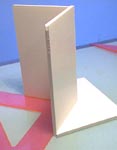
| 4. | Glue the pieces as shown. Use a right angle to make sure the pieces stay at 90 degrees while gluing. Also be sure that the form stands straight up at this point (you don't want it to lean). Place a right angle along the side to make sure it's straight vertically. |
 |
|---|
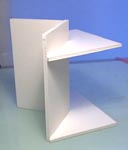
| 5. | Glue the other cut out piece further up the side. Also be sure it glues at 90 degrees. Here's what the finished form looks like. I've used foam core board for mine. I like foam core because it's light, easy to cut (if you have a sharp knife) and stays very straight. The best material to use is wood, but you need a saw for that. |
 |
|---|
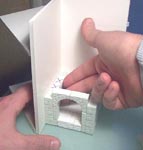
| 6. | To use the form, simply place your blocks up against it while building. After you glue a row down, place the corner of the form against your model and gently press the blocks against it. Rotate the model and do the same for all sides. |
 |
 |
|---|
| 7. | You can make other forms depending on the project you're building. I use this form to build flat walls with. It helps keep the blocks straight and even. Using forms will help any project line up better. The larger the project, the more they help you. |
 |
|---|
Making a Rock Hill
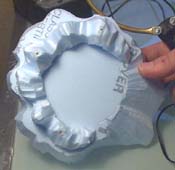
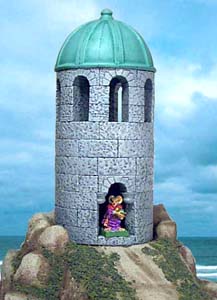
| 1. | I'm going to make a rock hill for my small tower to sit on. The tower was made from the turret mold #61. To see how to build the tower, visit the Turret Mold page. To make the hill, I'll use some polystyrene foam insulating board. This is the stuff they use for sheeting on houses before they put siding on. You can get it at any lumber yard and usually comes in pink or blue in thicknesses of 1/2", 1", 2" and even 3". |
 |
|---|
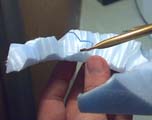
| 2. | I'm using a hot foam cutter to shape the foam board. This one was called the "Hot wire foam factory" and was pretty expensive (about $100) but I think it was worth the price. I'll start by drawing a circle on the foam the size of the tower. Next I'll use the hot wire cutter to cut the circle out of the center. |
 |
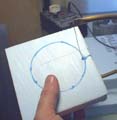 |
|---|
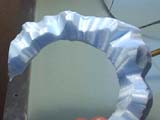
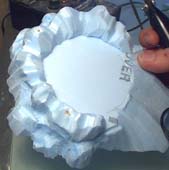
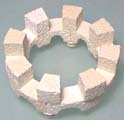
| 3. | Using the hot wire tool, I'm going to bevel the inside and outside edge of the foam ring. Since I don't want the rocks to go around the front of the tower, I've cut a section of the ring out. |
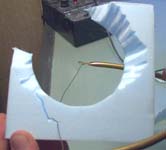 |
 |
|---|
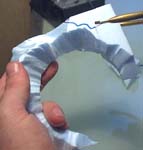
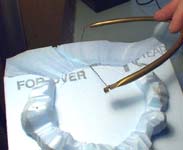
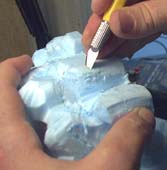
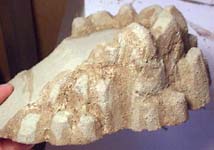
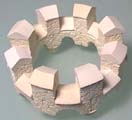
| 4. | Next I'll trim the top of the ring. What I'm trying to do is make the foam into odd shaped lumps around the ring. These will represent fingers of rock jutting up around the tower. |
 |
 |
|---|
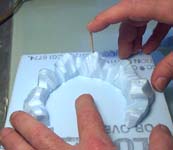
| 5. | Glue the ring onto the next piece of foam (which happens to be larger). Since I'm in a hurry I'm sticking a toothpick into the foam to hold the two pieces so I can work while the glue is still wet. Now I'm cutting the slope in front of the tower where people can walk up. |
 |
 |
|---|
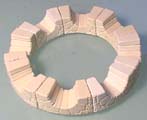
| 6. | Cut around the rest of the way leaving a ledge around the outside. On this second level, the trick is to make new fingers of rock in some places, but cut close in other places so the original fingers of rock will continue down straight. |
 |
 |
|---|
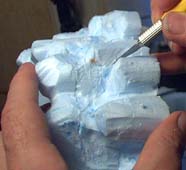
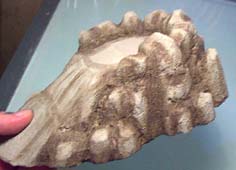
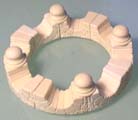
| 7. | At this point I'll use a hobby knife and trim up some places I can't get to with the wire cutter. On these photos, I'm trimming down a tall finger of rock. It's important that the rock pieces aren't all the same height. Try to make various sizes and heights of lumps around the outside. |
 |
 |
|---|
| 8. | Don't be afraid to make some deep grooves around the rocks. These grooves and shapes will be the final shape of the rocks. Now I'll glue this down to the third layer of foam and continue the process. |
 |
|---|
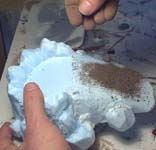
| 9. | To add texture, brush on a water-base glue (Elmer's) and sprinkle the surface with dirt. Grab some dirt from your yard and break it up with your hands. Don't worry about getting it to a fine powder, the big clumps won't stick to the glue anyway. Be sure to hide the dirt from your cats, mine love to dig around in it and make a mess. |
 |
 |
|---|
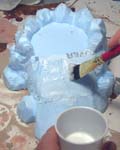
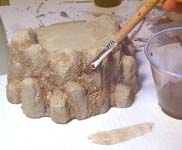
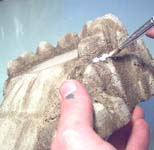
| 10. | Be sure the glue is completely dry before continuing. Using a stiff brush, remove the loose dirt. I'm going to use an earth colored latex paint to paint the foam. The easiest way to get earth color is to put some dirt in an envelope and take it to a hardware store (they'll mix any color you want). Pick out a color of paint that matches the dirt, only pick a color about 2 shades lighter. Real dirt is too dark. It only looks lighter because it's outside in the bright sunlight. To compensate for indoor lighting, the paint color has to be lighter. |
|---|
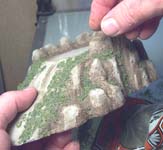
| 11. | When the paint is dry, it's time to brush on a wash. Take a brown and black paint mixture and mix it really thin. I put a brush stroke on a piece of paper in the first photo so you can see how thin the mixture is. Paint the wash into all the cracks and recesses of the stone. The second photo shows the first layer of wash. |
 |
 |
|---|
| 12. | Applying the wash is a hard thing to describe. Have you ever tried to add shadows on a pencil drawing? Where the light hits the object you leave white. As you move around the object (away from the light) it slowly get darker, and the shadows behind the object are really dark. The same principle applies here. Brush on the wash like you're using a pencil. The only difference is that you can't push harder to make the shadows darker - you have to apply more coats of wash. The top highlights of the rocks will have no wash. As you creep around the rock you'll have a little wash, and in the cracks you'll have several coats of wash. |
 |
|---|
| 13. | The last step is to add a little ground foam (railroad scenic materials) for moss or grass. I'm painting a water base glue (Elmer's) into some of the cracks, then sprinkling the foam on. |
 |
 |
|---|
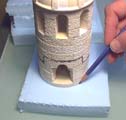
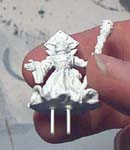
| 14. | Here's the finished hill with the tower on top. To see how to build the tower, check out the Turret Mold page. I've placed a 25mm figure so you can see the scale. The miniature is made by Games Workshop. I'm sure there's an easier and better way to make rock hills and mountains - and I'm going to find it. The model railroaders are the real masters at this sort of thing. Someday I'm going to write a terrain making article using the "Bob Ross" method. He has a clear way of showing how to paint mountains and "happy little clouds" in oil paint that's easy to follow. Surely there must be a way to model them in 3D just as easily. |
 |
|---|
Making a Fountain
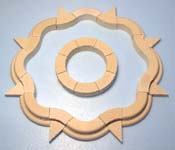
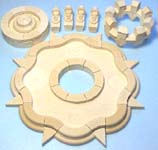
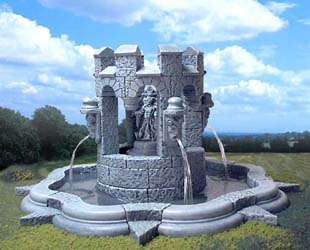
| 1. | This fountain will be made using the turret mold #61 and the wizard's tower #50. You'll need to cast the turret mold 8 times and you'll need four faces from the wizard's tower mold. I'm building this on a piece of 1" thick polystyrene foam insulating board. It's the same stuff used on the rock hill (shown above this article). Lay out the pieces as shown and glue them down to the foam board. |
 |
|---|
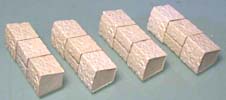
| 2. | Glue the blocks in the first photo upside-down and let the glue dry completely. Flip the piece over and glue 8 sliver pieces as shown to form the statue stand. Next glue a ring of flat tiles all the way around. |
 |
 |
 |
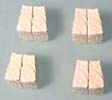
|---|
| 3. | There are four pillars used to support the top arches. To make these pillars, start by gluing four pairs of small tiles together. Lay them on their side and place a block on each end. |
 |
 |
|---|
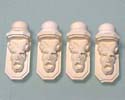
| 4. | Take four faces from the wizard's tower (mold #50) and glue a decorative knob on the top of each. You may have to sand the back of the knob slightly to fit. Then glue each face onto the outside of each pillar (the pillars conform to the circular shape of the fountain). |
 |
 |
|---|
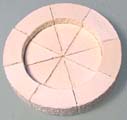
| 5. | Now for the top ring of the fountain. Glue 8 arch pieces together upside-down. Now glue 4 decorative knobs on every other point. Let this dry completely. |
 |
 |
|---|
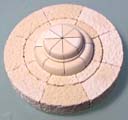
| 6. | Flip the piece over and glue on the blocks shown. Finish the top of the ring by adding the decorative caps. This completes the top ring of the fountain. All of these pieces will be painted individually first, then assembled to build the fountain. |
 |
 |
|---|
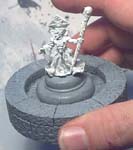
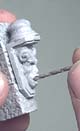
| 7. | I'm going to use a miniature as a statue in the fountain. Spray paint the miniature flat white so your stone color of paint will stick to it. To anchor the miniature down, I drilled a couple of small holes in the bottom and glued two pieces of wire. I also drilled two small holes in the stand and glued the miniature in place. Eventually we'll paint the miniature stone colored, exactly the same as the rest of the structure. |
 |
 |
|---|
| 8. | Before you attempt this next part, I strongly suggest you try your hand at a smaller version! Make a rectangle out of some blocks to represent your pool and try out the method shown below. Once you practice a little with this, you'll feel more comfortable doing it for real. |
|---|
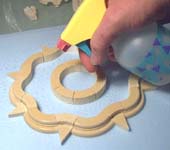
| 9. | We're going to make the fountain look like it's full of water. Get a spray bottle and drench the blocks. I'm not kidding, I mean soak it! We're going to pour plaster (or whatever you're using) into the pool and dry blocks will suck the moisture out of the plaster and harden it instantly. Keep spraying until the blocks can't soak up any more water and stay shiny. |
 |
|---|
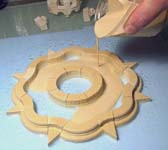
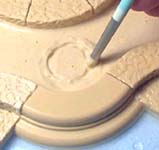
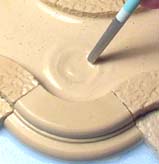
| 10. | Mix up your plaster and pour it into the pool. You want to add about 1/4" to the bottom and tap the sides to level the plaster. The plaster should have a layer of water on top. Don't soak it up with a paper towel! You need the water to make the pool ripples work. |
 |
 |
|---|
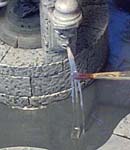
| 11. | Let the plaster set for about 5 minutes to firm up slightly. Don't wait too long or it will be too firm! Use the handle from a small paintbrush and work circles into the areas shown. Be sure the paintbrush handle is rounded on the tip. If the plaster is too liquid to make an impression, wait another 2 minutes and try again. At first it may tear up the plaster and look rough. Gently spray more water and continue to move around in a circle and it will smooth up. You want to make at least 2 circles inside each other, as perfectly round as you can. |
 |
|---|---|---|
 |
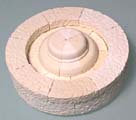
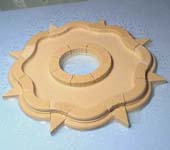
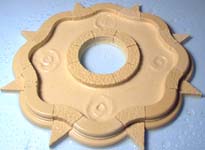
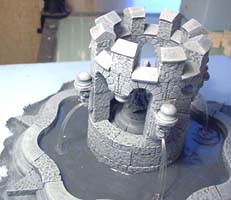
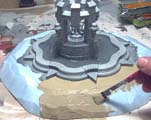
| 12. | Place your circles in the areas shown and let the pool dry completely. Shown here are all the parts to make your fountain. I'm going to paint them the same colors that I used for the Wizard's tower; Dark gray, medium gray and light gray. |
 |
 |
|---|
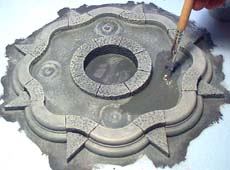
| 13. | Paint the whole fountain as you would any structure, dry brushing the lighter colors of gray on to bring out the details. For more specific info, see the Painting Instructions page. For the pool color, use your darkest gray (the one used for the base coat) and add a slight tint of green to it. Paint the water this color and be careful not to slop it up on the sides of the pool. Let it dry completely. |
 |
|---|
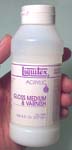
| 14. | On top of the pool we're going to paint on acrylic gloss medium & varnish. You can get it at most art or craft stores. It's usually used with acrylic paints to add gloss effects to a painting. Paint several thin coats over the pool, letting each dry before the next (the stuff dries within minutes). The more coats you put on, the more realistic your water will look. |
 |
 |
|---|
| 15. | Next we'll make water spew out of the faces. Get some clear fishing line and cut 16 pieces of about 5" long each. Using a small drill bit, drill a hole in each mouth large enough to fit four pieces of fishing line in. Glue them in place with super glue, making sure the natural curve of the line arcs downward. |
 | |
|---|---|---|---|
 |
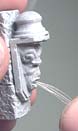 | ||
| 16. | Now it's time to assemble the fountain. Position the face columns (spewing water) so they are over the round puddles you made in the pool. Once the assembled fountain is dry, carefully trim the fishing line so it makes a gentle arc down and touches the puddle. I found that it looks better if you have to pull the fishing line down slightly to glue it to the puddle. Trim small amounts off at a time. If you cut the lines too short, you'll have to replace them with new pieces. Use super glue to attach the lines to the center of the puddles. |
 |
|---|
| 17. | As a final step, apply some acrylic gloss medium to the strands of fishing line. This will thicken them up and give them an irregular shape. While you're at it, apply a few more coats of acrylic gloss medium to the pool. The more thin coats you put on, the more like water it looks. |
 |
|---|
| 18. | I used a hot wire foam cutter to cut the shape of the hill (see the above article on making a rock hill). Then I painted the foam an earth color and sprinkled ground foam (railroad scenic materials) into the wet paint. You get better results if you use a few different colors. |
 |
 |
|---|
| 19. | Overall I was very pleased with the way the fountain turned out. The acrylic gloss medium gives the water that smooth glossy look. I debated what color to make the water in the fountain, but after looking at several real fountains (shallow ones) I found the water was the color of the stone under it, only darker. Deep bodies of water are usually blue or green, only because they mirror the color of the sky or grass. However, if your fountain is in a dungeon, those colors just don't work. |
 |
|---|