Painting Ship Corridors
|
Easiest Method Paint and Wash 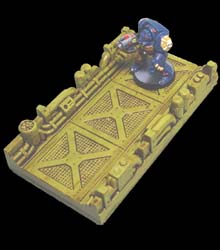 This method takes 2 steps:
Click here to scroll down to these instructions |
Medium Difficulty Black and Dry Brush 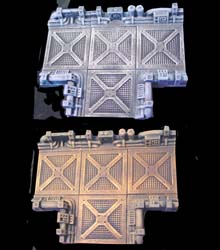 This method takes 3 steps:
This method is directly below. |
Medium Difficulty - Black and Dry Brush
Step 1 - Black Base Coat
| 1. |
|
|---|
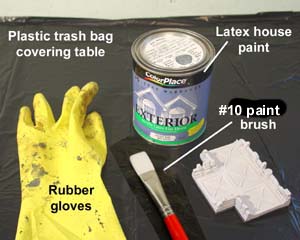
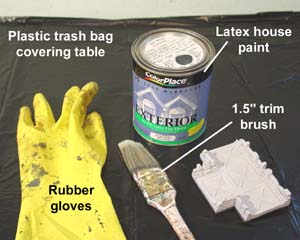 The first step will be to give the pieces a base coat of black paint. In order to do this, you will need a few materials such as:
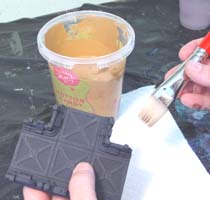
| 2. | The paint we will be using is solid black latex house paint. This paint straight out of the can may be too thick to flow down into the cracks very well. In order to get it to flow, we need to thin it with water a bit. I've found the best ratio to thin the paint is 3 parts paint to 1 part water. Mix the paint and water completely. If you use craft paint, you may not need to thin it with water. |
 |
|---|
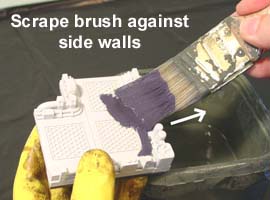
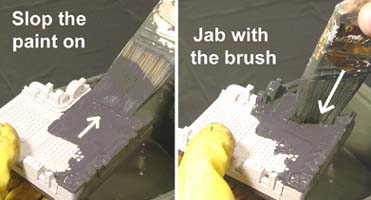
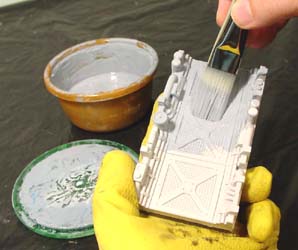
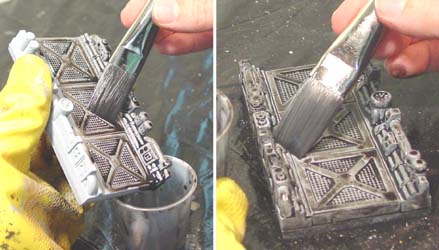
| 3. | Put the glove on your left hand, hold the piece you want to paint over the cup and slop the paint on. Let the excess paint drip back into the cup. You want the paint to run down into all the cracks. One way to do this is to scrape the brush against the walls. The excess paint will run down the sides and into the crevices. |
 |
|---|
| 4. | The grate tiles can be difficult to get the paint down into. What happens is that air bubbles form in the little holes and paint doesn't get down in there very well. To work around this, slop the paint over the grate sections. Then jam the brush straight down into the tiles with a jabbing motion. |
 |
|---|
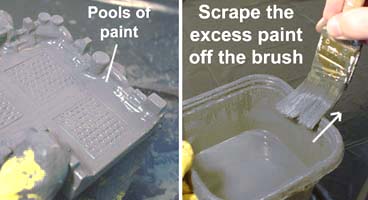
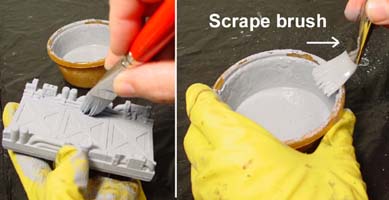
| 5. | Once the piece is completely coated, you will notice there will be pools of paint forming around the edges of the piece. We need to remove this excess paint from the piece. To do this, scrape the brush off onto the side of your paint container. Then jam the brush into the corners to remove the excess puddles of paint. Alternate scraping the brush and jabbing it in the corners until the excess paint is gone. |
 |
|---|
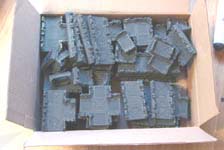
| 6. | After the piece is painted, set it on the trash bag to dry. A trash bag works well for this because you will have excess paint on the bottom of the pieces. Pieces remove easily from the trash bag after they're dry. This base coat takes the longest of all the painting steps. There are a lot of pieces to the space hulk board, so be ready to devote several evenings to the base coat alone. |
 |
|---|
Step 2 - Gray Dry Brush
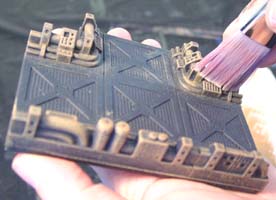
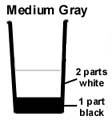
| 1. | The next step will be to dry brush the edges with gray. This is the same medium gray used in the Castle Gray colors but without the water. This medium gray paint is made by mixing 1 part black paint to 2 parts white paint. |
 |
|---|
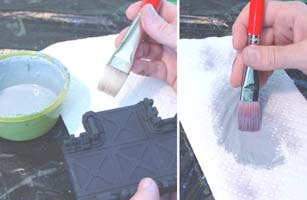
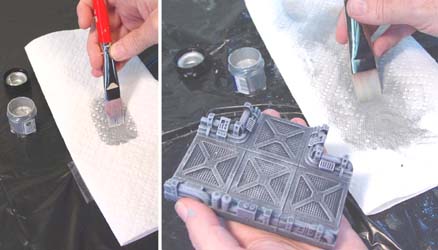
| 2. | To prepare your workspace for this, tape a paper towel down to the table. I'm using a nice soft 3/4" wide brush for the dry brushing. Be sure that your paint brush is as dry as you can possibly make it. Dip your brush into the paint and paint off the excess gray onto the paper towel. Then move to a clean spot and wipe the excess off until almost nothing shows on the paper towel! |
 |
|---|
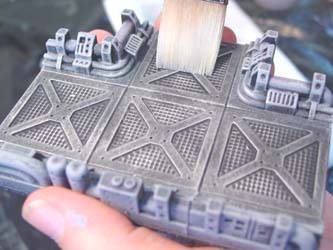
| 3. | Gently brush back and forth across the edges. For this painting style we only want to outline the edges of the equipment on the sides in gray so that all of the shapes show up. This is similar to outlining windows with Christmas lights. I wanted the edging to have a stark skeletal look. If you push too hard with the brush, you will turn the main part of the edging gray instead of simply outlining it. Try to avoid painting the floor as much as possible. If you get a little gray on the floor, it probably won't hurt because we'll be dry brushing the floor next. |
 |
|---|
| 4. | Continue brushing until it's as bright as you would like it. Once you are finished, set this piece next to you while you paint all the other pieces in the set. This original piece will be your guide as to how much paint to put on the remaining pieces. Try to match them to this piece and your whole set will be the same brightness. |
 |
|---|
Step 3 - Dry Brush Silver
| 1. | The last step will be to dry brush the floor with silver. For this job I'm using Games Workshop Mithril Silver. In my opinion, this is the best possible silver you can find for this job. Do not get the cheap silver craft paint at Wal-Mart! It will not do the job. I have also used the Vallejo silver which does a fairly good job but nothing compares to Games Workshop when it comes to the amount of metal flake in the paint. Be sure to take a paintbrush and stir the paint well before you use it. |
 |
|---|
| 2. | To prepare your workspace for this, tape a paper towel down to the table. I'm using a nice soft 3/4" wide brush for the dry brushing. Be sure that your paint brush is as dry as you can possibly make it. Dip your brush into the paint and paint off the excess silver onto the paper towel. Then move to a clean spot and wipe the excess off until almost nothing shows on the paper towel! |
 |
|---|
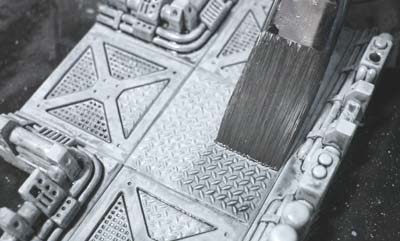
| 3. | Gently brush back and forth across the surface of the floor. Be very careful with the diamond plate tiles! These are very easy to get too much paint onto. If almost nothing shows up on the floor, then your brush is in the perfect state! Now you can jab the brush into the grate and "X" type of floor pieces. Continue brushing until it's as bright as you would like it. Once you are finished, set this piece next to you while you paint all the other pieces in the set. This original piece will be your guide as to how much paint to put on the remaining pieces. |
 |
|---|
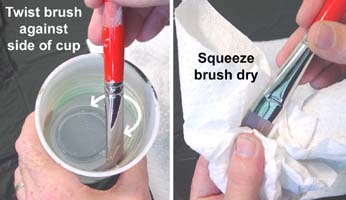
| 4. | Unfortunately you will need to clean your brush after you paint about 12-15 pieces. If you wait too long, your brush will continue to flare out until it becomes useless. To do this, put your brush in a cup of water and roll it along the side of the cup until the brush is clean. Afterward, you need to dry the brush completely. Take a paper towel and squeeze all the water out. |
 |
|---|
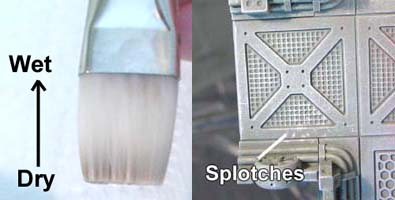
| 5. |
Here's what happens: You lightly dry brush on silver and everything is looking good. Then you jab the brush and splotch! Wet silver deep in the brush comes from nowhere to form a splotch on your grate. The only way to avoid this is to jab the brush on a paper towel first. Instead of jabbing it on your grate, jab it on the paper towel first and see what happens. If a splotch happens on the paper towel, then keep jabbing on the towel until it stops. Then resume lightly jabbing the brush onto the piece again. |
|---|
 I cannot stress enough that your brush needs to be dry. This is especially difficult just after you clean the brush. Continue to wipe and jab the brush on a paper towel even after you think it's dry.
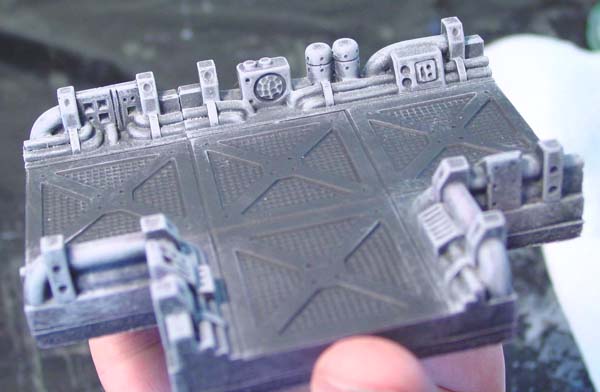
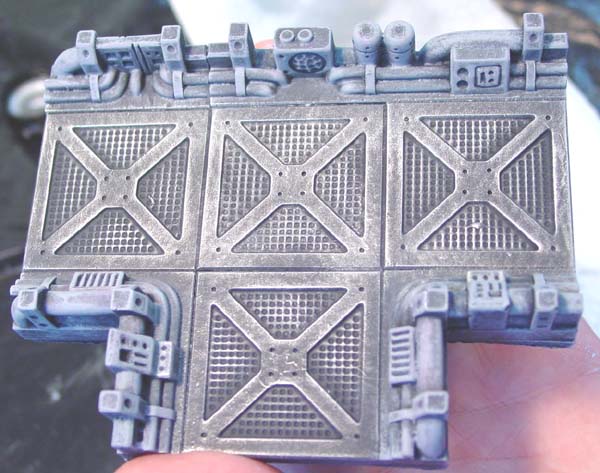
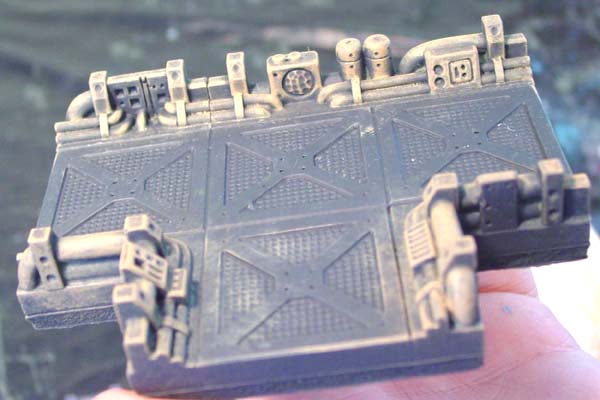
| 6. | This finishes your 3-step process for the space hulk sections. You may end up getting a little silver over onto the sides of the piece. Since the colors of the walls are gray, this really isn't much of a problem. A little silver crawling up the pipes on the edging will not look out of place but help blend the edge into the floor a little. Click on the photo for a larger image of this space hulk section example. |
 |
|---|
Alternate Colors
| 1. |
But this time instead of painting the walls medium gray, I'm going to use the earth tone medium that we used on the Earth Tone Painting Scheme. |
|---|
 For this alternate color scheme, we'll base coat the pieces solid black just like in the instructions above.
|
| 2. | To prepare your workspace for this, tape a paper towel down to the table. I'm using a nice soft 3/4" wide brush for the dry brushing. Be sure that your paint brush is as dry as you can possibly make it. Dip your brush into the paint and paint off the excess brown onto the paper towel. Then move to a clean spot and wipe the excess off until almost nothing shows on the paper towel! |
 |
|---|
| 3. | Gently brush back and forth across the edges. For this painting style we only want to outline the edges of the equipment on the sides in brown so that all of the shapes show up. I wanted the edging to have a stark skeletal look. If you push too hard with the brush, you will turn the main part of the edging brown instead of simply outlining it. Try to avoid painting the floor as much as possible. If you get a little brown on the floor, it probably won't hurt because we'll be dry brushing the floor next. |
 |
|---|
| 4. | Continue brushing until it's as bright as you would like it. Once you are finished, set this piece next to you while you paint all the other pieces in the set. This original piece will be your guide as to how much paint to put on the remaining pieces. Try to match them to this piece and your whole set will be the same brightness. |
 |
|---|
Dry Brushing Bronze-Gold
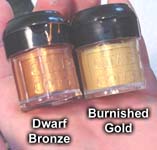
| 1. | The next step will be to dry brush the floor bronze-gold. For this job I'm using a mixture of Games Workshop Burnished Gold and Dwarf Bronze. In my opinion, Games Workshop brand is the best paint to use. I've tried the gold on its own but it's just too bright. The dwarf bronze on its own is just too coppery red. When I mixed the two, the color came out just right. Be sure to take a paintbrush and stir the paints well before you mix them. Pour equal parts of gold and bronze into a cup and mix them up well. |
 |
|---|
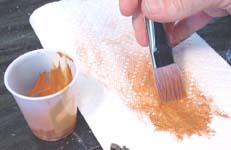
| 2. | To prepare your workspace for this, tape a paper towel down to the table. I'm using a nice soft 3/4" wide brush for the dry brushing. Be sure that your paint brush is as dry as you can possibly make it. Dip your brush into the paint and paint off the excess gold onto the paper towel. Then move to a clean spot and wipe the excess off until almost nothing shows on the paper towel! |
 |
|---|
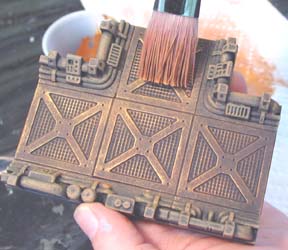
| 3. | Gently brush back and forth across the surface of the floor. Be very careful with the diamond plate tiles! These are very easy to get too much paint onto. If almost nothing shows up on the floor, then your brush is in the perfect state! Now you can jab the brush into the grate and "X" type of floor pieces. Continue brushing until it's as bright as you would like it. Once you are finished, set this piece next to you while you paint all the other pieces in the set. This original piece will be your guide as to how much paint to put on the remaining pieces. |
 |
|---|
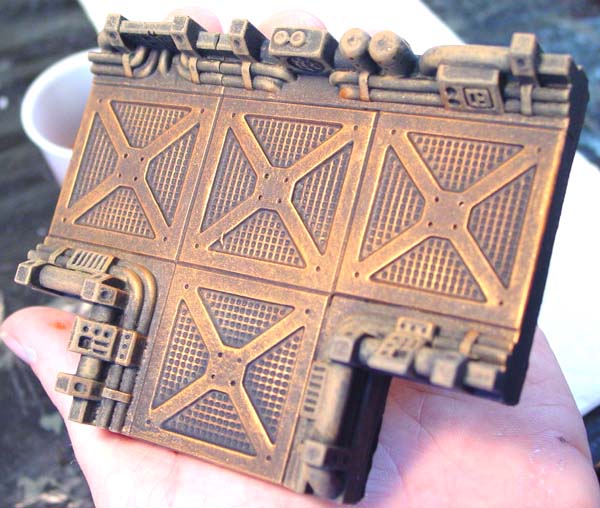
| 4. | This finishes your 3-step process for the space hulk sections. You may end up getting a little gold over onto the sides of the piece. Since the colors of the walls are brown, this really isn't much of a problem. Chances are a little gold crawling up the pipes on the edging will not look out of place but help blend the edge into the floor a little. Click on the photo for a larger image of this space hulk section example. |
 |
|---|
Easiest Method - Paint and Wash
Step 1 - Black Base Coat
| 1. |
|
|---|
 The first step will be to give the pieces a base coat of medium colored paint. In order to do this, you will need a few materials such as:
| 2. | This first color I'm trying is a medium gray latex house paint. This is the same color I used on the Castle Gray colors. You can make this shade of gray by mixing 1 part black paint to 2 parts white paint. Do not thin the paint with water! It's not critical that we get the paint into every detail since we'll be using an ink wash to soak into the cracks and details. A thicker paint will cover and hold up better. |
 |
|---|
| 3. | Put the glove on your left hand, hold the piece you want to paint over the cup and slop the paint on. Let the excess paint drip back into the cup. Cover the piece completely with paint and don't forget the sides and edges as well. It's not critical that paint goes into every small rivet hole because the ink wash will go into those places for us. |
 |
|---|
| 4. | Once the piece is completely coated, you will notice there will be pools of paint forming around the edges of the piece. We need to remove this excess paint from the piece. To do this, scrape the brush off onto the side of your paint container. Then jam the brush into the corners to remove the excess puddles of paint. Alternate scraping the brush and jabbing it in the corners until the excess paint is gone. |
 |
|---|
Test Your Paint Colors I strongly suggest that you try this method on a few test pieces before you paint the whole set. At the bottom of this article I show other colors that I have tried. Paint each test piece and try the shoe polish wash to see if you like the result. This method is the easiest, but you may not like how it turns out and the test will give you the chance to change colors or painting method before you paint the whole thing. In all I've tried about 12 different colors on various pieces to see which works the best. Some colors were just awful while others worked fairly well. |
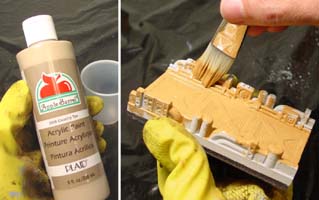
| 5. | I thought I would also try an alternate color just to see what would happen. Here I'm using Apple Barrel paint which is an inexpensive acrylic craft paint. This color is called country tan. Do not thin the paint. If the paint doesn't cover well, you might need to give it a second coat (after the first coat completely dries). I got mine to work with one coat but I had to be very careful not to accidentally wipe off the paint when applying the wash. |
 |
|---|
| 6. |
On my tests, I found that the spray paint did not melt the foam inside the foam core that I had mounted the pieces on, which surprised me because spray paint usually melts foam pretty easily. There are several down sides to spray paint though:
|
|---|
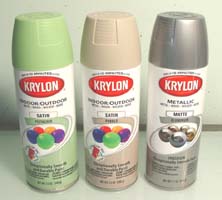 You can also experiment with various types of spray paint. Be sure that you get the matte or flat versions of them. Most hardware stores have a wide variety of colors to choose from.
Step 2 - Applying Shoe Polish Wash
| 1. |
I use some old measuring spoons to measure each part and mix them together in a cup. I suggest mixing a small amount to test on your piece to see if you like this method first. If you cannot find Future floor finish you can do without it but it helps the wash flow more nicely. |
|---|
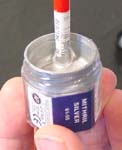
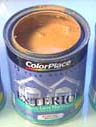
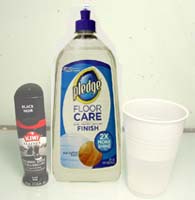 The wash is made of 3 ingredients:
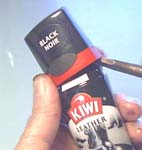
| 2. | The easiest way to get into the shoe polish bottle is to take a screwdriver and poke it up under the red rim of the top part. Carefully and slowly pry the lid up by twisting the screwdriver. You might do this over a trash can just in case things don't go smoothly and you end up spilling shoe polish. Pour the shoe polish into a plastic cup so that you can reach it with a paint brush easily. |
 |
|---|
| 3. | Holding your piece over the cup, drench the piece using the wash mixture. Make sure the wash goes into all the cracks and rivet holes on the piece. The excess that drips off the piece should go right back into the cup. If you find that this method is to your liking then you can use a much larger container to mix the wash in so it will be easier to hold the piece over it. Soak off the excess with a brush and scrape it back into the cup. |
 |
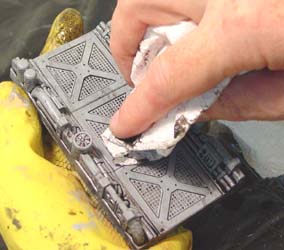
|---|
| 4. | Get a paper towel or soft rag and gently wipe over the floor surface. You must do this gently or you may rub off the paint on the floor or end up taking too much wash off with the rag. Also wipe off the tops of the pipes and equipment as well as a gentle swipe on each side of the piece. You don't want to take off too much wash but you do want the floor to be a little cleaner than the rest of the piece. If you take off too much you can always paint more back on and wipe it off again. Try to work quickly so that you do not give time for the wash to dry on the piece. If you get spots where the wash has dried, you can probably remove it with a damp rag. |
 |
|---|
| 5. | The diamond plate tiles will be a little more difficult. After you wipe over them, they will be very plain and not leave any wash on the surface at all. To make these tiles look better, you will need to apply more wash over these tiles alone and do not wipe it off. Don't load up the brush but instead dip it into the wash and scrape the excess out of the brush against the side of the cup. Then when you apply the wash to these tiles it should be just enough. The wash will run down to reveal the detail of the diamond plate tiles this way. |
 |
|---|
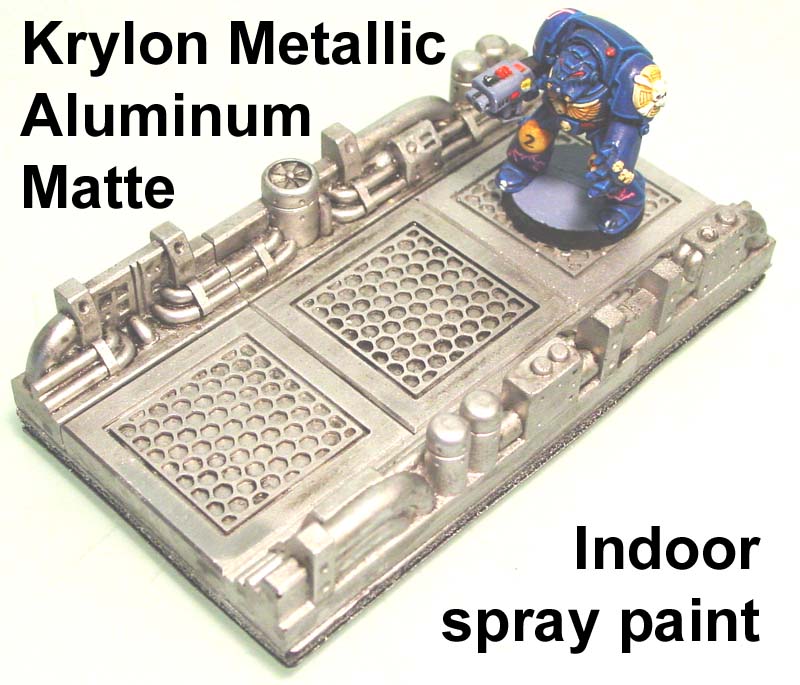
| 6. | Here are examples of different colors of paint as a base and my opinion of each of them. Click on the photo for a larger view of each. For this one I sprayed on Krylon metallic matte aluminum spray paint before the shoe polish wash. It says it's a matte finish but this stuff just screams "bright silver". I had hoped the wash would tone it down but it just didn't tone it down enough. The effect is like that of a new jet engine. |
 |
|---|
| 7. | For this one I sprayed on Krylon satin pebble spray paint. I had hoped for a look similar to the tans found in some of the star wars ships. I found the color to be a bit too much of a "flesh tone" rather than a leather or khaki look. For some reason (even though it did say satin finish), the shoe polish wash just didn't want to stick to the surface very well and wiped off a bit too clean. |
 |
|---|
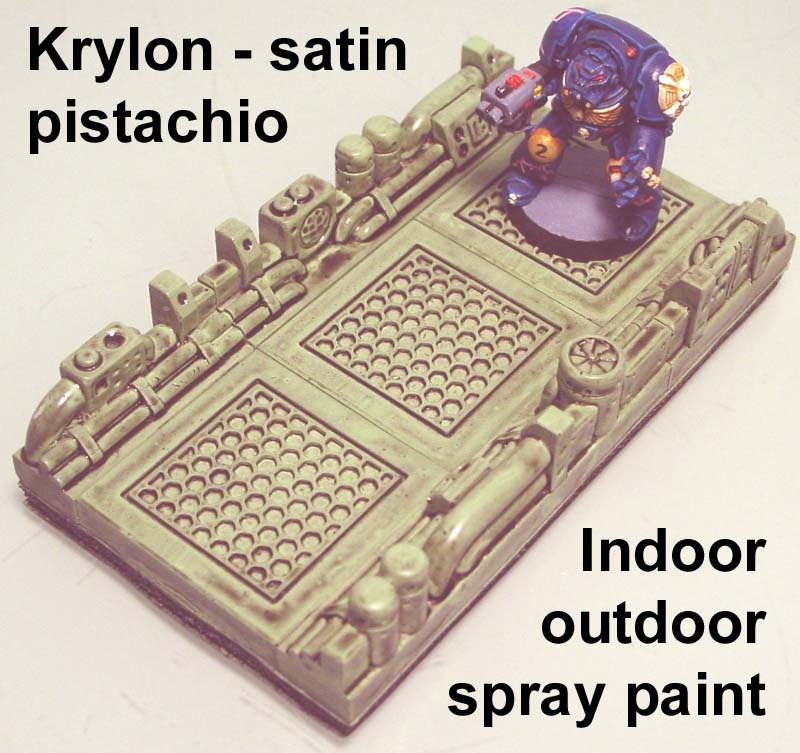
| 8. | The last spray paint I tried was Krylon satin pistachio. It probably worked the best of the spray paints for me. The color seemed a bit more of a "mint green" but the wash worked fairly well with it. I didn't want too dark of a green because I knew the wash would darken it further. It still doesn't quite remind me of an army green though. |
 |
|---|
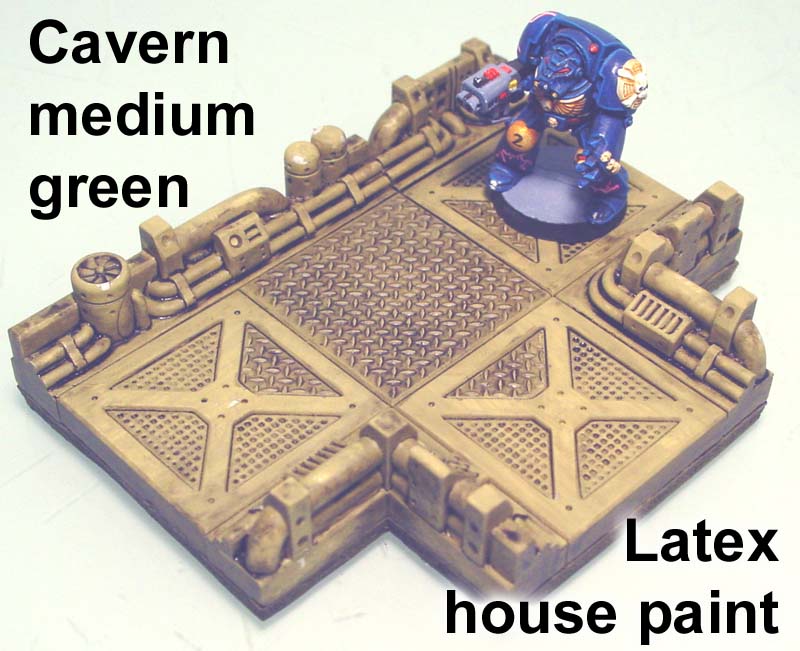
| 9. | I wanted to try greens that I already had first, so this is the medium khaki used with the "Descent" game board and the water caverns. The ink wash stuck to it pretty well but the color seemed just not quite green enough. There is a bit of tan to the color but it's probably better to go with either green or tan, not a mix of the two. |
 |
|---|
| 10. | Since I couldn't find a green that existed already, I just mixed up my own of what I considered to be an army green. I don't have the formula for this one but just try to mix a color similar to the "green army men" plastic toy figures. It was mixed using cheap acrylic craft paint. I thought this green worked out fairly well. When I first painted it on the color was a bit bright. After the wash, the color worked out fairly nicely. |
 |
|---|
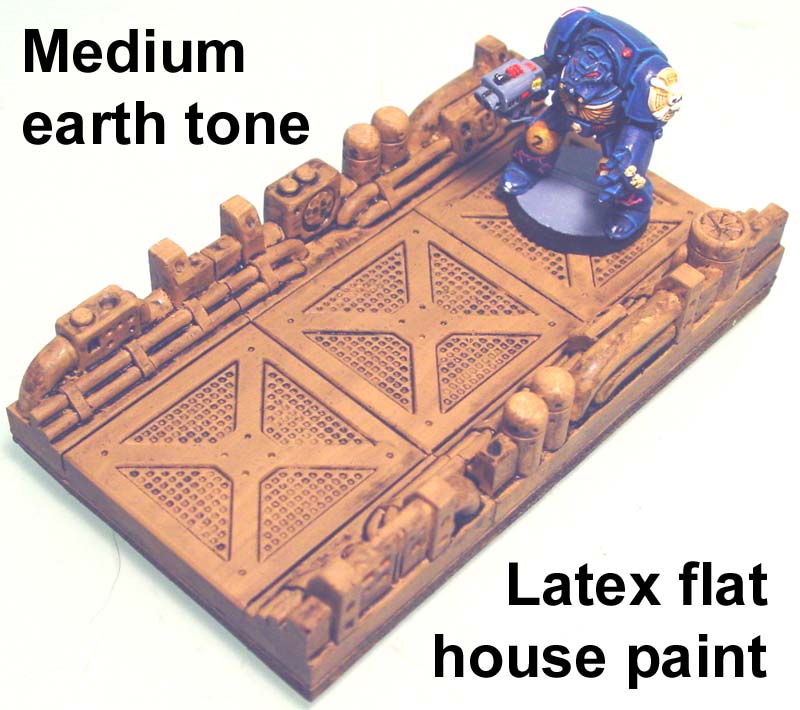
| 11. | I still wanted some colors that I had formulas for, so I tried the medium orange-brown from the earth tone painting instruction. This color worked out fairly well for a brown but I thought it was a bit too red and not quite tan enough. |
 |
|---|
| 12. | While looking for something good in the tan family, here is where I tried Apple Barrel "country tan" craft paint. This stuff is fairly cheap ($4.00 for an 8 oz bottle) and goes on well straight from the bottle. As far as tans go, I think I liked this one the best. It seemed to hold onto the wash well so it showed up the details better. |
 |
|---|
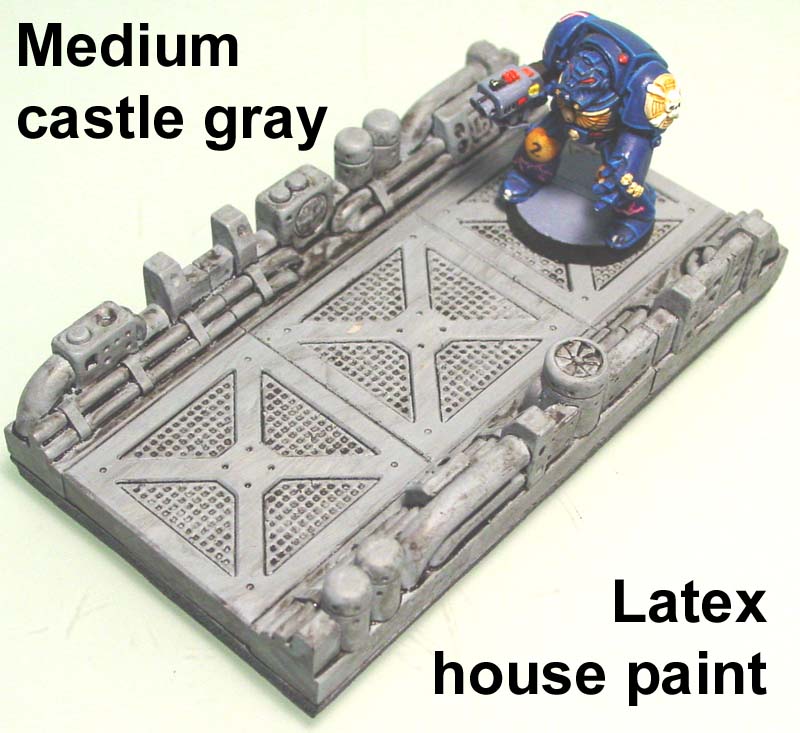
| 13. | Finally I tried the medium gray from the castle gray painting page. This color worked fairly well also - just the right medium shade so the piece wasn't too dark after the wash. However, the gray just didn't have the life that the other colors had. It just seemed a bit dull in comparison to the other interesting colors. |
 |
|---|
In conclusion, I thought this method would work for beginners or for those who have a really hard time with dry brushing. The method is pretty straight forward and takes less time than either of the other painting methods.
However, I personally prefer the previous dry brushing methods for getting the best results on your board game layout. If you spent the time and work required to make all the pieces for this game board, I feel it's kind of a shame to rush it at the end with a paint job that doesn't look quite as good.