Earth Tone Colors
|
Earth Tone Color Scheme
Earth Tone Painting InstructionsRecipe for Dirt Color Other Color Schemes
Recipe for Red Brick ColorRecipe for Desert Stone Color Painting Lava Tiles |
 Castle Gray Colors |
 Earth Tone Colors |
 Antiquing Method |
 Spray Painting |
 RAL Color System |
 Cavern Floors |
 Aging Techniques |
 Ship Corridors |
 Wood & Brick |
 Outdoor Areas |
 Game Pawns |
Please read through all of the instructions in order. Some of the tips in the first sections are not repeated in the latter ones, so reading through all of the instructions will help you pick up all of the tips. The demonstration videos for each segment will help you see exactly how the paint is applied to the model.
Earth Tone Color Scheme
| My color | RAL Classic | RAL Design System |
|---|---|---|
| Earth Tone Dark |
RAL# 8028 Terra brown | RAL# 060 30 10 |
| Earth Tone Medium |
RAL# 8001 Ochre brown | RAL# 070 60 30 |
| Earth Tone Light |
RAL# 1001 Beige | RAL# 080 80 05 |
|
Earth Tone Painting Instructions
Please read all of the instructions on Page 1 first. These previous instructions will give you specific details on how to dry brush your model and many other useful tips that will not be repeated in this section. |
| 1. |
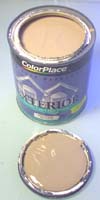
If you would like me to send you a sample chip of each color, mail me a self-addressed stamped envelope or send me an e-mail when you place an order. Any place that sells paint can mix up a quart the exact color to match the samples. |
|---|
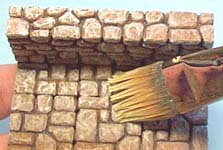
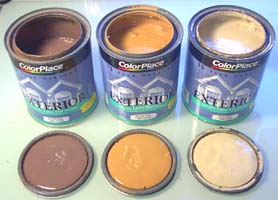 The paint colors for the earth tone color scheme are dark brown, medium orange-brown, and light cream.
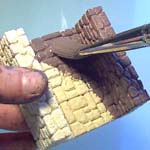
| 2. | The first color is a dark brown. You'll need to thin the brown with water before you can paint with it. You'll want to add 1 part water to 2 parts paint. Mix it well and slop it on with a 1" wide brush. Be sure it runs into all the cracks (and there's a lot of them with these blocks). Use the same process shown in the Painting the dark gray base coat section on page 1. |
 |
|---|
| 3. | The second color is the medium orange-brown. You'll want to add 1 part water to 3 parts paint. Dip the brush in the paint, wipe a good amount off on a rag and brush over the surface using a medium heavy pressure. The brush won't reach into the deep cracks which will remain dark brown. Use the same process shown in the Painting the medium gray coat section on page 1. |
 |
|---|
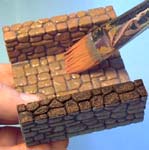
| 4. | The last color is a cream color. Dip your brush into the paint, then wipe most of it off on a paper towel, then lightly brush over the stone. Don't try and rush this last step! More brush strokes with very little paint in the brush looks much better than a few brush strokes with lots of paint. Use the same process shown in the Painting the final highlight coat section on page 1. |
 |
|---|
Recipe for Dirt Color
| 1. |
If you would like me to send you a sample chip of it, mail me a self-addressed stamped envelope or send me an e-mail when you place an order. Any place that sells paint can mix up a quart the exact color to match the samples. |
|---|
 Whenever you need to paint the color of dirt on your gaming terrain, here's a recipe that I use.
| My color | RAL Classic | RAL Design System |
|---|---|---|
| Dirt |
RAL# 1019 Grey beige | RAL# 075 60 20 |
|
Recipe for Red Brick Color
| 1. |
If you would like me to send you sample chips of the three colors, mail me a self-addressed stamped envelope or send me an e-mail when you place an order. Any place that sells paint can mix up quarts the exact color to match the samples. |
|---|
 Painting red brick onto a surface is exactly like painting the castle gray colors on the
 | My color | RAL Classic | RAL Design System |
|---|---|---|
| Red Brick Dark |
RAL# 8019 Grey brown | RAL# 360 30 05 |
| Red Brick Medium |
RAL# 8012 Red brown | RAL# 030 40 30 |
| Red Brick Light |
RAL# 3015 Light pink | RAL# 040 70 20 |
|
Recipe for Desert Stone Color
| 1. |
If you would like me to send you sample chips of the three colors, mail me a self-addressed stamped envelope or send me an e-mail when you place an order. Any place that sells paint can mix up quarts the exact color to match the samples. |
|---|
 Painting desert stone colored paint onto a surface is exactly like painting the castle gray colors on the
 | My color | RAL Classic | RAL Design System |
|---|---|---|
| Water Cavern Medium |
RAL# 1020 Olive yellow | RAL# 085 60 30 |
| Sand |
RAL# 1002 Sand yellow | RAL# 080 80 30 |
|
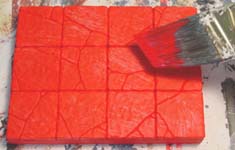
Painting Lava Tiles
Please read all of the instructions on Page 1 first. These previous instructions will give you specific details on how to dry brush your model and many other useful tips that will not be repeated in this section. |
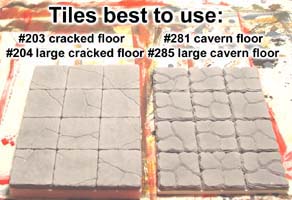
| 1. | The best kind of tiles to use for molten lava type of painting are molds 203, 204, 281 and 285. The reason these work better than other tiles is because they have large cracks. Tiles with thin cracks will not give enough room to let the red paint show through. Other tiles or blocks may be suitable for this method but you'll have to experiment to see how they work. |
 |
|---|
| 2. | Start by painting the whole thing completely white. If you are using white plaster, you may not have to do this. Start by thinning the paint a little. If you're using house paint, add about 1 part water to 4 parts paint. If you're using tube paints, you will have to thin it a little more. Slop the paint on and scrape it across the edges of the tiles so it will flow into the cracks. The surface of the tiles may not be covered well, but that doesn't matter. |
 |
|---|
| 3. | Let it dry completely. The next step is to paint it completely red. Most red paints are transparent and will not show up brightly unless you have white underneath Once again, thin the paint and slop it on making sure that it goes down into the cracks well. Let it dry completely before moving on. |
 |
|---|
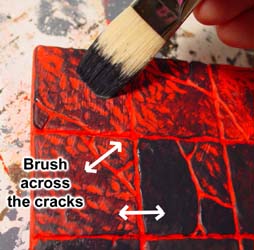
| 4. | Next take black paint and gently dry-brush it across the surface. The paint should be about the thickness of regular house paint. To begin with, put very little paint on your brush (wipe out the excess on a paper towel) and gently brush across the surface of the tiles. Be sure to brush across the cracks and not in the same direction as the cracks. Brushing across the cracks will leave them open and clean so the red will show through clearly. As you dry-brush, you will notice that the surface of the tiles will not fill in. That's OK for now. Just dry-brush until all of the cracks are outlined in black. |
 |
|---|
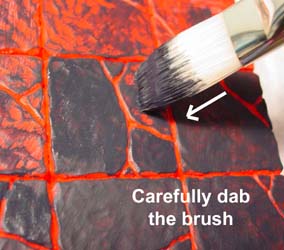
| 5. | Once the cracks are outlined in black, load up your brush with black paint and carefully dab the brush onto the surface of the tiles to fill in the top surfaces with solid black. You'll have to take your time on this. Filling in the flat surface with black is not easy. You want to be careful not to get any of the black paint down into the cracks. When you are finished, you may not be happy with how the black came out. Some of the black may be rough around the edges. Don't worry because the last step will clean up the edges for you somewhat. |
 |
|---|
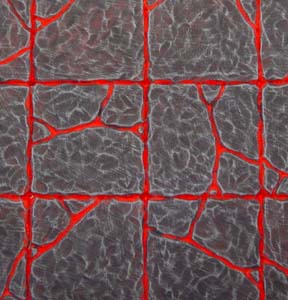
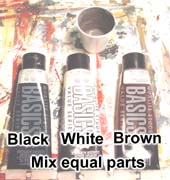
| 6. |
The gray I use is made using equal parts of Black, White and Brown tube paints. Be sure to thin it to the consistency of house paint. Most grays have a lot of blue in them. The blue color makes the tiles look too cool for my taste. After I added brown, it warmed the gray up enough to look like it belonged on a lava tile. Wipe almost all of the paint out of the brush when you dry-brush the surface. All you want to do is to gently pick up the details on the flat surfaces of the tiles. |
 |
|---|
 The final step is to dry-brush gray onto the top surface.