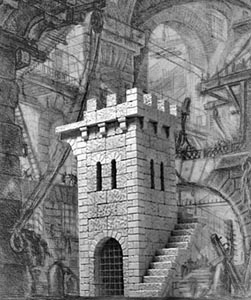
The Prison TowerI've inserted a photo of the tower into an etching by Giovanni Piranesi. His etchings have been my inspiration for this series of Roman molds I'm working on. This etching is from a series called "Imaginary Prisons". If you would like to see more of his etchings, there are several books available (my favorite is "Piranesi-The Complete Etchings" ISBN#3-8228-6620-2). |
|
Building Instructions
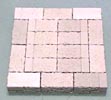
Mold #60 contains all of the blocks needed to build this tower. To make this model, you will need to fill the mold 13 times.
Be sure the blocks are completely dry before gluing them together. For detailed instructions on pouring the blocks, see the Casting Instructions Page.
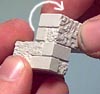
| 1. | You can download the plans shown here from the Building Plans page. I'm using a special type of casting material for this tower called "dental plaster". To find out more about it, check out the Casting Instructions page. It has a greenish cast to it. The prison tower mold has special blocks with a brick design on one corner. These are specially made to put an alternating brick pattern on the corners of the tower. If you stack the blocks so the smooth flat bottoms are down, the corner pattern won't work. Flip the top block upside-down and the pattern will work. As a rule, when you want the pattern to line up, just position the block so the pattern is on the outside corner and it will work out correctly every time. |
 |
|---|---|---|
 | ||
 |
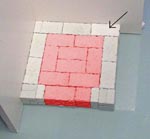
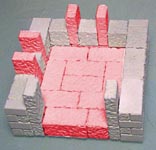
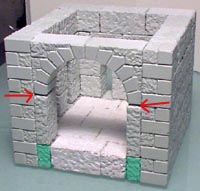
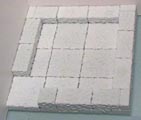
| 2. | Here's the first layer of blocks laid out. Don't glue the blocks shown in red! Put them there to help you keep the floor square. The block with the arrow pointing to it is upside-down so the brick pattern will fall correctly on the outside corners. I'm using a form to help me line the bottom up square. To see how to build a form, check out the Tips & Tricks 6 page. |
 |
|---|
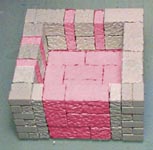
| 3. | Here's row 2 and 3. Do not glue the blocks in red! They hold the place for the doorway and windows. |
 |
 |
|---|
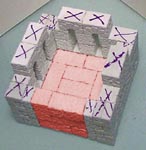
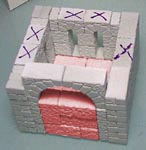
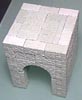
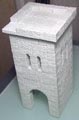
| 4. | Cap over the windows with the small arch blocks. Glue down the other block shown and mark the tops with a marker. Do not glue the next row down! We want this tower to come apart in sections and this is the dividing line. The marker lines will remind you not to put glue there. |
 |
|---|
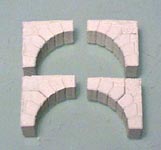
| 5. | You want to pre-assemble the large arches and let them dry. Finish out row 4 but do not glue to the blocks that are marked. Go ahead and glue the new blocks to each other though. This will form the next section that will lift off. |
 |
 |
|---|
| 6. |
At this point I discovered a problem. It appears that the arch pieces are too short and leave a gap under them. After some thorough searching I discovered what the problem was. It also happened to me on the Wizard's Tower's arrow slits. When you scrape off the blocks (while casting), they end up a little taller than they should. All of my original blocks measure exact within 1/1000th of an inch. But depending on how hard you scrape off the mold, their height can change. Usually you don't notice it because you build with the flat side of the block down. Since all of the blocks are too high by the same amount, they line up straight. But when you turn a flat block on its side, it doesn't have the height increase and appears short. To remedy this, you might sand down one of the longer flat blocks to fit (where the green ones are). Make them a little taller to fill the gap. For this model, I cut a piece of thick card stock and glued it in the gap later on. |
|---|
 Finish gluing row 5 but do not glue the blocks down to the marked area.
| 7. | If you made a form, occasionally push the tower up against it to keep it straight. To see how to make a form, check out the "Tips & Tricks 6" page. The next photo shows row 6 completed and glued down. |
 |
 |
|---|
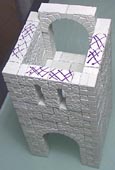
| 8. | Assemble the floor (row 7). The inside of the floor uses the decorative corner blocks. I used these blocks for the floor because you will have extra decorative blocks. Let it dry completely then glue it on top. |
 |
 |
|---|
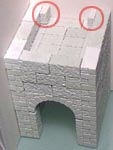
| 9. | Continue building up rows 8, 9 and 10. Once again, do not glue the blocks in red. To help with the door height problem, make the blocks circled in red a little taller by sanding down a long floor tile. |
 |
 |
 |
|---|
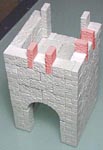
| 10. | Cap over the windows with the small arch blocks. Glue down the other blocks shown on the left and mark the tops with a marker. Do not glue the next row down! We want this tower to come apart in sections and this is the dividing line. The marker lines will remind you not to put glue there. |
 |
 |
|---|
| 11. | You want to pre-assemble the large arches and let them dry. Finish out row 11 but do not glue to the blocks that are marked. Go ahead and glue the new blocks to each other though. This will form the next section that will lift off. Go ahead and glue on rows 12 and 13. You're now ready for the roof. |
 |
|---|
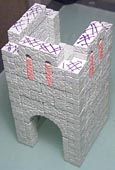
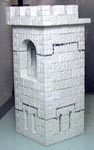
| 12. | You want to pre-assemble the roof section and let it dry completely. Place it on the tower as shown. The edges should extend over each side by 1/4". |
 |
 |
|---|
| 13. | At this point, the tower should come apart in 3 sections. Take a marker and mark the separation between each section. Doing this lets you see at a glance where the tower comes apart. This becomes really helpful when we glue the stairs on. We want the stairs (that will wrap around the outside) to separate with each section of the tower. |
 |
|---|
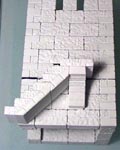
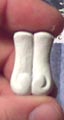
| 14. | The first stair section will need to have the bottom point sanded off (circled in red). Once you do that, assemble this first set of stairs on a flat surface. You will need a large arch to support the flat square floor tile. |
 |
|---|
| 15. | Important! As you glue stair sections onto the side of the tower, always be sure to line up the stairs with the block pattern of the tower. The stairs will span the distance perfectly if you line them up to the wall blocks as you glue them down. |
|---|
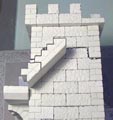
| 16. | Lay the tower on its left side. Glue this step section onto the lower half only! Add another section (shown in red) and glue it to the middle half only. Do not glue the stair sections to each other! The top stair hangs over the edge by 1/4". |
 |
 |
|---|
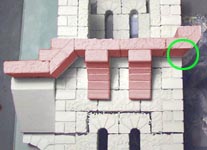
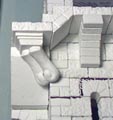
| 17. | Lay the tower on a book so the bottom stair can hang over as you rotate the tower. Glue the pieces under the doorway as shown. Sand the sharp corner off the piece circled in green. You may have to support the flat floor tile on the left while it dries (or hold it there until it dries). |
 |
|---|
| 18. | Glue the two decorative braces together as shown. Using the photo as a guide, assemble the complete bracework to support the corner floor tile. |
 |
 |
|---|
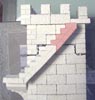
| 19. | Let the glue dry and rotate the tower again. You will need to support the backside of the tower with blocks so it will lay flat. Glue the stair section shown to the middle section. Leave a gap for the 1" floor tile that goes in the corner. |
 |
|---|
| 20. | Add another section (shown in red) and glue it to the top half only. Do not glue the stair sections to each other! The top step of this section should rest against the bottom of the roof that overhangs. |
 |
|---|
| 21. | Finish the top of the stairs by adding the support arch and flat floor tile. You will have to trim the top tile (shown in red). It should measure 1" x 3/4". This is because the roof extends 1/4" onto the stairs. |
 |
|---|
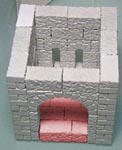
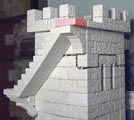
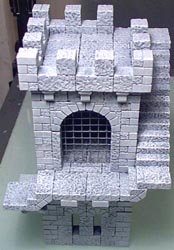
| 22. | Here's the completed tower. The second photo shows its separate sections already painted. For information on painting the tower, refer to the Painting Instructions page. |
 |
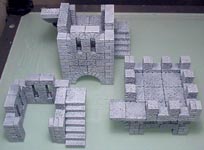 |
|---|
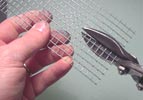
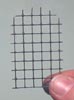
| 23. | For the prison gates, I'm using 1/4" grid hardware cloth. You can find it at any hardware store (used for animal cages and such). Trim it down to fit inside the doorway. You'll need wire cutters or tin snips for this. |
 |
 |
|---|
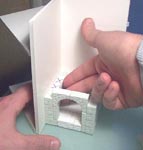
| 24. | Trim the bottom of the gate as flat as you can. I painted the gate the same medium gray that was used to paint the tower. To get the gate to stand up, cut a strip of thin stiff clear plastic about 1/2" wide x 1" long. The plastic I used was from the tab of a file folder. Glue the gate down to the strip of plastic with super glue (make sure it's standing up straight). When dry, you can position the gate where you want and it will stand up on its own. The plastic is nearly invisible. |
 |
|---|
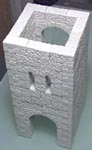
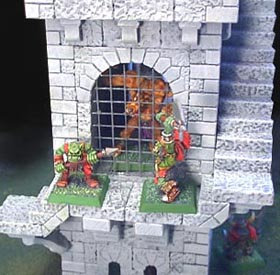 |
Here's a close up of the backside of the tower. The 1" ledge is wide enough to set most miniatures. These miniatures shown here are Warhammer(TM) miniatures. The small arch (1/4 wide opening) and the large arch (1 1/2" wide opening) are new sizes and don't appear in any other mold as yet. The rounded arches are very useful. Form a circle with four arches, lay them on their side and you have a round pit in the floor. I eventually plan to have various sizes of round towers that will match up with these arches to form vaulted ceilings or deep round pits. |