Tips & Tricks 17
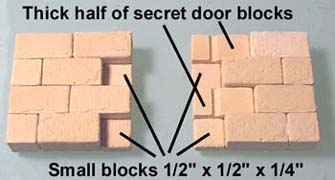
Making A Secret Door Using Mold #96
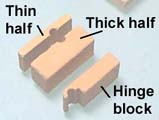
| 1. | The hinge of the secret door is made from the 3 blocks shown here. The thin and thick halves go together to make a block with an 1/8" hole in it. The hinge block is delicate so you will need to cast it out of dental plaster or plastic if you want it to hold up to much use. |
 |
 |
|---|
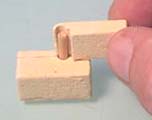
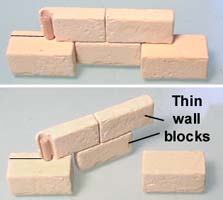
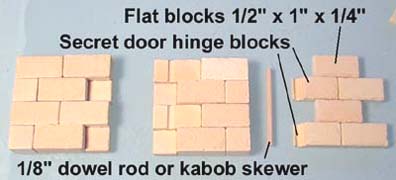
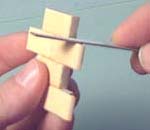
| 2. | You will need an 1/8" diameter dowel or kabob skewer for the hinge pin. If the dowel is the wrong diameter the door will not hinge correctly. Now let's add a few blocks to the hinge. The rest of the door will be made from thin wall blocks. The top photo shows the door in the closed position and the bottom photo shows the door in the open position. Please notice that the door is glued onto the dowel, but the dowel is not glued into the hole. If you glue the dowel into the hole, then the hinge pin cannot turn. |
 |
|---|
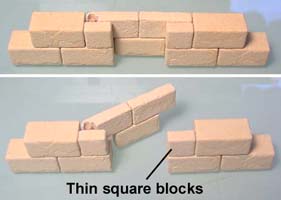
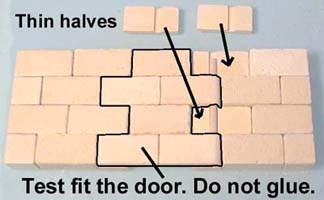
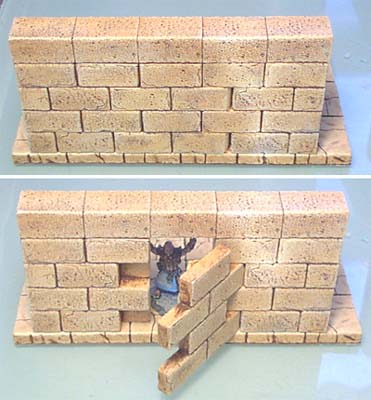
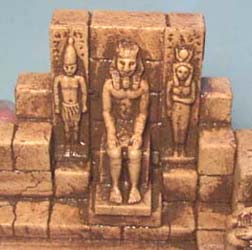
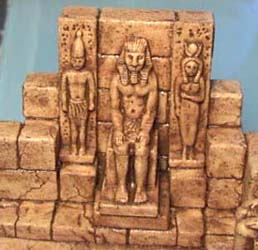
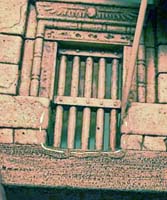
| 3. | Add a few more blocks to the door and you can see how it fits into a wall section. You will need to add a few thin square blocks to finish the job. The next part of this article shows how to make a secret door into a wall section. Notice the door is recessed on the front so you can put a statue or decoration there. |
 |
|---|
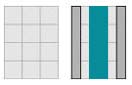
| 4. | For this test wall section you are looking at the back side of the wall. Stack up regular blocks on each side and glue them together as shown. Leave a 1" gap between the walls (which is where the door will go). |
 |
|---|
| 5. | The door (shown on the far right) is made up of hinge blocks and flat blocks. You will also need an 1/8" dowel or kabob skewer 2" long (or slightly shorter) for the hinge pin. |
 |
|---|
| 6. |
You will need to file or sand the edges down so it fits very loosely. I cannot stress this point enough! This wall section will have a coat of varnish (or paint) on it that will add thickness to the blocks. What begins as a nice fit will bind severely when you add a coat of varnish and stain. |
 |
|---|
 Once the door is completely dry, put the hinge pin in and fit it into the wall.
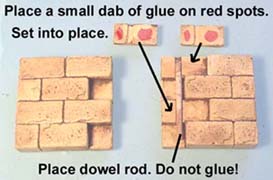
| 7. | Paint the pieces before you glue them! These pieces took a coat of varnish and some gel stain (colonial oak) to become the color you now see. Visit the Painting Instructions page for more details. Place the dowel rod in the groove and glue the thin halves of the hole blocks on top. Do not use excessive glue! The wooden dowel must turn freely after these blocks are glued on. |
 |
|---|
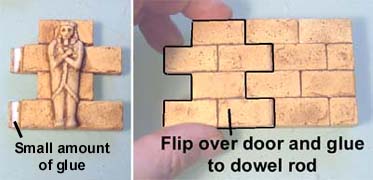
| 8. | Now you can glue the door onto the hinge pin. Be sure to use very little glue or it might squeeze out and glue the whole thing shut. |
 |
|---|
| 9. | 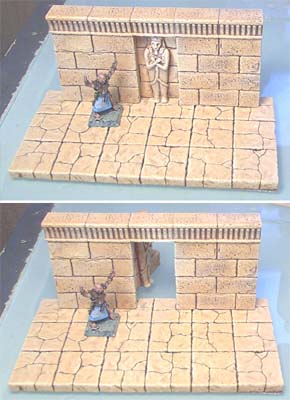 |
 |
|---|---|---|
Here is the wall capped off with decorative stones and placed on floor tiles. I have added the coffin lid as a decoration. As you look at the back of the wall, you can see that the secret door is fairly well hidden. You can make a secret door any size you like, or even place it flat on the floor for a trap door that opens upward. | ||
Using Cotton Swabs For Antiquing
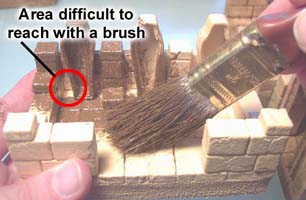
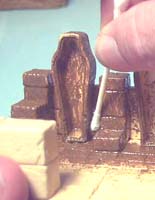
| 1. | When applying stain to a room using the antiquing method, sometimes it's difficult to get the brush into the cracks. For these tight areas a cotton swab works very well. Just load one up with stain and work it around into the deep areas of the room. |
 |
 |
|---|
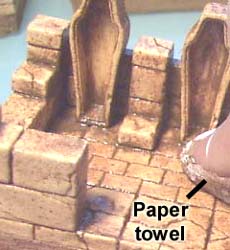
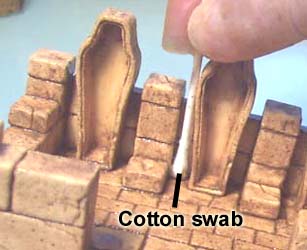
| 2. | When wiping off the stain, a paper towel cannot get into the cracks. Use a clean cotton swab to remove the excess stain. Notice the difference inside and between the coffins before and after the swab was used. |
 |
 |
|---|
| 3. | The cotton swab is also useful for statue details. A paper towel cannot get into the deep recesses around the statues. The second photo is after using a cotton swab. It can get into the smallest details and bring out all of the shapes of the statue. |
 |
 |
|---|
Planning Dungeon Waterways
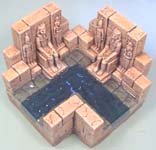
| 1. | Laying out new waterway tiles is very simple. Just take a regular hallway section as shown in the Basic Tomb Pieces and remove the center tiles. I chose this style for a number of reasons:
|
 |
|---|
| 2. | Here you can see the statues and doorway sides setting on the edge. Imagine what it would look like if the bottom of the waterway had no edges. The statues would look like they're floating in the water. For instructions on making these waterway sections, go to the Detailed Tombs page. |
 |
 |
|---|
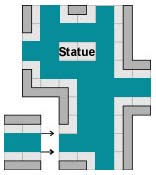
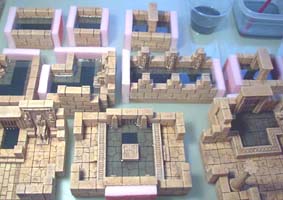
| 3. | The standard waterway width should be no less than 3 squares wide. The walls will cover half of the tiles on the outside edge and leave the other half sticking out into the waterway as a shelf. The center tiles are removed afterward. |
 |
|---|
| 4. |
As long as you leave 1 full square in the center and cover the outside squares on each side halfway with walls, any of your waterway pieces should fit together regardless of what arrangement you put them in. |
 |
|---|
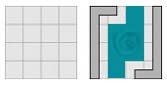 This example shows a piece 4 squares wide. The opening on each end should have one square in the center and the squares on each side should be halfway covered to fit in with the other waterway sections.
Pouring And Texturing Water
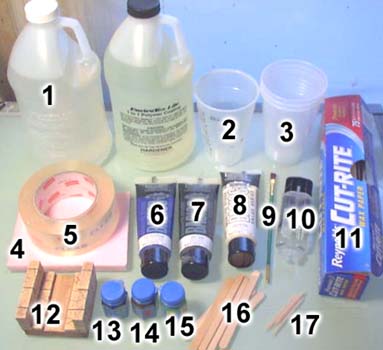
| 1. | This article shows how to create textured water for the Egyptian waterways. For instructions on building these pieces, please look at the Advanced Egyptian Tombs page. The items needed are shown in detail below: |
|---|
| 2. |
|
 |
|---|
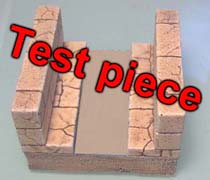
| 3. | Make a few test pieces! I can't stress this enough. Make at least two sections so you can test the color of the water you will be pouring into it. I guarantee that you will not get the water color right the first time! It will take at least two times of mixing before you come close to a color that works. These test pieces also give you a chance to practice the texture on top of the water using epoxy and get used to the time it takes for epoxy to set up. For instructions on making these waterway sections, go to the Detailed Tombs page. |
 |
|---|
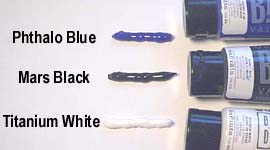
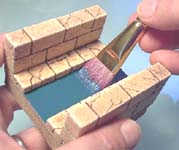
| 4. | Mix equal parts of the 3 colors of paint. Use this to paint the bottom strips of the waterway pieces. You may have to thin the paint with a little water to get it to spread evenly. Try to not get paint on the sides of the stones. |
 |
 |
|---|
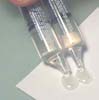
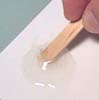
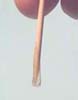
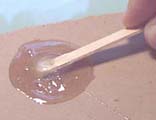
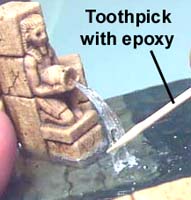
| 5. | Squeeze a small amount of 5 minute epoxy on a scrap of paper. Use a wooden craft stick to stir the two parts together completely. Once mixed, use a toothpick to pick up the epoxy. |
 |
 |
 |
|---|
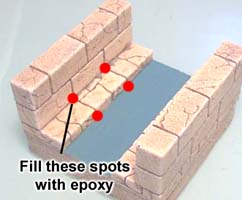
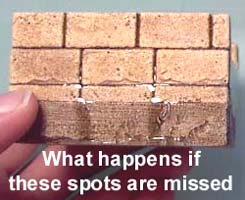
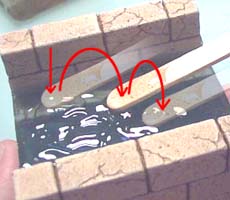
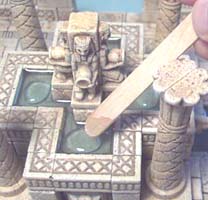
| 6. | Drip the epoxy into the spots shown here. This will ensure that the resin we pour into the section will not seep between the blocks. The second photo shows where resin has leaked through the wall. This is what will happen if you do not seal up these spots. |
 |
 |
|---|
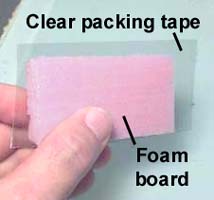
| 7. | Cut several pieces of foam board large enough to cover one end of your waterway pieces. Stick a piece of clear packing tape on top of it. Place this on the end of a waterway piece with the taped side facing the waterway piece. Push this group against something heavy to hold it in place (since the sticky side of the tape is stuck to the foam board). |
 |
 |
|---|
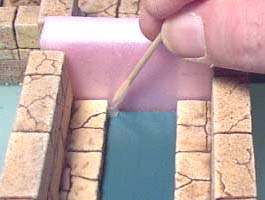
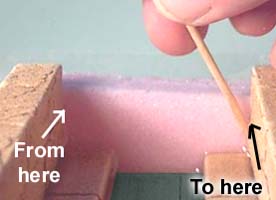
| 8. | Drip the epoxy to fill the crack where the foam meets the waterway piece. Be liberal with the epoxy. Fill the crack up to 1 block high on each side of the wall. |
 |
 |
|---|
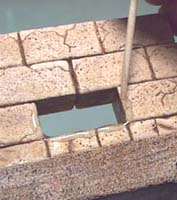
| 9. | There are a few dungeon pieces where it's difficult to drip epoxy where it meets the foam board. These photos are two examples. In these cases, place a bead of epoxy around the outside of the opening, then place the foam board against it to dry. |
 |
 |
|---|
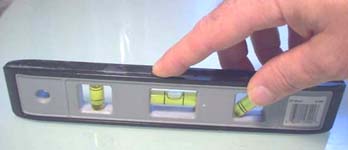
| 10. | Make sure that the table surface is level before you continue. If the table is not level, then your water will fill the section at an angle and look very odd. |
 |
|---|
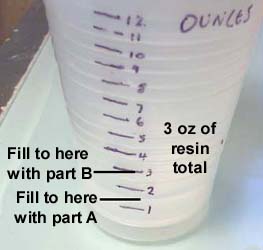
| 11. | We'll mix up 3 ounces of Envirotex Lite resin to fill this test section. For future reference, you need 1/2 ounce of resin for every square inch of water you want to fill. Place a clean cup inside your reusable measuring cup and pour 1.5 oz of part A and 1.5 oz of part B into it. |
 |
 |
|---|
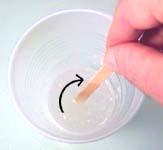
| 12. | Mix the two parts completely. Scrape the sides of the cup and mix it for about 2 minutes. You will notice that a lot of air will be mixed in during this time. Don't worry about the air bubbles. This product cures so slowly that all of the air will be removed while it sets up. |
 |
|---|
| 13. | Now we want to tint the resin by adding ink wash to it. I'm using blue, green and brown ink wash from Games Workshop. For 3 ounces of resin, add one drop of green ink wash, one drop of blue ink wash and 1/2 drop of brown ink wash. This recipe is a bit too much color, but it will give you a starting point. The easiest way to get a drop is to dip a paintbrush handle into the bottle, quickly remove it and hold it over the resin cup. Stir the resin and mix the color in completely. |
 |
|---|
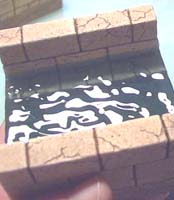
| 14. | Place your waterway section on a piece of wax paper. Pour the tinted resin into the waterway. For instructions on building these, see the Detailed Tombs page. It's up to you how deep you want to make it, but I would not go higher than where you sealed it with epoxy on the ends. I covered the floor tiles and came halfway up the first block on the side walls (actually, for the test you see here I accidentally filled it a little too full). You will notice that the resin looks fairly opaque and foamy because of all the air mixed into it. These air bubbles will disappear in a couple of hours. |
 |
|---|
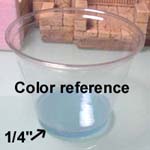
| 15. | Pour 1/4" of the leftover resin into a clear plastic cup. This will be used as a color reference for later on. It's very difficult to mix and match the color of resin, because the color changes depending on how thick of a layer you pour. When you mix a new batch of resin, you will add color to it, pour 1/4" into a new cup and compare it with this color reference cup. |
 |
|---|
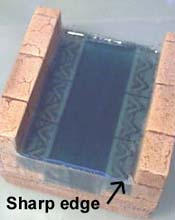
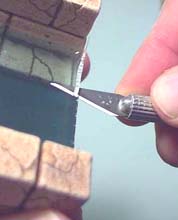
| 16. | Let the resin set overnight before you handle the piece. Pop off the foam ends and you will see the resin exposed. This method works because resin and epoxy do not stick to the slick plastic side of the tape. You will also notice the resin will creep up on the sides making a sharp edge where the sections will meet. To fix this, use a hobby knife and carve off the excess. Use a sharp knife and be extremely careful that you do not cut yourself. |
 |
 |
|---|
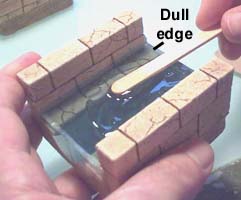
| 17. |
Stir it slowly and try not to work any excess air into the glue. Spread the glue on top of the piece. The edge where you trimmed the resin will be dull (not shiny), so be sure to spread it over these edges. The epoxy will give it a glossy coating again. |
 |
|---|
 Mix up a larger amount of epoxy. We want enough to put a thin coating over the whole top of the piece.
| 18. | After you spread it, hold the wooden stick at a shallow angle and dab it into the epoxy in a random pattern. After you dab, you will notice that the epoxy will smooth itself out again. Continue to dab occasionally until the epoxy starts to leave a trail of fine strings (about 3 minutes). |
 |
 |
|---|
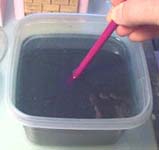
| 19. | Once you are pleased with the test results, it's time to pour the water for the rest of the waterways. Glue the foam board pieces on all the open ends of the waterway. Then mix up enough resin to fill the rooms (refer to step 11 above). Add small amounts of ink wash, mix it up and pour a little into a clear cup to compare it with the original test color (photo below). If it's not dark enough, pour it back into the batch, remix and try it again until you get the color you want. |
 |
|---|
| 20. |
I thought the test piece wasn't as green or muted as it should be. For the new batch I added more green and brown ink wash. The cup on the right is the new color which I like much better. |
|---|
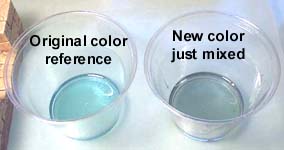 Here's where I compared my new color to the test color. The cup on the left was from the test piece. The cup on the right is the color we're mixing up now.
| 21. | Put down wax paper on the table surface in case a few of them leak (and a few will). Pour the resin into the waterway sections. Try to fill the pieces all up to the same level so they will look good butted next to each other. Leave them to set up overnight. The next day, mix up epoxy and texture the tops as you have on the test piece. Your waterway is now finished. For instructions on building these pieces, please look at the Advanced Egyptian Tombs page. |
 |
|---|
Making Water For Fountains
| 1. | This article will show you how to add water to the fountains. For instructions on building the fountains, please look at the Detailed Egyptian Tombs page.
Add a large bead of it to each of the fountain pools. Do not do more than 4 small pools at a time. The epoxy sets up fast and you need time to spread and texture it. |
 |
|---|
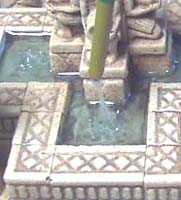
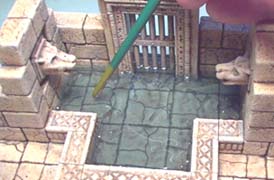
| 2. | Use a small paintbrush handle to spread the epoxy around to the edges of each pool. By this time, the epoxy should be starting to thicken up. Find where you think the stream of pouring water should be hitting the pool below and add texture to that spot. To texture it, dab the paintbrush handle into the epoxy and pull it repeatedly. Continue this on all the pools until the epoxy starts to string. Do this as long as you can (but not so long that the epoxy glues your paint brush handle to it.) |
 |
|---|
| 3. | Pour larger pools one at a time. Pour enough epoxy to cover the bottom of the pool with a thin layer. Find the spot where the stream of water would hit the bottom of the pool and use a paintbrush handle to work circular ripples away from that spot. When the epoxy is starting to set up, then dab the paintbrush handle into the epoxy and pull it repeatedly at the spot where water would splash down. |
 |
|---|
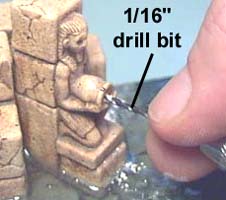
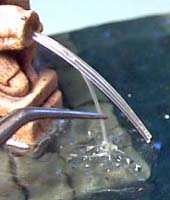
| 4. | Once the epoxy is completely hardened, you need to drill a small hole to insert fishing line into the pouring statue. I used a 1/16" drill bit, which is large enough to fit 4 strands of .023" diameter fishing line into. You can simply hold the drill bit and spin it with your fingers. If you have a pin vise, it will hold the drill bit for you and be easier to use. The lion and ram statue heads do not need a hole drilled. |
 |
 |
|---|
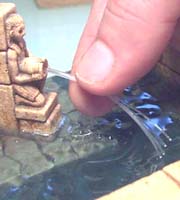
| 5. | Place a large drop of super glue (cyanoacrylate) on the end of the strands and insert them into the hole. Carefully trim the fishing line so it makes a gentle arc down and touches the water. I found that it looks better if you have to pull the fishing line down slightly to glue it to the water. Tweezers are a big help here. Use a drop of super glue to attach the lines to the center of the water (spread them out a little). |
 |
 |
|---|
| 6. | Once the fishing line is secure, mix up a small amount of 5 minute epoxy and spread it over the fishing line. This will help the fishing line look more like pouring water. Also put a little around the bottom where the fishing line touches the water. This will help secure the fishing line down better. For instructions on building these fountains, please look at the Detailed Egyptian Tombs page. |
 |
|---|
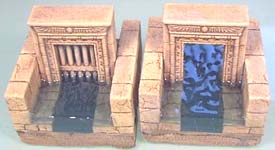
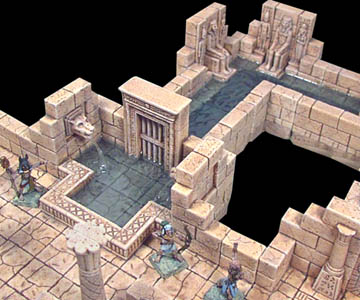
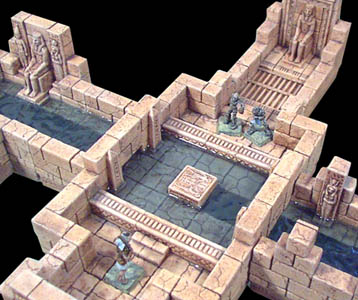
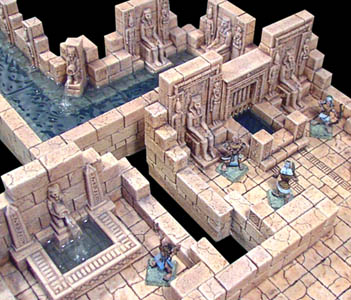
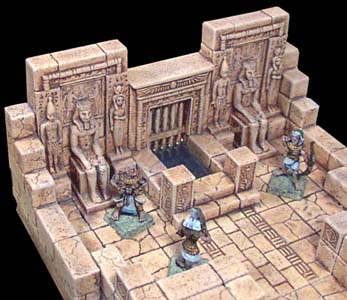
Here are a few photos of the finished waterways. The Egyptian miniatures shown here are from www.crocodilegames.com. They have a wonderful selection of Egyptian miniature figures, creatures and accessories.
These miniatures were painted by Robert Sparenberg (aka Imahilus). To paint the model look at the antiquing method found on our painting instructions page. For instructions on how to build these pieces, check out the Detailed Tomb Pieces page.
 |
 |
 |
 |